1
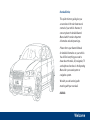
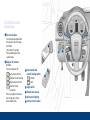
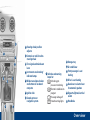
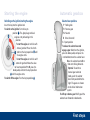
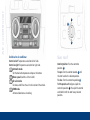
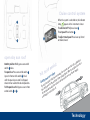
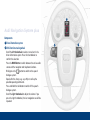
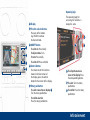
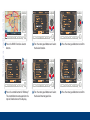
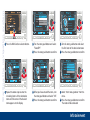
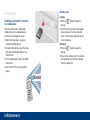
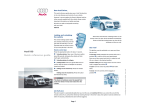
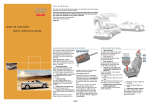
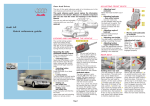
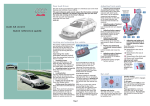
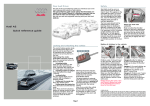
Audi A3 • A3 Sportback
Audi S3
Quick reference guide
Fuel tank flap
To open:
Press the left side of the flap.
To close:
Press the tank flap until you
hear it click into place.
Fuel and tyre
pressures
(see sticker)
Engine oil
The correct oil specifications and engine oil
capacity are listed in
the Performance,
weights and dimensions section of the
Owner’s Manual.
Warning triangle
The compartment for the warning triangle
is located in the luggage compartment
under the floor panel (on vehicles with fourwheel drive) or below the tailgate opening.
Dear Audi Driver,
This quick reference guide gives you
an overview of the main features and
controls of your vehicle. However, it
cannot replace the detailed Owner’s
Manual which contains important
information and safety warnings.
Please refer to your Owner's Manual
for detailed information on your vehicle.
You will find everything you need to
know about the radio, CD, navigation, TV
and telephone functions in the Operating
Manual for your sound system or
navigation system.
We wish you safe and enjoyable
motoring with your new Audi.
AUDI AG
Welcome
11
Controls and
displays
1
2
9
9
3
4
6
7
13
Adjuster for exterior
mirrors
Turn the adjuster for:
Left exterior mirror
Exterior mirror heating
Right exterior mirror
Exterior mirror
retraction
Press the adjuster to move
the mirror glass in the
desired direction.
12
10
Electric windows
To set the desired position:
Press/pull to the first stop
and hold.
„One-touch“ function:
Press/pull briefly to the
second stop.
8
3
Door handle and
central locking switch
Unlock
Lock
4
5
6
7
Light switch
Bonnet lock release
Instrument lighting
Cruise control system
2
1
5
14
8
15
16
17
9
10
11
18
19
12
20
13
14
22
Steering wheel position
adjuster
Controls on multi-function
steering wheel
Turn signal and main beam
lever
Instruments and warning/
indicator lamps
Windscreen wipers/washer
and buttons for on-board
computer
Ignition lock
Sound system or
navigation system
16
17
15
Switches and warning
lamps for:
SET
ESP
OFF
Activating tyre
pressure monitoring
Electronic stabilisation
program
Passenger airbag off
Hazard warning lights
18
19
20
21
22
Storage tray
Air conditioner
Front passenger’s seat
heating
Driver’s seat heating
Gear lever or selector lever
for automatic gearbox
Cigarette lighter/electrical
socket
Handbrake
21
Overview
Sitting position
Sit in a normal upright position and
do not sit too close to the steering
wheel. If necessary, also adjust the
position of the steering wheel.
Adjusting head restraint
min.
25 cm
8
Seat adjustment
7
To lower, press button 8 on the side of
the head restraint. The top of the head
restraint should be at eye level or higher.
Manual seat adjustment
3
Electric seat adjustment
1
2
3
To adjust seat height and move seat backwards or forwards:
Front of seat cushion up/down
Rear of seat cushion up/down
Seat up/down
Seat forwards/backwards
To adjust backrest:
4
Backrest further upright/
further reclined
To adjust lumbar
support:
Press the appropriate part of the
1
2
3
switch.
4
5
6
6
5
3
7
To adjust lumbar support:
Press the appropriate part of the switch.
To move seat backwards or forwards:
Lift the lever and move the seat.
Then release the lever and move the
seat further until the catch engages.
To adjust seat height:
Pull up or press down the lever
repeatedly.
To adjust backrest:
Take your weight off the backrest and
turn the knob.
Easy entry function (three-door
vehicles only):
Pull the lever upwards and fold the
backrest forwards.
Starting the engine
Switching on the ignition/starting the engine
Insert the key into the ignition lock.
To switch on the ignition: Turn the key to
position 1 . The glow plugs on diesel
engines start preheating in this
position.
To start the engine (on vehicles with
manual gearbox): Press the clutch
and turn the key to position 2 until
the engine starts.
To start the engine (on vehicles with
automatic gearbox): Move the selector lever to position P or N, press the
brake pedal, and turn the key to position
2 until the engine starts.
To switch off the engine: Turn the key to position 0 .
Automatic gearbox
Selector lever positions
P Parking lock
R Reverse gear
N Neutral
D Drive (forwards)
S Sport position
To release the selector lever and
engage a gear: Switch on the ignition,
press the brake pedal, and press the
interlock button on the selector lever.
Move the selector lever to D or
S to start driving forwards.
tiptronic: To switch to
manual gear selection
mode, push the selector
lever from position D to the
right. The gears are shown
on the driver information
system.
To shift up or down a gear: Briefly push the
selector lever forwards or backwards.
First steps
Air conditioner
2
1
0
Switches for air conditioner
Control on left: Temperature selection for left side
Control on right: Temperature selection for right side
AUTO Automatic mode
Set the desired temperature and press the button.
Blower speed (switches in the middle)
Air recirculation
Circulates and filters the air in the interior of the vehicle
ECON ECON mode
Activates/deactivates air cooling
Sun roof
Comfort position: Turn the control to
position 1 .
To open: Turn the control towards 2 until
the roof reaches the desired position.
To close: Turn the control to position 0 .
To tilt open/close: Briefly press/pull the
control in position 0 . Press/pull the control
and hold it to tilt the roof to any desired
position.
Cruise control system
1
2
1
2
open sky sun roof
Comfort position: Briefly press rear end of
switch 1 twice.
To open/close: Press rear end of switch 1
(open) or front end of switch 2 (close)
until the open sky sun roof is fully open/
closed or has reached the desired position.
To tilt open/close: Briefly press rear or front
end of switch 1 or 2 .
When the system is switched on, the indicator
lamp
appears in the instrument cluster.
To switch on/off: Pull/press lever 2 .
To set speed: Press button 1 .
To adjust stored speed: Press lever up (faster)
or down (slower).
ient,
grad foot
a
n
ds o ke your
a
econ
ral s en you t nger,
e
v
e
s
lo
h
r
t
W
o
n
f
.
lope ot brake ing back r a mome
s
a
on
e fo om roll held fo
way
ld th
fr
ing a
d ho vehicle le will be
n
a
Driv
s
c
e
es
h
h
r
t
e
p
v i
nt
u
If yo ill preve edal, the f.
f
w
p
o
s
thi
rake o drive
t
he b
off t ing you
allow
hill
ass
d
l
o
h
ist
Technology
1
Audi Navigation System plus
Components
1 Driver information system
2 Multi-function steering wheel
Scroll the left thumbwheel to select a menu item in the
driver information system. Press the thumbwheel to
confirm the selection.
Press the MODE button to switch between the active audio
source and the navigation and telephone functions.
Briefly press the
button to switch on the speech
dialogue system.
Speak after the <beep>, e.g. say <Help> to call up the
possible operating commands.
Press and hold the talk button to switch off the speech
dialogue system.
Scroll the right thumbwheel to adjust the volume. If you
press the right thumbwheel, the last navigation cue will be
repeated.
2
2
Operating logic
3
4
The operating logic for
accessing the functions is
always the same.
Display
Function selector buttons
Press one of the buttons
(e.g. RADIO) to activate
the desired mode.
5
6
3
A
ON/OFF button
B
C
To switch on: Press briefly.
To adjust volume: Turn.
To mute: Press briefly.
To switch off: Press and hold.
7
6
6
5
Control buttons
To activate one of the functions
shown in the four corners of
the display, press the control
button for that corner of the display.
4
7
A
B
Rotary pushbutton
To select a menu item on display
Turn the rotary pushbutton.
To confirm selection:
Press the rotary pushbutton.
3
:
C
To call up the menu in a
corner of the display: Press
the corresponding button.
To select: Turn the rotary
pushbutton.
To confirm: Press the rotary
pushbutton.
Infotainment
Storing a radio station
3
2
1
1
Press the RADIO function selector
button.
2
Turn the rotary pushbutton and select
the desired station.
3
Press the rotary pushbutton to confirm.
4
6
5
4
Press the control button for ”Memory”.
The control button corresponds to the
top left-hand corner of the display.
5
Turn the rotary pushbutton and select
the desired memory position.
6
Press the rotary pushbutton to confirm.
Starting the navigation system
Germany
M
N
3
MÜNCH-LEU…
5
MÜNCHAUR…
MÜNCHBERG
1
Press the NAV function selector button.
2
3
MÜNCHEBERG
DEL
2
1
LIST
Turn the rotary pushbutton and select
”Town/ZIP”.
Press the rotary pushbutton to confirm.
4
5
4
Turn the rotary pushbutton and select
the first letter of the destination town.
Press the rotary pushbutton to confirm.
Germany
N
MÜN
MÜNCHEN
MÜNCH-LEU…
MÜNCH-LEU…
MÜNCHAUR…
6
MÜNCHEBERG
DEL
LIST
6
Repeat the above step to enter the
remaining letters of the destination
town until the name of the desired
town appears on the display.
Centre
10
MÜNCHBERG
MÜNCHBERG
DEL
MÜNCHEN/MÜNCHEN (…
8
MÜNCHAUR…
7
8
MÜNCHEBERG
7
When you have entered the town, turn
the rotary pushbutton and select ”OK”.
Press the rotary pushbutton to confirm.
9
9
10
Select ”Start route guidance” from the
menu.
Press the rotary pushbutton to confirm.
The route will be calculated.
Infotainment
Memory cards
Functions
Loading:
p Press the
button to open the
display.
p Insert the memory card into the reader
slot as shown in the illustration and
press in the memory card until you feel
it click into place.
Removing:
p Press the
button to open the
display.
p Press in the memory card. The card will
be released and can then be removed
from the reader slot.
Establishing a BluetoothTM connection
for a mobile phone
You can quickly connect a Bluetooth
mobile phone to the onboard phone
system on your navigation system:
p Switch on the ignition, navigation
system and mobile phone.
p On your mobile phone, select the menu
that looks for Bluetooth devices (e.g.
”Hands-free”).
p On the mobile phone, select ”Audi UHV”
and confirm.
p Enter the PIN ”1234” on your mobile
phone.
©
Bluetooth
Infotainment
Warning and indicator lamps
Tyre pressure too low
(check without delay)
Door/s open
Cruise control system
Electro-mechanical
power steering
Engine management1) or
Tailgate open
Airbag system1)
Fault in the brake system
Glow plug system1)
Brake pads worn1)
Alternator1)
Electronic stabilisation
program (ESP)
Diesel particulate filter
obstructed
Light sensor/
rain sensor defective
Emission control system
Main beam headlights
Trailer turn signals
Turn signals/
hazard warning lights
Fuel level low
1)
Warning symbols
Seat belt warning lamp
Fault in brake system or
handbrake is applied
adaptive light defective
Anti-lock brake system1)
Headlight range control
defective1)
Check engine oil level
(lights up permanently)
Engine oil sensor
defective1) (flashes)
Electro-mechanical
power steering
Engine oil pressure
too low1)
Press clutch pedal
Bonnet open
Washer fluid level low
If this warning lamp lights up when driving, please contact a qualified workshop without delay.
Fault in the cooling
system
Engine oil pressure
too low
If one of these red symbols lights up in the
display while you are driving, stop the car
immediately, switch off the engine and refer to
the Owner’s Manual.
© 2007 AUDI AG
AUDI AG reserves the right to alter any part of the vehicle, its equipment and technical specifications.
No legal commitment can be implied by the information, illustrations or descriptions in this publication.
No part of this publication may be reprinted, reproduced or translated without the written permission
of AUDI AG. All rights under the laws of copyright are expressly reserved by AUDI AG. Subject to alteration
and amendment. Concept and layout: Pfriemer GmbH. Printed in Germany.
Warning and indicator lamps
www.audi.com
Audi A3 • A3 Sportback
Audi S3
Kurzanleitung
englisch 11.07
282.562.755.20