1
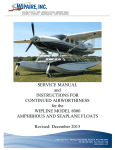
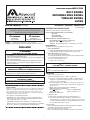
LITERATURE NUMBER BOLT SWIVEL RETAINING RING SWIVEL TUBULAR SWIVEL JACKS 9 ENGLISH, FRANCAIS •Installation •Operation •Maintenance (et Canada) SAFETY ALERT SYMBOLS RETAINING RING SWIVEL JACKS avoid possible injury or death Effective 12/10/07 Instructions are for single lock pin swivel jacks. Safety Symbols alerting you to potential personal safety hazards. Obey all safety messages following these symbols. WARNING MPD 87850 CHOOSE THE CORRECT MOUNTING BRACKET - SEE ILLUSTRATIONS • type of jack • size of trailer frame • type of jack installation CAUTION avoid possible injury and/or property damage SINGLE LOCK PIN JACK - USE MOUNTING BRACKET: (FIG 2) 87501 87502 P/N’s used only for Series 8---- Atwood Jacks MPD 87501 - Weld on bracket, fits most frames MPD 87502 - Bolt on bracket, fits frames 2˝ or 3˝ wide and 3˝, 4˝ or 5˝ deep Installer: Provide these instructions to the consumer. Consumer: Read and keep documents available for future reference. Bracket Mounting: Install Atwood mounting bracket as shown (FIG 1). INSTALLATION 1. WELD-ON BRACKET a. Following WELDING INSTRUCTIONS,weld bracket to side of frame by welding along both sides of bracket from top to bottom. 2. BOLT-ON BRACKET around frame a. Locate mounting plate against frame. b. Put furnished bolts through holes that are above and below frame. c. Assemble backing plates to bolts. d. Put on lock washer, then nuts. e. Torque nuts to 25-30 ft. lbs. WARNING JACK MAY FALL CAUSING INJURY Use ONLY Atwood mounting bracket and provided retaining ring with Atwood Retaining Ring Swivel Jacks. • Atwood mounting bracket is designed to ensure proper engagement of the locking pin during use. • Atwood mounting bracket and retaining ring is designed as a system with Atwood jacks to ensure proper snap ring engagement, retention and lock pin function. • WARNING JACK MAY FALL CAUSING INJURY CAUTION • Retaining Ring must be installed in accordance with provided instructions. • Do not over expand the retaining ring. HANDLE MAY INJURE OR DAMAGE PROPERTY • • BEFORE INSTALLATION, jack handle must clear all obstructions when in use. Install jacks in accordance with provided instructions. Jack Mounting: 1. Place jack on bracket (FIG 1). CAUTION 2. Attach the retaining ring (FIG 2-A & B) to the bracket. a. Use Truarc® External Ring Pliers No. 0609 or equivalent snap ring pliers to expand the retaining ring just enough to slide it over the groove in the bracket. b. When the retaining ring is directly over the groove, release the pliers and allow the ring to retract completely into the groove as shown in FIG 3. c. Obtain Truarc® External Ring Pliers No. 0609 from: HAZARDOUS FUMES • Adequate ventilation must be provided when welding. WELDING INSTRUCTION PREPARE THE METAL Metal must be completely clean and free from rust or paint before welding. It is difficult to arc against a dirty surface, but any contaminants will find their way into the weld and reduce its strength. Light use of an angle grinder or flap wheel will quickly remove surface rust and paint. For more inaccessible areas an air grinder or dremmel can b e effective. • M.I.G. OR STICK • M.I.G. WELDING • STICK WELDING Needed only for Series 8---- Atwood Jacks Truarc® Company LLC 70 East Willow St. Millburn, NJ 07041 USA Telephone: (800)526-7055 website: www.truarc.com 3. Inspect the ring. a. Ring must be completely in the groove and a firm fit FIG 3. b. To test for proper installation, attempt to rotate the ring. It should require force to cause it to rotate in the groove. It should not spin freely. Outer diameter of ring installed in groove should be 2.724˝ diameter maximum (FIG 3). - 5/32˝ fillet weld minimum. - Use A.W.S. ER 70S-3 or 6 wire or equivalent with a diameter of .035 - .045. The recommended shielding gas mixture is 75% - 95% Argon & 25% - 5% CO2. - Use E6011 A.W.S. welding rod or equivalent with a diameter as follows: 1/8” electrode set power between 115-130 Amps DC or 5/32” electrode set power between 140-160 Amps DC. To Disassemble: 1. Remove retaining ring using Truarc® External Ring Pliers No. 0609 or equivalent snap ring pliers (see Jack Mounting). 2. Use caution when removing the jack. 3. Use new retaining ring when reinstalling the jack on the bracket. 1 TUBULAR SWIVEL JACKS WARNING USE ONLY ATWOOD MOUNTING TUBES WITH ATWOOD TUBULAR SWIVEL JACKS JACK MAY FALL IF NOT PROPERLY ENGAGED Bracket Mounting: SINGLE LOCK PIN STYLE - Locking pin end must be inserted fully into bracket pin hole. Lock Pin shoulder must contact bracket tab before use. Do not raise or lower tongue if the handle is not correctly locked. • Dirt, sand, ice, etc., must not obstruct the proper seating of lock pin. • Visually check that locking pin end(s) are inserted fully into bracket receiving hole(s). • Never pull on lock pin(s) when any weight of the trailer is on the jack. • 1. Assemble jack with tube (4A) and pin (4B) installed. Use this as a templet prior to welding 2. Tack a weld at two spots at 1800 apart at the point where the mounting tube (4A) and the frame contact each other. 3. Separate jack from mounting tube (4A). 4. Weld completely around mounting tube (4A). Jack Mounting: TEST JACK FOR LOCK PIN ENGAGEMENT ON ALL JACKS Try to move jack to ensure proper engagement side to side with your hand before applying load to jack. • Locking pin(s) end(s) must be inserted fully into bracket pin holes FIG 6-B. 1. Fit jack bracket over mounting tube (FIG 4-A). 2. Slide lock pin (FIG 4-B) through jack and mounting tube holes. 3. Lock in place with hairpin cotter (FIG 4-C) through end of lock pin. • To Disassemble: 1. Remove hairpin cotter and lock pin. 2. Lift jack from bracket, use caution when removing the jack. TOP WIND JACKS: 1. Pull handle up to horizontal position. 2. Turn handle clockwise to raise tongue, counter-clockwise to lower. Prevent caster from rotating. 3. Push handle down along jack tube for storage. BOLT SWIVEL JACKS Bolt around frame bracket: 1. 2. 3. 4. Position jack on trailer tongue where jack can be freely swiveled. Put bolts through bracket holes that are above and below frame. Assemble furnished backing plates/lock washers/nuts on bolts (FIG 5). Torque nuts to 20-25 ft. lbs. SIDE WIND JACKS: 1. Turn handle clockwise to raise. 2. Turn handle counter-clockwise to lower. Prevent caster from rotating. Weld on frame bracket: RETAINING RING SWIVEL JACKS: 1. Position bracket with tabs located against bottom of tongue in a location where jack can be freely swiveled (FIG 5). 2. Following WELDING INSTRUCTIONS, attach bracket along top and bottom with 1-1/2˝ minimum weld bead. Weld entire length of vertical edges FIG 5. Tabs on bottom of bracket locate bracket squarely with bottom of frame. 3. Using provided socket head screws, attach jack to welded bracket with open side of bracket toward the ground. Torque screws to 2025 ft. lbs. Make sure screw heads do not protrude above surface of bracket. 1. Pull on locking handle with one hand FIG 6-A. 2. Swivel jack to vertical or horizontal position FIG 7 & 8. 3. Release locking handle. It must engage hole(s) on assembled bracket FIG 6-B. 4. Put jack in horizontal position before towing FIG 7-B & 8-B. TUBULAR SWIVEL JACKS: 1. 2. 3. 4. 5. OPERATION CAPACITY FIG 7. BOLT SWIVEL JACKS THE CAPACITY OF THE JACK IS IDENTIFIED ON THE TUBE OF THE JACK - 1. Pull on lock pin FIG 9. 2. Swivel jack to horizontal or vertical position FIG 7 & 8. 3. Release lock pin. Pin must fully engage bracket attached to trailer tongue FIG 6-B. 4. When raising or lowering jack prevent caster from rotating while cranking jack. 5. Put jack in horizontal position before towing FIG 7-B & 8-B. WARNING PERSONAL INJURY • Remove hairpin cotter and lock pin FIG 4. Swivel jack 90˚ FIG 7 & 8. Replace lock pin and hair cotter FIG 4. Put jack in horizontal position before towing Replace lock pin and hair cotter FIG 4-B. Never exceed the rated capacity identified on jack. MAINTENANCE JACK CAPACITY DEFINITION 1. Lubricate jack at least every six months in the following manner. a. Extend jack as far as possible. b. Lubricate entire length of outside inner ram with SAE 30 heavy oil. c. Squirt oil in oil hole or grease fitting provided at top of outer ram. d. Clean dirt, mud or tar from jack. Working Capacity = Maximum Load jack can support for castering and easy lifting of a fully loaded trailer. Supporting Capacity = Maximum Vertical Load that the jack can support. CAUTION 2. For side wind jacks, follow procedure in STEP 1. Then remove cap and lubricate gears with wheel bearing grease. PERSONAL INJURY / PRODUCT DAMAGE 3. Should jack become difficult to operate: remove, clean and oil. Inspect for bent or worn parts. Use only Atwood supplied parts for replacement. Replace all bent or worn parts. Body and feet must be clear of trailer tongue when raising or lowering jack. • ALWAYS FULLY RETRACT & SWIVEL JACK TO HORIZONTAL POSITION before towing trailer. • DO NOT use blocks for additional ground clearance, trailer can tip and fall. • Caster is intended to allow maneuvering of trailer for short distances on smooth hard surfaces. Do not force caster over rough surfaces or obstacles. • Lower jack to minimum height before moving trailer on caster. • Do not use tow vehicle to move trailer with jack in vertical position. • Replace jack if worn, damaged or not operating freely. • When lowering jack, always provide footing (caster wheel or a jack foot) beneath jack preventing dirt from entering center of ram. • 4. If it is not possible to get jack to operate freely, replace jack. 5. Should problems or questions arise, contact your dealer, the trailer manufacturer or Atwood Service Department, 574-264-2131. 2 2 3 ATWOOD HARDWARE SYSTEMS & COMPONENTS LIMITED WARRANTY Atwood Mobile Products warrants to the original owner this product will be free of defects in material and workmanship for a period of two years from the date of purchase. Atwood’s liability hereunder is limited to the replacement of product, repair of product or replacement of product with a reconditioned product, at the discretion of the manufacturer. The warranty is void if the product has been damaged by accident, unreasonable use, neglect, tampering or other causes not arising from defects in material or workmanship. The warranty extends to the original consumer purchaser of the product only, and is subject to the following conditions: 1. For two (2) years commencing with the date of purchase, Atwood will provide the replacement or repair of any Hardware System and Components that are found to be defective by Atwood in material or workmanship. 2. In the event of a warranty claim, the original purchaser must contact the Atwood Consumer Service Department, 1120 North Main St., Elkhart, IN 46514, Telephone 574-264-2131. Warranty Claim Service must be performed as approved by the Atwood Consumer Service Department. Warranty replacement hardware systems and components or parts will be furnished freight prepaid, labor cost to repair or replace will be limited to the amount of the original purchase price of the systems and components. The replaced warranty products or parts become the property of Atwood Mobile Products and must be returned to the Atwood Consumer Service Department freight prepaid, unless prior arrangements have been made. 3. This limited warranty is valid only when the product is applied, installed, maintained and operated in accordance with this Atwood Installation, Maintenance and Operating Manual. Any deviation from these recommended specifications must be approved in writing by Atwood. 4. Any implied warranties are limited to the duration of this limited warranty as stated above. Atwood does not assume responsibility for consequential damage or loss, including loss of use of vehicle, loss of time, inconvenience, expense for gasoline, telephone, travel, lodging, loss or damage to personal properties, or loss of revenues. Some states do not allow limitations on how long an implied warranty lasts or limitations on consequential damages, so the above limitations may not apply to you. This limited warranty gives you specific legal rights which may vary from state to state. 4