1
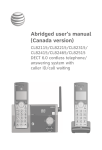
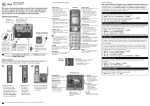
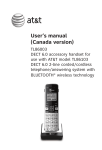
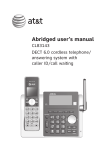
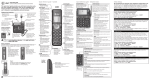
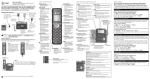
Quick start guide
CL81101/CL81201/CL81211/
CL81301
DECT 6.0 cordless telephone
with caller ID/call waiting
Installation
You must install and
charge the battery before
using the telephone.
STOP!
See page 3
for easy instructions.
Install the telephone base close to a telephone jack and a power outlet not
controlled by a wall switch. The telephone base can be placed on a flat surface
or vertically mounted on the wall. For optimum range and better reception, place
the telephone base in a central and open location.
If you subscribe to high-speed Internet service (DSL - digital subscriber line) through
your telephone line, you must install a DSL filter between the telephone line cord
and the telephone wall jack (see the following page). The filter prevents noise and
caller ID problems caused by DSL interference. Please contact your DSL service
provider for more information about DSL filters.
Your product may be shipped with a protective sticker covering the handset or
telephone base display - remove it before use.
For customer service or product information, visit our website at
www.telephones.att.com or call 1 (800) 222-3111. In Canada, dial
1 (866) 288-4268.
Avoid placing the telephone base too close to:
• Communication devices such as television sets, VCRs, or other
cordless telephones.
• Excessive heat sources.
• Noise sources such as a window with traffic outside, motors, microwave
ovens, refrigerators, or fluorescent lighting.
• Excessive dust sources such as a workshop or garage.
• Excessive moisture.
• Extremely low temperature.
• Mechanical vibration or shock such as on top of a washing machine
or workbench.
Telephone base and charger installation
Install the telephone base and charger as shown below.
The telephone base is ready for tabletop use.
Telephone base installation
•
Plug the large end of
the power adapter into
a power outlet not
controlled by a
wall switch.
•
Route the power
adapter cord and the
telephone line cord
through these slots.
•
•
If you have DSL highspeed Internet service, a
DSL filter (not included)
is required.
Telephone
line cord
•
Raise the antenna.
•
Plug one end of the
telephone line cord
into a telephone jack
or a DSL filter.
Plug the other end
of the telephone line
cord into the telephone
jack on the back of the
telephone base.
Plug the small end of the telephone base power adapter into
the power adapter jack on the back of the telephone base.
Charger installation
Plug the power adapter into an electrical outlet
not controlled by a wall switch.
IMPORTANT INFORMATION
1. Use only the power adapter(s) supplied with this product. To order a replacement
power adapter, visit our website at www.telephones.att.com or call
1 (800) 222-3111. In Canada, dial 1 (866) 288-4268.
2. The power adapters are intended to be correctly oriented in a vertical or floor mount
position. The prongs are not designed to hold the plug in place if it is plugged into a
ceiling, under-the-table or cabinet outlet.
Battery installation and charging
Once you have installed the battery, the screen indicates the battery status. For
best performance, keep the handset in the telephone base or charger when not
in use. The battery is fully charged after 10 hours of continuous charging.
BT183342/BT283342
BY 1021
NOTE: If you are on a phone call in low battery mode, you hear four short beeps every minute.
Step 1
Plug the battery
connector securely
into the socket inside
the handset battery
compartment, matching
the color-coded label.
Insert the supplied
battery with the label
THIS SIDE UP facing up
as indicated.
CHARGE light
Step 2
Align the cover flat
against the battery
compartment, then
slide it upwards until it
clicks into place.
Step 3
Charge the handset by placing it face forward in the
telephone base or charger. The CHARGE light on the
top of the handset is on during charging.
After you install your telephone or power returns following a power outage, the
handset will prompt you to set the date and time. To skip setting the date and
time, press OFF/CANCEL.
IMPORTANT INFORMATION
1. Use only the supplied rechargeable battery or replacement battery (model BT166342).
To order, visit our website at www.telephones.att.com or call
1 (800) 222-3111. In Canada, dial 1 (866) 288-4268.
2. If you do not use the handset for a long time, disconnect and remove the battery to
prevent possible leakage.
Quick reference guide - handset
pDIR/VOLUME
CHARGE indicator
Press pDIR to show directory entries.
Press to scroll up while in menus.
While entering names or numbers, press to move the cursor to the right.
Press to increase the listening volume when on a call.
On when the handset is
charging in the telephone base
or charger.
qCID/VOLUME
Press qCID to show
caller ID history.
Press to scroll down while
in menus.
While entering names or
numbers, press to move the
cursor to the left.
Press to decrease the listening
volume when on a call.
Press to initiate a one-to-one or one-to-group broadcast.
Press and hold to broadcast to a group of handsets.
MUTE/DELETE
MENU/SELECT
During a call, press to mute the
microphone.
While reviewing the caller ID
history, the directory or the redial
memory, press to delete an
individual entry.
While predialing, press to
delete digits.
Press to show the menu.
While in the menu, press to
select an item or save an entry or setting.
PUSH TO TALK
OFF/CANCEL
����������
During a call, press to hang up.
While in a menu, press to cancel an operation, back up to the previous menu, or exit the menu display, or press and hold to exit to idle mode.
Press and hold while the telephone is not in use to erase the missed call indicator.
PHONE/FLASH
Press to make or answer a call.
During a call, press to answer
an incoming call when you
receive a call waiting alert.
1
# (pound key)
While reviewing a caller ID
log entry, press repeatedly to
add or remove 1 in front of
the telephone number before
dialing or saving it in
the directory.
Press repeatedly to display other dialing options when reviewing a caller ID log entry.
EQ
During an outside or intercom call, press to change the audio quality to best suit
your hearing.
TONE
Press to switch to tone dialing
temporarily during a call if you
have pulse service.
REDIAL/PAUSE
/�������
SPEAKER
Press to make or answer calls
using the speakerphone.
Press to switch between the
speakerphone and the handset.
Press repeatedly to view the last 10 numbers dialed.
While entering numbers,
press and hold to insert a dialing pause.
Quick reference guide - handset
Main menu
Main menu
The > symbol highlights
a menu item.
Directory
Caller ID log
Intercom
Ringers
Set date/time
Settings
Website
>Directory
Caller ID log
p
q
Using menus:
•
•
•
•
Press MENU/SELECT to show the menu.
Press qCID or pDIR to scroll through menu items.
Press MENU/SELECT to confirm or save changes to a highlighted menu item.
Press
OFF/CANCEL to cancel an operation, back up to the previous menu,
or exit the menu display.
Quick reference guide - telephone base
IN USE indicator
On when the handset is in use.
On when a handset is being registered.
Flashes when there is an incoming
call or when a handset is being
deregistered.
Flashes when another telephone is in
use on the same line.
/HANDSET LOCATOR
Press to start the paging tone on all
handsets for 60 seconds.
Telephone settings
Set date/time
To set the date and time manually:
Ringers
1.When the handset is in idle mode, press MENU/SELECT to
>Set date/time
enter the main menu.
p
q
2.Press qCID or pDIR to scroll to >Set date/time and then
press MENU/SELECT.
SET DATE
3. Press qCID or pDIR to select the month, then press
MM/DD/YY
MENU/SELECT, or enter the number using the dialing keys.
p
q
4. Press qCID or pDIR to select the day, then press
MENU/SELECT, or enter the number using the dialing keys.
5. Press qCID or pDIR to select the year, then press
SET TIME
MENU/SELECT, or enter the number using the dialing keys, then
HH:MM -p
press MENU/SELECT to move on to set the time.
q
6. Press qCID or pDIR to select the hour, then press
MENU/SELECT, or enter the number using the dialing keys.
7. Press qCID or pDIR to select the minute, then press MENU/SELECT, or enter
the number using the dialing keys.
8. Press qCID or pDIR to highlight AM or PM, or press 2 for AM or 7 for PM.
Then press MENU/SELECT to confirm. There is a confirmation tone and the
screen returns to the previous menu.
Ringer volume
To set the ringer volume or turn the ringer off:
1.Press MENU/SELECT in idle mode to enter the main menu.
2.Use qCID or pDIR to scroll to >Ringers, then press
MENU/SELECT.
3.Press MENU/SELECT again to select >Ringer volume.
4.Press qCID or pDIR to sample each volume level.
5. Press MENU/SELECT to save your preference. There is
a confirmation tone and the screen returns to the
previous menu.
>Ringer
volume
Ringer tone
p
q
RINGER VOLUME
p
q
Telephone operation
Making a call
Press PHONE/FLASH or /�������
SPEAKER, then enter the
telephone number. The screen displays the elapsed time as
you talk (in hours, minutes and seconds).
NOTE: Pressing
PHONE/FLASH to access services from your
telephone service provider does not affect the elapsed time.
Elapsed time
Phone
0:00:30
10/15
10:01
Answering a call
Press PHONE/FLASH or /�������
SPEAKER.
-ORPress any dialing key (0-9, TONE or #).
Ending a call
Press
OFF/CANCEL or return the handset to the telephone base or charger.
AM
www.telephones.att.com
© 2010-2011 Advanced American Telephones. All Rights Reserved.
AT&T and the AT&T logo are trademarks of AT&T Intellectual Property licensed to
Advanced American Telephones, San Antonio, TX 78219.
Printed in China. Issue 3 AT&T 01/11.