1
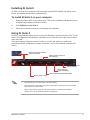
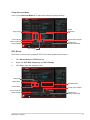
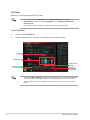
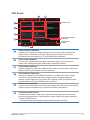
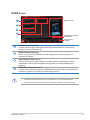
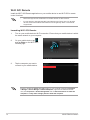
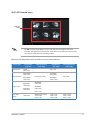
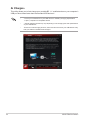
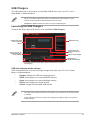
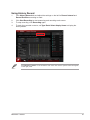
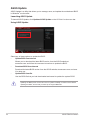
DE105
Republic of Gamers
AI Suite II User Manual
Maximus V Series
Installing AI Suite II...................................................................................................... 3
To install AI Suite II on your computer.............................................................. 3
Using AI Suite II............................................................................................................ 3
TurboV EVO.................................................................................................................. 4
TurboV
........................................................................................................ 4
DIGI+ Power Control.................................................................................................... 8
Smart DIGI+..................................................................................................... 8
CPU Power...................................................................................................... 9
EPU
DRAM Power..................................................................................................11
....................................................................................................................... 12
Launching EPU.............................................................................................. 12
Wi-Fi GO!..................................................................................................................... 13
Using Wi-Fi GO!............................................................................................. 13
Wi-Fi GO! functions........................................................................................ 13
Wi-Fi GO! Remote......................................................................................... 14
DLNA Media Hub........................................................................................... 16
Remote Desktop............................................................................................ 21
Remote Keyboard and Mouse....................................................................... 23
Smart Motion Control..................................................................................... 24
File Transfer................................................................................................... 25
Capture & Send............................................................................................. 26
FAN Xpert 2................................................................................................................. 28
Launching FAN Xpert 2.................................................................................. 28
Using FAN Xpert 2 Auto Tuning..................................................................... 28
USB 3.0 Boost............................................................................................................ 33
Launching USB 3.0 Boost.............................................................................. 33
Configuring USB 3.0 Boost............................................................................ 33
Ai Charger+................................................................................................................. 34
USB Charger+............................................................................................................. 35
Launching the USB Charger+........................................................................ 35
Maximus V Series
Probe II....................................................................................................................... 37
Launching Probe II......................................................................................... 37
Configuring Probe II....................................................................................... 37
Sensor Recorder........................................................................................................ 38
Using Sensor Recorder.................................................................................. 38
Using History Record..................................................................................... 39
ASUS Update.............................................................................................................. 40
MyLogo2..................................................................................................................... 41
ASUS ROG AI Suite II
Installing AI Suite II
AI Suite II is an all-in-one interface that integrates several ASUS utilities and allows you to
launch and operate these utilities simultaneously.
To install AI Suite II on your computer
1.
Place the support DVD to the optical drive. The Drivers installation tab appears if your
computer has enabled the Autorun feature.
2.
Click Utilities tab > AI Suite II.
3.
Follow the onscreen instructions to complete the installation.
Using AI Suite II
AI Suite II automatically starts when you enter the Windows® operating system (OS). The AI
Suite II icon appears in the Windows® notification area. Click the icon to open the AI Suite II
main menu bar.
Click each button to select and launch a utility, to monitor the system, to update the
motherboard BIOS, to display the system information, and to customize the settings of AI
Suite II.
Shortcut to the CPU Level Up
under TurboV EVO
Click to monitor sensors or
CPU frequency
Click to customize the
interface settings
Click to show the
system information
Click to update the motherboard BIOS
Click to select a utility
•
The applications in the Tool menu vary with models.
•
The screeshots of AI Suite II in this user manual are for reference only. The actual
screenshots vary with models.
•
Refer to the software manual in the support DVD or visit the ASUS website
at www.asus.com for detailed software configuration.
Maximus V Series
TurboV EVO
ASUS TurboV EVO allows you to manually adjust the CPU frequency and related voltages
such as CPU Level Up that offers automatic and easy overclocking and system boost
performance.
To launch TurboV EVO, click Tool > TurboV EVO on the AI Suite II main menu bar.
Refer to the software manual in the support DVD or visit the ASUS website at www.asus.
com for detailed software configuration.
TurboV
TurboV allows you to overclock the BCLK frequency, CPU voltage, and DRAM Bus voltage in
Windows® environment and in real-time without exiting and rebooting the OS.
Refer to the CPU documentation before adjusting CPU voltage settings. Setting a high
voltage may damage the CPU permanently, and setting a low voltage may lead to an
unstable system.
For system stability, all changes made in TurboV will not be saved to BIOS settings and
will not be kept on the next system boot. Use the Save Profile function to save your
customized overclocking settings and manually load the profile after Windows starts.
Click to
select mode
Load profile
Target values
Current values
Click to show
settings
Click to view
more settings
Click to restore all
startup settings
Save the current
settings as a
new profile
Voltage
Adjustment
bars
Undoes all the
changes
Applies all the
changes immediately
ASUS ROG AI Suite II
Using Advanced Mode
Click on the Advanced Mode tab to adjust the advanced voltage settings.
Voltage
Adjustment
bars
Target values
Undoes all the changes
Current values
Click to restore all
startup settings
Applies all the
changes immediately
Click to view
more settings
GPU Boost
GPU Boost overclocks the integrated iGPU for the best graphics performance.
1.
Click More Settings > GPU Boost tab.
2.
Adjust the iGPU Max Frequency and iGPU Voltage.
3.
Click Yes to save the changes made.
GPU Boost
Target values
Adjustment bars
Current values
Click to restore all
startup settings
Maximus V Series
Undoes all the changes
Applies all the
changes immediately
CPU Ratio
Allows you to manually adjust the CPU ratio.
•
The first time you use CPU Ratio, go to Extreme Tweaker > CPU Power
Management in BIOS and set the Turbo Ratio item to [Maximum Turbo Ratio
setting in OS].
•
Intel® K series CPU is required to adjust the settings of the CPU Ratio.
To use CPU Ratio:
1.
Click on the CPU Ratio tab.
2.
Drag the adjustment bar upwards or downwards to the desired value.
CPU Ratio
Adjustment bar
Click to restore all
startup settings
•
•
Undoes all the
changes
Applies all
the changes
immediately
Set the CPU Ratio Setting item in BIOS to [Auto] before using the CPU Ratio function
in TurboV. Refer to the BIOS chapter of your motherboard user manual for details.
The CPU Ratio bars show the status of the CPU cores, which vary with your CPU
model.
ASUS ROG AI Suite II
CPU Level Up
ASUS TurboV EVO provides you with CPU Level Up mode for the most flexible CPU autotuning options.
•
The overclocking result varies with the CPU model and the system configuration.
•
We recommend that you set up a better thermal environment to prevent overheating
from damaging the motherboard.
•
The CPU Level Up modes depend upon the CPU installed in your system.
Using CPU Level Up
1.
Click CPU Level Up tab, choose the
mode, and click Start.
2.
Read the warning messages and
click OK to start the auto-overclocking
process.
TurboV automatically overclocks the
CPU, saves the BIOS settings, and
restarts the system.
3.
After re-entering Windows, a message
appears indicating successful
overclocking. Click OK to exit.
Maximus V Series
DIGI+ Power Control
ASUS DIGI+ Power Control allows you to adjust VRM voltage and frequency modulation to
enhance reliability and stability. It also provides the highest power efficiency, generating less
heat to prolong the component lifespan and minimize power loss.
To launch DIGI+ Power Control, click Tool > DIGI+ Power Control on the AI Suite II main
menu bar.
Select Smart DIGI+ Key, CPU Power or DRAM Power to adjust the power control
settings.
Smart DIGI+
Smart DIGI+
application help
Smart DIGI+ Key
Quickly delivers a higher VRM frequency, voltage, and current for superior CPU/
iGPU/DRAM overclocking performance with one click.
OC Now!
Adjusts the CPU ratio in TurboV EVO.
Default (Smart DIGI+ Setting)
Sets your CPU/iGPU/DRAM power to default settings.
Only Intel® 3rd generation processors support the Smart DIGI+ Technology feature.
ASUS ROG AI Suite II
CPU Power
Application help
Applies all the changes
immediately
Undoes all the
changes
Click to view
more settings
CPU Load-line Calibration
It allows you to adjust the voltage settings and control the system temperature.
Higher load-line calibration could get higher voltage and good overclocking
performance but increases the CPU and VRM thermal conditions.
CPU Current Capability
CPU Current Capability provides wider total power range for overclocking. A
higher value setting gets higher VRM power consumption delivery
CPU Voltage Frequency
Switching frequency affects the VRM transient response and thermal components.
Higher frequency gets quicker transient response.
iGPU Load-line Calibration
Load-line is defined by Intel VRM specifications, and affects the iGPU voltage.
The iGPU working voltage decreases proportionally to integrated graphics
loading. A higher value can get a higher iGPU voltage, and a good performance,
but decreases the CPU and VRM thermal conditions.
iGPU Current Capability
A higher value brings wider total iGPU power range, and extends the overclocking
frequency range simultaneously to enhance the iGPU performance.
CPU Power Phase Control
Increase phase number under heavy system loading to get more transient and
better thermal performance. Reduce phase number under light system loading to
increase VRM efficiency.
* The system automatically set the default to [Extreme] when using the Intel® iGPU.
Maximus V Series
Application help
Applies all the changes
immediately
Undoes all the
changes
Click to view
more settings
VRM Protection Threshold
It allows you to set the VRM protection to your motherboard from overheating
accidents.
CPU Power Thermal Control
A higher temperature brings a wider CPU power thermal range and extends the
overclocking tolerance to enlarge overclocking potential.
CPU Power Duty Control
It allows you to adjust the current of every VRM phase and the thermal conditions
of every phase component.
10
ASUS ROG AI Suite II
DRAM Power
Application help
Applies all the changes
immediately
Undoes all the
changes
DRAM Current Capability
A higher value brings a wider total power range and extends the overclocking
frequency range simultaneously.
DRAM Voltage Frequency
Allows you to adjust the DRAM switching frequency for system stability or to
increase OC Range.
DRAM Power Phase Control
Select Extreme for full phase mode to increase system performance or select
Optimized for ASUS optimized phase tuning profile to increase DRAM power
efficiency.
DRAM Power Thermal Control
A higher temperature brings a wider DRAM power thermal range, and extends the
overclocking tolerance to enlarge overclocking potential.
•
The actual performance boost may vary depending on your CPU specification.
•
DO NOT remove the thermal module. The thermal conditions must be monitored.
Maximus V Series
11
EPU
EPU is an energy-processing utility that provides several power-saving modes. When set
to the Auto Mode, the system automatically changes its power-saving mode based on the
current system condition.
You can also configure the system settings such as CPU frequency, GPU frequency, vCore
Voltage, and Fan Control to customize a power-saving mode.
Launching EPU
To launch EPU, click Tool > EPU on the AI Suite II main menu bar.
Displays the following message
if no VGA power saving engine is
detected.
Multiple system
operating modes
The items lighting up
means power saving
engine is activated
Displays the amount of
CO2 reduced
*Shifts between the
display of Total and
Current CO2 reduced
Displays the current
CPU power
Advanced settings for each mode
Displays the system
properties of each mode
12
•
Select From EPU Installation to show the CO2 that has been reduced since you
installed EPU.
•
��������
*Select From the Last Reset to show the total CO2 that has been reduced since you
click the Clear button
.
•
Refer to the software manual in the support DVD or visit the ASUS website at www.asus.com for detailed software configuration.
ASUS ROG AI Suite II
Wi-Fi GO!
Wi-Fi GO! allows you to wirelessly stream media files to DLNA devices, remotely control
and access your computer using your mobile device, and easily transfer files between your
computer and mobile device.
•
Install the mPCIe Combo with Wi-Fi module card and the driver before using this
feature.
•
Wi-Fi GO! is supported only on Windows® 7/8.
•
All devices using the Wi-Fi GO! functions must be in the same network.
•
Wi-Fi module is not available on Maximus V Gene motherboard.
Using Wi-Fi GO!
To launch Wi-Fi GO!, click Tool > Wi-Fi GO! on the AI Suite II menu bar.
Allows you to set
a password
Application
help
Wi-Fi GO!
menu
Wi-Fi GO! functions
•
DLNA Media Hub: Provides support to the latest DLNA standard, and allows you to
stream media files to a DLNA-supported device.
•
Remote Desktop: Allows you to view your computer’s desktop and remotely operate
your computer in real-time from your mobile device.
•
Remote Keyboard and Mouse: Allows you to use your mobile device’s touch panel
as a remote keyboard and mouse for your computer.
•
Smart Motion Control: Allows you to remotely control your computer using your
mobile device’s customized motions.
•
File Transfer: Allows you to transfer files between your computer and mobile device.
•
Capture and Send: Allows you to take screenshots and send them to a mobile device.
Launch Wi-Fi GO! Remote on your mobile device to use Wi-Fi GO! Remote control
functions. For more details, refer to next section Wi-Fi GO! Remote.
Maximus V Series
13
Wi-Fi GO! Remote
Install the Wi-Fi GO! Remote application on your mobile device to use Wi-Fi GO!’s remote
control functions.
•
Wi-Fi GO! supports iOS 4.0/Android 2.3 mobile devices or later versions.
•
For iOS devices, download the Wi-Fi GO! Remote from iTunes store. For Android
devices, download the Wi-Fi GO! Remote from Google Play Store or from ASUS
support DVD.
Launching Wi-Fi GO! Remote
1.
Turn on your mobile device’s Wi-Fi connection. Ensure that your mobile device is within
the same network as your computer.
2.
On your mobile device, tap
and tap Enter on the Wi-Fi GO!
Remote page.
3.
Tap the computer you want to
connect to your mobile device.
Ensure to enable the WAKE-ON-LAN function of your computer. Right-click Computer
> Manage > Device Manager > Network Adapters, right-click the selected module
card, click Properties > Power Management and tick Allow this device to wake the
computer and Only allow a magic packet to wake the computer.
14
ASUS ROG AI Suite II
Wi-Fi GO! Remote menu
Wi-Fi GO!
menu
•
Tap ON to enable Smart Motion Control, File Transfer and Capture and Send.
•
The Wi-Fi GO! Remote’s user interface shown above is for reference only and may
vary with the mobile device’s operating system.
Below are the supported screen resolutions of your mobile devices:
Screen type
Small screen
Normal screen
Large screen
Extra large
screen
Low Density
(120, ldpi)
Medium Density
(160, mdpi)
High Density
(240, hdpi)
QVGA
(240 x 320)
480 x 640
WQVGA400
(240 x 400)
WVGA800
(480 x 800)
WQVGA432
(240 x 432)
WVGA800
(480 x 800)
WVGA854
(480 x 854)
1024 x 600
Maximus V Series
HVGA (320 x 480)
WVGA854
(600 x 1024)
Extra high density
(320, xhdpi)
640 x 960
WVGA800
(480 x 800)
WVGA854
(480 x 854)
600 x 1024
WXGA (1280 x 800)
1024 x 768
1280 x 768
1536 x 1152
1920 x 1152
1920 x 1200
2048 x 1536
2560 x 1536
2560 x 1600
15
DLNA Media Hub
DLNA Media Hub allows you to stream your multimedia files to your DLNA-supported device
and remotely control playback using your mobile device or your computer.
Click to select
media file type
Tick to select
source location
Click to refresh
media files
Displays the target
receiver’s name
and the media file
currently playing
Media files pane
Click to go back
to main menu
Click to edit the playlist
Click to select receiver
Using the DLNA Media Hub
1.
From the main screen, click DLNA Media Hub.
2.
Click
3.
Click any of the tabs to select your preferred media file type.
•
•
•
16
to select a device as your receiver.
When using your DLNA display (such as DLNA TV) as the receiver, ensure that
DLNA function is enabled.
When using another computer as the receiver, launch Windows Media Player,
click Stream > Allow remote control of my Player to remotely control media
playback.
When using the computer as sender and receiver, launch Windows Media
Player, click Stream > Allow remote control of my Player and Automatically
allow devices to play my media.
ASUS ROG AI Suite II
4.
•
Only computers under Windows® 7 support the DLNA Media Hub function.
•
Keep the Windows Media Player open. Ensure that your media file formats are
supported on Windows Media Player and DLNA playback devices.
Click any of the tabs to select your preferred media file type.
To play music:
1.
Click Music tab.
2.
Tick Library to view or play
files.
Tick Playlist and select an
existing playlist from the
dropdown list.
2.
Click a music file, and click
.
To edit the library:
1.
Tick Library.
2.
Click
3.
Click Add and locate the file
from the directory. To delete,
tick the selected file and click
Delete.
4.
Click OK.
to add or delete music files.
Maximus V Series
17
To edit the music playlist:
1.
Tick Playlist.
2.
3.
Click
.
Tick to select or deselect
the music file and click Save
Profile.
4.
Select the profile name and click
Save. To add as a new playlist,
key in your profile name and
click Save.
5.
To delete playlist, select the
profile and click .
To play a video file:
1.
Click Video tab.
2.
Tick Library to view the video
files from your local computer.
Tick Playlist to view the video
files saved in your profile.
3.
Click the video file you want to
watch, and click .
4.
Change the resolution from the
Quality dropdown list.
To edit the video library:
18
1.
Tick Library.
2.
Click
to add or delete video files.
3.
Click Add and locate the file
from the directory. To delete,
tick the selected file and click
Delete.
4.
Click OK.
ASUS ROG AI Suite II
To edit the video playlist:
1.
Tick Playlist.
2.
Click
3.
Tick to select or deselect the
video file and click Save Profile.
4.
Select the profile name and click
Save. To add as a new playlist,
key in your profile name and
click Save.
5.
To delete playlist, select the
profile and click .
.
To view images:
1.
Click Photo tab.
2.
Tick Library to view the image
files from your local computer.
Tick Playlist to view the image
files saved in your profile.
An image slideshow plays when
pressing .
To edit the image library:
1.
Tick Library.
2
Click
3.
Click Add and locate the file
from the directory. To delete,
tick the selected file and click
Delete.
4.
Click OK.
to add or delete image files.
Maximus V Series
19
To edit the image playlist:
20
1.
Tick Playlist.
2.
Click
3.
Tick to select or deselect the
image file and click Save Profile.
4.
Select the profile name and click
Save. To add as a new playlist,
key in your profile name and click
Save.
5.
To delete playlist, select the
profile and click .
.
ASUS ROG AI Suite II
Using the DLNA Media Hub via Wi-Fi GO! Remote
You can access the DLNA Media Hub on your mobile device via Wi-Fi GO! Remote.
1.
Tap DLNA Media Hub.
2.
Select and tap the receiver name.
3.
Tap Music, Video or Photo, select a file and tap
.
Your mobile device’s Wi-Fi GO! interface may vary with the mobile device’s operating
system.
Remote Desktop
Remote Desktop allows you to view your computer’s desktop and remotely operate your
computer in real-time from your mobile device.
Using the Remote Desktop
.
From the main screen, click Remote Desktop.
2.
Select a suitable codec Auto, Image optimization, or Speed optimization for your
mobile device.
3.
Click Apply.
Click to select
a video codec
Application help
Click to go
back to main
menu
Maximus V Series
21
Using the Remote Desktop via Wi-Fi GO! Remote
When the Remote Desktop is enabled, the mobile device shows the contents of your
desktop.
The Wi-Fi GO! Remote’s user interface shown above is for reference only and may vary
with the mobile device’s operating system.
22
ASUS ROG AI Suite II
Remote Keyboard and Mouse
Allows you to use your mobile device’s touch panel as a remote keyboard and mouse for
your computer.
Tick to hold left
click function
Tap to
customize
mouse settings
Mouse tap
area
Control keys
Tap to left
click
Tap to scroll
up or down
Tap to right
click
Mouse settings
Tap and drag scroll
bar to adjust the
mouse settings
Tap to restore
default settings
Maximus V Series
23
Smart Motion Control
Allows you to customize your motions in your computer to launch an application or function
using your remote-enabled mobile device.
Before using Smart Motion Control, ensure that your computer is connected to your mobile
device. For more details, refer to the section Wi-Fi GO! Remote.
Using the Smart Motion Control
.
Ensure to turn on the Smart Motion Control in your mobile device.
3.
From the dropdown lists of the
Action fields , , ,
in the
Movement tab, select the function
that you want to correspond with the
action.
4.
Click Apply & Save to save and
apply the settings immediately. Click
Apply to launch the settings without
saving it.
5.
Move your device corresponding to
your specified function.
6.
In the Proximity tab, select the
function or application that will
launch or run in your computer when
your mobile device’s touch panel
is near or close to a stationary or
moving object.
2.
In your computer, click Smart Motion Control in the main menu. Three function tabs
provide you the three types of remote control modes namely Movement, Proximity,
and Camera. Your computer instantly detects the connected mobile devices.
Your device must support a
motion sensor function.
24
ASUS ROG AI Suite II
7.
In the Camera tab, click
to take
pictures, or click
to record a
movie.
The files are automatically saved in
the mobile device’s SD card.
File Transfer
Allows you to transfer files wirelessly between your computer and mobile device.
Ensure to turn on the File Transfer function in your mobile device.
Before using File Transfer, ensure that your computer is connected to your mobile device.
For more details, refer to the section Wi-Fi GO! Remote.
Application help
Destination path for
the files transferred
from mobile device
to desktop
Click to go
back to main
menu
Destination
path for the files
transferred from
desktop to mobile
device
Click to browse a file for wireless
transfer
•
Android mobile devices can send and receive files.
•
iOS mobile devices can only send files.
Maximus V Series
25
Using File Transfer
.
2.
Right-click the file and click Send to > [Device name].
After the transfer is complete, click OK.
Using File Transfer via Wi-Fi GO! Remote
When File Transfer is enabled, the mobile device shows the files in your mobile device.
Tap to select
files for
transfer
Tap to send
selected files
Tap to select
all files
Tap to clear all
files
The Wi-Fi GO! Remote’s user interface shown above is for reference only and may vary
with the mobile device’s operating system.
Capture & Send
Allows you to capture screenshots and send them wirelessly to other mobile devices.
Before using Capture and Send, ensure that your computer is connected to your mobile
device. For more details, refer to the section Wi-Fi GO! Remote.
Application help
Click to go
back to main
menu
26
•
This function only supports Android 2.3 and later versions.
•
This function will be available on Wi-Fi GO! Remote 1.01.00 version.
ASUS ROG AI Suite II
Securing your computer for Wi-Fi GO! Remote functions
Wi-Fi GO! Settings allows you to create a password for your computer.
To create a password:
.
Click
3.
Click Apply.
2.
in the main menu.
Tick Use Password and key in your password.
Tick to enable
password
Key in your
password
Click to go
back to main
menu
Click to apply
settings made
•
When you launch the Wi-Fi GO! Remote, the application prompts you to key in the
computer’s password.
•
Your password must contain 6-12 letters or numbers or both.
Maximus V Series
27
FAN Xpert 2
FAN Xpert 2 automatically detects and tweaks all fan speeds, and provides you with
optimized fan settings based on the fans’ specifications and positions.
Launching FAN Xpert 2
To launch FAN Xpert 2, click Tool > FAN Xpert 2 from the AI Suite II menu bar.
Using FAN Xpert 2 Auto Tuning
FAN Xpert 2’s Fan Auto Tuning feature automatically detects the fans and their locations to
provide you with optimized fan settings.
To use Fan Auto Tuning:
28
1.
Click Fan Auto Tuning on the FAN Xpert 2 main menu.
2.
Wait for the Fan Auto Tuning Process to complete, then click Next.
ASUS ROG AI Suite II
DO NOT remove your fan during the Fan Auto Tuning process.
From the Fan Position screen, check and assign the locations of your fans, then click
OK to exit the screen.
3.
4.
•
•
•
•
Select any of these fan customized settings for each fan.
Silent: Minimized fan speed for silent fan operation.
Standard: Balanced configuration between noise level and fan speed.
Turbo: High fan speed for high cooling capability.
Full Speed: Maximum fan speed.
Select one customized setting
Maximus V Series
29
Advanced Mode
FAN Xpert 2’s Advanced Mode button
allows you to adjust the reaction speed for fan
rotation based on the system’s temperature and to configure the fan’s rotation per minute.
Click to switch window
to Advanced Mode
Smart Mode
The Smart Mode allows you to adjust the reaction speed for fan rotation based on the
system’s temperature.
Tick to adjust the Fan
Reaction Speed
Indicates the current
CPU fan temperature
30
Click these to switch
between CPU and chassis
fan screens
Click and drag to make the
adjustments
ASUS ROG AI Suite II
•
Silent: Minimized fan speed for silent fan operation.
•
Turbo: High fan speed for high cooling capability.
•
•
Standard: Balanced configuration between noise level and fan speed.
Full Speed: Maximum fan speed.
RPM Fixed Mode
The RPM Fixed Mode tab allows you to set your fan speed when CPU temperature is below
75 degrees.
Click and drag to make the
adjustments
Click to switch between CPU fan window
and chassis fan windows 1 to 4
•
To protect your CPU, the fan will not automatically turn off even if you set the CPU fan
power to 0.
•
Only 4-pin CPU fans and 4-pin and 3-pin chassis fans are compatible with FAN
Xpert 2.
•
FAN Xpert 2 may not be able to detect your fan speed if your fan has an external
control kit for rotation speed.
•
2-pin fans are only allowed to run at full speed.
Maximus V Series
31
Fan Information
Click
to see the details of each detected fan. You can click on either
results in table format or
to see the results in graph format.
to see the
Click to see the results in
table format
Click to see the results in
graph format
32
ASUS ROG AI Suite II
USB 3.0 Boost
ASUS USB 3.0 Boost technology supports UASP (USB Attached SCSI Protocol) and
automatically increases a USB 3.0 device’s transfer speed up to 170%.
Launching USB 3.0 Boost
To launch USB 3.0 Boost, click Tool > USB 3.0 Boost on the AI Suite II main menu bar.
Configuring USB 3.0 Boost
1.
Connect a USB 3.0 device to the USB 3.0 port.
USB 3.0 Boost automatically detects the property of the USB 3.0 device and switches
to Turbo mode or UASP mode (if UASP is supported by the USB 3.0 device).
2.
You can manually switch the USB 3.0 mode back to Normal mode at any time.
•
Refer to the software manual in the support DVD or visit the ASUS website at www.asus.com for detailed software configuration.
•
Due to Intel® chipset limitation, Intel® USB 3.0 ports do not support ASUS 3.0 Boost in
Windows XP operating system.
•
Use the USB 3.0 devices for high performance. The data transfer speed varies with
USB devices.
Maximus V Series
33
Ai Charger+
This utility allows you to fast-charge your portable BC 1.1* mobile devices on your computer’s
USB port three times faster than the standard USB devices**.
34
•
* Check your manufacturer if your USB device is a Battery Charging Specification
1.1 (B.C.) compliant or compatible device.
•
** Actual charging speeds may vary depending on the charging rate and specifications
of your USB device.
•
To ensure normal charging function, disconnect and reconnect your USB device every
time you enable or disable the Ai Charger+.
ASUS ROG AI Suite II
USB Charger+
This utility allows you to fast-charge your portable USB devices even if your PC is off, in
Sleep Mode, or Hibernate Mode.
•
When you enable the ErP-ready option in the BIOS, the USB Charger+ will not
operate under Sleep Mode, Hibernate Mode and Off mode.
•
MAXIMUS V GENE motherboard does not support USB Charger+
Launching the USB Charger+
To launch this utility, open the AI Suite II, then click Tool > USB Charger+.
Displays the status
of the connected
device*
Application help
Click to detect the
currently connected
device
Click to choose the
USB fast-charging
mode settings
Undoes all the changes
Applies all the
changes immediately
* The illustration above shows that no device connected to your PC for
fast-charging.
USB fast-charging mode settings
Click the dropdown box, and select a proper charge mode when your PC is off, in Sleep
Mode, or Hibernate Mode.
•
Disable: disables the USB fast-charging function.
•
Apple: fast-charges your connected Apple devices.
•
•
•
ASUS: fast-charges your connected ASUS devices.
Kindle: fast-charges your Kindle devices.
Others: charges other portable USB devices.
•
The utility cannot detect the devices connected to your computer if the charging mode
is enabled.
•
Some USB devices may not support fast-charging with USB Charger+ to protect the
voltage settings.
Maximus V Series
35
Setting up the charging function
When a portable device is connected to the USB port of the PC, the USB Charger+
automatically detects the kind of your device.
Charging the device
Click
to fast-charge your device.
Indicates that the
portable device is
in charging mode
Click to fast-charge
your connected
device.
Click to rescan the
connected device.
Clicking the stops the charging of your connected device, and rescans for other detected
devices. Click the
to re-enable the fast-charging.
Disabling the charging function
Click
to stop charging your device.
Click to stop
fast-charging
the connected
device.
36
ASUS ROG AI Suite II
Probe II
Probe II is a utility that monitors the computer’s vital components, and detects and alerts you
of any problem with these components. Probe II senses fan rotations, CPU temperature,
and system voltages, among others. With this utility, you are assured that your computer is
always at a healthy operating condition.
Launching Probe II
To launch Probe II, click Tool > Probe II on the AI Suite II main menu bar.
Configuring Probe II
Click the Voltage/Temperature/Fan Speed tabs to activate the sensors or to adjust the
sensor threshold values. The Preference tab allows you to customize the time interval of
sensor alerts, or change the temperature unit.
Saves your
configuration
Loads your saved
configuration
Applies your
changes
Loads the default threshold
values for each sensor
Click Monitor > Sensor on the AI Suite II main menu bar and the system status will appear
on the right panel.
Maximus V Series
37
Sensor Recorder
Sensor Recorder monitors the changes in the system voltage, temperature, and fan speed on
a timeline. The History Record function allows you to designate specific time spans on record
to keep track of the three system statuses for certain purposes.
Launching Sensor Recorder
To launch Sensor Recorder, click Tool > Sensor Recorder on the AI Suite II main menu bar.
Using Sensor Recorder
Click Voltage/ Temperature/ Fan Speed tabs for the status you want to monitor. Colored
lines will automatically appear on the diagram to indicate the immediate changes in the
system status.
38
ASUS ROG AI Suite II
Using History Record
1.
2.
3.
4.
Click History Record tab and adjust the settings on the left for Record Interval and
Record Duration according to need.
Click Start Recording to start measuring and recording each sensor.
To stop recording, click Recording again.
To track the recorded contents, set Type/ Date/ Select display items to display the
history details.
Click Monitor > Sensor on the AI Suite II main menu bar and the system status will appear
on the right panel.
Maximus V Series
39
ASUS Update
ASUS Update is a utility that allows you to manage, save, and update the motherboard BIOS
in Windows® environment.
Launching ASUS Update
To launch ASUS Update, click Update> ASUS Update on the AI Suite II main menu bar.
Using ASUS Update
Select any of these options to update the BIOS:
•
Update BIOS from Internet
Allows you to download the latest BIOS version from the ASUS website at
www.asus.com and follow the onscreen instructions to update the BIOS.
•
•
Download BIOS from Internet
Download the latest BIOS version from the ASUS website at www.asus.com and save
it for later use.
Update BIOS from file
Use the BIOS file that you had downloaded and saved to update the system BIOS.
Updating the BIOS poses some risks such as system instability or failure to boot. Before
updating the BIOS, ensure that you back up the original BIOS file.
40
ASUS ROG AI Suite II
MyLogo2
MyLogo2 allows you to customize the boot logo, which is the image that appears on the
screen during the Power On Self Tests (POST).
Launching MyLogo2
To launch MyLogo2, click Update > MyLogo2 on the AI Suite II main menu bar.
Using MyLogo2
Select the option that you want to use to update your boot logo, click Next and follow the
instructions below.
Change the boot logo of a downloaded BIOS file and update (or do not update) this BIOS to
the motherboard
1.
From the BIOS file field, click Browse to locate the BIOS file.
2.
From the Picture File field, click Browse to locate the image for your boot logo, then
click Next.
Maximus V Series
41
3.
Do any of the following:
•
Click Auto Tune to adjust the image size or the image resolution.
•
Click Booting Preview to preview the boot image.
4.
Click Next.
5.
Click Flash to update the boot logo.
6.
When prompted, click Yes to reboot the system. You will see the new boot logo the
next time you start up the system.
Ensure to enable the Full Screen Logo in BIOS to use this feature.
42
ASUS ROG AI Suite II