1
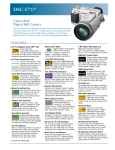
ARGUS Quick Click 5340 Getting to Know Your Camera L C D Mo n i to r In f o r m a ti o n Front View 1 C a m e r a Mo d e 1 P 5 7 8 3 9 10 4 1 . S hu tte r bu tto n 2 . F la s h 7 . S e lf- time r L E D 3 . M ic r o ph o n e 8 . V ie wfinde r window 4 . L e ns 9 . P C ( U S B ) / A V O ut 5. P owe r button 6 . M o d e d ia l Mode Dial P P r o gr a m A A u to V ide o P ortra it L a n ds c a pe S ports N ig h t S e tu p te rmina l 10. DC in 3V Terminal Description Select this m ode to perm it the shutter and aperture to be set m anually. Select this m ode to point-and-shoot. Select this m ode to record video clips. Select this m ode to m ake people stand out w ith the background out-of -f ocus. Use this m ode to take photographs of distant scenery or landscapes. Use this m ode to shoot f ast m oving objects. Select this option to take photographs of people against a dusk or night-tim e background Select this m ode to adjust the cam era settings. 7 8 2 9 3 4 10 5 11 12 6 13 14 1 . V i e wf i n d e r 2. R e c - pla y button M e nu bu tto n 3. 4. D e le te butto n 5. OK / ( D is pla y ) button 6 . T r i po d s o c k e t / 7. Z oom out ( wide - a ngle ) button T humbna il button Z oom in ( te le photo) button 8. / 9 . L C D monitor 10. A rrow button ( U p) A rrow button ( R ight) 11. S e lf- time r button 12. A rrow button ( D own) A rrow button ( L e ft) 13. F la s h button 1 4 . B a tte ry / S D c a rd c ove r 1 . M ode indic a tion [ A ] A u to M o de ] S e tu p M o de [ ] V id e o M o d e [ [ ] L a n d s c a pe M o d e [ P ] P r o g r a m M o de [ ] S ports M ode [ ] P ortra it M ode [ ] N ig h t M o d e 2 . I ma ge qua lity [ ] F IN E [ ] N O R MA L [ ] E C O N O MY 3 . I m a g e s iz e [ ] 2560 x 1920 [ ] 2048 x 1536 [ ] 1280 x 960 [ ] 640 x 480 4 . P os s ible numbe r of s hots 5 . I nte rna l me mory/S D me mory c a rd indic a tor ] S ta tu s o f i n te r n a l [ me mory [ 4 5 3M 8 SD 6 7 ] S ta tus of S D me mory SD 8 12 X1 1.5x 2004.09.17 11 6 . R e ma ining ba tte ry s ta tus ] F ull ba tte ry powe r [ ] M e dium ba tte ry powe r [ ] L ow ba tte ry powe r [ ] N o ba tte ry powe r [ 7 . S e lf- time r mode ] OF F [ ] 2 s e c . d e la y [ ] 1 0 s e c . d e la y [ ] 1 0 +2 s e c . d e la y [ 8 . W hite ba la nc e AU T O [ ] D AY L IG H T [ ] C L O U DY [ ] S UNS E T [ ] T UNG S T E N [ ] F LUO R E S C E NT 10+2 9 10 9 . C a pture mode indic a tor [ X1 ] S I N G L E [ ] B UR S T [ ] AE B 1 0 . D a te 1 1 . Z oom s ta t 1 2 . F oc us a re a 1 3 . F oc us indic a tor ( no indic a tion for a uto foc us ) AUT O [ ] MA C R O [ ] IN F IN IT Y 1 4 . F la s h m o d e ] A uto F la s h ( D e fa ult) [ [ ] R e d E ye [ ] F o r c e d fl a s h ] N o F la s h [ c a rd Me m or y Ca pa cit y 12MB 32MB 64MB 128MB 256MB 512MB Back View 1 3 14 13 6 2 2 2560x1920 (SUPER FINE) 4 12 24 48 96 192 St ill Im a g e 2560 x1920 (FINE) 8 24 48 96 192 348 2560x1920 (NORMAL) 17 40 80 160 320 640 V id e o 320x240 56” 2’21” 4’54” 9’43” 20’22” 38”06” Operating the Camera Still Image Mode Insert 2 AA batteries. or , , Rotate the mode dial to A , P , and turn on the camera by pressing the button. Compose the image on the monitor screen so that the main subject is within the focus frame. / button. Adjust the magnification ratio by pressing the Press the shutter button half-way down to focus the image. Press the shutter button the rest of the way down to capture the image. Video Mode Rotate the mode dial to and turn on the camera. Press the shutter button to start recording. To stop recording, press the shutter button again. Advance Setting Setting Date and Time: Rotate the mode dial to and turn the camera on. Press the to select [CUSTOM]. Use to select [DATE & TIME] then press the . Use and to select Month / Day / Year / Time and and to adjust the values. Press after all the fields are set. ARGUS Quick Click 5340 Setting Image Resolution and Quality: Rotate the mode dial to A , P , or , , and turn on the camera. Press the button to display the [PICTURE] menu and select [IMAGE SIZE]. Use and to make the selection and press to confirm the desired setting. Follow the same steps to set [QUALITY]. Using the Flash: or , , Rotate the mode dial to A , P , and turn on the camera. Toggle until the desired flash mode appears on the LCD screen and press . Flash Mode Description [ [ ] A uto F la s h The flash fires automatically according to suit ] R e d E ye Use this mode to reduce red-eye phenomenon when you want to take natural-looking photographs of people and animals in low light conditions. When taking photographs, the red-eye phenomenon can be reduced by asking the subject (person) to look at the digital camera or get as close to the digital camera as possible. ] F orc e d fla s h brightness. Select this mode for recording images with high contrast (backlighting) and deep shadows. [ Playback Mode Press the button to show the last picture taken. / Press the button once to display the thumbnail images. Use / / / to go through the images until you see the one you want to review. Press to display in full screen. For the recorded video clips, the will be displayed. Deleting Images/Video Clips To erase single image, press the button and confirm. To erase all images, press the button. Press the button and use and to select [DELETE]. Press . Use the and the to select [ALL IMAGE] and press . photographic conditions. The flash will always fire regardless of the surrounding [ Reviewing the Pictures ] No F la s h Use this mode in the environment when the flash use is prohibited or under the situation that the distance to the subject is too far away for the flash to have any effect. Using the Self-Timer: or , , Rotate the mode dial to A , P , and turn on the camera. Secure the camera to a tripod or a stable surface. Toggle until the desired timer mode appears on the LCD screen. Compose the image on the monitor screen and press the shutter button. Using Burst Mode: or , , Rotate the mode dial to A , P , and turn on the camera. Press , select [FUNCTION], and [CAPTURE MODE]. Select [BURST] and press . Press the shutter button half-way down to lock the focus. Press the shutter button the rest of the way down to shoot (shooting will stop when the shutter button is released). Advanced Playback Mode To connect the camera the computer**: Rotate the mode dial to and turn the camera on. Press the to select [CUSTOM] menu, then use the to select [USB]. Use the to select PC then press OK. Connect the camera to the PC using the supplied USB cable. Open My Computer, Removable Disk, DCIM folder, 100IMAGE and retrieve recorded images/video clips. (For Mac users, double click [untitled] or [unlabeled] disk drive icon on your desktop To use the digital camera as PC Webcam: Rotate the mode dial to and turn the camera on. Press the to select [CUSTOM] menu, then use to select [USB]. Use the or to select [PC CAM] then press . To connect the camera to the TV: Connect the camera to the TV using the supplied AV cable and refer to “Playback Mode” to view the images. To print to a PictBridge Compliant printer: Rotate the mode dial to and turn the camera on. Press the to select [CUSTOM] menu, then use to select [USB]. Use the or to select [PRINT] then press . ARGUS Quick Click 5340 T r o u b le s h o o t in g Sy m p t o m Pow er d oes not t ur n on. Cam er a sud d enly p ow er s d ow n P o s s ib le c a u s e s The b at t er y has r un out . The b at t er y is not or ient ed p r op er ly. The b at t er y cover is not closed p r op er ly. The AC p ow er ad ap ter (op t ional) is disconnect ed The f unct ion of POWER OFF in m od e has b een act ivat ed . The b at t er y has r un out . Im age is not cap t ured w hen t he shut t er b ut t on is pr essed The cam er a is in Mem or y is f ull. Flash d oes no f ir e NO FLASH is selected in f lash m od e. The cam er a is in m od e BURST/EAB/ The cap acit y of t he b uilt -in m em or y or SD m em or y car d is f ull. USB cab le is not connect ed secur ely. USB d r iver is not inst alled . Cam er a is t ur ned of f . Cont inuous sho ot ing is not p ossib le Cannot t r ansf er f iles over a USB connect ion m od e. So lu t io n /c o r r e c t iv e A c t io n s Load new or f ully char ged b at t eries. Load t he b at t eries in t he cor rect d ir ect ion. Close t he b att er y cover p r oper ly. Pr op er ly connect t he AC p ow er ad ap t er. Set t he op t ion of POWER OFF t o OFF. Tur n t he p ow er b ack on or char ge t he b at t er y. Rot at e t he m od e d ial t o A, P, , or , Tr ansf er t he d esir ed f iles t o you com p ut er and t hen d elet e unnecessar y f iles, or use d if f er ent m em or y car d . Select a d if f er ent f lash m od e. Select [SINGLE] in t he cap t ur e m od e. Inser t a new SD m em or y card. Check all connect ions. Inst all t he USB d r iver t o your com p ut er . Tur n on t he Cam er a. ** W in d o w s Sy s t e m R e q u ir e m e n t s Pe n t ium III 600 MHz p r o ce sso r o r h igh e r W in d o w s 98/98SE/ME/2000/XP* * * 32MB (64MB r e co m m e n d e d ) 128MB h ar d d isk sp ace CD-ROM d r ive An availab le USB p o r t Dis p la y Co lo r m o n it o r (800x600, 24-b it o r h igh e r r e co m m e n d e d ) * * * W in 98 & 98SE -- in st all t h e d r ive r f r o m t h e sup p lie d CD-ROM W in d o w s 2000/ME/XP -- n o d r ive r in st allat io n r e q uir e d MAC OS 9.0 – n o d r ive r in st allat io n r e q uir e d CP U Op e r a t in g Sy s t e m RAM Ha r d Dis k Sp a c e R e q u ir e d De v ic e s Ma c in t o s h Sy s t e m R e q u ir e m e n t s Po w er PC G3/G4 OS 9.0 o r h igh e r * * * 32MB (64MB r e co m m e n d e d ) 128MB h ar d d isk sp ace CD-ROM d r ive An availab le USB p o r t Co lo r m o n it o r (800x600, 24-b it o r h igh e r r e co m m en d e d )