1
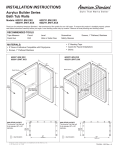
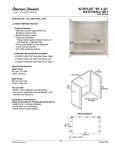
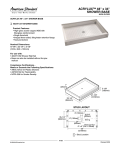
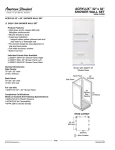
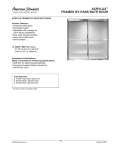
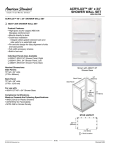
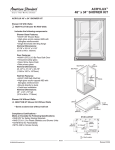
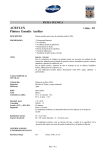
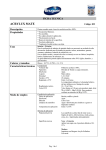
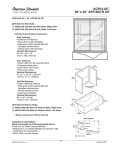
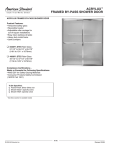
INSTALLATION INSTRUCTIONS
Acrylux Builder Series Shower Walls
Models: 3232Y1.SW.XXX, 3636Y1.SW.XXX, 4834Y1.SW.XXX,
6032Y1.SW.XXX, 3838Y1.CWT.XXX
Thank you for selecting American Standard – the benchmark of fine quality for over 100 years. To ensure this product is installed properly, please
read these instructions carefully before you begin. Local building codes vary by location. Observe all local plumbing and building codes.
3232Y1.SW.XXX
Shower Wall
RECOMMENDED TOOLS
Tape Measure
Safety Glasses
3/16" Drill Bit
Screwdriver
Drill
Hole or Saber Saw
Caulk Gun
Pencil
Square
Level
Back Panel
32"
813mm
STUD LAYOUT:
Shower wall will fit all standard
32" x 32" shower bases.
Side Panel
30"
762mm
Door
Opening
70"
1778mm
MATERIALS:
•
•
•
•
•
Side
Panel
33-1/2"
851mm
2 Tubes of Adhesive Compatible with Polystyrene
Screws 1" Flathead Stainless
2" Masking Tape
Caulk (for Faucet Installation)
Shims
Back
Panel
32"
813mm
= stud location
3636Y1.SW.XXX
Shower Wall
Back
Panel
36"
914mm
STUD LAYOUT:
Shower wall will fit all standard
36" x 36" shower bases.
34"
(864mm)
Door
Opening
70"
(1778mm)
34"
864mm
4834Y1.SW.XXX
Shower Wall
Side
Panel
46"
1168mm
Door
Opening
STUD LAYOUT:
Shower wall will fit all standard
34" x 48" shower bases.
70"
1778mm
37-1/2"
953mm
35-1/2"
902mm
36"
914mm
48"
1219mm
= stud location
= stud location
Back
Panel
32"
813mm
6032Y1.SW.XXX
Shower Wall
Side
Panel
58"
1473mm
Door
Opening
70"
1778mm
38"
965mm
3838Y1.CWT.XXX
Shower Wall
STUD LAYOUT:
Shower wall will fit all
standard 38" x 38"
Corner Entry/Neo
shower bases.
STUD LAYOUT:
Shower wall will fit all
standard 32" x 60"
shower bases.
72"
1829mm
33-1/2"
851mm
39-1/2"
1003mm
39-1/2"
1003mm
60"
1524mm
= stud location
Product names listed herein are trademarks of AS America, Inc.
© AS America, Inc. 2008
= stud location
7 5 42 8 6 - 1 0 0 R e v. A
INSTALLATION INSTRUCTIONS
IMPORTANT
• Allow panels to reach room temperature before installation.
• Before you begin, locate appropriate product reference (see page 1).
• Read installation instructions carefully before starting project.
• Keep instructions for warranty information.
• Caulk will be necessary when installing American Standard walls on a shower base
from another manufacturer.
STEP 1. PREPARING ALCOVE
• Strip alcove to the bare studs. It may be necessary to add a stud at each front corner to
provide attachment for side panels as shown in appropriate stud layout on page 1.
FIGURE 1. Check that studs are plumb with
floor/shower.
• Check that there are no screws, nails or staples in the studs which would interfere with
the base or wall installation.
• If installing over existing base, check that studs are plumb to the base, then go to
Step 3.
• For new construction, place studs as shown in appropriate stud layout on page 1.
• Check that the sub floor for the base is level and studs are plumb to the sub floor.
(Fig. 1)
STEP 2. BASE INSTALLATION
• Follow Manufacturer’s instructions for installing your base.
IMPORTANT: Shower base must be plumb and square to alcove for proper wall
installation.
FIGURE 2. Stud must contact entire length of
back panel.
STEP 3. TRIAL FITTING PANELS
• Place back panel first. The stud on each side of the back panel should contact the
entire length of the back panel. (Fig. 2)
• Fit the side panels by aligning pins on side panels with slots on back panel. (Fig. 3)
• If the studs and back panel do not contact correctly you will need to shim for support.
(Fig. 4)
• Center assembled wall on base. Make sure panels are resting flat on base.
• Align the front of the side walls and the front of the base. This makes drywall
installation easier.
• If necessary, shim between wall panels and studs to provide a tight fit between the
back and side panels. (Fig. 4)
• Measure and mark all control holes. After removing side panels, drill or saw
necessary holes.
FIGURE 3. Align pins with slots on back wall.
IMPORTANT: Drill or saw holes from the front side. Cover area to be cut with
masking tape to prevent chipping and scratching.
• Mark the height of the wall on each stud to indicate where to apply adhesive on the
stud. (Fig. 5)
• Remove panels from alcove.
SHIM PANELS AT EACH STUD IF
NECESSARY TO ASSURE THEY
SIT FLAT ON SHOWER BASE
AND FIT TIGHTLY TOGETHER
(INSTRUCTIONS CONTINUED ON NEXT PAGE)
FIGURE 4. You can shim against the stud.
-2-
7 5 4 2 8 6 - 1 0 0 R e v. A
INSTALLATION INSTRUCTIONS (continued)
MARK TOP OF STUD
STEP 4. INSTALLING SHOWER WALL IN ALCOVE
CENTER ASSEMBLED
WALL ON SHOWER
• Apply a generous bead of adhesive below mark on each back wall stud only (follow
adhesive manufacturer’s recommended instructions).
• Position back panel in place and press firmly against studs to assure full contact
with adhesive.
• Apply adhesive to studs for side panel opposite the shower controls.
• Push side panel firmly into place.
• Apply adhesive to each stud for faucet side panel and push side panel firmly into
place. (Fig. 6)
• Reposition shims as needed.
• Align the front of the side walls and the front of the shower base.
FIGURE 5. Mark studs.
• With walls properly positioned and shimmed, screw front flanges of side panels
to studs.
• Screw top flange of side panels to studs.
• Screw back panel flange to studs.
• After installation is complete, press panels against each stud to assure full contact
with the adhesive. This will prevent the wall from “oil canning” and helps deaden the
sound in finished alcove.
STEP 5. CAULKING
• When installed on an American Standard Shower Base, your American Standard
Shower Wall is designed to function properly without being caulked. However, if you
prefer the appearance of caulked joints, all seams must be caulked.
• Caulk must be applied around holes for the faucet, diverter valve and shower head.
• If your American Standard Shower Walls are used on a shower base other than an
American Standard base, it will be necessary to caulk all seams.
FIGURE 6. Apply adhesive.
• If a shower door is installed, it will require caulking between the base, the walls and
the door.
• When caulking is required, always use a good grade silicone caulk for best results.
STEP 6. FINISHING
DRYWALL
• Using lattice strips or 1/4" luan, shim studs so that drywall will overlap nail flange
smoothly. (If your wall extends past the shown alcove, it may be necessary to shim
these studs.) (Fig. 7)
• Install 1/2" drywall on sides of alcove first then the back.
TILE
FIGURE 7. Shim studs.
• Install 1/2" drywall up to (not over) wall nail flanges.
• Tile may now be installed over drywall up to the wall.
CLEANING
• Do not use any abrasive cleaners or metal scrapers.
• If drywall mud or plaster gets on your shower, it may be carefully removed with a
wooden scraper made from a piece of scrap wood.
• Adhesive may be removed with mineral spirits.
• Ideal cleaners are Soft Scrub Gel® or Comet Gel®.
WARNING: Some cleaning products are not suitable for use. Read all labels carefully.
DO NOT USE if they say “not suitable for use with ABS, acrylic or polystyrene”.
-3-
7 5 4 2 8 6 - 1 0 0 R e v. A
SCRATCH REMOVAL INSTRUCTIONS
1. For effective scratch removal and polishing, you will need to purchase these items:
1 sheet 1000 grit 3M® wet-dry sandpaper
1 sheet 1500 grit 3M® wet-dry sandpaper
1 sheet 2000 grit 3M® wet-dry sandpaper
1 small container of 3M® rubbing compound #05933
These items can be purchased at most auto supply stores that provide supplies to
professional paint and body shops. Call before you go.
Not all auto supply stores will have these items.
2. Start sanding with 2000 grit paper. Use small squares of paper about 2" x 2" for all
sanding and use lots of water. The water serves as both a lubricant and to prevent residue
buildup on the paper. Residue buildup shortens the effective life of the paper and may
scratch the surface you are trying to polish.
3. 2000 grit paper is the finest grit available (the higher the number, the finer the grit). If you
can’t remove all of the scratches with 2000 grit, switch to 1500 grit. Remember to wash
the paper frequently with water as you sand.
4. If all of the scratches cannot be removed with 1500 grit, switch to 1000 grit. This should
remove most fine scratches. If you have deep scratches or a gouge, coarser paper may
have to be used (see chart to right). Be careful! Using grit that is too coarse may actually
put in more scratches than it removes.
5. Once you have removed all of the scratches by sanding the finest paper possible, repeat
the sanding process using successively finer grits of paper until you have once again
sanded with 2000 grit.
SUPERFICIAL
SCRATCH
2000 grit
LIGHT SCRATCH
1500 - 2000 grit
MEDIUM SCRATCH
1000 - 2000 grit
DEEP GOUGE
600 - 2000 grit
SCRATCH / SANDPAPER GUIDE
6. Now use 3M® rubbing compound #05933 on a soft, damp cloth. Polish using considerable
pressure to produce a smooth, shiny finish.
AS AMERICA, INC. (“AMERICAN STANDARD”) LIMITED WARRANTY FOR ACRYLUX PRODUCTS
AS America, Inc. (“American Standard”) warrants to the original consumer purchaser that it will, at its option, repair or replace any of its
plumbing products found by it to be defective under normal use and maintenance within the following periods from date of purchase:
Electronic Components - two (2) years; Pump Motors - three (3) years; Fittings and Plumbing - two (2) years; Shell - ten (10) years
residential; three (3) years commercial. In the event of a limited warranty claim proof of purchase will be required—save sales receipt.
This limited warranty DOES NOT COVER the following:
1. Defects or damage arising from shipping, installation, alterations, accidents, abuse, misuse, lack of proper maintenance and use of other
than genuine American Standard replacement parts, in all cases whether caused by a plumbing contractor, service company, the owner or
any other person.
2. Deterioration through normal wear and tear.
3. Expense of normal maintenance - periodic replacement of washers, seals, etc. is a normal maintenance requirement.
4. IN NO EVENT WILL AMERICAN STANDARD BE LIABLE FOR THE COST OF REPAIR OR REPLACEMENT OF ANY INSTALLATION
MATERIALS, INCLUDING BUT NOT LIMITED TO, TILES, MARBLE ETC.
5. Postage or shipping costs for returning products for repairs or replacement under this limited warranty and labor or other costs incurred in
connection with product removal or installation under this limited warranty.
6. ANY LIABILITY FOR CONSEQUENTIAL OR INCIDENTAL DAMAGES, ALL OF WHICH ARE HEREBY EXPRESSLY DISCLAIMED, OR
THE EXTENSION BEYOND THE DURATION OF THIS LIMITED WARRANTY OF ANY IMPLIED LIMITED WARRANTIES, INCLUDING
THOSE OF MERCHANTABILITY OR FITNESS FOR AN INTENDED PURPOSE. (Some jurisdictions do not allow limitations on how long
an implied limited warranty lasts, or the exclusion or limitation of incidental or consequential damages, so these limitations and exclusions
may not apply to you.)
7. Responsibility for compliance with local code requirement. (Since code requirements vary greatly, distributors, dealers, installation
contractor and users of plumbing products should determine whether there are any code restrictions on the installation or use of a specific
product.)
8. If a whirlpool unit is purchased by a dealer and used as a demonstration unit the limited warranty takes effect as soon as the dealer uses
the product as a demo. If this demonstration unit is subsequently sold to a customer, the dealer may transfer the remaining period of the
limited warranty to the buyer only with American Standard written approval.
This limited warranty gives you specific legal rights. You may have other statutory rights that vary from state to state or from province to
province, in which case this limited warranty does not affect such statutory rights.
By Mail: American Standard Inc.
P.O. Box 659
West Caldwell, N.J. 07007
Attention: Customer Care Center
-4-
By Telephone:
1-800-442-1902
7 5 4 28 6 - 1 0 0 R e v. A