1
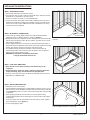
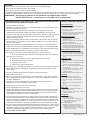
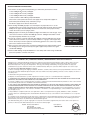
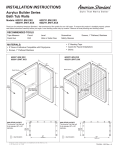
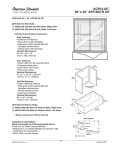
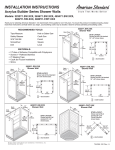
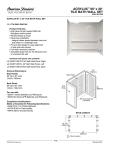
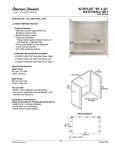
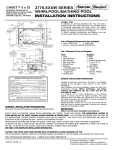
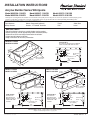
INSTALLATION INSTRUCTIONS
Acrylux Builder Series Whirlpools
Model 6030Y2A.118.XXX
Model 6030Y2A.218.XXX
Model 6030Y1.118.XXX
Model 6030Y1.218.XXX
Model 6032Y1.118.XXX
Model 6032Y1.218.XXX
Thank you for selecting American Standard – the benchmark of fine quality for over 100 years. To ensure this product is installed properly, please
read these instructions carefully before you begin. Local building codes vary by location. Observe all local plumbing and building codes.
RECOMMENDED TOOLS AND MATERIALS
Tape Measure
Safety Glasses
Mortar Compound (optional)
Screws, 1" Flathead, Stainless
Pencil
Drill
Saber Saw
Level
IMPORTANT:
•
•
•
•
•
Read installation instructions carefully before starting project.
Before you begin, locate appropriate product reference (below).
Allow tub to reach room temperature before installation.
Water test tub before installation.
Keep instructions for warranty information.
6030Y2A.118.XXX
6030Y2A.218.XXX
STUD LAYOUT:
The American Standard Acrylux Bathtub
will fit all standard 30" x 60" tub walls.
1"
25mm
19"
483mm
18"
457mm
10"
254mm
31-1/2"
800mm
Motor / Pump
Access Cover
59-7/8"
1521mm
30"
762mm
14"
356mm
6"
152mm
GFI Electrical
Outlet
Drain CL
8"
203mm Floor Cut Out 6" x 10"
(152 x 254mm)
60"
1524mm
= stud location
6030Y1.118.XXX
6030Y1.218.XXX
6032Y1.118.XXX
6032Y1.218.XXX
30"
762mm
59-7/8"
1521mm
32"
813mm
59-7/8"
1521mm
18"
457mm
15"
381mm
Motor / Pump
Access Cover
Motor / Pump
Access Cover
STUD LAYOUT:
The American
Standard Acrylux
Whirlpool will fit all
standard 30" x 60"
tub walls.
10"
254mm
6"
152mm
31-1/2"
800mm
= stud location
14"
356mm
8"
203mm
GFI Electrical
Outlet
Drain CL
Floor Cut Out 6" x 10"
(152 x 254mm)
60"
1524mm
STUD LAYOUT:
The American
Standard Acrylux
Whirlpool will fit all
standard 32" x 60"
tub walls.
12"
305mm
6"
152mm
33-1/2"
851mm
= stud location
15"
381mm
8"
203mm
Drain CL
GFI Electrical
Outlet
Floor Cut Out 6" x 12"
(152 x 305mm)
60"
1524mm
Left-hand drain shown - reverse layout for right-hand drain.
Subject to manufacturing tolerance of [+] or [-] 1/8"
Product names listed herein are trademarks of AS America, Inc.
© AS America, Inc. 2008
7 5 4 2 8 2 - 1 0 0 R e v. A
INSTALLATION INSTRUCTIONS
STEP 1. PREPARING ALCOVE
• Alcove studs should be constructed as shown.
• Floor must be clean, smooth, and level (check with level). Sub floor must be
installed. Do not install tub on open floor joists.
• Cut hole in sub floor as shown, to accommodate drain.
• Access panels must be located on both ends of whirlpool alcove to service
pump/motor and drain assembly after installation. Failure to provide access
to these areas may result in added removal and re-installation costs in the
event service may be required.
4"
102mm
STEP 2. ELECTRICAL CONNECTIONS
• Install a 110 volt, 20 amp duplex outlet to the stud wall underneath the
whirlpool at least 4" (102mm) above the sub floor. (Figure 1)
• Motor/pump must have a separate 110 volt, 20 amp service from the breaker
panel to the motor/pump location. Do not combine any other electirc service
with whirlpool supply line.
• Service supply line must be connected to a ground fault interrupter (GFI) at
the breaker panel for added protection and to meet code requirement. Install
breaker after all other electrical connections have been made.
• Your whirlpool wiring should be installed by a licensed electrician. All
electrical preparation and connections must be made in strict compliance
with local and national electrical codes.
WARNING: If whirlpool is not properly wired, there
is danger of electrical shock or fire.
STEP 3. LEAK TEST WHIRLPOOL
• Water test tub in area where all fittings and connections can be
inspected.
• Fill tub with water, make sure water is above jets. Run for 10 minutes.
Inspect all fittings, plugs and connections for possible leaks.
• Drain tub. If any leaks are found, call American Standard Customer Service
Department at 1-800-442-1902.
Wire to ground
fault interrupter
FIGURE 1. Locate receptacle in same end of alcove
as motor.
FIGURE 2. Check to assure tub is level.
STEP 4. INSTALLING WHIRLPOOL
• Install drain, waste and overflow.
• Trial fit whirlpool in prepared alcove. With whirlpool sitting flat on floor, check
with level on top of tub. Whirlpool should be level from front to back and side
to side (Figure 2). If tub is not level, remove tub and level floor using leveling
compound.
• A floor leveling compound (smooth mortar) or a similar quick-setting
compound specifically made for leveling floors may be used to fully support
and level tub.
• If alcove is larger than tub, shim between tub and studs to create a tight fit.
Screw tub flange to studs. (Figure 3)
• Connect drain piping to drain.
FIGURE 3. If necessary, shim between tub and
studs for tight fit and screw to each stud.
-2-
7 5 4 2 8 2 - 1 0 0 R e v. A
CLEANING
•
•
•
•
Normal cleaning: wash with warm water, soft cloth and a mild liquid detergent.
Ideal cleaners are Soft Scrub Gel® or Comet Gel®.
Do not use any abrasive cleaners or metal scrapers.
FLUSHING INSTRUCTIONS: Whirlpool unit must be flushed every ninety (90) days with a sanitizing chemical such as a spa freshener,
algicide or household bleach. Fill tub with water, add sanitizing chemical and allow the unit to circulate for at least 20 minutes.
WARNING: Some cleaning products are not suitable for use. Read all labels carefully.
DO NOT USE if they say “not suitable for use with ABS, acrylic, or polystyrene.
READ BEFORE INSTALLATION AND/OR USE – IMPORTANT SAFETY INSTRUCTIONS
INSTRUCTIONS PERTAINING TO A RISK OF FIRE
TROUBLE SHOOTING PUMP/MOTOR
1. Read and follow all instructions
MOTOR WON'T START
2. DANGER: To reduce the risk of injury, do not permit children to use this unit unless they
are closely supervised at all times.
3. Infants should not be permitted in the whirlpool at water temperatures over 100˚
Fahrenheit and only with prior medical consultation and permission from your doctor.
4. Pregnant women and persons suffering from heart disease, diabetes, or high or low blood
pressure should not enter the whirlpool tub without prior medical consultation and
permission from their doctor.
5. For your first whirlpool bath, start with a short duration of five minutes. You can increase
the time intervals as your body's tolerance adjusts. However, do not use longer than 15
minutes at any one time.
6. High water temperatures and prolonged periods of use can raise internal human body
temperature excessively and impair the body's ability to regulate its internal temperature.
7. Check whirlpool before use. Maximum safe temperature is 104˚ Fahrenheit (40˚ Celsius).
8. Observe reasonable time limits to avoid nausea, dizziness, and fainting.
9. Do not direct the water spray to the following body areas in these instances:
A. Any area of the body that is swollen, burned, inflamed or where skin eruptions or
ulcerated sores are present.
1. Check to see if on/off switch or pneumatic
switch is in "on" mode.
2. Check for loose connections, blown circuit
breakers, GFI or fuses.
3. With the power off at the circuit breaker, check
manually to see that the motor shaft has free
movement and lacks obstruction.
MOTOR CUTS OUT/STOPS
1. Turn GFI breaker off. Check for loose
wiring/connections.
2. Check for low voltage at the motor (frequently
caused by undersized wire).
NOTE: Pumps equipped with automatic reset
overload protectors and solid state electronics
and switches aredesigned to eliminate failures
caused by mechanical switches and governors.
MOTOR HUMS BUT DOES NOT START
1. Turn GFI breaker off. Check for binding of the
motor shaft or obstruction in pump. Manually
rotate motor shaft to see that shaft turns freely.
2. Check for low voltage and undersized gauge
of wire.
B. Any area of the body that is sore unless approved by your doctor.
PUMP WON'T PUMP
C. The abdomen when pain is present.
1. Open air control valve to release any possible
air lock.
D. Legs with varicose veins.
2. Make sure all suction and discharge lines and
return port are clear and unobstructed.
E. Calves of legs with unexplained pain.
10. Keep body, hair, and clothing a maximum of 12 inches away from the suction fitting at all
times when whirlpool is operating. Do not operate the unit without the guard over the
suction fitting.
11. Do not use whirlpool while under the influence of alcohol or narcotics.
12. Enter and exit tub slowly.
3. Check to see that water is at high enough level
for pump to prime.
4. Check for air leak in the suction line - slightly
loosen pump union connector and then
re-tighten (by hand).
5. Check for obstructions in the piping system.
LOW FLOW
13. Do not use electrically connected devices such as televisions, radios, stereo speakers,
lights, cooking devices, hair dryers, telephones, or other electrical appliances within five
feet of the whirlpool tub.
14. Use this unit only for its intended use as described in this manual. Do not use
attachments not recommended by the manufacturer.
1. Turn GFI breaker off. Check for any
obstructions in pump that impede impeller.
2. Check for low voltage - undersized gauge
of wire.
3. Check suction line for obstructions and/or
air leaks.
15. Never drop or insert any object into any opening.
4. Check for obstruction in discharge line.
16. Keep all breakable objects out of area.
NOISY PUMP
17. All electrical supply circuits providing the electrical power source to be connected to the
whirlpool bath should be checked, installed, and inspected by a licensed electrician and
inspected by the Building Code Authority having jurisdiction at the installation location
upon installation and prior to use of the whirlpool bath.
1. Check for air leak in suction line which can
cause “rumbling” sound.
18. The unit must be connected only to a supply circuit that is protected by a ground-fault
circuit-interruptor (GFCI). Such a GFCI should be provided by the installer and should be
tested on a routine basis. If GFCI fails to operate properly there may be a ground current
flowing, indicating the possibility of an electric shock. Do not use this unit. Disconnect the
unit and have the problem corrected by a qualified service representative before using.
19. A green colored terminal is provided within the terminal compartment. To reduce the risk
of shock, connect this terminal to the grounding terminal of your electric service or supply
panel with a continuous green insulated copper wire equivalent in size to the circuit
conductors supplying this equipment, but no smaller than No. 12 AWG (3.3mm).
2. Check for “cavitation” caused by an obstructed
or under sized suction line.
WATER LEAK
1. Turn GFI breaker off.
Check union connectors:
a) Be sure they are tight - hand tighten only.
b) Inspect O-ring to be sure it is properly
seated and not damaged.
2. Turn GFI breaker off.
Water between pump housing and motor:
a) Check the rotary seal to be sure it is clean
and without contamination on surface.
b) Check seal to see if it is worn or damaged
- replace seal if necessary.
20. SAVE THESE INSTRUCTIONS.
-3-
7 5 42 8 2 - 1 0 0 R e v. A
SCRATCH REMOVAL INSTRUCTIONS
1. For effective scratch removal and polishing, you will need to purchase these items:
1 sheet 1000 grit 3M® wet-dry sandpaper
1 sheet 1500 grit 3M® wet-dry sandpaper
SUPERFICIAL
SCRATCH
2000 grit
1 sheet 2000 grit 3M® wet-dry sandpaper
1 small container of 3M® rubbing compound #05933
These items can be purchased at most auto supply stores that provide supplies to
professional paint and body shops. Call before you go.
Not all auto supply stores will have these items.
2. Start sanding with 2000 grit paper. Use small squares of paper about 2" x 2" for all
sanding and use lots of water. The water serves as both a lubricant and to prevent residue
buildup on the paper. Residue buildup shortens the effective life of the paper and may
scratch the surface you are trying to polish.
3. 2000 grit paper is the finest grit available (the higher the number, the finer the grit). If you
can’t remove all of the scratches with 2000 grit, switch to 1500 grit. Remember to wash
the paper frequently with water as you sand.
4. If all of the scratches cannot be removed with 1500 grit, switch to 1000 grit. This should
remove most fine scratches. If you have deep scratches or a gouge, coarser paper may
have to be used (see chart to right). Be careful! Using grit that is too coarse may actually
put in more scratches than it removes.
5. Once you have removed all of the scratches by sanding the finest paper possible, repeat
the sanding process using successively finer grits of paper until you have once again
sanded with 2000 grit.
LIGHT SCRATCH
1500 - 2000 grit
MEDIUM SCRATCH
1000 - 2000 grit
DEEP GOUGE
600 - 2000 grit
SCRATCH / SANDPAPER GUIDE
6. Now use 3M® rubbing compound #05933 on a soft, damp cloth. Polish using considerable
pressure to produce a smooth, shiny finish.
AS AMERICA, INC. (“AMERICAN STANDARD”) LIMITED WARRANTY FOR ACRYLUX PRODUCTS
AS America, Inc. (“American Standard”) warrants to the original consumer purchaser that it will, at its option, repair or replace any of its
plumbing products found by it to be defective under normal use and maintenance within the following periods from date of purchase:
Electronic Components - two (2) years; Pump Motors - three (3) years; Fittings and Plumbing - two (2) years; Shell - ten (10) years
residential; three (3) years commercial. In the event of a limited warranty claim proof of purchase will be required—save sales receipt.
This limited warranty DOES NOT COVER the following:
1. Defects or damage arising from shipping, installation, alterations, accidents, abuse, misuse, lack of proper maintenance and use of other
than genuine American Standard replacement parts, in all cases whether caused by a plumbing contractor, service company, the owner or
any other person.
2. Deterioration through normal wear and tear.
3. Expense of normal maintenance - periodic replacement of washers, seals, etc. is a normal maintenance requirement.
4. IN NO EVENT WILL AMERICAN STANDARD BE LIABLE FOR THE COST OF REPAIR OR REPLACEMENT OF ANY INSTALLATION
MATERIALS, INCLUDING BUT NOT LIMITED TO, TILES, MARBLE ETC.
5. Postage or shipping costs for returning products for repairs or replacement under this limited warranty and labor or other costs incurred in
connection with product removal or installation under this limited warranty.
6. ANY LIABILITY FOR CONSEQUENTIAL OR INCIDENTAL DAMAGES, ALL OF WHICH ARE HEREBY EXPRESSLY DISCLAIMED, OR
THE EXTENSION BEYOND THE DURATION OF THIS LIMITED WARRANTY OF ANY IMPLIED LIMITED WARRANTIES, INCLUDING
THOSE OF MERCHANTABILITY OR FITNESS FOR AN INTENDED PURPOSE. (Some jurisdictions do not allow limitations on how long
an implied limited warranty lasts, or the exclusion or limitation of incidental or consequential damages, so these limitations and exclusions
may not apply to you.)
7. Responsibility for compliance with local code requirement. (Since code requirements vary greatly, distributors, dealers, installation
contractor and users of plumbing products should determine whether there are any code restrictions on the installation or use of a specific
product.)
8. If a whirlpool unit is purchased by a dealer and used as a demonstration unit the limited warranty takes effect as soon as the dealer uses
the product as a demo. If this demonstration unit is subsequently sold to a customer, the dealer may transfer the remaining period of the
limited warranty to the buyer only with American Standard written approval.
This limited warranty gives you specific legal rights. You may have other statutory rights that vary from state to state or from province to
province, in which case this limited warranty does not affect such statutory rights.
By Mail: American Standard Inc.
P.O. Box 659
West Caldwell, N.J. 07007
Attention: Customer Care Center
-4-
By Telephone:
1-800-442-1902
7 5 4 2 8 2 - 1 0 0 R e v. A