1
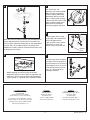
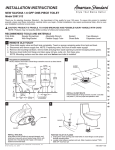
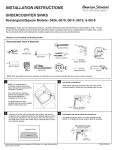
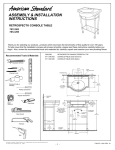
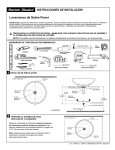
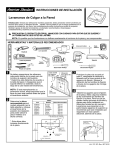
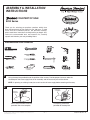
ASSEMBLY & INSTALLATION
INSTRUCTIONS
COUNTERTOP SINK
0293 Series
Thank you for selecting our products...products which have
been the benchmarks of fine quality for over 100 years. To help
insure that the installation process will proceed smoothly,
please read these instructions carefully before you begin. Also,
review the recommended tools and materials list; carefully
unpack and examine your new plumbing fixture.
Recommended Tools & Materials
Pipe Wrench
Adjustable Wrench
Drill
Saber Saw
Phillips Screwdriver
10'
Channel Lock Pliers
Regular Screwdriver
Basin Wrench
Tape Measure
Putty Knife
1
Plumbers' Putty
or Caulking
Level
Hacksaw
Tubing Cutter
Using the template provided,locate the position of the lavatory. Provide proper clearance under the
countertop for the faucet supply lines, drain assembly and the structural parts of the cabinet.
NOTE: If replacing an existing lavatory be certain to shut off water supply before removing old lavatory.
2
Perimeter
of template
Perimeter
of template
Drill a clearance hole inside the
perimeter line of the template.
Product names listed herein are trademarks of AS America, Inc.
© AS America, Inc. 2009
Cut opening around the
perimeter of the template.
- 1 -
7 30 5 2 4 - 1 0 0 R e v. B
3
5
After checking fit and
alignment, turn lavatory upside
down and apply a generous
portion of sealant around the
underside of the rim near the
edge. Carefully lower lavatory
in place, align with marks made
earlier, and press down firmly.
Allow sealant to set before
connecting supplies and drain.
A
6
Mount the faucet and drain assembly (not included) on the
lavatory following faucet manufacturer's instructions. Be
certain to apply a bead of sealing putty on the underside of
the drain (Part "A") in order to ensure a watertight seal
between the lavatory and drain. Remove excess putty after
installing drain on lavatory.
4
Connect supply line to faucet
(finger tight) and carefully bend
tubes to engage with the
supply shut-off valves. Tighten
connections at faucet and
shut-off valves for secure seal.
Shut-Off
Valves
7
Connect trap to drain assembly
hand tight to check alignment. It
may be necessary to cut off part
of the tailpiece (area "B") or part
of the horizontal leg of the trap
(area "C"). Secure joints for
watertight assembly.
C
B
Before applying the sealant, place the lavatory
temporarily into the cut-out. Check for alignment and
clearance. Then mark the lavatory and countertop in
several places as a guide for the installation location.
In the United States:
American Standard Brands
P.O. Box 6820
Piscataway, New Jersey 08855
Attention: Director of Consumer Affairs
In Canada:
AS Canada ULC
2480 Stanfield Rd.
Mississauga, Ontario
Canada L4Y 1S2
Toll Free: (800) 387-0369
In Mexico:
Customer Service Manager
AS Maquilia Mexico, S.A. de C.V.
Via Morelos #330
Col. Santa Clara
Ecatepec 55540 Edo. Mexico
For residents of the United States, warranty
information may also be obtained by calling the
following toll free number: (800) 442-1902
www.americanstandard.ca
www.americanstandard.com.mx
www.americanstandard-us.com
- 2 -
7 3 0 5 2 4 - 1 0 0 R e v. B