1
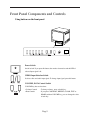
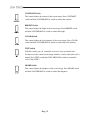
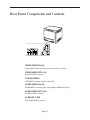
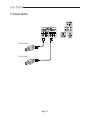
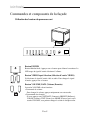
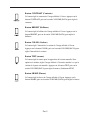
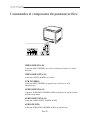
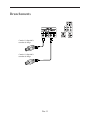
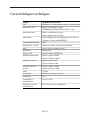
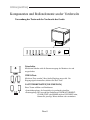
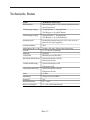
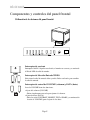
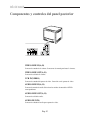
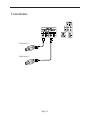
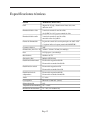
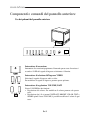
COLOR MONITOR
ADMCRT15
User Guide
Mode d’emploi
Bedienungsanleitung
Manuale dell'utente
Guía del usuario
IMPORTANT SAFETY INSTRUCTIONS
1.
2.
3.
4.
5.
6.
7.
8.
9.
10.
11.
12.
13.
14.
Read these instructions.
Keep these Instructions.
Heed all warnings.
Follow all instructions.
Do not use this apparatus near water.
Clean only with dry cloth.
Do not block any ventilation openings. Install in accordance with the
manufacturer’s instructions.
Do not install near any heat sources such as radiators, heat registers,
stoves, or other apparatus (including amplifiers) that produce heat.
Do not defeat the safety purpose of the polarized or grounding-type plug.
A polarized plug has two blades with one wider than the other.
A grounding type plug has two blades and a third grounding prong.
The wide blade or the third prong are provided for your safety.
If the provided plug does not fit into your outlet, consult an electrician for
replacement of the obsolete outlet.
Protect the power cord from being walked on or pinched particularly at
plugs, convenience receptacles and the point where they exit from the
apparatus.
Only use attachment/accessories specified by the manufacturer.
Use only with the cart, stand, tripod, bracket
or table specified by the manufacturer or sold
with the apparatus. When a cart is used, use
caution when moving the cart/apparatus
combination to avoid injury from tip-over.
Unplug this apparatus during lightning storms or when unused for long
periods of time.
Refer all servicing to qualified service personnel. Servicing is required
when the apparatus has been damaged in any way, such as power-supply
cord or plug is damaged, liquid has been spilled or objects have fallen
into the apparatus the apparatus has been exposed to rain or moisture
does not operate normally or has been dropped.
Eng-2
CAUTION
RISK OF ELECTRIC SHOCK
DO NOT OPEN
CAUTION : TO REDUCE THE RISK OF ELECTRIC SHOCK, DO NOT
REMOVE COVER (OR BACK). NO USER SERVICEABLE
PARTS INSIDE. REFER SERVICING TO QUALIFIED
SERVICE PERSONNEL.
Graphic Symbol Explanation
The lightning flash with arrowhead symbol, within an
equilateral triangle, is intended to alert the user to the
presence of uninsulated ‘dangerous voltage’ within the
product’s enclosure that may be of sufficient magnitude to
constitute a risk of electric shock to persons.
The exclamation point within an equilateral triangle is
intended to alert the user to the presence of important
operating and maintenance (servicing) instructions in
the literature accompanying the appliance.
Warning - To Prevent Fire or Shock Hazard, Do Not
Expose This Monitor To Rain or Moisture.
Eng-3
IMPORTANT SAFEGUARDS
Caution
Power source is indicated on the rear of the set. It contains high-voltage parts.
If you remove the cover, it may cause fire or electric shock. Do not remove the
cover by yourself. (Control switches are at the front of the monitor.)
1. Read Instructions : All the safety and operating instructions should be
read before the appliance is operated.
2. Retain Instructions : The safety and operating instructions should be
retained for future reference.
3. Heed Warnings : All warnings on the monitor and in the operating
instructions should be adhered to.
4. Follow Instructions : All operating and user instructions should be
followed.
5. Cleaning : Unplug this monitor from the wall outlet before cleaning.
Do not use liquid cleaners or aerosol cleaners. Use a damp cloth for
cleaning.
Exception. A monitor that is meant for uninterrupted service and that for
some specific reason, such as the possibility of the loss of an authorization
code for a CATV converter is not intended to be unplugged by the user for
cleaning or any other purpose may exclude the reference to unplugging
the monitor in the cleaning description otherwise required in Item 5.
6. Attachments : Do not use attachments not recommended by
AD(AMERICAN DYNAMICS) as they may cause hazards.
7. Water and Moisture : Do not use this monitor near water for example,
near a bathtub, wash bowl, kitchen sink or laundry tub in a wet basement
or near a swimming pool and the like wet basement or near a swimming
pool and the like.
Eng-4
8. Accessories : Do not place this monitor on an unstable cart, stand,
tripod, bracket or table. The monitor may fall, causing serious injury to a
child or adult and serious damage to the appliance. Use only with a cart,
stand, tripod. bracket or table recommended by AD(AMERICAN
DYNAMICS) or sold with the monitor. Any mounting of the monitor
should follow AD(AMERICAN DYNAMICS)’s instructions and should
use a mounting accessory recommended by AD(AMERICAN
DYNAMICS).
9. Ventilation : Slots and openings in the cabinet are provided for
ventilation and to ensure reliable operation of the monitor and to protect
it from overheating and these openings should never be blocked by
placing the monitor on a bed, sofa, rug or other similar surface. This
monitor should never be placed near or over a radiator or heat register.
This monitor should not be placed in a built-in installation such as a
bookcase or rack unless proper ventilation is provided or
AD(AMERICAN DYNAMICS)’s instructions have been adhered to.
10. Power Sources : This monitor should be operated only from the type of
power source indicated on the making label. If you are not sure of the
type of power supply to your installation site, consult your
AD(AMERICAN DYNAMICS) dealer or local power company.
11. Grounding or Polarization : For monitors equipped with a 3-wire
grounding-type plug having a third(grounding) pin. This plug will only
fit into a grounding type power outlet. This is a safety feature. If you are
unable to insert the plug into the outlet, contact your electrician to
replace your obsolete outlet. Do not defeat the safety purpose of the
grounding-type plug.
12. Power : Cord Protection-Power supply cords should be routed so that
they are not likely to be walked on or pinched by items placed upon or
against them, paying particular attention to cords at plugs, convenience
receptacles and the point where they exit from the monitor.
Eng-5
13. Lightning : For added protection for this monitor during a lightning
storm or when it is left unattended and unused for long periods of time,
unplug it from the wall outlet and disconnect the cable system. This will
prevent damage to the monitor due to lightning and power-line surges.
14. Overloading : Do not overload wall outlets and extension cords as this
can result in a risk of fire of electric shock.
15. Object and liquid Entry : Never push objects of any kind into this
monitor through openings as they may touch dangerous voltage points or
short-out parts that could result in a fire or electric shock.
Never spill liquid of any kind on the monitor.
16. Servicing : Do not attempt to service this monitor yourself as opening or
removing cover may expose you to dangerous voltage or other hazards.
Refer all servicing to qualified service personnel.
17. Damage Requiring Service : Unplug this monitor from the wall outlet
and refer servicing to qualified service personnel under the following
conditions.
a. When the power-supply cord or plug is damaged.
b. If liquid has been spilled or objects have fallen into the monitor.
c. If the monitor has been exposed to rain or water.
d. If the monitor does not operate normally by following the operating
instructions. Adjust only those controls that are covered by the
operating instructions as an improper adjustment of other controls
may result in damage and require extensive work by a qualified
technician to restore the monitor to its normal operation.
e. If the monitor has been dropped or the cabinet has been damaged.
f. When the monitor exhibits a distinct change in performance-this
indicates a need for service.
Eng-6
18. Replacement Parts : When replacement parts are required, be sure the
service technician has used replacement parts specified by
AD(AMERICAN DYNAMICS) or have the same characteristics as the
original parts.
Unauthorized substitutions may result in fire, electric shock or other
hazards.
19. Safety Check : Upon completion of any service or repairs to this
monitor, ask the service technician to preform safety checks to
determine that the monitor is in proper operating condition.
Eng-7
Contents
IMPORTANT SAFETY INSTRUCTIONS .................Eng-2
IMPORTANT SAFEGUARDS................................... Eng-4
Front Panel Components and Controls ........................ Eng-9
• Using buttons on the front panel ............................Eng-9
Rear Panel Components and Controls ....................... Eng-11
Connections ............................................................... Eng-12
Maintenance................................................................Eng-13
Specifications..............................................................Eng-14
Eng-8
Front Panel Components and Controls
Using buttons on the front panel
Power Switch
On/off switch. If you press this button, the monitor is turned on and the LED of
selected input signal is lit.
VIDEO Input Selection Switch
It selects video and audio input signal. To change input signal, press this button.
VOLUME, DATA Control Switch
VOLUME key has two functions :
• Volume Controls
• Data Controls
: To change volume, press only this key.
: If you press CONTRAST, BRIGHT, COLOR, TINT or
SHARP and then VOLUME key, you can change the value
of each key.
Eng-9
CONTRAST Switch
This control adjusts the contrast of the screen image. Press CONTRAST
switch and then VOLUME(DATA) switch to control the contrast.
BRIGHT Switch
This control adjusts the bright of the screen image. Press BRIGHT switch
and then VOLUME(DATA) switch to control the bright.
COLOR Switch
This control adjusts the color intensity of the screen image. Press COLOR
switch and then VOLUME(DATA) switch to control the color intensity.
TINT Switch
With this switch, you can control the color to be close to natural color.
For the best result, control screen image with this switch so that skin color is
natural. Press TINT switch then VOLUME(DATA) switch to control the
color. (Only NTSC)
SHARP Switch
This control adjusts the sharpness of the screen image. Press SHARP switch
and then VOLUME(DATA) switch to control the sharpness.
Eng-10
Rear Panel Components and Controls
VIDEO LINE IN(A, B)
Camera INPUT connector. Input connectors for up to 2 cameras
VIDEO LINE OUT(A, B)
Monitor OUTPUT connector.
VCR IN(VIDEO)
VCR INPUT connector. Connect to the VCR.
AUDIO LINE IN(A, B)
AUDIO INPUT connector. Select corresponding AUDIO input signals
AUDIO LINE OUT(A, B)
AUDIO OUTPUT connector.
AUDIO IN (VCR)
VCR AUDIO INPUT connector.
Eng-11
Connections
CCD Camera 1
CCD Camera 2
Eng-12
Maintenance
If the quality of the picture on the COLOR MONITOR is poor and cannot be
improved, inspect all system connections and cable runs.
Repairs should be performed by a qualified technician with adequate test equipment
and facilities.
Eng-13
Specifications
System
ADMCRT15 (NTSC/PAL)
CRT
15” diagonal, 0.6mm stripe pitch, 90° deflection
Video In/Out
2 Channel Input/2 Channel Output.
VCR INPUT 1.0Vp-p BNC jack
Audio In/Out
2 Channel Input/2 Channel output.
VCR Input RCA jack
Power Source
Control range of main section 100V~250V or “Indicated
on the rear of the MONITOR set”
Power Consumption
50W
Dimensions (W x D x H)
365mm x 391mm x 342mm (without packing)
Weight
about 16.5Kg (with packing)
Resolutions
400 TV lines
Video System
Multiple system (NTSC/PAL)
Horizontal Stabilization
Pull in Range ± 500Hz
Holding Range ± 500Hz
Vertical Stabilization
Pull in Range ± 4Hz
Holding Range ± 4Hz
Sub Carrier Stabilization
Pull in Range ± 400Hz
Holding Range ± 400Hz
Audio
1.5Watts
Convergence
Less than 0.4mm Max (Center)
Overscan
10%
Operating Temperature
0°C ~ +40°C
Operating Humidity
10 ~ 90% (Non-condensing)
Eng-14
COLOR MONITOR
ADMCRT15
Mode d’emploi
ATTENTION
RISQUE DE DECHARGE
ELECTRIQUE NE PAS OUVRIR
ATTENTION : POUR REDUIRE LE RISQUE DE DECHARGE ELECTRIQUE, NE
RETIREZ PAS LE CACHE (NI LE PANNEAU ARRIERE). AUCUNE
PIECE NE PEUT ETRE REPAREE PAR L’UTILISATEUR.
ADRESSEZ-VOUS AU PERSONNEL QUALIFIE POUR LE
DEPANNAGE.
Explication des symboles graphiques
L'éclair et son extrémité en forme de flèche dans un triangle
équilatéral sont destinés à alerter l’utilisateur de la présence
d’une ‘tension électrique dangereuse’ non isolée à l'intérieur
du produit, d’une intensité suffisamment importante pour
constituer un risque de décharge électrique pour les êtres
humains.
Le point d’exclamation dans un triangle équilatéral est
destiné à avertir l’utilisateur de l’existence de consignes
importantes d’utilisation et d’entretien (dépannage) dans la documentation
accompagnant l’appareil.
Avertissement – Pour éviter les risques d'incendie ou de
décharge électrique, n'exposez pas ce
moniteur à la pluie ou à l'humidité.
Fra-2
CONSIGNES IMPORTANTES
Attention
Le point d’alimentation est indiqué à l’arrière de l'appareil. Il contient des pièces
sous haute tension. Si vous retirez le couvercle, un incendie ou une décharge
électrique risque de se produire. Ne retirez pas vous-même le couvercle. (Les
boutons de commande sont situés à l'avant du moniteur).
1. Lisez les consignes : Vous devez prendre connaissance de toutes les
consignes de sécurité et d’utilisation avant la mise en marche de
l’appareil.
2. Conservez les consignes : Les consignes de sécurité et d’utilisation
sont à conserver en vue d’une consultation ultérieure.
3. Tenez compte des avertissements : Tous les avertissements figurant
sur le moniteur et dans les consignes d’utilisation doivent être pris en
compte.
4. Suivez les consignes : Toutes les consignes d’utilisation doivent être
suivies.
5. Nettoyage : Débranchez le moniteur de la prise d’alimentation avant de
le nettoyer. N’utilisez pas de produits de nettoyage liquides ou en
aérosol. Utilisez un chiffon humide pour le nettoyage.
Exception. Dans le cas d’un moniteur destiné à fonctionner en continu
et excluant, pour des raisons telles que le risque de perdre le code
d’autorisation d’un convertisseur de télévision par câble, tout
débranchement de la part de l’utilisateur en vue d’un nettoyage ou pour
toute autre raison, il peut arriver que le débranchement du moniteur ne
soit pas mentionné dans la description du nettoyage qui autrement est
requise au point 5.
6. Accessoires : N’utilisez pas d’accessoires non recommandés par
AD(AMERICAN DYNAMICS), car ils peuvent se révéler dangereux.
7. Eau et humidité : N’utilisez pas ce moniteur à proximité de source
d’eau, par exemple à proximité d’une baignoire, d’un lavabo, d’un
évier, d’un bac de lavage, dans un sous-sol humide ou près d’une
piscine, etc.
Fra-3
8. Accessoires : Ne placez pas ce moniteur sur un chariot, un socle, un
trépied, une console ou une table instable. La chute du moniteur
pourrait blesser grièvement un enfant ou un adulte et gravement
endommager l'appareil. Utilisez uniquement un chariot, un socle, un
trépied, une console ou une table recommandé(e) par le fabricant ou
vendu(e) avec le moniteur. Suivez les consignes de AD(AMERICAN
DYNAMICS) lors du montage du moniteur et utilisez l'accessoire de
montage recommandé par AD(AMERICAN DYNAMICS).
9.
Ventilation : Dans le châssis, les fentes et les ouvertures assurent la
ventilation et le bon fonctionnement du moniteur, lui évitant ainsi les
risques de surchauffe ; n’obstruez jamais ces ouvertures en plaçant le
moniteur sur un lit, un canapé, un tapis ou toute autre surface similaire.
Ne placez pas le moniteur à proximité ou au-dessus d'un radiateur ou
d'un registre de chaleur. Ne placez pas le moniteur dans un meuble
encastré comme une bibliothèque ou une étagère sauf dans le cas où une
ventilation adéquate est prévue ou si vous vous conformez aux
consignes de AD(AMERICAN DYNAMICS).
10. Sources d'alimentation : Raccordez ce moniteur uniquement à la
tension d'alimentation indiquée sur l'étiquette. Si vous n'êtes pas sûr de
la tension d'alimentation du lieu d’installation, consultez votre
revendeur AD(AMERICAN DYNAMICS) ou votre fournisseur
d'électricité local.
11. Prise de terre ou polarisation : Pour les moniteurs équipés d’une prise
de type mise à la terre 3 conducteurs avec une troisième broche (de
mise à la terre). Cette prise ne peut être branchée que dans une prise
murale avec mise à la terre. Il s’agit d’un dispositif de sécurité. Si vous
ne parvenez pas à insérer la prise dans l'alimentation murale, contactez
votre électricien pour qu'il remplace cette dernière. Ne démontez pas le
dispositif de sécurité de la prise de terre.
12. Alimentation : Les cordons d'alimentation secteur doivent cheminer de
telle sorte qu'ils soient en dehors des zones de passage et ne soient pas
pincés par des objets placés sur ou contre eux. Accordez une attention
particulière aux cordons au niveau des prises, des réceptacles source
d'alimentation et à leur point de sortie du moniteur.
Fra-4
13. Foudre : Afin d’assurer une protection supplémentaire pour le
moniteur, débranchez-le de la prise murale et débranchez le connecteur
du réseau câblé en cas d'orage ou d'absence et de non-utilisation
prolongées. Cela évitera que le moniteur ne soit endommagé par la
foudre et par des surtensions des lignes électriques.
14. Surcharge : Ne surchargez pas les prises murales ou les câbles de
rallonge car cela crée un risque d’incendie ou de décharge électrique.
15. Entrée d’objets et de liquides : N’introduisez aucun objet dans les
ouvertures du moniteur car ils risqueraient de toucher des zones de
tension électrique dangereuses ou de court-circuiter des pièces et ainsi
de provoquer un incendie ou une décharge électrique. Ne renversez
aucun liquide quel qu'il soit sur le moniteur.
16. Réparations : Ne tentez pas de réparer vous-même le moniteur, car en
ouvrant ou en retirant les couvercles vous vous exposeriez à des
tensions électriques dangereuses et à d’autres risques. Confiez
l'ensemble des réparations au personnel qualifié.
17. Dommages nécessitant réparations : Débranchez le moniteur de la
prise murale et confiez les réparations au personnel qualifié dans les cas
suivants :
a. Lorsque le cordon ou la prise d’alimentation est endommagée.
b. Si un liquide a été renversé sur l'appareil ou si des objets sont
tombés dans le moniteur.
c. Si la moniteur a été exposé à la pluie ou à l’eau.
d. Si le moniteur ne fonctionne pas normalement malgré le respect des
consignes d'utilisation. Réglez seulement les commandes traitées
dans les consignes d'utilisation, car un réglage incorrect des autres
commandes peut endommager le moniteur et exige souvent un
important travail de la part du technicien qualifié pour ramener le
moniteur à son état normal.
e. Si le moniteur est tombé ou si le châssis est endommagé.
f. Si le moniteur donne des signes évidents de baisse de performance,
un dépannage s’impose.
Fra-5
18. Pièces de rechange : Lorsque des pièces de rechange sont nécessaires,
assurez-vous que le technicien de dépannage utilise des pièces de
rechange spécifiées par AD(AMERICAN DYNAMICS) ou des pièces
présentant les mêmes caractéristiques que les pièces d'origine.
Des substitutions non autorisées peuvent provoquer un incendie, des
décharges électriques et d’autres dommages.
19. Contrôle de sécurité : Après chaque intervention sur ce moniteur,
demandez au technicien de dépannage d'effectuer des contrôles de
sécurité pour s'assurer que le moniteur est en bon état de
fonctionnement.
Fra-6
Table des matières
CONSIGNES IMPORTANTES .................................. Fra-3
Commandes et composants de la façade....................... Fra-8
• Utilisation des boutons du panneau avant ..................Fra-8
Commandes et composants du panneau arrière ......... Fra-10
Branchements.............................................................. Fra-11
Entretien ......................................................................Fra-12
Caractéristiques techniques..........................................Fra-13
Fra-7
Commandes et composants de la façade
Utilisation des boutons du panneau avant
Bouton POWER
Bouton Marche/Arrêt. Appuyez sur ce bouton pour allumer le moniteur. La
LED rouge du signal d’entrée sélectionné s’allume.
Bouton VIDEO Input Selection (Sélection d’entrée VIDEO)
Il sélectionne le signal d’entrée vidéo et audio. Pour changer le signal
d’entrée, appuyez sur ce bouton.
Bouton VOLUME, DATA (Volume, Données)
La touche VOLUME a deux fonctions :
• Commande du volume
: Pour changer le volume, appuyez uniquement sur cette touche.
• Commmande des données
: Si vous appuyez sur CONTRAST (Contraste), BRIGHT (Brillance),
COLOR (Couleur), TINT (Nuance) ou SHARP (Finesse), puis sur la
touche VOLUME, vous pourrez changer la valeur de chaque touche.
Fra-8
Bouton CONTRAST (Contraste)
Ce bouton règle le contraste de l’image affichée à l’écran. Appuyez sur le
bouton CONTRAST, puis sur la touche VOLUME (DATA) pour régler le
contraste.
Bouton BRIGHT (Brillance)
Ce bouton règle la brillance de l’image affichée à l’écran. Appuyez sur le
bouton BRIGHT, puis sur la touche VOLUME (DATA) pour régler la
brillance.
Bouton COLOR (Couleur)
Ce bouton règle l’intensité de la couleur de l’image affichée à l’écran.
Appuyez sur le bouton COLOR, puis sur la touche VOLUME (DATA) pour
régler l’intensité de la couteur.
Bouton TINT (nuance)
Ce bouton règle la nuance pour la rapprocher de la teinte naturelle. Pour
optimiser le résultat, réglez l’image affichée à l’écran de manière à ce que la
couleur de la peau soit naturelle. Appuyez sur le bouton TINT, puis sur la
touche VOLUME (DATA) pour régler la nuance. (Seulement NTSC)
Bouton SHARP (Finesse)
Ce bouton règle la finesse de l’image affichée à l’écran. Appuyez sur le
bouton SHARP, puis sur la touche VOLUME (DATA) pour régler la finesse.
Fra-9
Commandes et composants du panneau arrière
VIDEO LINE IN(A, B)
Connecteur INPUT (ENTREE) de la caméra. Connecteurs d’entrée de 2 caméras
maximum
VIDEO LINE OUT(A, B)
Connecteur OUTPUT (SORTIE) de la caméra.
VCR IN(VIDEO)
Connecteur INPUT (ENTREE) du magnétoscope. Connexion au VCR
(Magnétoscope).
AUDIO LINE IN(A, B)
Connecteur AUDIO INPUT (ENTREE AUDIO). Sélectionnez les signaux d’entrée
AUDIO correspondants
AUDIO LINE OUT(A, B)
Connecteur AUDIO OUTPUT (SORTIE AUDIO).
AUDIO IN(VCR)
Connecteur AUDIO INPUT (ENTREE AUDIO) du magnétoscope.
Fra-10
Branchements
Caméra 1 à dispositif à
transfert de charge
Caméra 1 à dispositif à
transfert de charge
Fra-11
Entretien
Si la qualité d’image du MONITEUR COULEUR est mauvaise ou s’il est impossible
de l’améliorer, contrôlez tous les branchements et les parcours de câbles.
Les réparations doivent être effectuées par un technicien qualifié disposant
d’installations et d’équipements de contrôle appropriés.
Fra-12
Caractéristiques techniques
Système
ADMCRT15 (NTSC/PAL)
CRT
Diagonale 15”, pas de masque de 0,6 mm ; déviation de 90°
Entrée/sortie vidéo
Entrée 2 canaux/Sortie 2 canaux.
ENTREE MAGNETOSCOPE prise BNC 1,0 Vp-p
Entrée/sortie audio
Entrée 2 canaux/Sortie 2 canaux.
Entrée magnétoscope prise RCA
Alimentation
Plage de réglage de la section principale 100V~250V ou
“ Indiquée à l’arrière du MONITEUR ”
Consommation électrique
50W
Dimensions (L x P x H)
365 mm x 391 mm x 342 mm (hors emballage)
Poids
environ 16,5 kg (emballage inclus)
Résolutions
400 lignes TV
Système vidéo
Système multiple (NTSC/PAL)
Stabilisation horizontale
Plage de capture ± 500Hz
Plage de maintien ± 500Hz
Stabilisation verticale
Plage de capture ± 4Hz
Plage de maintien ± 4Hz
Stabilisation de sous-
Plage de capture ± 400Hz
porteuse
Plage de maintien ± 400Hz
Audio
1,5 Watt
Convergence
Inférieur à 0,4mm maxi. (centre)
Surbalayage
10%
Température de
De 0°C à +40°C
fonctionnement
Humidité au cours du
De 10 % à 90% (sans condensation)
fonctionnement
Fra-13
COLOR MONITOR
ADMCRT15
Bedienungsanleitung
VORSICHT
GEFAHR DURCH STROMSCHLAG
NICHT ÖFFNEN
VORSICHT: ZUR VERMEIDUNG EINES ELEKTRISCHEN SCHLAGS DÜRFEN
SIE DIE RÜCKWAND AUF KEINEN FALL ABNEHMEN. IM
GERÄTEINNEREN BEFINDEN SICH KEINE BEDIENELEMENTE.
LASSEN SIE REPARATUREN VON ENTSPRECHEND
AUSGEBILDETEM KUNDENDIENSTPERSONAL DURCHFÜHREN.
Erklärung der grafischen Symbole
Das Blitzsymbol im gleichseitigen Dreieck soll davor
warnen, dass im Gerät nicht isolierte gefährliche
Spannungen anliegen. Dies kann zu einem elektrischen
Schlag führen und stellt eine ernsthafte Verletzungsgefahr
dar.
Das Ausrufezeichen im gleichseitigen Dreieck soll darauf
hinweisen, dass die zum Lieferumfang des Geräts gehörende
Dokumentation wichtige Hinweise zu Bedienung, Wartung
und Reparatur enthält.
Achtung: Zur Vermeidung von Bränden oder
Stromschlägen darf dieses Gerät weder Regen
noch Feuchtigkeit ausgesetzt werden.
Deu-2
WICHTIGE SICHERHEITSHINWEISE
Warnhinweise
Das Netzteil befindet sich an der Rückseite des Geräts. Es enthält
Hochspannungsbauteile. Das Entfernen der Abdeckung kann zu Bränden oder
Stromschlägen führen. Entfernen Sie daher unter keinen Umständen die
Abdeckung. (Die Bedienelemente befinden sich auf der Vorderseite des Geräts.)
1. Bedienungsanleitung lesen: Lesen Sie vor der Inbetriebnahme des
Geräts aufmerksam die Bedienungsanleitung mit allen Sicherheits- und
Bedienungsanweisungen.
2.
Bedienungsanleitung aufbewahren: Sie sollten die
Bedienungsanleitung mit allen Sicherheits- und Bedienhinweisen
aufbewahren, damit Sie zu einem späteren Zeitpunkt darin nachlesen
können.
3.
Warnhinweise beachten: Beachten Sie die Warnhinweise am Gerät
und in der Bedienungsanleitung.
4.
Anweisungen befolgen: Befolgen Sie die Bedien- und
Verwendungshinweise.
5. Reinigung: Trennen Sie das Gerät vom Netz, bevor Sie
Reinigungsarbeiten durchführen. Verwenden Sie keine Flüssig- oder
Aerosolreiniger. Reinigen Sie das Gerät mit einem angefeuchteten
Tuch.
Ausnahme: Ein Gerät, das aus einem bestimmten Grund
unterbrechungsfrei betrieben werden muss, weil anderenfalls
beispielsweise der Genehmigungscode für einen CATV-Adapter
verloren gehen kann, darf zu Reinigungs- oder sonstigen Zwecken nicht
vom Netz getrennt werden. Dies ist die einzige Ausnahme zu den
obigen Hinweisen.
6.
Erweiterungen: Verwenden Sie ausschließlich von AD(AMERICAN
DYNAMICS) empfohlene Erweiterungen. Anderenfalls ist ein
gefahrloser Betrieb nicht gewährleistet.
7.
Wasser und Feuchtigkeit: Betreiben Sie dieses Gerät nicht in der Nähe
von Wasser, z. B. in der Nähe einer Badewanne, eines Waschbeckens,
einer Küchenspüle, einer Waschmaschine usw.
Deu-3
8.
Zubehör: Stellen Sie dieses Gerät nur auf Gestelle, Ständer, Dreibeine,
Konsolen oder Tische, die ausreichende Stabilität bieten. Anderenfalls
könnte das Gerät herunterfallen, beschädigt werden und ernsthafte
Verletzungen hervorrufen. Verwenden Sie nur Gestelle, Ständer,
Dreibeine, Konsolen oder Tische, die von AD(AMERICAN
DYNAMICS) empfohlen oder speziell für das Gerät angeboten werden.
Bei der Montage des Geräts müssen die Anweisungen von
AD(AMERICAN DYNAMICS) befolgt werden. Verwenden Sie
ausschließlich das von AD(AMERICAN DYNAMICS) empfohlene
Montagezubehör.
9.
Belüftung: Schlitze und Öffnungen am Gerät dienen der ausreichenden
Belüftung. So wird ein störungsfreier Betrieb des Geräts und der Schutz
vor Überhitzung gewährleistet. Aus diesem Grund dürfen diese
Öffnungen nicht blockiert werden, z. B. durch Aufstellen des Geräts auf
einer weichen Oberfläche wie einem Bett, Sofa oder Teppich.
Außerdem darf das Gerät keinesfalls in der Nähe oder über einem
Radiator oder Heizkörper aufgestellt werden. Dieses Gerät darf nicht in
einem Bücherregal oder einer Schrankwand aufgestellt werden. Dies ist
nur dann zulässig, wenn für ausreichende Belüftung gesorgt wird oder
die Anweisungen von AD(AMERICAN DYNAMICS) eingehalten
werden.
10. Netzanschluss: Dieses Gerät darf nur an einer auf dem Typenschild
ausgewiesenen Spannungsquelle betrieben werden. Falls Sie in dieser
Hinsicht nicht sicher sind, fragen Sie Ihren Fachhändler oder Ihr
Energieversorgungsunternehmen.
11. Erdung und Polarität: Diese Bestimmungen gelten für Geräte mit
einem dreiadrigen Stecker, der mit einem dritten Stift (Erdung)
ausgestattet ist. Dieser Stecker kann nur an geerdete Netzsteckdosen
angeschlossen werden. Dies ist eine zusätzliche Sicherheitsvorkehrung.
Wenn Sie den Stecker nicht an die Steckdose anschließen können,
setzen Sie sich mit einem Elektriker in Verbindung, um die veraltete
Steckdose auszuwechseln. Setzen Sie die Sicherheitsfunktion dieses
geerdeten Steckers auf keinen Fall außer Kraft.
12. Stromversorgung: Netzkabel müssen so verlegt werden, dass niemand
auf das Kabel treten kann oder es durch Gegenstände gequetscht wird.
Dies gilt insbesondere für die Kabelenden am Gerät bzw. am Stecker.
Deu-4
13. Gewitter: Zum Schutz des Geräts bei einem Gewitter oder während
längerer Abwesenheit bzw. Nichtbetrieb trennen Sie das Gerät vom
Netz. Trennen Sie außerdem den Kabelanschluss vom Gerät. Auf diese
Weise werden Schäden durch Blitzschlag oder Spannungsstöße
vermieden.
14. Überlastung: Schließen Sie nicht zu viele Geräte an eine Steckdose
oder ein Verlängerungskabel an, da dies zu einem Brand oder
elektrischen Schlag führen kann.
15. Eindringen von Gegenständen und Flüssigkeiten in das Gerät:
Stecken Sie niemals Gegenstände durch die Schlitze des Geräts, da
Elemente berührt werden können, an denen hohe elektrische
Spannungen anliegen. Die Folge könnte ein Brand oder elektrischer
Schlag sein. Verschütten Sie niemals Flüssigkeiten auf dem Gerät.
16. Reparaturen: Führen Sie keinesfalls selbst Reparaturen am Gerät aus.
Durch geöffnete oder abgebaute Abdeckungen setzen Sie sich
gefährlichen Netzspannungen und anderen Gefahren aus. Überlassen
Sie Reparaturarbeiten stets entsprechend ausgebildetem
Kundendienstpersonal.
17. Reparaturbedürftige Schäden: Trennen Sie das Gerät vom Netz, und
wenden Sie sich in allen unten aufgeführten Fällen an einen
qualifizierten Kundendienst:
a. Das Netzkabel oder der Stecker ist beschädigt.
b. Es wurde Flüssigkeit verschüttet, oder es sind Gegenstände in das
Gerät gefallen.
c. Das Gerät wurde Feuchtigkeit ausgesetzt.
d. Das Gerät funktioniert trotz Einhaltung der Bedienungsanweisungen
nicht einwandfrei. Nehmen Sie nur die in dieser
Bedienungsanleitung beschriebenen Einstellungen vor. Eine
fehlerhafte Ausführung anderer Einstellungen kann zu Schäden
führen und erfordert oftmals aufwendige Reparaturen durch einen
entsprechend ausgebildeten Techniker, um den Normalbetrieb
wiederherzustellen.
e. Das Gerät wurde fallen gelassen, oder das Gehäuse wurde
beschädigt.
f. Das Gerät zeigt auffällige Veränderungen in der Funktionsweise.
Dies ist ein Anzeichen für notwendige Reparaturarbeiten.
Deu-5
18. Ersatzteile: Falls Teile ausgetauscht werden müssen, achten Sie darauf,
dass der Kundendiensttechniker die von AD(AMERICAN
DYNAMICS) angegebenen Ersatzteile oder solche Ersatzteile
verwendet, die die gleichen technischen Eigenschaften wie die
Originalteile aufweisen. Der Einbau nicht genehmigter Ersatzteile kann
zu einem Brand oder elektrischen Schlag führen oder andere Gefahren
bergen.
19. Sicherheitsprüfung: Bitten Sie den Techniker nach Abschluss der
Instandhaltungs- oder Reparaturarbeiten an diesem Gerät, den
einwandfreien Betrieb anhand routinemäßiger Sicherheitsüberprüfungen
festzustellen.
Deu-6
Inhalt
WICHTIGE SICHERHEITSHINWEISE.................... Deu-3
Komponenten und Bedienelemente an
der Vorderseite ............................................................ Deu-8
• Verwendung der Tasten auf der
Vorderseite des Geräts .........................................Deu-8
Komponenten und Bedienelemente an
der Rückseite ............................................................. Deu-10
Anschlüsse ................................................................. Deu-11
Wartung ......................................................................Deu-12
Technische Daten .......................................................Deu-13
Deu-7
Komponenten und Bedienelemente an der Vorderseite
Verwendung der Tasten auf der Vorderseite des Geräts
Netzschalter
Mit diesem Schalter wird die Stromversorgung des Monitors ein- und
ausgeschaltet.
VIDEO-Taste
Mit dieser Taste werden Video/Audio-Eingänge ausgew hlt. Um
Eingangssignal einzustellen, drücken Sie diese Taste.
LAUTSTÄRKETASTEN[VOLUME/DATA]
Diese Tasten erfüllen zwei Funktionen:
• Lautstärkeregelung: die Lautstärke wie gewünscht einstellen.
• Datenregelung: Bei Auswahl der Funktionen CONTRAST, BRIGHT,
COLOR, TINT oder SHARP mit den VOLUME-Tasten,
können Sie jeweilige Werte erhöhen oder vermindern.
Deu-8
Kontrasttaste
Drücken Sie diese Taste, um den Bildkontrast einzustellen.
Ändern Sie den Wert des Bildkontrastes mit den Lautstärketasten.
Helligkeitstaste
Drücken Sie diese Taste, um die Bildhelligkeit einzustellen.
Ändern Sie den Wert der Bildhelligkeit mit den Lautstärketasten.
Farbintensität
Drücken Sie diese Taste, um die Farbintensit t des Bildes einzustellen.
Ändern Sie den Wert der Bildfarbe mit den Lautstärketasten.
Farbtontaste
Drücken Sie diese Taste, um die Bildfarbe dem natürlichen Farbton
anzugleichen.
Ändern Sie den Wert des Bildfarbtons mit den Lautstärketasten.
(Nur NTSC)
Schärfetaste
Drücken Sie diese Taste, um die Bilddarstallung einzustellen.
Ändern Sie den Wert der Bildschärfe mit den Lautstärketasten.
Deu-9
Komponenten und Bedienelemente an der Rückseite
VIDEO LINE IN(A, B)
Anschluss für den Kameraeingang. Anschlüsse für bis zu zwei Kameras
VIDEO LINE OUT(A, B)
Anschluss für den Kameraausgang.
VCR IN(VIDEO)
Anschluss für den Videoeingang. Anschluss an den Videorekorder
AUDIO LINE IN(A, B)
Anschluss für den Audioeingang. Auswahl der entsprechenden AudioEingangssignale
AUDIO LINE OUT(A, B)
Anschluss für den Audioausgang
AUDIO IN(VCR)
Anschluss für den Videorekorder-Audioeingang
Deu-10
Anschlüsse
CCD Camera 1
CCD Camera 2
Deu-11
Wartung
Falls Sie die Bildqualität des Farbmonitors schlecht ist und durch Anpassen der
Menüeinstellungen nicht verbessert werden kann, überprüfen Sie alle Anschlüsse und
Kabel.
Reparaturen sollten ausschließlich von einem Techniker mit entsprechender
Ausbildung sowie mit geeigneten Testwerkzeugen und Hilfsmitteln durchgeführt
werden.
Deu-12
Technische Daten
System
ADMCRT15 (NTSC/PAL)
Röhrenmonitor
Bildschirmdiagonale 15 Zoll, vertikaler Streifenabstand 0,6
mm, Sichtwinkel 90°
Videoeingang/-ausgang
2 Eingangskanäle / 2 Ausgangskanäle.
VCR Eingang 1,0 Vp-p BNC-Buchse.
Audioeingang/-ausgang
4 Eingangskanäle / 1 Ausgangskanäle.
VCR Eingang 1,0 Vp-p Chinch-Buchse.
Spannungsquelle
Die Betriebsspannung beträgt 100–250 V oder ist auf der
Rückseite des Geräts angegeben.
Leistungsaufnahme
50 W
Abmessungen (B x T x H)
365 mm x 391 mm x 342 mm (ohne Verpackung)
Gewicht
Ca. 16,5 kg (mit Verpackung)
Auflösung
400 Zeilen
Videosystem
Mehrfachsystem (NTSC/PAL)
Horizontale Stabilisierung
Synchronisierbereich ± 500 Hz
Freilaufend ± 500 Hz
Vertikale Stabilisierung
Synchronisierbereich ± 4 Hz
Freilaufend ± 4 Hz
Unterträgerstabilisierung
Synchronisierbereich ± 400 Hz
Freilaufend ± 400 Hz
Audio
1,5 Watt
Annäherung
Weniger als 0,4 mm (Mitte)
Skalierung
10%
Betriebstemperatur
0°C ~ +40°C
Relative Feuchtigkeit
10 ~ 90% (nicht kondensierend)
Deu-13
COLOR MONITOR
ADMCRT15
Guía del usuario
PRECAUCIÓN
PELIGRO DE DESCARGA ELÉCTRICA
NO ABRIR
PRECAUCIÓN: PARA REDUCIR EL PELIGRO DE DESCARGA
ELÉCTRICA, NO RETIRE LA CUBIERTA. NO HAY
PIEZAS EN EL INTERIOR QUE PUEDA REPARAR EL
USUARIO. CONSULTE AL PERSONAL CUALIFICADO
DE SERVICIO TÉCNICO.
Explicación de símbolos gráficos
Un triángulo con un rayo y una punta de flecha es un
símbolo de advertencia para avisar al usuario de la presencia
de voltajes peligrosos no aislados dentro de la carcasa del
producto que pueden ser lo suficientemente intensas como
para constituir un peligro de descarga eléctrica.
Un triángulo con un signo de exclamación es un símbolo de
advertencia para avisar al usuario de que hay instrucciones
importantes de funcionamiento y mantenimiento
(reparaciones) en la documentación que acompaña al aparato.
Advertencia: para evitar un incendio o el peligro de
descarga, no exponga este monitor a la
lluvia ni a la humedad.
Esp-2
INSTRUCCIONES DE SEGURIDAD
Precaución
La fuente de alimentación está indicada en la parte posterior del aparato.
Contiene piezas de alto voltaje. Si retira la cubierta, puede producir un incendio
o una descarga eléctrica. No retire la cubierta usted mismo. (Los interruptores de
control están en la parte frontal del monitor).
1.
Lea las instrucciones: antes de manejar el aparato deberán leerse todas
las instrucciones de seguridad y de funcionamiento.
2.
Guarde las instrucciones: deberá guardar las instrucciones de
seguridad y funcionamiento para su consulta posterior.
3.
Preste atención a las advertencias: deberá observar todas las
advertencias del monitor y de las instrucciones de funcionamiento.
4.
Siga las instrucciones: deberá seguir todas las instrucciones de uso y
funcionamiento.
5.
Limpieza: desenchufe el monitor de la toma de la pared antes de
limpiarlo. No utilice productos de limpieza líquidos ni aerosoles.
Para limpiar el aparato utilice un paño húmedo.
Excepción: para limpiar un monitor que se utilice ininterrumpidamente
y que por alguna razón específica, como la posibilidad de que se
produzca la pérdida del código de autorización de un decodificador de
TV por cable, no deba desenchufarse, puede ignorarse lo especificado
en el punto 5.
6.
Conexiones: no utilice conexiones no recomendadas por
AD(AMERICAN DYNAMICS), ya que pueden constituir un peligro.
7.
Agua y humedad: no utilice este monitor cerca del agua, por ejemplo
cerca de una bañera, lavabo, fregadero o lavadero, en un sótano húmedo
ni cerca de una piscina o similar.
Esp-3
8.
Accesorios: no coloque este monitor sobre una mesita con ruedas,
soporte, trípode o mesa que no sean estables. El monitor podría caerse
provocando graves lesiones a niños o adultos y averiándose seriamente.
Utilice las mesitas con ruedas, soportes, trípodes o mesas recomendadas
por AD(AMERICAN DYNAMICS) o que se venden junto con el
monitor. Para montar el monitor deberán seguirse las instrucciones de
AD(AMERICAN DYNAMICS) y utilizarse los accesorios de montaje
recomendados por AD(AMERICAN DYNAMICS).
9.
Ventilación: las ranuras y aberturas de la carcasa son para la ventilación
del aparato y para garantizar un funcionamiento fiable del monitor y
protegerlo del recalentamiento. Estas aberturas nunca deberán taparse
colocando el monitor sobre una cama, sofá, alfombra o superficie
similar. Este monitor nunca deberá colocarse cerca ni encima de un
radiador ni una rejilla de aire caliente.Tampoco lo coloque en una
instalación integrada, como una librería o estantería a menos que tenga
una ventilación adecuada o se observen las instrucciones de
AD(AMERICAN DYNAMICS).
10. Fuentes de alimentación: este monitor sólo debe funcionar con el tipo
de fuente de alimentación indicado en la etiqueta del fabricante. Si no
está seguro del tipo de alimentación eléctrica de su instalación, consulte
al distribuidor de AD(AMERICAN DYNAMICS) o a la compañía
eléctrica.
11. Puesta a tierra o polarización: para monitores equipados con un enchufe
con toma de tierra que cuenten con una tercera patilla (tierra). Este
enchufe sólo podrá conectarse en una toma eléctrica con puesta a tierra.
Se trata de una medida de seguridad: si no puede insertar el enchufe en
la toma de la pared, póngase en contacto con un electricista para que le
cambie la toma de la pared. No ignore el objetivo de seguridad de los
enchufes con toma de tierra.
12. Alimentación: los cables de alimentación y protección deben colocarse
de forma que no puedan pisarse ni quedar atrapados por objetos encima
o contra ellos, poniendo especial atención en los cables cerca del
enchufe, los receptáculos de los electrodomésticos y el punto en el que
salen del monitor.
Esp-4
13. Tormentas eléctricas: para proteger aún más este monitor durante una
tormenta eléctrica o cuando no lo utilice durante largos periodos de
tiempo, desenchúfelo de la toma de la pared y desconecte el cable del
sistema. Esto evitará que el monitor se dañe por rayos o picos de tensión
de la línea eléctrica.
14. Sobrecarga: no sobrecargue las tomas de la pared ni los cables
alargadores, ya que esto puede provocar incendios o descargas
eléctricas.
15. Introducción de objetos y líquidos: nunca introduzca objetos de
ningún tipo dentro del monitor a través de las aberturas, ya que pueden
tocar puntos de voltajes peligrosos o provocar cortocircuitos, con el
consiguiente peligro de incendio o descarga eléctrica. No derrame
líquidos de ningún tipo sobre el monitor.
16. Reparaciones: no intente reparar este monitor usted mismo ya que al
abrir o quitar las cubiertas puede exponerse a voltajes peligrosos y otros
riesgos. Confíe las reparaciones a personal técnico cualificado.
17. Daños que exijan reparación: si se produce alguna de las condiciones
siguientes, desenchufe el monitor de la toma de la pared y confíe la
reparación a personal técnico cualificado.
a. Cuando el enchufe o el cable de alimentación esté dañado.
b. Si se han derramado líquidos o han entrado objetos dentro del
monitor.
c. Si el monitor se ha expuesto al agua o a la lluvia.
d. Si el monitor no funciona normalmente siguiendo las instrucciones
de funcionamiento. Ajuste sólo los controles especificados en las
instrucciones de funcionamiento, ya que un ajuste incorrecto de
otros controles puede provocar daños y probablemente exigirá que
un técnico cualificado trabaje aún más para devolver el monitor a su
funcionamiento normal.
e. Si el monitor se ha caído o se ha dañado la carcasa.
f. Cuando el monitor experimente un cambio en su rendimiento que
indique la necesidad de reparación.
Esp-5
18. Piezas de repuesto: cuando se necesiten piezas de repuesto, asegúrese
de que el técnico utiliza piezas especificadas por AD(AMERICAN
DYNAMICS) o que tengan las mismas características que las piezas
originales. Los repuestos no autorizados pueden producir incendios,
descargas eléctricas u otros peligros.
19. Comprobación de seguridad: cuando termine cualquier operación de
servicio o reparación de este monitor, pida al técnico que realice
pruebas de seguridad que garanticen que el monitor está en buenas
condiciones de funcionamiento.
Esp-6
Índice
INSTRUCCIONES DE SEGURIDAD ........................ Esp-3
Componentes y controles del panel frontal ...................Esp-8
• Utilización de los botones del panel frontal ..............Esp-8
Componentes y controles del panel posterior ............ Esp-10
Conexiones ................................................................. Esp-11
Mantenimiento ........................................................... Esp-12
Especificaciones técnicas ............................................Esp-13
Esp-7
Componentes y controles del panel frontal
Utilización de los botones del panel frontal.
Interruptor de corriente
Interruptor On/Off. Al pulsar este botón, el monitor se conecta y se enciende
el Diodo LED de señal de entrada.
Interruptor de Selección Entrada VIDEO
Selecciona la señal de entrada vídeo y audio. Pulse este botón, para cambiar
la señal de entrada.
Interruptor de control del VOLUME (volumen) y DATA (datos)
La tecla VOLUME tiene dos funciones:
• Ajuste del volumen (VOLUME)
: Pulsar simplemente esta tecla para ajustar el volumen.
• Ajuste de datos (DATA)
: Pulse las teclas CONTRAST, BRIGHT, TINT o SHARP y a continuación
la tecla de VOLUME, para el ajuste de los datos.
Esp-8
Botón de CONTRAST (CONTRASTE)
Este control sirve para ajustar el contraste de la imagen. Pulse el botón
CONTRAST y a continuación el interruptor VOLUME (DATA).
Botón de BRIGHT (BRILLO)
Este botón sirve para ajustar el brillo de la imagen. Pulse el botón BRIGHT y
luego el botón VOLUME para efectuar el control del brillo.
Botón de COLOR
Este control sirve para ajustar la intensidad de color de la imagen. Pulse el
botón COLOR y a continuación el botón VOLUME (DATA) para controlar
la intensidad de color.
Botón de TINT (TONO)
Utilizar este botón para mejorar la naturalidad del color. Para lograr mejores
resultados, ajuste la imagen con este botón para que el color de la piel
parezca natural. Pulse el botón TINT y a continuación el botón VOLUME
(DATA) para el ajuste del tono. (Sólo NTSC)
Botón de SHARP (NITIDEZ)
Este control sirve para ajustar la nitidez de la imagen. Pulse el interruptor
SHARP y a continuación el botón VOLUME (DATA) para ajustar la nitidez
de la imagen.
Esp-9
Componentes y controles del panel posterior
VIDEO LINE IN(A, B)
Conector de entrada de la cámara. Conectores de entrada para hasta 2 cámaras.
VIDEO LINE OUT(A, B)
Conector de salida de la cámara.
VCR IN(VIDEO)
Conector de entrada del aparato de vídeo. Conexión con el aparato de vídeo.
AUDIO LINE IN(A, B)
Conector de entrada de audio. Seleccione las señales de entrada de AUDIO
correspondientes
AUDIO LINE OUT(A, B)
Conector de salida de audio.
AUDIO IN(VCR)
Conector de entrada de audio para aparato de vídeo.
Esp-10
Conexiones
CCD Camera 1
CCD Camera 2
Esp-11
Mantenimiento
Si la calidad de la imagen del monitor en color es mala y no puede mejorarla,
inspeccione todas las conexiones y cables del sistema.
Confíe las reparaciones a un técnico cualificado que disponga de los aparatos de
prueba e instrumentos adecuados.
Esp-12
Especificaciones técnicas
Sistema
ADMCRT15 (NTSC/PAL)
CRT
diagonal de 15 pulg., distancia entre líneas de 0,6 mm,
deflexión de 90°
Entrada/salida de vídeo
2 canales de entrada /2 canal de salida.
clavija BNC de 1,0 Vp-p para entrada de vídeo
Entrada/salida de audio
2 canales de entrada /2 canal de salida.
entrada de vídeo clavija RCA
Fuente de alimentación
La gama de control de la sección principal es de 100V~250V
o "según se indica en la parte posterior del MONITOR".
Consumo eléctrico
50W
Dimensiones (An x Pr x Al)
365mm x 391mm x 342mm (sin embalaje)
Peso
16,5 Kg aprox. (con embalaje)
Resoluciones
400 líneas de TV
Sistema de vídeo
Múltiple (NTSC/PAL)
Estabilización horizontal
Frecuencia de enganche ±500 Hz
Frecuencia de acumulación ±500 Hz
Estabilización vertical
Frecuencia de enganche ±4 Hz
Frecuencia de acumulación ±4 Hz
Estabilización de la
Frecuencia de enganche ±400 Hz
subportadora
Frecuencia de acumulación ±400 Hz
Audio
1,5 vatios
Convergencia
Menos de 0,4 mm máx. (centro)
Sobreexploración
10%
Temperatura de funcionamiento
0°C ~ +40°C
Humedad en funcionamiento
10 ~ 90% (sin condensación)
Esp-13
COLOR MONITOR
ADMCRT15
Manuale dell'utente
ATTENZIONE
RISCHIO DI SCARICHE ELETTRICHE
NON APRIRE
ATTENZIONE: PER RIDURRE IL RISCHIO DI SCARICHE ELETTRICHE, NON
RIMUOVERE IL COPERCHIO (O IL PANNELLO POSTERIORE).
ALL'INTERNO NON SONO PRESENTI COMPONENTI
RIPARABILI DALL'UTENTE. RIVOLGERSI AL PERSONALE DI
ASSISTENZA QUALIFICATO.
Descrizione dei simboli
Il fulmine con la punta a freccia, in un triangolo equilatero,
avverte l'utente della presenza di correnti ad elevato
voltaggio non isolate, all'interno del prodotto, in grado di
provocare scariche elettriche all'utente.
Il punto esclamativo all'interno di un triangolo equilatero
avverte l'utente della presenza, nella documentazione fornita
con il prodotto, di istruzioni importanti sulla manutenzione e
sul funzionamento.
Attenzione: per prevenire un rischio di incendio o di
scariche elettriche, non esporre
l'attrezzatura a pioggia o umidità.
Ita-2
NORME DI SICUREZZA
Attenzione
La tensione di rete è indicata nella parte posteriore del prodotto. Contiene
componenti ad alto voltaggio. La rimozione del coperchio può provocare incendi
o scariche elettriche. Non rimuovere il coperchio. I comandi sono situati nella
parte anteriore del monitor.
1.
Leggere le istruzioni: è necessario leggere attentamente tutte le
istruzioni riguardanti la sicurezza e il funzionamento prima di utilizzare
l'apparecchio.
2.
Conservare le istruzioni: conservare, per consultazione futura, le
istruzioni sulla sicurezza e sul funzionamento.
3.
Prestare attenzione alle avvertenze: rispettare tutte le segnalazioni di
avvertenza presenti sul monitor e nelle istruzioni per l'uso.
4.
Seguire le istruzioni: attenersi alle istruzioni sull'uso e sul
funzionamento.
5.
Pulizia: scollegare il monitor dalla presa di corrente prima di
pulirlo.Non utilizzare detergenti liquidi o vaporizzati. Per la pulizia,
utilizzare un panno umido.
6.
Acqua e umidità: non utilizzare il monitor in prossimità dell'acqua, ad
esempio, una vasca da bagno, un lavello o un lavandino, una superficie
umida o una piscina e in altre situazioni simili.
7.
Accessori: non posizionare il monitor su un carrello, un treppiedi, una
mensola o un tavolo poco stabili. La caduta del monitor può ferire
gravemente un bambino o un adulto e causare gravi danni
all'apparecchio. Utilizzare solo carrelli, supporti, treppiedi, mensole o
tavoli consigliati da AD(AMERICAN DYNAMICS) o venduti assieme
al monitor. È necessario seguire attentamente tutte le istruzioni sul
montaggio fornite da AD(AMERICAN DYNAMICS) e utilizzare
accessori di montaggio consigliati da AD(AMERICAN DYNAMICS).
Ita-3
8.
Ventilazione: sul cabinet sono state praticate fessure e aperture per
garantire la ventilazione, un funzionamento affidabile del monitor e per
proteggerlo dal surriscaldamento. Tali aperture non devono mai essere
ostruite, ad esempio appoggiando il monitor su superfici morbide quali,
letti, poltrone, divani e simili. Il monitor non deve mai essere
posizionato vicino o sopra una fonte di calore. Non è possibile inoltre
inserire il monitor in una struttura composta come una libreria o un
rack, a meno che non sia garantita una ventilazione appropriata oppure
non si seguano le istruzioni di AD(AMERICAN DYNAMICS).
9.
Tipo di alimentazione: utilizzare il monitor solo con il tipo di
alimentazione indicato sull'etichetta. Se non si è sicuri del tipo di
alimentazione presente in casa, consultare il rivenditore
AD(AMERICAN DYNAMICS) o l'azienda elettrica locale.
10. Collegamento a massa e polarizzazione: i monitor dotati di presa a tre
poli con massa, devono essere collegati con prese dotate del terzo polo
(terra o massa). Questo tipo di spina è compatibile solo con le prese
dotate di collegamento a massa. Si tratta di un'opzione di sicurezza,
quindi se non si riesce a inserire la spina nella presa, contattare
l'elettricista di fiducia per sostituire la vecchia presa. Non ignorare il
principio di sicurezza della spina con collegamento a massa.
11. Alimentazione: protezione dei cavi. I cavi di alimentazione devono
essere posizionati in modo che non sia possibile caplestarli oppure che
non possano essere schiacciati da altri oggetti, ponendo particolare
attenzione ai cavi vicino alle spine, alle prese di corrente e al punto in
cui i cavi escono dal monitor.
12. Fulmini: per maggiore sicurezza, scollegare il monitor dalla corrente e
tutto il sistema di cablaggio durante forti temporali oppure se non si
utilizza il monitor per lunghi periodi. Si evitano in questo modo danni al
monitor provocati da fulmini o da sbalzi di corrente.
Ita-4
13. Sovraccarico: non sovraccaricare le prese di corrente o le prolunghe
poiché potrebbero verificarsi incendi e scariche elettriche.
14. Inserimento di oggetti e di liquidi: non inserire alcun oggetto nel
monitor attraverso le aperture poiché potrebbero entrare in contatto con
componenti ad alto voltaggio o provocare cortocircuito in parti che
potrebbero incendiarsi o provocare scariche elettriche. Non versare
alcun tipo di liquido sul monitor.
15. Assistenza: non tentare di aggiustare il monitor. L'apertura o la
rimozione di pannelli può provocare all'utente scariche elettriche o altri
rischi. Rivolgersi al personale di assistenza qualificato.
16. Guasti per cui è richiesta assistenza: nel caso di una delle seguenti
situazioni, scollegare il monitor dalla presa a parete e rivolgersi al
personale di assistenza qualificato.
a. Se la spina o il cavo di alimentazione sono danneggiati.
b. Se sostanze liquide o parti solide sono cadute nel monitor.
c. Se il monitor è stato esposto alla pioggia o all'acqua.
d. Se il monitor non funziona correttamente anche seguendo le
istruzioni. Regolare solo le impostazioni descritte nelle istruzioni per
l'uso, poiché un'errata regolazione delle impostazioni può provocare
guasti e richiedere l'assistenza di personale qualificato per
ripristinare il regolare funzionamento del monitor.
e. Se il monitor è caduto o il telaio è stato danneggiato.
f. Se il monitor evidenzia un sensibile calo delle prestazioni, allora è
necessario richiedere assistenza.
Ita-5
17. Parti di ricambio: se occorrono parti di ricambio, verificare che il
tecnico utilizzi componenti consigliati da AD(AMERICAN
DYNAMICS) oppure che siano dotati delle stesse caratteristiche degli
originali. Sostituzioni non autorizzate possono provocare incendi,
scariche elettriche o altri rischi.
18. Controllo di sicurezza: al termine della riparazione o del servizio di
assistenza, chiedere al tecnico di eseguire alcuni controlli per verificare
che il monitor funzioni correttamente.
Ita-6
Sommario
IMPORTANTI ISTRUZIONI DI SICUREZZA ........... Ita-3
Componenti e comandi del pannello anteriore .............. Ita-8
• Uso dei pulsanti del pannello anteriore .....................Ita-8
Componenti e comandi del pannello posteriore............Ita-10
Collegamenti ................................................................ Ita-11
Manutenzione............................................................... Ita-12
Specifiche .................................................................... Ita-13
Ita-7
Componenti e comandi del pannello anteriore
Uso dei pulsanti del pannello anteriore
Interruttore di accensione
Interruttore di accensione/spegnimento. Premendo questo tasto il monitor si
accende e il LED del segnale di ingresso selezionato si illumina.
Interruttore di selezione dell’ingresso VIDEO
Seleziona il segnale di ingresso audio e video.
Per modificare il segnale di ingresso, premere questo pulsante.
Interruttore di regolazione VOLUME, DATI
Il tasto VOLUME ha due funzioni :
• Regolazione del volume : Per modificare il volume, premere solo questo
tasto.
• Regolazione dati : Se si preme CONTRAST, BRIGHT, COLOR, TINT o
SHARP quindi il tasto VOLUME, è possibile modificare il valore di ogni
tasto.
Ita-8
Tasto CONTRAST
Regola il contrasto dell’immagine. Premere questo tasto quindi il tasto
VOLUME (DATA) per regolare il contrasto.
Tasto BRIGHT
Regola la luminosità dell’immagine. Premere questo tasto quindi il tasto
VOLUME (DATA) per regolare la luminosità.
Tasto COLOR
Regola l’intensità del colore dell’immagine. Premere questo tasto quindi il
tasto VOLUME (DATA) per regolare l’intensità del colore.
Tasto TINT
Regola il colore in modo che si avvicini il più possibile al colore naturale.
Per ottenere migliori risultati, regolare la tonalità dell’immagine con questo
tasto fino a quando il colore della pelle non risulta naturale.
Premere questo tasto quindi il tasto VOLUME (DATA) per regolare il
colore. (Solo NTSC)
Tasto SHARP
Regola la nitidezza dell’immagine. Premere questo tasto quindi il tasto
VOLUME (DATA) per regolare la nitidezza dell’immagine.
Ita-9
Componenti e comandi del pannello posteriore
VIDEO LINE IN(A, B)
Connettore Camera INPUT. Connettori di ingresso per un massimo di 2 telecamere
VIDEO LINE OUT(A, B)
Connettore Camera OUTPUT.
VCR IN(VIDEO)
Connettore VCR INPUT. Collegare al VCR.
AUDIO LINE IN(A, B)
Connettore AUDIO INPUT. Selezionare i segnali di ingresso AUDIO corrispondenti
AUDIO LINE OUT(A, B)
Connettore AUDIO OUTPUT.
AUDIO IN(VCR)
Connettore VCR AUDIO INPUT.
Ita-10
Collegamenti
CCD Camera 1
CCD Camera 2
Ita-11
Manutenzione
Se la qualità dell'immagine del MONITOR A COLORI è scadente e non può essere
migliorata, ispezionare tutti i collegamenti del sistema e i cavi esterni.
Le riparazioni devono essere eseguite da un tecnico qualificato, dotato di adeguate
attrezzature e apparecchiature per eseguire test.
Ita-12
Specifiche
Sistema
ADMCRT15 (NTSC/PAL)
CRT
Diagonale da 15", distanza tra linee di pixel di 0,6 mm,
15” diagonal, 0.6mm stripe pitch, 90° deflection
Ingresso/uscita video
Ingresso canale 2 /Uscita canale 2.
INGRESSO VCR 1.0Vp-p jack BNC
Ingresso/uscita audio
Ingresso canale 2/Uscita canale 2.
INGRESSO VCR jack RCA
Alimentazione
Intervallo di controllo della sezione principale di
100V~250V o “Indicato sul retro del MONITOR"
Consumo di energia
50W
Dimensioni (L x P x A)
365 mm x 391 mm x 342 mm (senza confezione)
Peso
circa 16,5 Kg (senza confezione)
Risoluzione
400 righe TV
Sistema video
Sistema multiplo (NTSC/PAL)
Stabilizzazione orizzontale
Gamma di variazione ± 500 Hz
Gamma di mantenimento ± 500 Hz
Stabilizzazione verticale
Gamma di variazione ± 4 Hz
Gamma di mantenimento ± 4 Hz
Stabilizzazione sotto
Gamma di variazione ± 400 Hz
portante
Gamma di mantenimento ± 400 Hz
Audio
1,5 Watt
Convergenza
Inferiore a 0,4 mm max (Centrale)
Overscan
10%
Temperatura di esercizio
0°C ~ +40°C
Umidità operativa
10 ~ 90% (senza condenza)
Ita-13
Please visit our website for more information
www.americandynamics.net <http://www.americandynamics.net>
É2003 Sensormatic Electronics Corporation.
Product specifications subject to change without notice.
Certain product names mentioned herein may be trade names
and/or registered trademarks of other companies.
Part No.: AA68-03238A-00
Printed in Korea


![Handbuch (deutsch) [PDF ]](http://vs1.manualzilla.com/store/data/006804687_1-349a3aed475e4eaa9b965dce892f30c9-150x150.png)