1
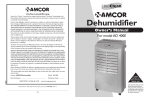
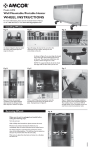
Owner’s
Manual
One Year Limited Warranty
Amcor, Inc. (“Amcor”) warrants the original retail purchaser (“Purchaser”) purchasing in the
United States that the Amcor product with which this warranty is enclosed is free from defects
in materials and workmanship.
Amcor’s sole obligation under this warranty is to replace, or at Amcor’s discretion, to repair,
free of charge, all defective parts, for a period of one (1) year from date of original purchase.
ANY IMPLIED WARRANTY OF MERCHANTABILITY IS SIMILARLY LIMITED TO ONE (1)
YEAR FROM DATE OF ORIGINAL PURCHASE AND NO ACTION BASED UPON ANY
IMPLIED WARRANTY OF MERCHANTABILITY OR OTHERWISE MAY BE COMMENCED
AFTER EXPIRATION OF ONE (1) YEAR FROM DATE OF ORIGINAL RETAIL PURCHASE.
Some states do not allow limitations on how long an implied warranty lasts, so the above limitation
may not apply to you.
65 Pint Dehumidifier
Model AHD-65E
Owner’s
Manual
The provisions of this warranty shall not apply to any product which in Amcor’s judgment has
been (1) subject to misuse or neglect. (2) damaged in an accident. (3) used for a purpose for
which it was not designed, or (4) repaired or altered in any way that adversely affected its
performance or reliability.
To obtain warranty service, the defective product or part must be shipped or delivered to:
Amcor’s authorized service center. All postage, insurance and shipping charges are the responsibility
of the Purchaser and are not included in this warranty.
AMCOR NEITHER ASSUMES NOR AUTHORIZES ANY PERSON TO ASSUME FOR IT ANY
OTHER ( LIABILITY IN CONNECTION WITH ITS PRODUCTS,THERE ARE NO WARRANTIES
WHICH EXTEND BEYOND THE DESCRIPTION ON THE FACE HEREOF. NO RESPONSIBILITY
IS ASSUMED FOR INCIDENTAL OR CONSEQUENTIAL DAMAGES THAT MAY RESULT FROM
THE USE OF AN AMCOR PRODUCT, NOR FOR THE DAMAGES DUE TO ACCIDENT, ABUSE,
LACK OF RESPONSIBLE CARE, THE AFFIXING OF ANY UNAUTHORIZED ATTACHMENT,
LOSS OF PARTS, OR USE AT A VOLTAGE OTHER THAN SPECIFIED. Some states do not allow
the exclusion of limitation of incidental or consequential damages, so these limitations may not
apply to you.
Amcor disclaims all liabilities for defects or damages caused by use of replacement parts obtained
from or by service at any service center other than Amcor’s authorized service center.
This warranty gives you specific legal rights, and you may also have other rights which vary from
state to state.
Model: AHD-65E
Date Purchased:_____________________________________
Production Code:________
5/2006
QUESTIONS? Call 866-361-2233 · www.amcorgroupusa.com
It is important that
you read these
instructions before
using your new
purchase and we
strongly recommend
that you keep them
in a safe place for
future reference.
913124550
Product: AMCOR Dehumidifier
Dear Customer: Please keep this warranty for your record. DO NOT return it.
10
www.amcorgroupusa.com
Table of Contents
THANK YOU..............................................................................................................................1
Energy Saving Tips......................................................................................................................................................1
SPECIFICATIONS.......................................................................................................................2
SAFETY .........................................................................................................................................3
BEFORE USE................................................................................................................................4
OPERATION ..........................................................................................................................5-6
Control Panel................................................................................................................................................................5
Using the Bucket.........................................................................................................................................................6
Use Continuous Drainage.........................................................................................................................................6
MAINTENANCE ........................................................................................................................7
TROUBLESHOOTING .............................................................................................................8
WARRANTY.............................................................................................................................10
Specifications
Maintenance
Proper Use and Care
Model Number
AHD-65E
Automatic Humidistat Control
Yes
Automatic Shut Off
Yes
Refrigerant
R-22
Power Supply
115V / 60Hz
Humidity Removal Capacity
65 pints / Day
Fan Speed
2-Speed
Weight
43.2 lbs.
Dimensions
14.375"W x 22.25"D x 13.375"H
REMARKS:
The dehumidification may be affected by the height of
the ceiling, quality of insulation, number of windows, etc.
2
• Place the dehumidifier in a location that does not restrict air flow into the rear coil or
out of the front grille.
• The dehumidifier must be operated in an enclosed area to be most effective.
Close all doors, windows and other outside openings to the room.
• A dehumidifier operating in a basement will have little or no effect in drying an adjacent
enclosed storage area (such as a closet) unless there is adequate circulation of air in and
out of the area.
• If the “BUCKET FULL” light comes on when using the unit for the first time,
take the bucket out and put it in again. The light will go off.
• Turn the dehumidifier off and remove the plug from the wall outlet before cleaning.
Use water and a mild detergent to clean the inlet and outlet grilles. Do not use bleach
or abrasives.
The air filter is on the front of the dehumidifier. It should be checked and cleaned at
least every 2 to 3 weeks or when needed.
• To Remove Filter: Unplug the unit, remove the bucket and lift out the filter.
Clean the filter with a vacuum cleaner or wash it with clean water and dry it
with a dry cloth.
7
Troubleshooting
Problem
Cause
Thank You!
Solution
Never try to repair or dismantle the air conditioner yourself. Tampering with the unit
may result in the loss of warranty and can endanger the user and property.
The Unit
Does Nothing
No power supply.
Make sure outlet works and the plug is
pushed completely into the outlet.
Fuse is blown or circuit
was tripped.
Replace fuse or circuit.
Bucket is full.
Drain the bucket.
Unit shuts off when bucket is full.
Ambient temperature is
above 122° or below 32°F.
Unit will restart after shutting off
for 3 minutes.
Dehumidifier is
icing up.
Normal operation in initial
stage of operation.
Frost will usually disappear within 60
minutes unless temperature is below 60°F
Poor Airflow
Airflow is restricted
Make sure there are no curtains, blinds or
furniture blocking the front or back of unit.
Dirty Air Filter
Clean the filter.
NOTE: After prolonged usage, the condenser coils behind the filter may develop a residue buildup.
Unless cleaned regularly with a soft brush, this residue will harden and may require special cleaning by a
refrigeration/air conditioning serviceman.
Unit used for first time.
When first installed, allow at least 3 or 4
days to remove the moisture from the room
to maintain the desired dryness.
Area to be humidified
is too large.
Check with dealer that model is
suitable for room size and moisture level.
Controls not set correctly.
Adjust controls according to instructions.
Unsatisfactory
Dehumidification
Thank you for purchasing an AMCOR Dehumidifier. AMCOR is a leading brand in
indoor air treatment. We would like you to enjoy the many benefits this unit offers,
so please read this manual carefully and take full advantage of the many advanced
features that your AMCOR Dehumidifier offers you.
AMCOR has specialized in complete indoor environment control, manufacturing
world-class air conditioners, dehumidifiers and air purifiers with innovative technology.
In designing these advanced products, we have listened carefully to our customers
and have passed their views on to our research and development laboratories.
We wish you many years of enjoyable use.
After reading this manual, please keep it in a safe place for future reference.
Energy Saving Tips
• Do not locate the dehumidifier where furniture or other objects can obstruct
the airflow.
• Keep the filters clean.
Doors / windows not closed. Check that all openings are closed tightly.
Clothes dryer in operation
in the same room.
Install the dehumidifier away from the
moistureladen air generated by the dryer.
Dryer should be vented to the outside.
Room temperature too low. The unit will not operate satisfactorily if the
room temperature is below 60°F.
If this product is defective or not working properly,
please DO NOT return to your retail store.
Please contact Amcor for service or technical assistance.
www.amcorgroupusa.com
8
1
Before Use
Operation
Read this manual carefully. It contains instructions to help you use,
maintain and enjoy your dehumidifier.
ELECTRICAL SAFETY
Grounding
This dehumidifier must be grounded. Grounding reduces the risk of electric shock by
providing an escape wire for the electric current. The power cord has a grounding wire
with a grounding plug. Plug it into an outlet that is properly installed and grounded.
UP
Button
WARNING: Improper use of the grounding plug can result in a risk of electric shock. Call
a qualified electrician if you don’t understand the grounding instructions or if you are not
sure if the dehumidifier is properly grounded. If the wall outlet is not grounded, please
contact an electrician to have it replaced with a properly grounded outlet.
Do not, under any circumstances, cut or remove the third (ground) prong from the
power cord.
Control Panel
Adapter Plug
Because most 2-prong outlets are not grounded, we strongly advise against using an adapter
plug. However, a temporary connection may be made where local codes permit and if the
2-prong wall outlet is properly grounded. Make sure the larger prong of the adapter goes
into the large slot to provide proper polarity.
For Proper Grounding
1. Ground the adapter to the outlet by using the outlet cover screw to secure the ground
terminal to the outlet box.
2. Please confirm the outlet is grounded through the house wiring. If the grounding
connector breaks. DO NOT USE the dehumidifier until a proper ground has again
been made.
Extension Cord
If an extension cord is required to reach the nearest wall receptacle, use only a UL-listed,
3-wire, grounding type, 16 AWG, 15A, 125V appliance extension cord.
4
HUMISIDTAT
1.
POWER
2.
HUMIDISTAT: This allows you to adjust the humidity of the air.
You may set the humidity by pressing the UP and DOWN buttons.
3.
TIMER: Your dehumidifier can be set to go on or off at your desire.
This can be done up to 24 hours in advance.
4.
TWO-SPEED FAN: When this you can control the fan speed.
You have 2 levels of Fan Speed for you to set at you desired level.
LOW will circulate air at the lower velocity and HIGH will circulate at the higher velocity.
5.
CURRENT TEMP/TIMER SET DISPLAY: When machine is running, it displays the
current temperature. Press the “TIMER” button to set the machine to shut off or
turn on automatically after a specified amount of time.
6.
BUCKET FULL INDICATOR: When light comes on, automatic flow control stops the
unit. Turn the unit off by pressing “POWER” key before emptying the bucket.
7.
AUTO RESTART: Turns the unit on automatically when the power returns
8.
AUTO-DEFROST SENSOR (BUILT-IN): When temperature gets down to 60° F or
lower, ice may form on the evaporator coils preventing removal of moisture.
The IC stops the compressor when this happens but allows the fan to continue running.
When the ice is no longer present it starts the compressor.
9.
CURRENT TEMP/TIMER SET DISPLAY: When machine is running, it displays the
current temperature. Press the “TIMER” button to set the machine to shut off or
turn on automatically after a specified amount of time.
10. CURRENT HUMIDITY/SETTING HUMIDITY DISPLAY: Displays the current humidity.
If you press the “ADJUST HUMIDITY” button, the screen will show the humidity you set
and be back to show the ambient humidity 5 seconds later.
Setting Humidity Range: 40%RH ~ 70%RH
Display Humidity Range: (LO)30%RH ~ (HI)90%RH
5
Safety
Operation
It is normal for the surrounding air to become slightly warmer as the dehumidifier operates.
This warming effect further reduces the relative humidity of the surrounding air.
Using
There are 2 ways to remove collected water.
the Bucket
1. Using the Bucket
Read Instructions Before Using
When the bucket is full, the red indicator light, “BUCKET FULL,”
will go on.You must turn the humidity control off before
removing the bucket. Wait a few minutes to allow the water
to stop dripping. Use both side handles to lift and remove bucket.
Pour water through opening and replace bucket. (See Fig.l )
When using the dehumidifier, always follow basic precautions, including the following:
• This dehumidifier must be properly installed and grounded as described in this manual.
• Never operate this dehumidifier in an area that is likely to accumulate standing water.
If this condition develops, disconnect the power supply before stepping into the water.
NOTE: All models are equipped with built-in water overflow control. The unit will shut down when the
water level reaches a maximum level in the bucket. This prevents the bucket from overflowing.
The maximum water level can be adjusted by lifting the red plunger located on the top of the bucket.
Turning the plunger clockwise about two turns will raise the water level.
Turning it anti-clockwise will lower the maximum water level.
Using
the Hose
WARNING: Make sure the drain cap be tightened before running the unit.
• Repair or replace immediately all electric service cords that have become frayed or
otherwise damaged. Do not use a power cord that shows signs of damage along its length
or either the plug or where it is connected to the appliance.
• Always unplug dehumidifier before servicing or moving the unit.
2. Use Continuous Drainage:
The water can be drained out continuously through a long hose that
connects to the bottom of the bucket.
Remove the bucket and remove the plastic cap on the bottom of bucket.
Then take the rubber insert out of the cap (Keep the rubber insert well
for use later). See Fig. #1.
Fig. #1
Using the supplied hose, thread the hose through the cap opening and
add the washer to the cap. Screw the cap to the threaded mating connector
on the bucket. Make sure to use the washer or the connection may leak.
See Fig. #2.
Thread the hose through the round hole and extend the hose to
the back of the unit. See Fig. #3.
Fig. #2
Place the bucket in its original position.
Fig. #3
6
3