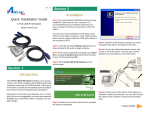
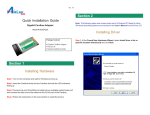
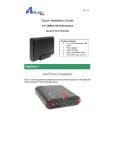
1
Ver. 1A
Step 2 Connect the shared keyboard, monitor,
mouse, microphone, and speakers to the main KVM
unit. See Fig. 1.1
Quick Installation Guide
Model # AKVM-2A
Front-panel button
The front-panel button lets you directly switch between the computers. Simply press the button on the
KVM unit to select the computer. By default, PC port
switching and audio port switching are bound together.
If you want to disable the binding of PC and audio port
switching, use the hotkey sequence, ScrLk + ScrLk
+ W. To enable the binding again, just click ScrLk +
ScrLk + Q.
Hotkey Sequence
Fig 1.1
Section 1
Introduction
The AKVM-2A switch is a 2-port PS/2 type KVM switch
with audio support that comes with two sets of built-in
1.5M cables. It enables users to access, control, boot,
and reboot two computers using only one keyboard, video
monitor, mouse, microphone, and speakers. Its onepiece design offers more portability and convenience to
users than conventional KVM switches.
1
Step 3 Connect each set of the built-in KVM cables
to a computer’s keyboard, video, mouse, microphone, and speaker ports. You can use individual
standard keyboard, mouse, video, and audio cables
to extend the cable distance, but depending on the
type of cables you use, the maximum cable distance is limited to 5 ~ 7 meters (15.5 ~ 23 feet).
Step 4 Power up the connected computers one by
one. After the computers are powered up, the
keyboard and mouse will be recognized and you can
begin operating the KVM switch.
Before connecting any cable, please make sure all of your
computers and their peripherals have been powered off.
Otherwise, the KVM switch may not be set up properly.
Step 1 Make sure all the computers that are to be
connected to the KVM switch and their peripherals
are powered-off. If not, power them off before you
proceed with the following steps.
Hotkey sequence = ScrLk + ScrLk + Command key
The two consecutive ScrLk key should be pressed
within 2 seconds and the following command key(s)
should also be pressed within 2 seconds. Otherwise,
the hotkey sequence will not be validated.
For detailed Hotkey sequences and their corresponding functions, please refer to the Quick Reference
Chart on back.
Section 4
Technical Support
Section 2
Installation
The hotkey sequence consists of three specific
keystrokes pressd on the keyboard.
Section 3
Operations
There are two methods to select a specific computer:
Using the front-panel button or the hotkey
sequence.
Email: [email protected]
Toll free: 1-888-746-3238
Website: www.airlink101.com
Copyright © 2005 AirLink101. All rights reserved. AirLink101, the stylized AirLink101 logo,
specific product designations, and all other words and logos that are identified as trademarks
and/or service marks are, unless noted otherwise, the trademarks and service marks of
AirLink101. All other product or service names are the property of their respective holders.
AirLink101 products are protected under numerous U.S. and foreign patents and pending
applications, mask work rights, and copyrights.
Continue on Back
Quick Reference Chart
Command
Hotkeys
Front-Panel Button
1
Select PC
ScrLk + ScrLk + (x)
Select Audio channel
ScrLk + ScrLk + (Fx) 2
Description
Select the active PC channel
Select the active Audio channel
(Fx is a function key)
ScrLk + ScrLk + Q
Enable the binding of PC port and Audio
port switching (factory default)
Unbind PC & Audio switching
ScrLk + ScrLk + W
Disable the binding of PC port and Audio
port switching (once unbound, PC and
Audio switching becomes independent)
Next lower channel
ScrLk + ScrLk + (up arrow)
Select the lower channel
Next higher channel
ScrLk + ScrLk + (down arrow)
Reset KVM
ScrLk + ScrLk + End
Reset the KVM Switch
Autoscan
ScrLk + ScrLk + S
Autoscan through every connected channel
Stop Autoscan
Any key on keyboard
Bind PC & Audio switching
Press the push button to
rotate through the channel
Press the front-panel button
Select the higher channel
Terminate Autoscan activity
1 Note (x) = 1 or 2
2 Note (Fx) = F1 or F2
Mouse troubleshooting on a non-PnP OS (Linux, NT4.0): If you experience mouse lock when hot-plugging mouse on a non-PnP OS such as Linux or WinNT4.0, just
hit one of the following hotkey commands for mouse reset
ScrLk + ScrLk + M + 1 for a 2-key mouse setting; ScrLk + ScrLk + M + 2 for a 3-key wheel mouse setting; ScrLk + ScrLk + M + 3 for a 5-key wheel mouse setting
Hotkey convention: The hotkey notation “ScrLk + ScrLk + Key”, denotes that you should hit the individual key consecutively one at a time, not simultaneously.