1
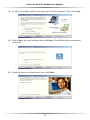
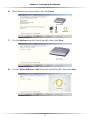
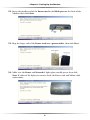
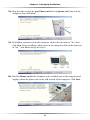
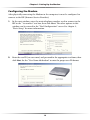
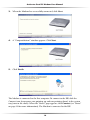
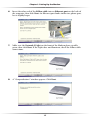
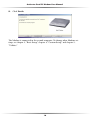
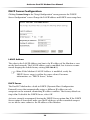
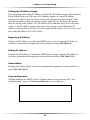
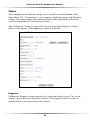
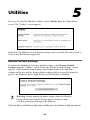
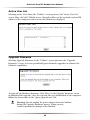
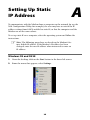
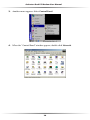
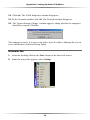
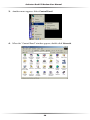
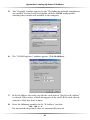
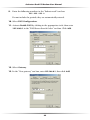
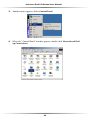
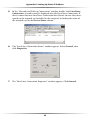
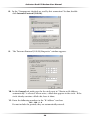
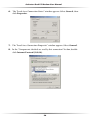
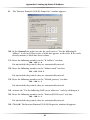
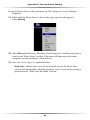
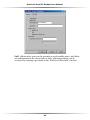
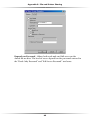
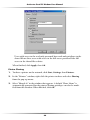
Dual PC Modem
User Manual
Table of Contents
1 Introduction
1
Package Contents
Minimum System Requirements
Modem Features
Technical Support
2 Setting up the Modem
Connecting the First Computer
Configruring the Modem
Connecting a Second Computer
3 Basic Setup
1
1
2
4
5
5
13
15
17
Basic Setup
17
4 Custom Setup
21
Custom Setup
DHCP Server Configuration
Status
5 Utilities
21
22
24
25
Restore Default Settings
Active User List
Upgrade Firmware
25
26
26
6 Troubleshooting and
Frequently Asked Questions
27
Troubleshooting
Frequently Asked Questions
27
29
A Setting Up Static IP Address
33
Windows 98 and 98 SE
Windows Me
Windows 2000
Windows XP
33
37
41
46
B Specifications
53
General
LED Indicators
Environmental
53
53
54
C Non-WindowsSystem Setup
Classic
OS X
53
53
55
i
Actiontec Dual PC Modem User Manual
D File and Printer Sharing
Windows 98 and Me
Windows 2000
Macintosh
57
57
64
65
E Glossary
67
Notices
71
Regulatory Compliance Notices
Modifications
Limited Warranty
71
71
73
ii
1
Introduction
Thank you for purchasing the Actiontec Dual PC Modem. This easy to use Modem
is the simplest way to connect up to two computers to a single phone line and
share your internet connection. The Dual PC Modem is perfect for the home office
or small business. If you want to take your computing to the next level, the
Actiontec Dual PC Modem is one of the keys to your success.
Package Contents
• Actiontec Dual PC Modem
• Power adapter
• Ethernet cables (2)
• Phone cord
• Installation CD
• Quick start guide
• Start Here guide
• User name addendum
• Warranty and registration card
Minimum System Requirements
• Internet service
• Computer with an 10 Mbps or 10/100 Mbps Ethernet connection
• Microsoft Windows 98, 98 Second Edition (SE), Millennium Edition (Me), NT
4.0, 2000, XP, Mac OS 9.0+, or OS X+
• Internet Explorer 4.0 or higher or Netscape Navigator 4.0 or higher
• TCP/IP network protocol installed on each computer
1
Actiontec Dual PC Modem User Manual
Modem Features
This section contains a quick description of the Modem’s lights (LEDs), and ports
and switches on its rear panel.
Front Panel
The Modem features 4 lights on its front panel: Power, Modem, Network 1, and
Network 2.
2
1
RK
WO
NET
DEM
R
WE
PO
MO
Power Light
The Power Light displays the Modem’s current status. If the Power Light glows
steadily green, the Modem is receiving power and is fully operational. If the
Power Light is not illuminated when the power adapter is plugged in, the
Modem has suffered a critical error and technical support should be contacted.
Modem Light
When the Modem Light glows steadily, the Modem is connected to the ISP. If it
is flashing, the Modem is connecting to the ISP.
Network Lights 1 and 2
The Network Lights glow green when a network link is established with a computer. A flashing Network light signifies network traffic traveling across the
Ethernet connection.
2
Chapter 1 Introduction
Rear Panel
There are 5 ports (Power, 2, 1, Line, and Phone) and a Reset Switch on the rear
panel.
LINE
2
ROUTER
UTER
TO COMP
PHONE
1
POWER
RESET
Power Adapter
(from Power Port
to Power Outlet)
Ethernet Cable
(from Port 2 to
Second Computer)
Ethernet Cable
(from Port 1 to
First Computer)
Phone Cord
(from Line Port
to Phone Jack)
Phone Cord
(from Phone Port
to Telephone)
Reset Switch
Depressing the reset switch for one or two seconds will reset the Modem. To
restore to factory default settings, depress and hold for at least 10 seconds.
Power Port
This port is used to connect the smaller end of the Power cord.
Port 2
This Ethernet port is used to connect an Ethernet cable between the Modem and
an additional computer.
Port 1
This Ethernet port is used to connect an Ethernet cable between the Modem
and the first computer connected.
3
Actiontec Dual PC Modem User Manual
Line Port
This port is used to connect a phone cord between the Modem and a phone
jack.
Phone Port
This port is used to connect a phone cord between the Modem and a telephone.
Technical Support
Actiontec Electronics prides itself on making high-quality, durable, high-performance products. If you need assistance, the Actiontec Technical Support Department is
available all day ever day to provide professional support.
Actiontec Electronics, Inc.
760 N. Mary Avenue
Sunnyvale, CA 94085
Technical Support
Phone: 1.888.436.0657
E-mail: click here for instructions
Internet: www.actiontec.com/support
4
Setting Up the
Modem
2
The instructions that follow parallel the steps contained in the Actiontec
Installation Buddy™, which provides a visual guide to setting up the Modem.
Actiontec recommends the user run the Installation Buddy first, before attempting
any other procedures.
Connecting the First Computer
Connecting the first computer to the Modem for setup involves three basic steps:
connecting the Modem to the computer with an Ethernet cable, plugging in the
Power cord of the Modem, and connecting the Modem to a phone wall jack.
1. Insert the Installation Buddy CD in the CD-ROM drive of the computer. The
Installation Buddy will start automatically. Wait until the following screen
appears, read the onscreen instructions, then click Next.
2. Read the onscreen instructions in the next window, then click Next.
5
Actiontec Dual PC Modem User Manual
3. In the next window, click in the box next to “First computer”, then click Next.
4. Select No in the next window, then click Next. This Modem does not operate
with AOL.
5. Read the onscreen instructions, then click Next.
6
Chapter 2 Setting Up the Modem
6. Read the onscreen instructions, then click Next.
7. Get the Modem from the Quick Start Kit, then click Next.
8. Get the Yellow Ethernet cable from the Quick Start Kit, then click Next.
7
Actiontec Dual PC Modem User Manual
9. Insert one end of the Yellow cable in the Yellow port (marked “1”) on the
back of the Modem, then click Next.
10. Insert the other end of the Yellow cable into an Ethernet port on the back of
the computer, then click Next. An Ethernet port looks similar to a phone
port, but is slightly larger.
11. Get the black Power cord from the Quick Start Kit, then click Next.
8
Chapter 2 Setting Up the Modem
12. Insert the smaller end of the Power cord in the Black port on the back of the
Modem, then click Next.
13. Plug the larger end of the Power cord into a power outlet, then click Next.
14. Make sure the Power and Network 1 lights glow steadily green, then click
Next. If either of the lights are not on, check the Power cord and Yellow cable
connections.
9
Actiontec Dual PC Modem User Manual
15. When the Installation Buddy detects the modem, click Next.
16. Get the gray Phone cord from the Quick Start Kit, then click Next.
17. Insert one end of the gray Phone cord into the Orange port (marked
“Line”) on the back of the Modem, then click Next.
10
Chapter 2 Setting Up the Modem
18. Plug the other end of the gray Phone cord into the phone jack closest to the
computer, then click Next.
19. If installing a phone next to the computer, click in the box next to “Yes”, then
click Next. If not installing a phone next to the computer, click in the box next
to “No, ” click Next, and go to step 22.
20. Find the Phone cord of the telephone to be installed next to the computer and
unplug it from the phone jack in the wall or back of the computer. Click Next.
11
Actiontec Dual PC Modem User Manual
21. Insert the other end of the Phone cord into the Green port (marked
“Phone”) on the back of the Modem, then click Next.
22. The Modem is connected to the computer. Click Next, the go to “Configuring
the Modem,” on the next page.
12
Chapter 2 Setting Up the Modem
Configuring the Modem
After physically connecting the Modem to the computer, it must be configured to
connect to the ISP (Internet Service Provider).
1. In the next window, enter the main telephone number used to connect to the
ISP in the “1st number” text box, then click Next. The other options in this
window can be entered in the “Dial Configuration” screen. See chapter 3,
“Basic Setup,” for more information.
2. Enter the user ID (or user name) and password in the appropriate text boxes, then
click Next. See the “User Name Addendum” to enter the proper user ID format.
13
Actiontec Dual PC Modem User Manual
3. When the Modem has successfully connected, click Next.
4. A “Congratulations” window appears. Click Next.
5. Click Finish.
The Modem is connected to the first computer. To connect to the ISP, click the
Connect icon (two arrows, one pointing up and one pointing down) in the system
tray (next to the clock). When the “Status” page appears, click Connect (see “Status”
on page 23 for more information). The Modem is connected to the ISP.
14
Chapter 2 Setting Up the Modem
To change other Modem settings, see chapter 3, “Basic Setup,” chapter 4, “Custom
Setup,” and chapter 5, “Utilities.” To connect a second computer to the Modem, go
to “Connecting a Second Computer,” below.
Connecting a Second Computer
1. Insert the Installation Buddy CD in the CD-ROM drive of the second computer to be connected to the Modem. The Installation Buddy will start automatically. Wait until the following screen appears, read the onscreen instructions, then click Next.
2. Read the onscreen instructions in the next window, then click Next.
15
Actiontec Dual PC Modem User Manual
3. In the next window, click in the box next to “Additional computer,” then click
Next.
4. Get the second Yellow Ethernet cable from the Quick Start Kit, then click
Next.
5. Insert one end of the Yellow cable in the Yellow port (marked “2”) on the
back of the Modem, then click Next.
16
Chapter 2 Setting Up the Modem
6. Insert the other end of the Yellow cable into an Ethernet port on the back of
the computer, then click Next. An Ethernet port looks similar to a phone port,
but is slightly larger.
7. Make sure the Network 2 Light on the front of the Modem glows steadily
green, then click Next. If the Light does not illuminate, check the Yellow cable
connections.
8. A “Congratulations” window appears. Click Next.
17
Actiontec Dual PC Modem User Manual
9. Click Finish.
The Modem is connected to the second computer. To change other Modem settings, see chapter 3, “Basic Setup,” chapter 4, “Custom Setup,” and chapter 5,
“Utilities.”
18
3
Basic Setup
This chapter is a guide through the basic setup of the Actiontec Dual PC
Modem’s functions, including how to connect to the ISP.
Basic Setup
To perform a basic setup of the Modem:
1. Open a Web browser. In the address bar, enter
http://192.168.0.1
then press Enter on the keyboard.
2. The “Main Menu” screen appears. Select Setup/Configuration.
3. Follow the instructions in the “Set Up/Configuration” screen, then click Begin
Basic Setup.
19
Actiontec Dual PC Modem User Manual
4. In the next window, “Dial Configuration,” enter the user name and password used to connect to the ISP in the appropriate text boxes. Then, enter
the main telephone number used to dial up to the ISP in the “#1 Number
To Dial” text box (and, if applicable, a secondary number in the “#2
Number To Dial” text box).
The additional options in this screen do not have to be configured at this time
to connect the Modem to the ISP.
DOD & Disconnect After Idle…
Activate this option (by clicking in the check box) to automatically sever the
Internet connection after a certain amount of idle time. Enter the number of
idle time minutes (minimum 2 minutes) before disconnection occurs in the text
box before “Minutes.”
Dial X To Reach an Outside Line
Activate this option (by clicking in the check box) if the Modem is connected to
a telephone system that requires a number to be dialed before connecting to an
outside line. Enter the outside line number in the text box after “Dial.”
20
Chapter 3 Basic Setup
Dial X To Disable Call Waiting
Activate this option (by clicking in the check box) to disable call waiting, then
enter the numbers that disable call waiting in the text box after “Dial.” If call
waiting is left enabled, when someone calls on the same line on which the
Modem is connected, the Modem will disconnect. After disabling call waiting,
incoming caller will hear a busy signal.
5. When finished with the “Dial Configuration” screen, click Next. The “Save
Configuration” screen appears. Click Save and Restart to save the Modem’s
settings.
6. The “Congratulations” screen appears. The Modem is successfully configured.
21
Actiontec Dual PC Modem User Manual
22
4
Custom Setup
This section contains information concerning the custom setup of the Modem
Custom Setup
To access the Custom Setup configuration screens, follow these instructions:
1. Open the Web browser. In the address bar enter:
http://192.168.0.1
then press Enter on the keyboard.
2. The “Main Menu” screen appears. Select Setup/Configuration.
3. In the “Set Up/Configuration” screen, read the instructions, then select
Custom Setup from the menu on the left side.
23
Actiontec Dual PC Modem User Manual
DHCP Server Configuration
Clicking Custom Setup in the “Setup/Configuration” screen generates the “DHCP
Server Configuration” screen. Change the LAN IP address and DHCP server range here.
LAN IP Address
The value in the LAN IP Address text box is the IP address of the Modem as seen
on the local network. The LAN IP address can be modified, but Actiontec recommends keeping the default factory setting (192.168.0.1).
If the Modem’s LAN IP Address is modified, verify the
☞ Note
DHCP Server range is within the same subnet. For more
:
information, see “DHCP Server,” below.
DHCP Server
The Dual PC Modem has a built-in DHCP (Dynamic Host Configuration
Protocol) server that automatically assigns a different IP address to each
computer on the network, eliminating IP address conflicts. The factory default setting is On. To disable the DHCP Server, select Off.
Actiontec strongly recommends leaving the DHCP Server option On. If the DHCP
Server option is turned off, make sure the IP addresses of the networked computers are on the same subnet as the IP address of the Modem.
24
Chapter 4 Custom Setup
Setting the IP Address Range
The beginning and ending IP addresses define the IP address range of the Modem.
If the default values are left intact, the Modem supplies a unique IP address
between 192.168.0.4 and 192.168.0.254 to each computer on the network. Note
that the first three groups of numbers of the addresses are identical; this means
they are on the same subnet. The IP address of the Modem must be on the same
subnet as the IP address range it generates. For instance, if the Modems’s IP
address is changed to 10.33.222.1, set the beginning IP address to 10.33.222.4, and
the ending IP address to 10.33.222.254.
Beginning IP Address
Displays the IP address at which the DHCP server starts assigning IP addresses.
Actiontec recommends keeping the factory default setting (192.168.0.4).
Ending IP Address
Displays the IP Address at which the DHCP Server stops assigning IP addresses.
Actiontec recommends keeping the factory default settings (192.168.0.254).
Subnet Mask
Displays the Subnet Mask. Actiontec recommends keeping the factory default settings (255.255.255.0).
Save Configuration
Clicking Next in the DHCP Server Configuration screen generates the “Save
Configuration” screen. Click Save and Restart to save changes.
25
Actiontec Dual PC Modem User Manual
Status
After configuring the Modem, settings can be viewed by selecting Status in the
Main Menu. The “Current Status” screen appears, displaying many of the Modem’s
settings. No settings (other than connecting or disconnecting from the Internet)
can be changed from the Current Status screen.
After clicking the “Connect” icon in the system tray of the desktop, the Current
Status screen appears. Click Connect to connect to the ISP.
Diagnose
Clicking the Diagnose button generates the Connection Status screen. This screen
displays various Internet connection statistics. The Diagnose button can only be
clicked if there is no connection to the Internet.
26
5
Utilities
To access the Dual PC Modem’s utilities, select Utilities from the “Main Menu”
screen. The “Utilities” screen appears.
From here, the Modem’s factory default settings can be restored, the active user list
viewed, and the firmware upgraded.
Restore Default Settings
To restore the Modem to its factory default settings, select Restore Default
Settings from the “Utilities” screen. When the “Restore Default Settings” screen
appears, click Restore Default Settings. Any changes made to the Modem’s
settings will be lost and the factory default settings will be restored. During this
process, the Modem’s Power Light flashes and the Modem is disabled.
Warning: Do not unplug the power adapter from the Modem
during the Restore Default Settings process. Doing so may
result in permanent damage to the Modem.
When the Power and Ethernet lights glow steadily green, the Modem is fully operational.
27
Actiontec Dual PC Modem User Manual
Active User List
Selecting Active Users from the “Utilities” screen generates the “Active User List”
screen. Here, the MAC (Media Access Control) address of the network card and IP
address of the computer connected to the Modem are displayed.
Upgrade Firmware
Selecting Upgrade Firmware in the “Utilities” screen generates the “Upgrade
Firmware” screen. Actiontec periodically posts firmware upgrades to enhance the
Modem’s capabilities.
To upgrade the Modem’s firmware, click “Here” in the Upgrade Firmware screen
to download the upgrade. Once the upgrade files are downloaded to the computer,
follow the instructions in the “dpcm_upgrade.exe” file.
Warning: Do not unplug the power adapter from the Modem
during the Upgrade Firmware process. Doing so may
result in permanent damage to the Modem.
28
Troubleshooting
and Frequently
Asked Questions
6
This chapter includes a list of troubleshooting options and frequently asked questions concerning the Dual PC Modem.
Troubleshooting
Slow Speed/Dropped Connections
If experiencing problems with slow speeds or dropped connections while using the
Modem, the static speed setting on the Ethernet card in the computer may be the
cause. To check or change this setting, select the operating system and follow the
instructions:
Windows 98, 98SE, and Me
1. From the desktop, right-click on the Network Neighborhood icon (My
Network Places in Me).
2. Click on Properties.
3. The “Network Properties” window appears. Select the type of Ethernet card
installed in the computer from the list, then click Properties.
4. Click Advanced and, in the “Property” list, select an entry for speed or
media type.
5. Click on the down arrow on the right and from the menu that appears,
click auto, autoselect, or auto sense, then click OK.
6. Click OK in the Network Properties window.
7. Restart the computer.
The speed setting on the Ethernet card has been changed. If this doesn’t correct the
problem, make sure to check this setting on all computers connected to the Modem.
29
Actiontec Dual PC Modem User Manual
Windows 2000 and XP
1. From the desktop, click the “My Network Places” icon (if using XP and the
icon is not on the desktop, see “Placing the ‘My Network Places’ Icon on the
Desktop,” below).
2. Right-click in the “My Network Places” window and select Properties.
3. In the “Network Connections” window, right-click on the connection for
your Ethernet card (it may read “Local Area Connection”).
4. Click Properties.
5. Click Configure (under the Ethernet card).
6. Click Advanced and, in the “Property” list, select the entry for speed or
media type.
7. Click on the down arrow on the right, then click on auto, autoselect, or
auto sense from the menu that appears.
8. Click OK.
The speed setting on the Ethernet card has been changed. If this doesn’t correct the
problem, make sure to check this setting on all computers connected to the Modem.
Placing the “My Network Place” Icon on the Desktop
1. Right-click on any area of the desktop where there are no icons.
2.
Click Properties.
3. In the “Display Properties” window, select Desktop.
4. Click Customize Desktop.
5. In the “Desktop Icons” section of the “Desktop Items” window, click in the
“My Network Places” check box.
6. Click OK, and click OK again.
The “My Network Places” icon appears on the desktop.
30
Chapter 6 Troubleshooting and FAQs
Frequently Asked Questions
I’ve run through the setup of the Modem and put in all my user information
correctly, but the Modem won’t connect. What do I do?
Different ISPs use different formats for their user names. There is an addendum
on the back of the “Start Here” guide with hints about entering a user name.
This information can also be found on our support site:
www.actiontec.com/support.
I have run out of Ethernet ports on my Modem. How do I add more computers?
To add more computers, install an Ethernet hub, switch, or wireless access point.
Connect a standard Ethernet cable from the UPLINK port of the hub, switch, or
wireless access point to the Yellow port (marked “2:) on the Modem.
What connection speeds does the Modem support?
The two LAN connections on the Modem are auto-switching, and support
speeds of 10/100Mbps. The WAN connection supports V.92, V.90, and K56flex
analog dial-up standards.
Is the Modem flash-upgradeable? How do I do it?
Yes, the firmware is flash-upgradeable. You can find a link to the firmware site in
the Utilities screen of the Web configurator (see chapter 5 “Utilities”).
Does the Modem function as a cable or DSL modem?
No. The Modem only acts as an analog router to share a dial-up connection. It is
NOT a Broadband device.
I use my laptop at work and at home. Is there something special I need to
do to make it work in both places?
Yes. You must reconfigure the network settings (Workgroup, Domain, Password,
User name, IP addressing or any other specific settings used by your company).
Third party software, such as NetSwitcher, can be used to automatically switch
between different configurations.
31
Actiontec Dual PC Modem User Manual
What is the valid IP range I can use for my home network?
The default valid IP range for the Actiontec Dual PC Modem is 192.168.0.4 to
192.168.0.254. These values can be changed in the “DHCP Server
Configuration” screen of the Web configurator Custom Setup section. See chapter 4, “Custom Setup,” for more information.
How do I find out what IP address my computer is using?
Windows 98, 98SE, and Me - Select Start, Run, then enter winipcfg. Click
Enter. When the “winipcfg” screen appears, make sure the computer’s network
device is selected.
Windows 2000, and XP - Select Start, Run, then enter cmd. Click Enter. When
the “command screen” appears, enter ipconfig and click Enter.
I used DHCP to configure my network. Do I need to restart my computer to
refresh my IP address?
No. Select the operating system used on the computer, below, and follow the
instructions to refresh the IP address:
Windows 98, 98SE, and Me - Select Start, Run, enter winipcfg, then click
Enter. Ensure the Ethernet adapter is selected in the device box. Click
Release_all, then click Renew_all.
Windows 2000 - Select Start, Run, enter cmd, then click Enter. At the DOS
prompt, enter ipconfig /release, then enter ipconfig /renew.
Windows XP - Unplug the Ethernet cable and plug it back in.
Can I run an application located on another computer over the network?
Yes, if the application is designed to run over a network.
Can I play games between computers on my network, or on the Internet?
Yes, if the games was designed for multi-player or LAN play. For specific information on whether a game is capable of Internet or LAN play refer to the game
documentation. Some games require ports to be forwarded to host or join
games over the Internet; those games may not work with the Modem.
32
Chapter 6 Troubleshooting and FAQs
Everything appears to be setup properly with the Modem, but I can’t connect to the Internet. What should I do?
If the Modem is not dialing out, it may need to be power cycled. To do this,
unplug the power cord from the Modem. Leave it unplugged for about 30 seconds, then plug it back in. The Modem should now be able to dial out.
How many computers can be connected through the Actiontec Dual PC
Modem?
The Modem is capable of 252 connections, but we recommended to have no
more than 5 connections. As the number of connections increases, the available
speed for each computer decreases. Keep in mind that a dial-up connection has
a very limited amount of bandwidth.
Is my Modem a firewall?
Yes. The Modem provides its security through the use of a NAT firewall, which
acts as a physical barrier between your network and the Internet.
What is NAT and how does it protect my network?
NAT (Network Address Translation) is a level of security which masks the private IP addresses of the computers on your network with a single public IP
address. With NAT, the private IP address of any computer on your network is
never transmitted over the Internet.
Which Virtual Private Networking (VPN) protocols are supported?
The Modem does not support VPN.
Can I use Internet firewall or security programs with my network?
Because the Modem uses NAT firewall security, it is not necessary to use any
other program (BlackIce Defender, Norton Internet Security, or ZoneAlarm, for
example) for security. The use of third party firewall or Internet security software is not recommended, as certain programs will create problems on a private
network.
33
Actiontec Dual PC Modem User Manual
I use an ISP that offers V.92 service. Will Modem On Hold (MOH) work with
the Modem?
No. The Modem does not support MOH.
34
A
Setting Up Static
IP Address
To communicate with the Modem from a computer on the network (to use the
Web Configuration Utility, for example), the user may have to switch the IP
address settings from DHCP-enabled to static IP, so that the computer and the
Modem are on the same subnet.
To set up static IP on a computer, select the operating system and follow the
instructions.
The following procedures are based on the Modem’s fac☞ Note:
tory default address. If the Modem’s address has been
IP
IP
changed, enter the new IP address when instructed to enter an
IP address.
Windows 98 and 98 SE
1. From the desktop, click on the Start button in the lower left corner.
2. From the menu that appears, select Settings.
35
Actiontec Dual PC Modem User Manual
3. Another menu appears. Select Control Panel.
4. When the “Control Panel” window appears, double-click Network.
36
Appendix A Setting Up Static IP Address
5. The “Network” window appears. In the "The following network components
are installed" list box, locate and double-click the TCP/IP configuration
matching the network card installed in the computer.
6. The “TCP/IP Properties” window appears. Select IP Address.
7. In the IP Address tab, make sure the the circle next to “Specify an IP Address”
is selected. When active, a black dot appears in the circle. If the circle already
contains a black dot, leave it alone.
8. Enter the following numbers in the “IP Address” text box:
192.168.0.4
Do not include the periods; they are automatically entered.
37
Actiontec Dual PC Modem User Manual
9. Enter the following numbers in the “Subnet mask” text box:
255.255.255.0
Do not include the periods; they are automatically entered.
10. Select DNS Configuration.
11. Activate Enable DNS by clicking in the appropriate circle, then enter
192.168.0.1 in the “DNS Server Search Order” text box. Click Add.
12. Select Gateway.
13. In the “New gateway” text box, enter 192.168.0.1, then click Add.
38
Appendix A Setting Up Static IP Address
14. Click OK. The TCP/IP Properties window disappears.
15. In the Network window, click OK. The Network window disappears.
16. The “System Settings Change” window appears, asking whether the computer
should be restarted. Click Yes.
The computer restarts. It is now set up with a static IP address, allowing the user to
access the Modem’s Advanced Setup utility.
Windows Me
1. From the desktop, click on the Start button in the lower left corner.
2. From the menu that appears, select Settings.
39
Actiontec Dual PC Modem User Manual
3. Another menu appears. Select Control Panel.
4. When the “Control Panel” window appears, double-click Network.
40
Appendix A Setting Up Static IP Address
5. The “Network” window appears. In the “The following network components
are installed” list box, locate and double-click the TCP/IP configuration
matching the network card installed in the computer
6. The “TCP/IP Properties” window appears. Click IP Address.
7. In the IP Address tab, make sure the the circle next to “Specify an IP Address”
is selected. When active, a black dot appears in the circle. If the circle already
contains a black dot, leave it alone.
8. Enter the following numbers in the “IP Address” text box:
192.168.0.4
Do not include the periods; they are automatically entered.
41
Actiontec Dual PC Modem User Manual
9. Enter the following numbers in the “Subnet mask” text box:
255.255.255.0
Do not include the periods; they are automatically entered.
10. Select DNS Configuration.
11. Activate Enable DNS by clicking in the appropriate circle, then enter
192.168.0.1 in the “DNS Server Search Order” text box. Click Add.
12. Select Gateway.
13. In the “New gateway” text box, enter 192.168.0.1, then click Add.
42
Appendix A Setting Up Static IP Address
14. Click OK. The TCP/IP Properties window disappears.
15. If there is a check in the box next to “Detect connection to network media,”
click on it to uncheck the box.
16. In the Network window, click OK. The Network window disappears.
17. The “System Settings Change” window appears, asking whether the computer
should be restarted. Click Yes.
The computer restarts. It is now set up with a static IP address, allowing the user to
access the Modem’s Advanced Setup utility.
Windows 2000
1. From the desktop, click on the Start button in the lower left corner.
2. From the menu that appears, select Settings.
43
Actiontec Dual PC Modem User Manual
3. Another menu appears. Select Control Panel.
4. When the “Control Panel” window appears, double-click Network and Dialup Connections.
44
Appendix A Setting Up Static IP Address
5. In the “Network and Dial-up Connections” window, double-click Local Area
Connection. A number may be displayed after the Local Area Connection. If
there is more than one Local Area Connection listed, locate the one that corresponds to the network card installed in the computer by finding the name of
the network card in the Device Name column.
6. The “Local Area Connection Status” window appears. Select General, then
click Properties.
7. The “Local Area Connection Properties” window appears. Click General.
45
Actiontec Dual PC Modem User Manual
8. In the “Components checked are used by this connection” list box, doubleclick Internet Protocol (TCP/IP).
9. The “Internet Protocol (TCP/IP) Properties” window appears.
10. In the General tab, make sure the the circle next to “Obtain an IP Address
automatically” is selected. When active, a black dot appears in the circle. If the
circle already contains a black dot, leave it alone.
11. Enter the following numbers in the “IP Address” text box:
192.168.0.4
Do not include the periods; they are automatically entered.
46
Appendix A Setting Up Static IP Address
12. Enter the following numbers in the “Subnet mask” text box:
255.255.255.0
Do not include the periods; they are automatically entered.
13. Enter the following numbers in the “Default gateway” text box:
192.168.0.1
Do not include the periods; they are automatically entered.
14. Activate the “Use the following DNS server addresses” circle by clicking in it.
15. Enter the following numbers in the “Preferred DNS server” text box:
192.168.0.1
Do not include the periods; they are automatically entered.
16. Click OK. The “Internet Protocol (TCP/IP) Properties” window disappears.
17. In the “Local Area Connection Properties” window, click OK. The Local Area
Connection Properties window disappears.
18. Click Close in the Local Area Connection Status window. The window disappears.
19. Close the Network and Dial-up Connections window by clicking on the “x”
button at the upper right corner of the window.
The computer is now set up with a static IP address, allowing the user to access the
Modem’s Advanced Setup utility.
47
Actiontec Dual PC Modem User Manual
Windows XP
1. From the desktop, click on the Start button in the lower left corner.
2. From the menu that appears, select Settings.
3. Another menu appears. Select Control Panel.
48
Appendix A Setting Up Static IP Address
4. When the “Control Panel” window appears, double-click Network
Connections.
5. In the “Network Connections” window, double-click Local Area Connection.
A number may be displayed after the Local Area Connection. If there is more
than one Local Area Connection listed, locate the one that corresponds to the
network card installed in your computer by finding the name of the network
card in the Device Name column.
49
Actiontec Dual PC Modem User Manual
6. The “Local Area Connection Status” window appears. Select General, then
click Properties.
7. The “Local Area Connection Properties” window appears. Select General.
8. In the “Components checked are used by this connection” list box, doubleclick Internet Protocol (TCP/IP).
50
Appendix A Setting Up Static IP Address
9. The “Internet Protocol (TCP/IP) Properties” window appears.
10. In the General tab, make sure the the circle next to “Use the following IP
Address” is selected. When active, a black dot appears in the circle. If the circle
already contains a black dot, leave it alone.
11. Enter the following numbers in the “IP Address” text box:
198.162.0.4
Do not include the periods; they are automatically entered.
12. Enter the following numbers in the “Subnet mask” text box:
255.255.255.0
Do not include the periods; they are automatically entered.
13. Enter the following numbers in the “Default gateway” text box:
192.168.0.1
Do not include the periods; they are automatically entered.
14. Activate the “Use the following DNS server addresses” circle by clicking in it.
15. Enter the following numbers in the “Preferred DNS server” text box:
192.168.0.1
Do not include the periods; they are automatically entered.
16. Click OK. The Internet Protocol (TCP/IP) Properties window disappears.
51
Actiontec Dual PC Modem User Manual
17. In the Local Area Connection Properties window, click OK. The Local Area
Connection Properties window disappears.
18. Click Close in the Local Area Connection Status window. The window
disappears.
19. Close the Network and Dial-up Connections window by clicking on the “x”
button at the upper right corner of the window.
The computer is now set up with a static IP address, allowing the user to access the
Modem’s Advanced Setup utility.
52
B
Specifications
General
Model Number
R7000M (Dual PC Modem)
Dimensions
Length: 5.375 in.
Width: 4.35 in
Height: 1.25 in
Standards
IEEE 802.3 (10BaseT)
IEEE 802.3u (100BaseTX)
LAN
10/100 RJ-45 switched ports (2)
Speed
LAN Ethernet - 10/100 Mbps
Cabling Type
Phone, Ethernet
Modem
56 Kbps V.92 quick connect
V.90
V.92
K56 flex
LED Indicators
Power, Modem, Network 1, Network 2
53
Actiontec Dual PC Modem User Manual
Environmental
Power Input
External, +9V +- 5% @ 1 A
Certifications
FCC Class B (part 15, 68)
UL
Operating Temperature
0º C to 40º C (32ºF to 104ºF)
Storage Temperature
-20ºC to 70ºC (-4ºF to 158ºF)
Operating Humidity
10% to 85% non-condensing
Storage Humidity
5% to 90% non-condensing
54
C
Non-Windows
System Setup
The Modem supports both the Classic Macintosh operating systems (9.2.2 and
below), as well as OS X.
When installing any software, consult the user manual and
☞ Note:
help files supplied with the software for detailed information.
Actiontec provides the following information as a guideline only.
Classic
To configure the Router, Open Transport 2.5.2 or above must be loaded on the
computer.
1. Click Apple, Control Panels, then TCP/IP.
55
Actiontec Dual PC Modem User Manual
2. When the “TCP/IP” window appears, select Edit from menu bar, then select
User Mode.
3. When the “User Mode” window appears, select Advanced, then click OK.
4. In the “TCP/IP” window, select Ethernet from the “Connect via” drop-down
list.
5. Select Using DHCP Server from the “Configure” drop-down list.
6. Ensure the “Use 802.3” option is not checked.
7. Disregard any addresses in the IP Address text boxes. They will be reacquired
when the first connection is made.
8. Click Options and when the “TCP/IP Options” window appears, select Active.
Ensure the “Load only when needed” option is not checked, then click OK.
9. Close the “TCP/IP” window and when prompted to save changes, click Save.
10. Restart the computer. The TCP/IP settings are configured.
Next, go to “Connecting to the ISP” on page 115.
56
Appendix C Non-Windows System Setup
OS X
1. Open the “System Preferences” application via the Dock or Apple Menu. The
“Network” window appears.
2. Select Built-In Ethernet from the “Show” drop-down list.
3. Select TCP/IP and, from the “Configure” drop-down list, select Using DHCP.
4. Click Apply Now and close the “System Preferences” application. The TCP/IP
settings are configured.
Next, go to chapter 2, “Basic Setup.”
57
Actiontec Dual PC Modem User Manual
58
File and Printer
Sharing
D
The Modem supports file and printer sharing, allowing any computer on the network to share files and access a shared printer. To configure file and printer sharing, select the operating system and follow the instructions.
Windows 98 and Me
File Sharing
1. Click Start, Settings, then Control Panel.
2. In the “Control Panel” window, click Network.
3. The “Network” window appears. If “File and Printer Sharing” is not listed in
“The following network components are installed” list box, click Add….
59
Actiontec Dual PC Modem User Manual
4.
In the “Select Network Component Type” window, select Service in the “Click
the type of network component you want to install” list box, then click Add….
5. The “Select Network Service” window appears. Select File and printer sharing for Microsoft Networks from the “Models” list box, then click OK.
6. In the “File and Print Sharing” window, ensure both of the listed options are
checked. If not, click the boxes, then click OK.
60
Appendix D File and Printer Sharing
7. The “Network” window reappears. Select Identification.
The “Identification” tab contains three text boxes:
Computer Name - Enter the name of the computer (i.e., MyComputer,
John, CPU654) in this text box. All computers on the network must have a
unique name.
☞
Note: Actiontec recommends the “Computer Name” contain
no spaces. For example, entering “jackscomputer” is correct;
entering “big beige box” is incorrect.
Workgroup - Enter the name of the network in this text box. The
“Workgroup” name is used to include other computers on the network. All
computers on the network must have the same Workgroup name.
Computer Description - Enter any description in this text box. Usually,
computer’s location or the name of the main user is entered here.
61
Actiontec Dual PC Modem User Manual
8. Select Configuration. In the “Primary Network Logon” list box, ensure
Client for Microsoft Networks is selected. If not, select it from the dropdown list, then click OK.
9. The “System Settings Change” window appears. Click Yes to restart the computer.
☞
Note: If the “System Settings Change” window does not appear,
restart the computer manually after completing step 7.
10. After the computer restarts and a password and user name entered, a file or
drive for sharing must be activated.
☞
Note: To avoid being prompted for a username and password
every time , enter a user name, but leave the password blank,
and click OK.
62
Appendix D File and Printer Sharing
Locate the file or drive to share (navigate via “My Computer” or use Windows
Explorer).
11. Right-click the file or drive to share. In the pop-up menu that appears,
select Sharing.
12. Select Shared As from the “File Share Screen Properties” windows and enter a
name in the “Share Name” text box. This name will show up on the other
computers on the network as a shared device.
13. Select an “Access Type,” as explained below.
Read Only - Allows other users on the network to view the file or drive
selected, but not modify it. Sharing privileges can be restricted by entering a
password in the “Read-Only Password” text box.
63
Actiontec Dual PC Modem User Manual
Full - Allows other users on the network to read, modify, move, and delete
any information in the selected file or drive. Sharing privileges can be
restricted by entering a password in the “Full Access Password” text box.
64
Appendix D File and Printer Sharing
Depends on Password - Allows both read-only and full access on the
shared file or drive. The level of access depends on the passwords entered in
the “Read-Only Password” and “Full Access Password” text boxes.
65
Actiontec Dual PC Modem User Manual
Users with access to the read-only password have read-only privileges to the
shared file or drive; users with access to the full-access password have full
access to the shared file or drive.
When finished, click Apply, then OK.
Printer Sharing
1. To share a printer on the network, click Start, Settings, then Printers.
2. In the “Printers” window, right-click the printer to share and select Sharing
from the pop-up menu.
3. Select “Shared As” in the window that appears. A default “Share Name” is
automatically generated for the printer. Sharing privileges can also be modified from this window. When finished, click OK.
66
Appendix D File and Printer Sharing
Windows 2000
1. After configuring the computer (including installing and configuring the network adapter), Windows 2000 automatically enables file and print sharing.
The only item to be checked is the computer and workgroup names. All computers on the network must have a unique computer name and the same
workgroup name. To check or change the computer and workgroup names,
right-click My Computer, then select Properties from the pop-up menu.
2. In the “System Properties” window, select Network Identification. If the “Full
computer name” is unique and the “Workgroup” name is the same as all other
computers on the network, click OK. If not, click Properties.
3. The “Identification Changes” window appears. In the “Computer Name” text
box, enter a name different than the names of the other computers on
the network.
4. In the “Workgroup” text box, enter the network name. This name must be the
same on every computer on the network. Click OK.
67
Actiontec Dual PC Modem User Manual
5. The “Network Properties” window appears. Click OK, and restart
the computer.
Macintosh
To set up file and printer sharing on a Macintosh computer:
File Sharing
1. Select Apple, Control Panels, then File Sharing.
2. When the “File Sharing” window appears, select “Start/Stop.” In the “Network
Identity” section, enter an Owner Name and Owner Password.
Caution: To deter potential hackers from guessing the pass word,
Actiontec recommends the password contain a minimum
of eight characters and a mix of numbers and upper- and
lower-case letters.
3. In the “File Sharing” section, click Start. If the button in this section reads
“Stop,” file sharing is already enabled.
4. To activate program linking, click “Start” in the “Program Linking” section.
5.
To allow other users to access the computer without giving out the owner
name and owner password, select Users and Groups, then New User.
68
E
Glossary
Access Point
A device that allows wireless clients to connect to one another. An access point
can also act as a bridge between wireless clients and a “wired” network, such as
an Ethernet network. Wireless clients can be moved anywhere within the coverage area of the access point and remain connected to the network. If connected
to an Ethernet network, the access point monitors Ethernet traffic and forwards
appropriate Ethernet messages to the wireless network, while also monitoring
wireless traffic and forwarding wireless client messages to the Ethernet network.
ATM (Asynchronous Transfer Mode)
A networking technology based on transferring data in fixed-size packets
Client
A desktop or mobile computer connected to a network.
DHCP (Dynamic Host Configuration Protocol)
A protocol designed to automatically assign an IP address to every computer on
your network.
DNS (Domain Name System) Server Address
Allows Internet host computers to have a domain name and one or more IP
addresses. A DNS server keeps a database of host computers and their respective
domain names and IP addresses so that when a user enters a domain name into
a Web browser, the user is sent to the proper IP address. The DNS server address
used by computers on the home network corresponds to the location of the DNS
server the ISP has assigned.
DSL (Digital Subscriber Line) Modem
A modem that uses existing phone lines to transmit data at high speeds.
Encryption
A method to allow wireless data transmissions a level of security.
ESSID (Extended Service Set Identifier)
A unique identifier for a wireless network. Also known as “SSID.”
69
Actiontec Dual PC Modem User Manual
Ethernet Network
A standard wired networking configuration using cables and hubs.
Firewall
A method preventing users outside the network from accessing and/or damaging files or computers on the network.
Gateway
A central device that manages the data traffic of your network, as well as data
traffic to and from the Internet.
IP (Internet Protocol) Address
A series of four numbers separated by periods identifying a unique Internet
computer host.
ISP Gateway Address
An IP address for the Internet router. This address is only required when using a
cable or DSL modem.
ISP (Internet Service Provider)
A business that allows individuals or businesses to connect to the Internet.
LAN (Local Area Network)
A group of computers and devices connected together in a relatively small area
(such as a house or an office). A home network is considered a LAN.
MAC (Media Access Control) Address
The hardware address of a device connected to a network.
NAT (Network Address Translation)
A method allowing all of the computers on a home network to use one IP
address, enabling access to the Internet from any computer on the home network without having to purchase more IP addresses from the ISP.
PC Card
An adapter that inserts in the PCMCIA slot of a computer, enabling the communication with the Router.
70
Appendix E Glossary
PPPoE (Point-To-Point Protocol over Ethernet)/
PPPoA (Point-To-Point Protocol over ATM)
Methods of secure data transmission.
Router
A central device that manages the data traffic of your network.
Subnet Mask
A set of four numbers configured like an IP address used to create IP address
numbers used only within a particular network.
SSID
See “ESSID.”
TCP/IP (Transmission Control Protocol/Internet Protocol)
The standard protocol for data transmission over the Internet.
WAN (Wide Area Network)
A network that connects computers located in separate areas, (i.e., different
buildings, cities, countries). The Internet is a WAN.
WECA (Wireless Ethernet Compatibility Alliance)
An industry group that certifies cross-vender interoperability and compatibility
of IEEE 802.11b wireless networking products and promotes the standard for
enterprise, small business, and home environments.
WLAN (Wireless Local Area Network)
A group of computers and other devices connected wirelessly in a small area.
71
Actiontec Dual PC Modem User Manual
72
Notices
Regulatory Compliance Notices
Class B Equipment
This equipment has been tested and found to comply with the limits for a Class B
digital device, pursuant to Part 15 of the FCC Rules. These limits are designed to
provide reasonable protection against harmful interference in a residential installation. This equipment generates, uses, and can radiate radio frequency energy and,
if not installed and used in accordance with the instructions, may cause harmful
interference to radio communications. However, there is no guarantee that interference will not occur in a particular installation. If this equipment does cause
harmful interference to radio or television reception, which can be determined by
turning the equipment off and on, the user is encouraged to try to correct the
interference by implementing one or more of the following measures:
Reorient or relocate the receiving antenna;
Increase the separation between the equipment and receiver;
Connect the equipment to an outlet on a circuit different from that to
which the receiver is connected;
Consult the dealer or an experienced radio or television technician for help.
Modifications
The FCC requires the user to be notified that any changes or modifications made
to this device that are not expressly approved by Actiontec Electronics, Inc., may
void the user’s authority to operate the equipment.
Declaration of conformity for products marked with the FCC logo – United States
only.
This device complies with Part 15 of the FCC Rules. Operation is subject to the
following two conditions:
1.
This device may not cause harmful interference;
73
Actiontec Dual PC Modem User Manual
2. This device must accept any interference received, including interference that
may cause unwanted operation.
To comply with FCC RF exposure compliance require☞ Note:
ments, the antenna used for this transmitter must be installed to
provide a separation distance of at least 20 cm from all persons
and must not be co-located or operating in conjunction with
any other antenna or transmitter.
For questions regarding your product or the FCC declaration, contact:
Actiontec Electronics, Inc.
760 North Mary Ave.
Sunnyvale, CA 94086
United States
Tel: (408) 752-7700
Fax: (408) 541-9005
74
Limited Warranty
Hardware: Actiontec Electronics, Inc., warrants to the end user (“Customer”) that
this hardware product will be free from defects in workmanship and materials,
under normal use and service, for twelve (12) months from the date of purchase
from Actiontec Electronics or its authorized reseller.
Actiontec Electronics’ sole obligation under this express warranty shall be, at
Actiontec’s option and expense, to repair the defective product or part, deliver to
Customer an equivalent product or part to replace the defective item, or if neither
of the two foregoing options is reasonably available, Actiontec Electronics may, in its
sole discretion, refund to Customer the purchase price paid for the defective product. All products that are replaced will become the property of Actiontec Electronics,
Inc. Replacement products may be new or reconditioned. Actiontec Electronics warrants any replaced or repaired product or part for ninety (90) days from shipment,
or the remainder of the initial warranty period, whichever is longer.
Software: Actiontec Electronics warrants to Customer that each software program
licensed from it will perform in substantial conformance to its program specifications, for a period of ninety (90) days from the date of purchase from Actiontec
Electronics or its authorized reseller. Actiontec Electronics warrants the media containing software against failure during the warranty period. The only updates that
will be provided are at the sole discretion of Actiontec Electronics and will only be
available for download at the Actiontec Web site, www.actiontec.com. Actiontec
Electronics’ sole obligation under this express warranty shall be, at Actiontec
Electronics’ option and expense, to refund the purchase price paid by Customer for
any defective software product, or to replace any defective media with software
which substantially conforms to applicable Actiontec Electronics published specifications. Customer assumes responsibility for the selection of the appropriate applications program and associated reference materials. Actiontec Electronics makes no
warranty or representation that its software products will meet Customer’s
requirements or work in combination with any hardware or applications software
products provided by third parties, that the operation of the software products will
be uninterrupted or error free, or that all defects in the software products will be
corrected. For any third-party products listed in the Actiontec Electronics software
product documentation or specifications as being compatible, Actiontec
Electronics will make reasonable efforts to provide compatibility, except where the
non-compatibility is caused by a “bug” or defect in the third party’s product or
from use of the software product not in accordance with Actiontec Electronics
published specifications or user guide.
75
Actiontec Dual PC Modem User Manual
THIS ACTIONTEC ELECTRONICS PRODUCT MAY INCLUDE OR BE BUNDLED
WITH THIRD-PARTY SOFTWARE, THE USE OF WHICH IS GOVERNED BY A SEPARATE END-USER LICENSE AGREEMENT.
THIS ACTIONTEC ELECTRONICS WARRANTY DOES NOT APPLY TO SUCH THIRDPARTY SOFTWARE. FOR THE APPLICABLE WARRANTY, PLEASE REFER TO THE
END-USER LICENSE AGREEMENT GOVERNING THE USE OF SUCH SOFTWARE.
Obtaining Warranty Service: Customer may contact Actiontec Electronics
Technical Support Center within the applicable warranty period to obtain warranty service authorization. Dated proof of purchase from Actiontec Electronics or its
authorized reseller may be required. Products returned to Actiontec Electronics
must be pre-authorized by Actiontec Electronics with a Return Merchandise
Authorization (RMA) number marked on the outside of the package, and sent
prepaid and packaged appropriately for safe shipment, and it is recommended that
they be insured or sent by a method that provides for tracking of the package. The
repaired or replaced item will be shipped to Customer, at Actiontec Electronics’
expense, not later than thirty (30) days after Actiontec Electronics receives the
defective product.
Return the product to:
(In the United States)
Actiontec Electronics, Inc.
760 North Mary Avenue
Sunnyvale, CA 94085
Actiontec Electronics shall not be responsible for any software, firmware, information, memory data, or Customer data contained in, stored on, or integrated with
any products returned to Actiontec Electronics for repair, whether under warranty
or not.
WARRANTIES EXCLUSIVE: IF AN ACTIONTEC ELECTRONICS’ PRODUCT DOES
NOT OPERATE AS WARRANTED ABOVE, CUSTOMER’S SOLE REMEDY FOR
BREACH OF THAT WARRANTY SHALL BE REPAIR, REPLACEMENT, OR REFUND OF
THE PURCHASE PRICE PAID, AT ACTIONTEC ELECTRONICS’ OPTION. TO THE
FULL EXTENT ALLOWED BY LAW, THE FOREGOING WARRANTIES AND REMEDIES ARE EXCLUSIVE AND IN LIEU OF ALL OTHER WARRANTIES, TERMS OR
CONDITIONS, EXPRESS OR IMPLIED, EITHER IN FACT OR BY OPERATION OF
LAW, STATUTORY OR OTHERWISE, INCLUDING WARRANTIES, TERMS OR CONDITIONS OF MERCHANTABILITY, FITNESS FOR A PARTICULAR PURPOSE, SATISFACTORY QUALITY, CORRESPONDENCE WITH DESCRIPTION, AND NON-INFRINGEMENT, ALL OF WHICH ARE EXPRESSLY DISCLAIMED. ACTIONTEC ELECTRONICS
76
Limited Warranty
NEITHER ASSUMES NOR AUTHORIZES ANY OTHER PERSON TO ASSUME FOR IT
ANY OTHER LIABILITY IN CONNECTION WITH THE SALE, INSTALLATION, MAINTENANCE OR USE OF ITS PRODUCTS.
ACTIONTEC ELECTRONICS SHALL NOT BE LIABLE UNDER THIS WARRANTY IF
ITS TESTING AND EXAMINATION DISCLOSE THAT THE ALLEGED DEFECT OR
MALFUNCTION IN THE PRODUCT DOES NOT EXIST OR WAS CAUSED BY CUSTOMER’S OR ANY THIRD PERSON’S MISUSE, NEGLECT, IMPROPER INSTALLATION
OR TESTING, UNAUTHORIZED ATTEMPT TO OPEN, REPAIR OR MODIFY THE
PRODUCT, OR ANY OTHER CAUSE BEYOND THE RANGE OF THE INTENDED USE,
OR BY ACCIDENT, FIRE, LIGHTNING, OTHER HAZARDS, OR ACTS OF GOD.
LIMITATION OF LIABILITY: TO THE FULL EXTENT ALLOWED BY LAW, ACTIONTEC ELECTRONICS ALSO EXCLUDES FOR ITSELF AND ITS SUPPLIERS ANY LIABILITY, WHETHER BASED IN CONTRACT OR TORT (INCLUDING NEGLIGENCE), FOR
INCIDENTAL, CONSEQUENTIAL, INDIRECT, SPECIAL, OR PUNITIVE DAMAGES OF
ANY KIND, OR FOR LOSS OF REVENUE OR PROFITS, LOSS OF BUSINESS, LOSS OF
INFORMATION OR DATA, OR OTHER FINANCIAL LOSS ARISING OUT OF OR IN
CONNECTION WITH THE SALE, INSTALLATION, MAINTENANCE, USE, PERFORMANCE, FAILURE, OR INTERRUPTION OF ITS PRODUCT, EVEN IF ACTIONTEC
ELECTRONICS OR ITS AUTHORIZED RESELLER HAS BEEN ADVISED OF THE POSSIBILITY OF SUCH DAMAGES, AND LIMITS ITS LIABILITY TO REPAIR, REPLACEMENT,OR REFUND OF THE PURCHASE PRICE PAID, AT ACTIONTEC ELECTRONICS’ OPTION. THIS DISCLAIMER OF LIABILITY FOR DAMAGES WILL NOT BE
AFFECTED IF ANY REMEDY PROVIDED HEREIN SHALL FAIL OF ITS ESSENTIAL
PURPOSE.
Disclaimer: Some countries, states or provinces do not allow the exclusion or limitation of implied warranties or the limitation of incidental or consequential damages for certain products supplied to consumers, or the limitation of liability for
personal injury, so the above limitations and exclusions may be limited in their
application to you. When the implied warranties are not allowed to be excluded in
their entirety, they will be limited to the duration of the applicable written warranty.
This warranty gives you specific legal rights which may vary depending on local law.
Dispute Resolution: The customer may contact the Director of Technical Support
in the event the Customer is not satisfied with Actiontec Electronics’ response to
the complaint. In the event that the Customer is still not satisfied with the response
of the Director of Technical Support, the Customer is instructed to contact the
Director of Marketing. In the event that the Customer is still not satisfied with the
response of the Director of Marketing, the Customer is instructed to contact the
Chief Financial Officer and/or President.
77
Actiontec Dual PC Modem User Manual
Governing Law: This Limited Warranty shall be governed by the laws of the State
of California, U.S.A., excluding its conflicts of laws and principles, and excluding
the United Nations Convention on Contracts for the International Sale of Goods.
78