1
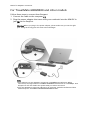
Notice for EasyPort connection
For TravelMate 5000
Follow these steps to connect Acer EasyPort:
1 Remove the cap from the orange power jack on the back of the EasyPort, next
to the connector cable.
2 Insert the cap into the 90W DC-in jack on the front of the EasyPort.
3 Plug the EasyPort power cord into the orange power jack on the back of the
EasyPort.
4 Connect the EasyPort power cord (1) and cable to the computer (2).
5 Plug the power adapter that came with your notebook into the 135W DC-in
jack (3) on the EasyPort.
Warning: When you plug in the power adapter, please make sure you use the right
port. using the wrong port will cause serious damage
Note:
1.The LAN port on Acer EasyPort III supports 10/100Mbps Fast Ethernet. When
connected, the Giga LAN on TravelMate 5000 will be disabled. Acer EasyPort III will
also disable the system VGA and S-Video ports when connected.
2.The Acer EasyPort III supports USB 2.0 on all computer models manufactured after
2003 except for TravelMate 360/420/540/650/660 models.
Notice for EasyPort connection
For TravelMate 6000/8000 and other models
Follow these steps to connect Acer Easyport
1 Connect the cable to the computer (1).
2 Plug the power adapter that came with your notebook into the 90W DC-in
jack (2) on the EasyPort.
Warning: When you plug in the power adapter, please make sure you use the right
port. Using the wrong port will cause serious damages
Note:
1.The LAN port on Acer EasyPort III supports 10/100Mbps Fast Ethernet. When
connected, the Giga LAN on TravelMate 6000/8000 will decrease to 10/100Mbps. Acer
EasyPort III will also disable the system VGA port when connected.
2.The Acer EasyPort III supports USB 2.0 on all computer models manufactured after
2003 except for TravelMate 360/420/540/650/660 models.