1
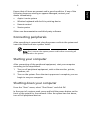
Aspire L series
User's Guide
Copyright© 2005 Acer Incorporated
All Rights Reserved
Aspire L series
User's Guide
Changes may be made periodically to the information in this publication without obligation
to notify any person of such revisions or changes. Such changes will be incorporated in new
editions of this manual or supplementary documents and publications. This company makes
no representations or warranties, either expressed or implied, with respect to the contents
hereof and specifically disclaims the implied warranties of merchantability or fitness for a
particular purpose.
Record the model number, serial number, purchase date, and place of purchase information in
the space provided below. The serial number and model number are indicated on the label
affixed to your computer. All correspondence concerning your unit should include the serial
number, model number, and purchase information.
No part of this publication may be reproduced, stored in a retrieval system, or transmitted, in
any form or by any means, electronically, mechanically, by photocopy, recording, or otherwise,
without the prior written permission of Acer Incorporated.
Model number: __________________________________
Serial number: ___________________________________
Purchase date: ___________________________________
Place of purchase: ________________________________
Acer and the Acer logo are registered trademarks of Acer Inc. Other companies' product
names or trademarks are used herein for identification purposes only and belong to their
respective companies.
1
Front panel
Rear panel
System features
Performance
Multimedia
Connectivity
System peripherals
Wireless keyboard with built-in pointing device
Remote control
1
1
2
2
2
2
3
3
3
Setting up your computer
4
Necessary to know before setup
Selecting a location
Opening the package
Connecting peripherals
Starting your computer
Shutting down your computer
Using Microsoft® Windows® XP Media Center Edition
Getting started
Help and support
Troubleshooting
Taking care of your computer
Important tips
Cleaning and servicing
To clean your computer and keyboard
When to contact a service technician
Asking for technical assistance
Declaration of conformity for EU countries
Modem notices
TBR 21
Important safety instructions
Lithium battery statement
Laser compliance statement
Declaration of conformity for CE marking
4
4
4
5
5
5
6
6
8
9
11
11
12
12
12
12
13
13
13
13
15
16
17
Contents
System tour
Remark: All images are for reference purposes only.
Actual configuration may vary.
1
English
System tour
Your computer consists of the following:
Front panel
#
Item
#
Item
1
Optical drive eject button
2
Slot-loading optical drive
3
Power button
4
Front-access cover
5
4 USB 2.0 ports
6
4-pin IEEE 1394 port
Rear panel
#
Item
#
Item
1
PS/2 mouse
port
2
PS/2 keyboard
port
3
TV-out
4
S-video out
5
Parallel port
6
VGA port
7
6-pin IEEE
1394 port
8
4 USB 2.0 ports
9
Ethernet (RJ-45)
port
10
S/PDIF out
11
Microphone jack
12
Line-out/
headphone jack
13
Line-in jack
14
S-video out
15
TV-out
16
Antenna-in
17
DC-in
English
2
System tour
System features
Performance
•
AMD Athlon64 (FX) socket-939 processor
•
DDR-SDRAM PC3200, expandable to a maximum of 4 GB
•
Power management functionality
•
Slot-loading DVD/CD writer
•
High-capacity SATA HDD
•
Supports USB 2.0 high-performance peripherals
Multimedia
•
Stereo-surround audio system via onboard audio controller
•
Audio-in/line-in, audio-out/line-out, headphone-out and
external microphone-in jacks
Connectivity
•
PS/2 mouse and keyboard ports
•
External monitor (VGA) port
•
Composite TV-out connector
•
S-video connector
•
SPDIF-out connector
•
Parallel port
•
8 USB 2.0 ports
•
Ethernet (RJ-45) LAN port
•
4-pin (front) and 6-pin (rear) IEEE 1394 ports
3
The Aspire L series computer consists of the system itself and system
peripherals, like input devices or a set of speakers (optional). This
section provides a brief description of basic system peripherals.
Wireless keyboard with built-in pointing device
The wireless keyboard provides all the functionality of a standard
keyboard and includes a built-in pointing device. Connect the
keyboard receiver to a USB port and place the receiver so that it is in
line-of-sight of the keyboard.
Remote control
Connect the remote control receiver to a USB port and place the
receiver so that it is in line-of-sight of the remote control.
Note: All images are for reference purposes only.
Actual configuration may vary.
English
System peripherals
English
4
Setting up your computer
Setting up your computer
The Aspire L series is a versatile and powerful system, supporting an
AMD CPU. The computer uses a state-of-the-art bus architecture, which
improves system efficiency and helps the system support varied
multimedia and software applications.
Your Aspire L series has standard I/O (input/output) interfaces such as a
parallel port, PS/2 ports, USB ports, IEEE 1394 ports, microphone, stereo
line-in and line-out jacks. The system can accommodate extra
peripheral equipment through these I/O ports.
Furthermore, the system is compatible with the Microsoft® Windows®
XP Media Center Edition operating system.
Necessary to know before setup
Selecting a location
Selecting the optimum location for your computer:
•
Do not place the system too close to other electrical equipment.
•
Do not place the system in high-traffic areas or where the power
cord or other cords may be stepped on.
•
Avoid placing the system in any location that is excessively dusty
or damp.
•
Do not stack other equipment on top of the system.
•
Do not block system ventilation.
Opening the package
Open the package carefully and keep all packing materials for
later use.
5
•
Aspire L series system
•
Wireless keyboard with built-in pointing device
•
Remote control
•
Starter poster
Other user documentation and third-party software.
Connecting peripherals
After everything is connected, plug the power cord into the system and
insert the other end into a power outlet.
Note: Don't connect the system power cord before connecting all
peripherals to the system.
Starting your computer
After connecting all the peripheral equipment, start your computer
according to the steps below:
1
Turn on all peripheral equipment, such as the monitor, printer,
speakers, etc.
2
Turn on the system. Once the start up process is complete, you can
begin to use your computer.
Shutting down your computer
From the "Start" menu, select "Shut Down" and click OK.
In the event of a system crash, press and hold the power button on the
front of the system for four seconds. After the system has shut down,
turn off all peripheral devices.
English
Ensure that all items are present and in good condition. If any of the
following items are missing or appear damaged, contact your
dealer immediately:
English
6
Setting up your computer
Using Microsoft® Windows® XP
Media Center Edition
Getting started
There are two ways to open Windows® XP Media Center Edition:
1
Use your mouse to open the Start menu by clicking on the start
icon in the bottom left hand of your Windows desktop. Then select
Media Center from the Start menu or from your list of programs.
2
Press the green Start button on your Windows Media Centre
remote control (selected models only).
My Music
With Media Center, it is possible to copy CDs, create playlists, organize
your music library, and create queues to play your favorite tunes.
To create a playlist:
1
First, Start Media Center using the remote or a mouse.
2
Select My Music, and then navigate to select the music you wish to
add to the list.
3
Press OK, then choose Add to Queue. Confirmation is then
displayed to show the music was added to the queue.
7
With My TV it is possible to find and record your favorite shows using
the program guide (selected regions only). It is also possible to record a
show while watching another prerecorded show.
To watch a recorded show
1
Select My TV, then Recorded TV.
2
Navigate to select the name of the recording you wish to watch,
then press Play.
Play DVDs
Your Acer Media Center Edition PC has all the functionality of a
conventional DVD player.
My Pictures
Using My Pictures you can create a slide show to view your favorite
photos or burn a disk of your holiday snaps to send to your relatives.
To Zoom and Pan a picture
1
Press the Start button, then select My Pictures.
2
Press OK, then select the image you wish to view.
3
Use the OK button to zoom in, press it again to zoom in further.
4
Use the arrow buttons to pan the image.
Radio (selected models only)
Use Radio to manage and listen to your favorite FM and Internet radio
stations.
Note: A radio tuner card must be installed to enable the FM radio
functions.
My Videos
Watch digital video that you have created or downloaded from the
Internet.
English
My TV (selected models only)
English
8
Setting up your computer
Help and support
Answers to many of your questions can be found in the help section.
To open the Help section:
1
Start up Media Center and then select Settings (by pressing More
on your remote or right-clicking the mouse)
2
Select the Help option, then choose what kind of help you need.
9
The following are possible situations that may arise during the use of
your computer, and each is followed by simple answers and solutions.
Q: I pressed the power switch but the system did not boot up.
A: Check the LED located around the power switch.
If the LED is not lit, no power is being applied to the system. Do any of
the following:
•
Check if the voltage selector switch located on the rear panel of
the computer is set to the correct voltage.
•
Check if you have properly plugged the power cable into an
electrical outlet.
•
If you are using a power strip or AVR, make sure it is plugged in
and turned on.
If the LED is lit, check the following:
•
Is a non-bootable (non-system) optical disk in the optical drive?
If yes, remove or replace it with a system optical disk and press
<Ctrl> + <Alt> + <Del> to restart your computer.
Q: Nothing appears on the screen.
A: Your computer's power management function automatically
blanks the screen to save power. Press any key to turn the display
back on.
If pressing a key does not work, restart your computer. If restarting
your computer does not work, contact your dealer or the technical
support center for assistance.
Q: The printer does not work.
A: Do the following:
•
Make sure the printer is connected to a power outlet and that it is
turned on.
•
Make sure the printer cable is connected securely to the system's
parallel port and the corresponding port on the printer.
•
For additional information concerning the printer, refer to the
printer's documentation.
English
Troubleshooting
English
10
Troubleshooting
Q: No sound comes out of the speakers.
A: Check the following:
•
The volume may be muted. Look for the Volume icon on the
taskbar. If it is crossed-out, click on the icon and deselect the mute
option. You can also press the volume control/mute knob on your
USB keyboard to toggle the mute function.
•
If headphones, earphones or external speakers are connected to
the line-out jack of your computer, the internal or built-in
speakers are automatically turned off.
Q: System cannot read hard disk, CD or DVD information.
A: Check the following:
•
Make sure you are using the correct type of media.
•
Make sure the CD or DVD is inserted correctly (rightside up) into
the proper drive.
•
Check to be sure the CD or DVD is clean and unscratched.
•
Check your drive by using a good (undamaged) optical disk. If your
CD or DVD drive cannot read the information on the good CD or
DVD, there may be a problem with the drive. Contact your dealer
or technical support center for assistance.
Q: System cannot write to hard disk or optical disk.
A: Check the following:
•
Make sure the media is not write-protected.
•
Make sure you are using the correct type of optical disk.
11
Please read the instructions listed in this section. Following these
instructions will help you maximize the durability of your computer.
Important tips
•
Do not place other equipement on top of the computer.
•
Do not block system ventilation.
•
Do not expose the computer to direct sunlight. Do not place it
near sources of heat, such as a radiator.
•
Do not subject the computer to magnetic fields.
•
Do not expose the computer to rain or moisture.
•
Do not spill water onto or into the computer.
•
Do not subject the computer to heavy shock or vibration.
•
Do not expose the computer to dust or dirt.
•
Never place the system on uneven surfaces.
•
Do not step on the power cord or place heavy objects on top of it.
Carefully route the power cord and any cables away from
foot traffic.
•
When unplugging the power cord, do not pull on the cord itself
but pull on the plug.
•
The total ampere rating of the equipment plugged in should not
exceed the ampere rating of the cord, if you are using an
extension cord. Also, the total current rating of all equipment
plugged into a single wall outlet should not exceed the
fuse rating.
•
Check the documentation that came with your software and/or
drivers to see if you can select other settings to make viewing the
screen more comfortable.
English
Taking care of your computer
English
12
Taking care of your computer
Cleaning and servicing
To clean your computer and keyboard
1
Turn off the computer and unplug the power cord.
2
Use a soft cloth moistened with water and gently wipe the exterior
of the computer and the keyboard. Do not use liquid or aerosol
cleaners.
When to contact a service technician
•
If you drop and damage the computer.
•
If liquid has been spilled into the computer.
•
If the computer is not operating normally.
Asking for technical assistance
For technical assistance, contact your local dealer or distributor.
You may also access the Acer Web site (http://www.acersupport.com)
for information on how and where to contact the service centers
available in your area.
13
Acer hereby declares that this personal computer is in compliance with the essential
requirements and other relevant provisions of Directive 1999/5/EC.
Notice: Shielded cables
All connections to other computing devices must be made using shielded cables
to maintain compliance with FCC regulations.
Notice: Peripheral devices
Only peripherals (input/output devices, terminals, printers, etc.) certified to
comply with the Class B limits may be attached to this equipment. Operation
with non-certified peripherals is likely to result in interference to radio and TV
reception.
Modem notices
TBR 21
This equipment has been approved [Council Decision 98/482/EC - "TBR 21"] for
pan-European single terminal connection to the Public Switched Telephone
Network (PSTN). However, due to differences between the individual PSTNs
provided in different countries, the approval does not, of itself, give an
unconditional assurance of successful operation on every PSTN termination
point. In the event of problems, you should contact your equipment supplier in
the first instance.
Important safety instructions
Read these instructions carefully. Save them for future reference.
1
Follow all warnings and instructions marked on the product.
2
Unplug this product from the wall outlet before cleaning. Do not use
liquid cleaners or aerosol cleaners. Use a water-moistened cloth for
cleaning.
3
Do not use this product near water.
4
Do not place this product on an unstable cart, stand or table. If the product
falls, it could be seriously damaged.
5
Slots and openings are provided for ventilation to ensure reliable
operation of the product and to protect it from overheating. These
openings must not be blocked or covered. The openings should never be
blocked by placing the product on a bed, sofa, rug or other similar surface.
English
Declaration of conformity for EU countries
English
14
This product should never be placed near or over a radiator or heat
register, or in a built-in installation unless proper ventilation is provided.
6
This product should be operated from the type of power indicated on the
marking label. If you are not sure of the type of power available, consult
your dealer or local power company.
7
Do not allow anything to rest on the power cord. Do not locate this
product where people will walk on the cord.
8
If an extension cord is used with this product, make sure that the total
ampere rating of the equipment plugged into the extension cord does not
exceed the extension cord ampere rating. Also, make sure that the total
rating of all products plugged into the wall outlet does not exceed the fuse
rating.
9
Never push objects of any kind into this product through cabinet slots as
they may touch dangerous voltage points or short-out parts that could
result in a fire or electric shock. Never spill liquid of any kind onto or into
the product.
10 Do not attempt to service this product yourself, as opening or removing
covers may expose you to dangerous voltage points or other risks. Refer all
servicing to qualified service personnel.
11 Unplug this product from the wall outlet and refer servicing to qualified
service personnel under the following conditions:
a
When the power cord or plug is damaged or frayed.
b
If liquid has been spilled into the product.
c
If the product has been exposed to rain or water.
d
If the product does not operate normally when the operating
instructions are followed. Adjust only those controls that are covered
by the operating instructions, since improper adjustment of other
controls may result in damage and will often require extensive work
by a qualified technician to restore the product to normal condition.
e
If the product has been dropped or the case has been damaged.
f
If the product exhibits a distinct change in performance, indicating a
need for service.
12 Use only the proper type of power supply cord set (provided in your
accessories box) for this unit. It should be a detachable type : UL listed/CSA
certified, type SPT-2, rated 7A 125V minimum, VDE approved or its
equivalent. Maximum length is 15 feet (4.6 meters).
13
Always disconnect all telephone lines from the wall outlet before serving
or disassembling this equipment.
15
Avoid using a telephone line (other than the cordless type) during an
electrical storm. There may be a remote risk of electric shock from
lightning.
15
Regarding the standards of workstation regulations, do not place the
model in the visual field of the user, because of the glossy front of the case.
Lithium battery statement
CAUTION
Danger of explosion if battery is incorrectly replaced. Replace only with
the same or equivalent type recommended by the manufacturer.
Dispose of used batteries according to local regulations. Recycle if
possible.
ADVARSEL!
Lithiumbatteri - Eksplosionsfare ved fejlagtig håndtering. Udskiftning
må kun ske med batteri af samme fabrikat og type. Léver det brugte
batteri tilbage til leverandøren.
ADVARSEL
Eksplosjonsfare ved feilaktig skifte av batteri. Benytt samme
batteritype eller en tilsvarende type anbefalt av apparatfabrikanten.
Brukte batterier kasseres i henhold til fabrikantens instruksjoner.
VARNING
Explosionsfara vid felaktigt batteribyte. Anvãnd samma batterityp
eller en ekvivalent typ som rekommenderas av apparattillverkaren.
Kassera anvãnt batteri enligt fabrikantens instruktion.
VAROITUS
Päristo voi räjähtää, jos se on virheellisesti asennettu. Vaihda paristo
ainoastaan laitevalmistajan suosittelemaan tyyppiin. Hävitä käytetty
paristo valmistajan ohjeiden mukaisesti.
VORSICHT!
Explosionsgefahr bei unsachgemäßen Austausch der Batterie Ersatz
nur durch denselben oder einem vom Hersteller empfohlenem
ähnlichen Typ. Entsorgung gebrauchter Batterien nach Angaben des
Herstellers.
English
14
English
16
Laser compliance statement
The CD or DVD drive used with this computer is a laser product. The CD
or DVD drive's classification label (content shown below) is located on
the drive.
CLASS 1 LASER PRODUCT
CAUTION: INVISIBLE LASER RADIATION WHEN OPEN. AVOID EXPOSURE
TO BEAM.
APPAREIL A LASER DE CLASSE 1 PRODUIT
LASERATTENTION: RADIATION DU FAISCEAU LASER INVISIBLE EN CAS
D’OUVERTURE. EVITTER TOUTE EXPOSITION AUX RAYONS.
LUOKAN 1 LASERLAITE LASER KLASSE 1
VORSICHT: UNSICHTBARE LASERSTRAHLUNG, WENN ABDECKUNG GEÖFFNET
NICHT DEM STRAHLL AUSSETZEN
PRODUCTO LÁSER DE LA CLASE I
ADVERTENCIA: RADIACIÓN LÁSER INVISIBLE AL SER ABIERTO. EVITE EXPONERSE
A LOS RAYOS.
ADVARSEL: LASERSTRÅLING VEDÅBNING SE IKKE IND I STRÅLEN.
VARO! LAVATTAESSA OLET ALTTINA LASERSÅTEILYLLE.
VARNING: LASERSTRÅLNING NÅR DENNA DEL ÅR ÖPPNAD ÅLÅ TUIJOTA
SÅTEESEENSTIRRA EJ IN I STRÅLEN
VARNING: LASERSTRÅLNING NAR DENNA DEL ÅR ÖPPNADSTIRRA EJ IN I
STRÅLEN
ADVARSEL: LASERSTRÅLING NAR DEKSEL ÅPNESSTIRR IKKE INN I STRÅLEN
17
Name of manufacturer:
Acer Inc.
Address of manufacturer:
8F, 88, Sec. 1, Hsin Tai Wu Rd.
Hsichih, Taipei Hsien 221
Taipei, Taiwan
Declares that product:
Personal computer
Model:
Aspire series
Conforms to the EMC Directive 89/336/EEC as attested by conformity
with the following harmonized standards:
EN55022:1998/A1: 2000; AS/NZS CISPR 22: 2002: Limits and methods of
measurement of radio interference characteristics of information
technology equipment
EN55024: 1998/A1: 2001; AS/NZS CISPR 24: 1997: Information
technology equipment - immunity characteristics -- limits and methods
of measurement Including:
Standard
Description
Results
Criteria
EN61000-4-2: 1995/A1: 1998/A2: 2001
AS/NZS 61000.4.2: 2002
Electrostatic discharge
Pass
B
EN61000-4-3: 1996/A1: 1998/A2: 2001
AS/NZS 61000.4.3: 1999
Radio-frequency,
electromagnetic field
Pass
A
EN61000-4-4: 1995/A1: 2001/A2: 2001
AS/NZS 61000.4.4: 1999
Electrical fast transient/burst
Pass
B
EN61000-4-5: 1995/A1: 2001
AS/NZS 61000.4.5: 1999
Surge
Pass
B
EN61000-4-6: 1996/A1: 2001
AS/NZS 61000.4.6: 1999
Conductive disturbance
Pass
A
EN61000-4-8: 1993/A1: 2001
AS/NZS 61000.4.8: 2002
Power frequency magnetic field
Pass
A
EN61000-4-11: 1994/A1: 2001
AS/NZS 61000.4.11: 1999
Voltage dips / short interruption
and voltage variation
>95% in 10 ms
Pass
B
30% in 500 ms
Pass
C
>95% in 5000 ms
Pass
C
Standard
Description
Results
EN61000-3-2: 2000
AS/NZS 61000.3.2: 2003
Limits for harmonics current emissions
Pass
English
Declaration of conformity for CE marking
English
18
EN61000-3-3: 1995
A1: 2001/ AS/NZS 61000.3.3: 1998
Limits for voltage fluctuations and flicker in
low-voltage supply systems
Pass
Conforms to the Low Voltage Directive 73/23/EEC as attested by
conformity with the following harmonized standard:
EN60950: 2000 3rd: Safety of Information Technology Equipment
Including Electrical Business Equipment.
This equipment has been approved by Council Decision 98/482/EC
(CTR21) for pan-European single terminal connection to the Public
Switched Telephone Network (PSTN).
We, Acer Inc., hereby declare that the equipment bearing the trade
name and model number specified above was tested conforming to
the applicable rules under the most accurate measurement standards
possible, and that all the necessary steps have been taken and are in
force to assure that production units of the same equipment will
continue to comply with the requirements.
--------------------------Easy Lai, Director
Acer Incorporated