1
®
DIGITAL QUARTZ STOPWATCH
AE602M100 AE760M100
AE790M500 AE790M500DEC
INSTRUCTION MANUAL
IMPORTANT NOTE FOR MODEL 760M & 790M
This stopwatch can store up to 100 or 500 split/lap times depending on the model. However please note when
there are 5 free memories left, the icon “FULL” will blink to remind you of the nearly full situation. Whenever
the storage is full, extra split/lap times will NOT be stored into memory even though you reset your stopwatch
and start a new event. Extra split/lap times will only be shown on the display but not recorded.
In order for the stopwatch to record the lap/split times again, you must delete the data in the DATA memory.
Please refer to the “Data Mode” section on the instruction manual for how to delete the memory.
Instructions
Introduction
You are about to enjoy an advanced Cumulative and Lap memory professional digital quartz stopwatch with
advanced timing features.
Model AE602M100, AE760M100, AE790M500 & AE790M500DEC Stopwatch includes Time of day, Daily
Alarm, Chronograph stopwatch, 100 or 500 memory, Data register (Model 760M & 790M only), Countdown
timer, Stroke Measurement timer, Pacer from 5 to 240 beats per minute.
Model AE790M500DEC Decimal Stopwatch includes Decimal stopwatch (1/100 of a sec, 1/1000 of a
minute, 1/100,000 of an hour).
Model AE760M100 & AE790M500 Speed Stopwatch includes Speed Measurement.
General Features
-
4 buttons operation
Large LCD display with contrast adjustment
12/24 hour display
Normal time and chime
Daily alarm
Full 1/100 second chronograph with working range from 0 to 19 hr. 59 min. 59.99 seconds with 100 or
500 memory records of split and lap time.
Recall function for recorded split and lap times
Count-Down timer with working range from 0 to 19hr. 59min. 59.9 seconds
Three operating modes (Countdown Repeat, Countdown Stop, Countdown then count up) for countdown timer
Stroke measurement basing on "3"
Speed measurement (AE760M100 & AE790M500 Model only)
Decimal second, minute and hour chronograph (AE790M500DEC Model only)
Segmented run memory (Model 760M & 790M only)
Beep sound selectable
Low battery check
1
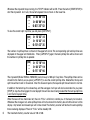
As you choose each "mode", a message will be displayed for a second before you enter the mode:
Normal Time mode
(All models)
TIME
Timer mode
(All models)
TIMER
Alarm Time mode
(All models)
ALARM
Pacer mode
(All models)
PA C E R
Chronograph mode
(All models)
CHRONO
Stroke Measurement
(All models)
Lap Time Recall mode
(All models)
RECALL
Speed mode
(AE760M100 &
AE790M500 model only)
Data mode
(760M & 790M models only)
STROKE
SPEEd
DATA
The operation of the stopwatch is divided into eight modes (as noted above):
1.
2.
3.
4.
5.
6.
7.
8.
Normal time mode
Alarm time mode
Chronograph and Recall mode
Data mode (760M & 790M Models only)
Count-down timer mode
Pacer mode
Stroke measurement mode
Speed mode (AE760M100 & AE790M500 model only)
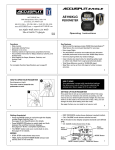
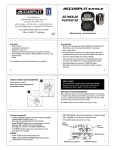
Button Operation
-
2
-
Mode - used to change the mode of the watch
Start / Stop / Set - used to start and stop the timer counting or the chronograph function
Recall - used for recalling recorded split and lap times
Lap / Split / Reset / Select - for taking the record of the split and lap time
This is only a brief description of these buttons. Detailed uses of the buttons are different in particular functions
and will be described later in the instructions.
Pressing [MODE] button will toggle among the modes above. Note that there is no auto-return function in the
stopwatch. Whenever you change modes, the stopwatch will remain in that mode until the [MODE] button is
pressed again
Each time you enter a mode, a message will be displayed for a second before you enter the mode:
Note:- In the following descriptions, items printed in dark gray stand for flashing digits.
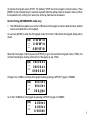
Normal Time Mode
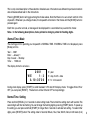
The starting point for operating your stopwatch is NORMAL TIME. If NORMAL TIME is not displayed, press
[Mode] until it is.
Year : - 2001
Date : - January 1
Day of week : - Monday
Time : - 12:00 am
The display format is as below :-
➔
➔
➔
2001
WE
1- 3
A 1 0 : 3 5' 3 0
year
day, month - date
hr : min second
During clock display, press [START] to switch between 12Hr and 24Hr display mode. To toggle chime ON or
OFF, you can press [RESET]. The bell icon will be ON and OFF correspondingly.
Normal Time Setting
Press and hold [RECALL] for 2 seconds to enter setting mode. The normal time setting starts with second. The
second digits will then be flashing. You can change the flashing digit by pressing [START] button. To speed up
the setting you can press and hold [START] for longer than 2 seconds to activate fast setting. To select other
digits, press [RESET] button. The setting order is: Second, Minute, Hour, Year, Month, Date, month-date (m-d)
3
or date-month (d-m), Sound ON or OFF, Contrast (darkness of the digits - default is 9), then back to Second,
and recycles again. Note: when the second is to be set, press [START] to reset the second digits to zero.
At the end of setting, press [RECALL] or [MODE] to exit from the setting mode and back to Normal Time
Display.
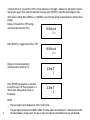
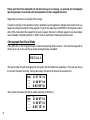
Display for Sound ON or OFF setting :(Let the current status be "ON".)
SOUnd
On
Press [START] to toggle Sound ON or OFF.
SOUnd
On
Display for contrast adjustment:(Let the current contrast be "5")
Press [START] consecutively to advance
the contrast up to 16, then cycle back to 1.
The contrast setting will be shown on
the display.
COnT
5
COnT
16
NOTE:
4
-
The hour digits may be displayed in 12hr or 24hr format.
-
The year digits can be set from 2000 to 2099. The date adjusts automatically for odd and even months
including February of leap years. The day of week also adjusts automatically after you set the date.
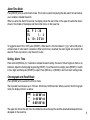
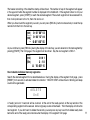
Alarm Time Mode
Press [MODE] until you enter Alarm mode. This mode is used for displaying the daily alarm time and allows
you to enable or disable the alarm.
When you enter the Alarm Time mode, the display shows the alarm time on the upper line while the date is
shown in the middle of the display and the normal time is on the lower line.
AL P 3 : 3 0
TU
1- 3
A 1 0 : 3 5' 3 0
To toggle the alarm ON or OFF, press [RESET]. When alarm is ON, the indicator "(((o)))" will be ON while it
will be turned off when alarm is disabled. When alarm time is reached, the alarm signal will sound for 60
seconds. Press any button to stop the alarm sound.
Setting Alarm Time
Press and hold [RECALL] for 2 seconds to activate the alarm setting. The alarm "minute" digits will flash as an
indication. Adjust the flashing digit by pressing [START]. To set the alarm hour digits, press [RESET] to switch
to hour digits and then press [START] to adjust. Press [RECALL] or [MODE] to exit from Alarm setting mode.
Chronograph and Recall Mode
Press [MODE] until you enter the Chrono mode.
The stopwatch can measure up to 19 hours. 59 minutes, 59.99 seconds. When you enter the Chronograph
mode, the display format is as below.
{000}
SPLIT
LAP
STOP
0: 00' 00" 00
0: 00' 00" 00
0: 00' 00" 00
The upper line shows the split time, the middle line shows the lap time and the accumulated elapsed time is
displayed on the lower line.
5
Whenever the stopwatch stops running, the "STOP" indicator will be ON. Press the button [START/STOP] to
start the stopwatch. As it runs, the current elapsed time is shown on the lower line.
{000}
SPLIT
LAP
RUN
0: 00' 00" 00
0: 00' 00" 00
0: 03' 35" 52
To view the current split / lap time, you can press [LAP/SPLIT].
{001}
SPLIT
LAP
RUN
0: 10' 43" 35
0: 10' 43" 35
0: 10' 43" 35
The number of split/lap times is shown on the upper left corner. The corresponding split and lap times are
displayed on the upper and middle line. Press [LAP/SPLIT] again, the next split/lap time will be shown and
the number of split/lap time is updated.
{002}
SPLIT
LAP
RUN
0: 15' 10" 94
0: 04' 27" 59
0: 15' 10" 94
The stopwatch (Model 790M & 790MDEC) can store up to 500 split / lap times. The split/lap times can be
stored into the memory as you press [LAP/SPLIT] to view the current split/lap time. Meanwhile, the lap and
split time will be frozen for 5 seconds. After this 5-second period, the lap and split time will return to normal.
In addition, the fastest lap, the slowest lap, and the averages of all laps will also be recorded. As you press
[STOP] to stop the chronograph, the last lap/split time will also be stored (provided that the last lap/split time
is not the first lap/split time).
When there are 5 free memories left, the icon "FULL" will blink to remind you of the nearly full situation.
Whenever the storage is full, extra split/lap times will not be stored into memory but will still be shown on the
display. Any fastest and slowest laps will not be stored. The memory counter will flash as the extra split/lap
times are being displayed. The icon "FULL" will be steadily ON.
6
The maximum memory counter value is 100 or 500.
To stop the chronograph, press [STOP]. The indicator "STOP" will come on again to show the status. Press
[RESET] as the stopwatch stops to reset the stopwatch while the split/lap times will be kept in memory. When
the stopwatch starts running from reset state, all the lap memories will be cleared.
Decimal Timing (AE790M500DEC model only)
1.
The DM Model can operate as a normal 1/100 second chronograph as well as decimal minute, decimal
second, and decimal hour chronograph.
As you press [MODE] to enter the chronograph mode, the normal 1/100 second chronograph display will be
shown.
{000}
SPLIT
LAP
STOP
0: 00' 00" 00
0: 00' 00" 00
0: 00' 00" 00
Reset the chronograph to 00, then press [LAP/SPLIT] to go to the second chronograph mode. (1/100s). You
will note the change by looking at the bottom of the display to see 1/100s.
{000}
SPLIT
LAP
STOP
0 0 0 0 0. 0 0
0 0 0 0 0. 0 0
0 0 0 0 0. 0 0
1/100S
Change to the 1/1000 of a minute chronograph mode by pressing [LAP/SPLIT] again. (1/1000M)
{000}
SPLIT
LAP
STOP
0 0 0. 0 0 0
0 0 0. 0 0 0
0 0 0. 0 0 0
1/1000M
Go to the 1/10,000 hour chronograph by pressing [LAP/SPLIT] again.(1/10,000H)
{000}
SPLIT
LAP
STOP
0. 0 0 0 0 0
0. 0 0 0 0 0
0. 0 0 0 0 0
1/100000H
7
Please note that if the stopwatch has started running (or is running), no selection for chronograph
operating modes can be made until the stopwatch has been stopped and reset.
Segmented run memory for lap/split time storage:A header consisting of the date/time stamp is attached to each segment to indicate the moment when you
began recording the particular timing segment. To get to this feature, press [MODE] in chronograph mode to
enter DATA mode when the stopwatch has been stopped. Records for different segments can be recalled,
read or deleted. Detailed operation in "DATA" mode is described in Data Mode section below..
Chronograph Data Recall Mode
Press [RECALL] in Chronograph mode to recall stored split/lap time memories. The mode message will be
shown up for one to two seconds as mode message display is enabled.
RECALL
The split and lap time will be displayed on the upper and the middle line respectively. The lower line shows
the current stopwatch counting. During data recall, the fastest lap time will be reviewed first.
RECALL FAST
{004}
SPLIT
LAP
RUN
0: 01' 12" 34
0: 00' 01" 60
0: 03' 06" 52
Then comes the slowest lap time by further pressing of [RECALL].
RECALL
{001}
SPLIT
LAP
RUN
8
SLOW
0: 00' 07" 63
0: 00' 07" 63
0: 03' 10" 16
Press [RECALL] again to view the average lap time.
RECALL
AVG
{005}
LAP
RUN
0: 00' 05" 12
0: 03' 16" 03
Press [RECALL] continually to review all the stored split/lap times. The sequence starts from the last record
to the first record when the stopwatch is running and vice versa when the stopwatch has been stopped.
RECALL
{005}
SPLIT
LAP
RUN
0: 00' 14" 91
0: 00' 02" 05
0: 03' 28" 94
[RECALL]
RECALL
{004}
SPLIT
LAP
RUN
0: 00' 12" 86
0: 00' 01" 60
0: 03' 33" 64
[RECALL]
RECALL
{003}
SPLIT
LAP
RUN
0: 00' 11" 26
0: 00' 01" 78
0: 03' 40" 15
[RECALL]
RECALL
{002}
SPLIT
LAP
RUN
0: 00' 09" 48
0: 00' 01" 85
0: 03' 45" 34
9
[RECALL]
RECALL
{001}
SPLIT
LAP
RUN
0: 00' 07" 63
0: 00' 07" 63
0: 03' 48" 01
After recalling the first record, press [RECALL] once more to exit from Recall mode and go back to chronograph
mode. The "RECALL" icon will be OFF.
[RECALL]
{005}
SPLIT
LAP
RUN
0: 03' 50" 11
0: 00' 42" 60
0: 03' 50" 11
During memory recall, you can press either [START], [STOP] or [LAP/SPLIT] to exit from chrono recall mode
and jump to the chrono start/stop or lap state respectively.
Data Mode (AE760M & AE790M Model only)
Press [MODE] until you enter DATA mode The mode message "DATA" will be shown for one to two seconds
before the number of free memories is to be shown.
FREE
95 LAP
You can press [START] to scroll through all segments. The current segment will come first.
RECALL
{008}
SEG
{002}
2001
2-19
A 10: 15' 30
10
The header consisting of the date/time stamp will be shown. The number of laps in the segment will appear
in the upper left while the segment number is displayed in the middle left. If the segment shown is not your
desired segment, press [START] to reach the desired segment. The current segment will be accessed first,
then it will cycle back to the 1st, then 2nd and so on.
When you have found the segment you want, you can press [RECALL] button consecutively to read the lap
records from the first to the last lap.
RECALL
{001}
SEG SPLIT
{002}
LAP
RUN
0: 01' 00" 55
0: 00' 12" 86
0: 01' 00" 55
As you continue to press [RECALL] during the display of the last lap, you can advance to the next segment by
pressing [START], The front page of the segment will be shown. Say the next segment is SEG 1.
RECALL
{012}
SEG
{001}
2001
2-18
A 10: 00' 15
How to delete individual memory segments:Search the desired segment first as described above. During the display of the segment front page, press
[RESET] for 2 seconds to activate Delete One function. "DELETE ONE" will be shown in blinking and beep
sound will be generated.
dELETE
OnE
A "ready" period of 2 seconds will be counted. At the end of the ready period, all the lap records of the
corresponding segment will be erased. And a long beep sound will be heard. Then the display will show the
next segment. If you don't want to delete the records, you can press any key to exit from delete ready state
before the end of the ready period and resume the display of the segment front page.
11
How to delete all memory segments:Instead of deleting one segment, you can also delete all memory segments. When you enter the Data mode,
you see the screen "FREE XXX LAP". Press and hold the [RESET] for 3 seconds. You will hear "Beep, beep,
beep" for 3 seconds, then a long "Beep". At this point all data in the memory will be deleted and "DELETE
ALL " will show on the display.
If you don't want to delete the records, you can press any key to exit "DELETE ALL " state before the end of
the ready period and resume the display of the segment front page.
dELETE
ALL
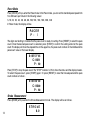
Timer Mode
Press [MODE] until you enter the Timer mode. 3 count-down operation modes are available on this stopwatch:
Count down repeat ( CR )
Count down stop ( CS )
Count down, then count up ( CU )
The timer is set at the factory to the count-down repeat (CR) mode. At entering timer mode, the mode
message "TIMER" will be shown for a second before the timer counting is to be displayed.
{000}
CR
0: 00' 00" 0
0: 00' 00" 0
A 12 : 58' 20
The upper line shows the programmable timer value (initially set at 0:00:00:0) while the middle line displays
the current timer counting. Time of Day clock display is at the lower line of the display. "CR" indicates the
current timer operating mode while the timer cycle counter is located at the upper left of the display.
Before starting the timer, enter a countdown time first. Then press [START] to start timer running. When the
timer counts down to zero, a 3 second "beep ... beep" sound will be generated for a timer setting within one
minute; 15 second "beep ... beep" sound for 1 minute to 10 minutes setting and 30 second "beep ... beep"
sound for over 10 minutes. Pressing any key will stop the beep sound.
12
Under CR operation mode, the timer value will be reloaded and count down will start again. The timer cycle
counter will be increased by one and updated on the display.
Under CS operation mode, the timer, after counting down to 0:00'00", will stay at 0:00'00"0 until you press
[RESET] to reload the timer value.
Under CU operation mode, the timer, after counting down to 0:00'00"0, will count up and stop at 19:59'59"9.
How to set the timer
Press and hold [RECALL] for 2 seconds to activate timer setting. Timer setting starts with second digits,
which are shown blinking. You can press [START] to advance the flashing digits. Or you can press [RESET]
to select other digits. The setting is in sequence of second, minute, hour and timer operating mode (CR, CS
and CU).
NOTE: You can only set Hour, Minute and Seconds. The 1/10 second cannot be set.
Press and hold [RECALL] for 2 seconds.
Timer setting starts with second
digits.
{000}
Press [RESET] to move to minute
digits.
{000}
Press [RESET] further to go to
hour digits. Hour digits can be
adjusted from 0 to 19.
{000}
Press [RESET] again to adjust the
operating mode. Press [START]
to switch the operating modes
among CR, CS and CU.
{000}
CR
CR
CR
CR
0: 00' 00" 0
0: 00' 00" 0
A 12 : 58' 55
0: 00' 00" 0
0: 00' 00" 0
A 12 : 58' 57
0: 00' 00" 0
0: 00' 00" 0
A 12 : 59' 02
0: 00' 00" 0
0: 00' 00" 0
A 12 : 59' 11
At the end of setting, press [RECALL] or [MODE] to leave setting mode.
13
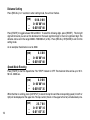
Pacer Mode
Press [MODE] until you enter the Pacer mode. In the Pacer mode, you can set the standard pacer speed from
5 to 240 beats per minute in the following values:
5, 10, 20, 30, 40, 50, 60, 80, 100, 120, 150, 180, 200, 240
In Pacer mode, the display will be:-
PAC E R
P - 5
The digits are flashing to indicate that the pace count is ready for setting. Press [RESET] to select the pace
count. Once the desired pace count is selected, press [START] to confirm the setting and start the pace
count. The display will show the elapsed time on the upper line, the pace count number on the middle and the
pace count value on the lower display.
0: 00' 51" 85
C - 00 51
P - 60
Press [STOP] to stop the pace count. The "STOP" indicator is ON to show the status and the display freezes.
To restart the pace count, press [START] again. Or press [RESET] to reset the time elapsed and the pace
count number as follows:-
0: 00' 00" 00
C - 00 00
P - 60
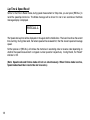
Stroke Measurement
Press [MODE] until you enter the Stroke Measurement mode. The display will be as follows.
14
STROkE
0. 0
In the Stroke Measurement mode, the duration of 3 strokes is taken and the stroke frequency (counts per
minute) is calculated. As the stroke frequency falls out of the range of 10 - 180, "Err" will appear to show the
error condition.
Press [START] to start the measurement. During the 1st second, 180.0 will be shown and flashing as below.
STROkE
180. 0
At the end of the first second, the display will become steady.
If measurement is stopped in the first second (stroke frequency > 180), error signal " Err " will be shown. After
the first second has elapsed, the instantaneous measurement reading will be shown. When you press [STOP],
the display will show the steady stroke measurement reading. If the measurement lasts for more than 18
seconds (stroke frequency < 10), an error signal "Err" will be displayed. When the measurement is stopped,
press [RESET] to reset the displayed reading to "0.0".
Speed Mode (AE760M100 & AE790M500 Model only)
Press [MODE] until you enter the Speed mode. The display will be as follows.
DIST
{000}
LAP
STOP
KM
0. 0 0 0
0: 00' 00" 00
0: 00' 00" 00
(Note that the default setting is KM. Hence "KM" icon will be ON.)
The upper line shows the distance or speed. The lap time is in the middle line, while the total time is displayed
on the lower line.
In the Speed mode, you can record a number of lap times and speeds for covering the distance you program
into the chronograph.. Before starting to use the Speed mode, you need to enter the distance as explained
below. Otherwise, the speed measurement won't work.
15
Distance Setting
Press [RECALL] for 2 seconds to enter setting mode, the unit icon flashes.
DIST
{000}
LAP
STOP
KM
0 0 0. 0 0 0
0: 00' 00" 00
0: 00' 00" 00
Press [START] to toggle between KM and MILE. To select the following digits, press [RESET]. The far right
digit will blink and you can set the distance from the least significant digit to the most significant digit. The
distance can be set in the range 0.000 to 1999.999 km (or ML). Press [RECALL] OR [MODE] to exit from the
setting mode.
As an example, the distance is set at 400m.
DIST
{000}
LAP
STOP
KM
0. 4 0 0
0: 00' 00" 00
0: 00' 00" 00
Speed Mode Running
Press [START] to start the Speed timer. The "STOP" indicator is OFF. The maximum time can be up to 19 hr.
59 min. 59.99 sec.
DIST
{000}
LAP
RUN
KM
0. 0 0 0
0: 00' 00" 00
0: 00' 05" 35
While the timer is running, press [LAP/SPLIT] to record the lap time and the corresponding speed (in km/hr or
mph) will be displayed on the upper line. The lap counter (shown on the upper left corner) will advance by one.
DIST
{001}
LAP
16
RUN
KM
2 5. 7 6 0
0: 01' 05" 35
0: 01' 05" 35
Press [LAP/SPLIT] to record more lap times and show different speeds. Note that as the speed exceeds the
value 1999.999 km/hr or 1999.999 mph, "Err" will be shown and no storage will be made for that record.
[LAP/SPLIT]
DIST
{002}
LAP
RUN
[LAP/SPLIT]
DIST
{003}
LAP
RUN
KM
2 2. 0 6 0
0: 01' 05" 25
0: 02' 01" 15
KM
2 5. 7 3 0
0: 00' 55" 95
0: 02' 57" 10
To stop the speed measurement, press [STOP] to stop the timer.
DIST
{003}
LAP
STOP
KM
2 5. 7 3 0
0: 00' 59" 13
0: 03' 48" 23
Before starting again, you can reset the timer by pressing [RESET].
DIST
{000}
LAP
STOP
KM
0. 4 0 0
0: 00' 00" 00
0: 00' 00" 00
Note: When you reset the Speed timer, the speed measurement starts again from a reset state, and all speed
records in memory will be cleared (provided that the storage is not under segmented run memory mode).
The Recall function is similar to chronograph recall. If segmented run memory is selected, the DATA mode
can be accessed and records storing both the speed and elapsed time can be retrieved.
17
Lap Time & Speed Recall
Similar to the Chrono Recall mode, during speed measurement or Stop state, you can press [RECALL] to
recall the speed/lap memories. The Mode message will be shown for one to two seconds as the Mode
message display is displayed.
RECALL
The Speed and Lap time will be displayed on the upper and the middle lines. The lower line shows the current
time counting. During Data recall, the fastest speed will be reviewed first, then the slowest speed and average
speed.
Further presses of [RECALL] will retrieve the memories in ascending order or reverse order depending on
whether the speed measurement is stopped or under operation respectively. During Recall, the "Recall"
indicator is ON.
(Note: Speed mode and Chrono mode will not run simultaneously. When Chrono mode is active,
Speed mode should be in reset state and vice versa.)
18
NO-PROOF-OF-PURCHASE LIMITED WARRANTY
See label on back of unit for details, or check
http://support.ACCUSPLIT.com
ACCUSPLIT, Inc.
3090 Independence Drive, Suite 148
Livermore, CA 94551 USA
800-935-1996 • 925-290-1900 • FAX 925-290-1930
www.ACCUSPLIT.com • [email protected]