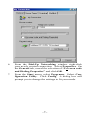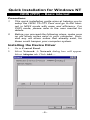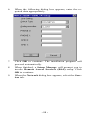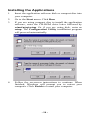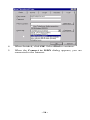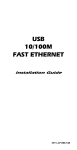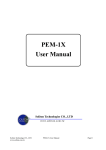
1
ISDN TA PCI Card
From Quick Setup
to
Internet Access
Class B
CE Mark Warning
This is a Class B product. In a domestic environment, this
product may cause radio interference, in which case the user
may be required to take adequate measures
Quick Installation for Windows
98/ME/2000/XP
VCOMM (PPP) -- Basic Internet
Precautions:
1.
This quick installation guide aims at helping you to
setup the ISDN TA PCI Card and go to the Internet in VCOMM mode with ease and efficiency. For
NDIS and CAPI modes, refer to the user manual
for details.
2.
Before you proceed the following steps, make sure
no old driver suites exist in your computer. Uninstall any old driver suites that already exist, for
these could hamper your computer system.
Getting Started
Before you begin, make sure you turn off all power to your
computer.
1.
Remove the chassis cover of your computer.
2.
Align the contact edge of the ISDN TA PCI Card toward the connector of any free PCI Bus Master expansion slot. Push firmly and slowly until it is fully seated
in the connector.
3.
Screw the PCI card to the computer chassis with the
provided screws.
4.
Replace the computer’s chassis cover.
5.
Turn on your computer.
6.
Start
Windows
98/ME/2000/XP.
Windows
98/ME/2000/XP will automatically detect the new
device.
7.
Load the device driver disc into the CD-ROM drive of
your system, make sure the file path is correct and perform
the
following
steps
to
continue.
8.
When the following dialog box appears, select the appropriate switch type in Windows 2000/XP and click
Next. Follow the on-screen instructions to finish
setting.
-3-
9.
To verify whether the Network device exists in your
computer and is enabled, go to My ComputerÆControl PanelÆSystem. Click the Device
Manager tab. If the Intelligent PCI ISDN TA (ISDN)
device, Modems, Multifunction adapters and Network adapters are found, it means that your Network
device is well installed and enabled. If not, consult your
computer dealer for technical support.
Installing the Applications
1.
Go to My Computer.
2.
Select the drive whichever contains the device driver.
For example, if you are using disks, insert disk#1 into
drive A, double-click “3½ Floppy (A:)”. Or if you are
-4-
using compact disc, select the CD-ROM drive and double-click on folder PCI\WIN98ME when in Windows
98/ME, or PCI\WIN2KXP for Windows 2000/XP.
3.
Double-click Setup.exe. Follow the on-screen instructions to proceed.
Windows 2000/XP Uninstall
Removing the Device Driver
1.
Go to My ComputerÆControl PanelÆSystem.
2.
From the System window, click the Hardware tab.
3.
From the Hardware tab, double click the Device Manager button.
4.
From the Device Manager window, click Multifunction adapters to expand. Right-click Intelligent PCI
ISDN TA Multi-Functions.
5.
Choose Uninstall and click OK. The software of this
device will be removed automatically.
-5-
Removing the Applications
1.
Go to My ComputerÆControl Panel.
2.
From the Control Panel window, double click the
Add/Remove Programs icon.
3.
Choose Configuration Utility for Windows 2000.
Click Change/Remove button and click OK. The applications for this device will be removed automatically.
4.
Remove the ISDN TA PCI Card from your computer.
Making a New Connection
1.
Go to My Computer.
2.
Select Dial-Up Networking. Double-click Make a
New Connection, a dialog box will appear as shown
below.
3.
Name the new connection appropriately.
4.
Select Intelligent PCI ISDN TA (modem).
5.
Enter in the area code and phone number of your Internet Service Provider (ISP). Leave out the ‘-‘. (Example: ‘1234567’ NOT ‘123-4567’ ) Typically, the country and area codes are not required and should be disabled.
-6-
6.
From the Dial-Up Networking window right-click
your newly created connection. Select Properties. On
the General tab, cancel the selection of “Use area code
and Dialing Properties” and click OK.
7.
From the Start menu, select Programs. Select Configuration Utility. Click Config. A dialog box will
prompt you to change the settings to fit your needs.
-7-
8.
9.
Select the proper switch type corresponding to your
need. Switch Type varies between countries. Although
you have the option of “Automatic” as a selection, it is
highly recommended that you choose a specific selection to reduce the chance of incompatibility. Typically
the selections are as follows:
Area
Switch Type
Canada & United
States
Northern Telecom &
NI-1
Japan
INS Net 64
Taiwan
DSS1 (ETSI)
Europe
DSS1 (ETSI)
Enter in the ISDN phone numbers and the Service Profile Identifier. Number (SPID) will be supplied by your
local ISDN telephone company.
[NOTE: With the “INS Net 64” & "DSS1 (ETSI)” switch
types, there are no SPID’s to be entered.]
10. Now you are ready to connect your ISDN Network
Connection Cable to the PCI card, already installed in
your computer.
-8-
Quick Installation for Windows NT
NDIS (PPP) -- Basic Internet
Precautions:
1.
This quick installation guide aims at helping you to
setup the ISDN TA PCI Card and go to the Internet in NDIS mode with ease and efficiency. For
CAPI mode, please refer to the user manual for
details.
2.
Before you proceed the following steps, make sure
no old driver suites exist in your computer. Uninstall any old driver suites that already exist, for
these could hamper your computer system.
Installing the Device Driver
1.
Go to Control Panel.
2.
Select Network. A Network dialog box will appear.
Select Adapter tab. Click Add….
-9-
3.
Click Have Disk… and click OK to continue.
4.
If you are using disks to install the device driver, insert
the device driver disk into the floppy disk drive of your
system and enter the drive name, for example, A:, to
continue. Or if you are using compact disc to install, insert the compact disc into the CD-ROM drive of your
system and enter the CD-ROM drive letter followed by
PCI\WINNT\DRIVERS, and click OK to continue.
5.
When the Select OEM Option dialog box appears,
click OK to continue.
- 10 -
6.
When the following dialog box appears, enter the required data appropriately.
7.
Click OK to continue. The installation program will
proceed automatically.
8.
When finished, a Setup Message will prompt you to
invoke Remote Access Services (RAS) setup. Click
OK to continue.
9.
When the Network dialog box appears, select the Services tab.
- 11 -
10. Select Remote Access Service. Click Properties. The
following figure will appear. Select Add... When the
Add RAS Device dialog box appears, select ISDN1 –
ISDN_TA and click OK. Click Add... again to add
ISDN2-ISDN_TA. When completed, click Continue.
The Network dialog box will appear again. Click Close.
The installation program will continue automatically.
When finished, Windows will prompt you to restart
your computer. Click Yes to continue.
- 12 -
- 13 -
Installing the Applications
1.
Insert the application software disk or compact disc into
your computer.
2.
Go to the Start menu. Click Run.
3.
If you are using compact disc to install the application
software, enter the CD-ROM drive letter followed by
winnt\ntap\setup. Or if you are using disk, enter a:
setup. The Configuration Utility installation program
will proceed automatically.
4.
Follow the on-screen instructions to continue. When
finished, Windows will prompt you to restart your
computer. Click Finish to restart your computer.
- 14 -
Making a New Connection
1.
Go to My Computer. Select Dial-Up Networking.
2.
Click New... to name the phonebook appropriately.
3.
Shift to the next tab to enter the required data.
- 15 -
4.
When finished, click OK. Select Dial to continue.
5.
When the Connect to ISDN dialog appears, you are
connected to the Internet.
- 16 -