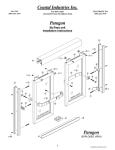
1
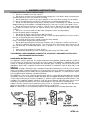
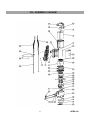
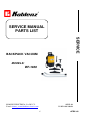
SERVICE MANUAL
PARTS LIST
SERVICE
BACKPACK VACUUM
MODELS:
BP-1400
KOBLENZ ELECTRICA S.A. DE C.V.
E-mail: [email protected]
APRIL-09
LP-BP1400-200904
1
APRIL-09
INDEX
I. WARNING INSTRUCTIONS
3
II. SAFETY PRECAUTIONS
4
III. SPECIFICATIONS
4
VI. MAINTENANCE
4
V. TROUBLE SHOOTING CHART
5
VI. OPERATION INSTRUCTIONS
6
VII REPLACEMENT PROCEDURES
7
VIII. ASSEMBLY VACUUM
8
IX. PART LIST
9
2
APRIL-09
I.- WARNING INSTRUCTIONS
To reduce risk of fire, electric shock, or injury:
Do not use outdoors or on wet surfaces.
Do not leave vacuum cleaner unattended when plugged in. Turn off the switch and unplug the
electrical cord when not in use and before servicing.
Do not allow to be used as a toy. Close attention is necessary when used by or near children.
Use only as described in this manual. Use manufacturer’s recommended attachments.
Do not use with damaged cord or plug. If vacuum cleaner is not working as it should, has been
dropped, damaged, left outdoors, or dropped into water, return it to a service center before using.
Do not pull or carry by cord, use cord as a handle, close a door on cord, or pull a cord around
sharp edges or corners. Do not run vacuum cleaner over cord. Keep cord away from heated
surfaces.
Do not use extension cords or outlets with inadequate current carrying capacity.
Turn off all controls before unplugging.
Do not handle plug or vacuum cleaner with wet hands.
Do not put any objects into openings. Do not use with any opening blocked, keep free of dust,
lint, hair, and anything that may reduce airflow.
This vacuum cleaner creates suction. Keep hair, loose clothing,
fingers, and all parts of body away from openings.
Do not pick up anything that is burning or smoking, such as cigarettes, matches or hot ashes.
Do not use without dust bag in place. Use extra care when cleaning on stairs. Do not use to
pick up flammable or combustible liquids such as gasoline, or use in areas where they may be
present.
Store your cleaner indoors in a cool, dry area.
Do not unplug by pulling on cord. To unplug, grasp the plug, NOT THE CORD.
THESE MODELS ARE GROUNDED, CONNECT TO A PROPERLY GROUNDED OUTLET ONLY SEE GROUNDING INSTRUCTIONS.
GROUNDING INSTRUCTIONS
This appliance must be grounded. If it should malfunction or breakdown, grounding provides a path of
least resistance for electric current to reduce the risk of shock. This appliance is equipped with a cord
having an equipment-grounding conductor and grounding plug. The plug must be inserted into an
appropriate outlet that is properly installed and grounded in accordance with all local codes and
ordinances.
WARNING - Improper connection of the equipment-grounding conductor can result in a risk of electric
shock. Check with a qualified electrician or service person if you are in doubt as to whether the outlet
is properly grounded. Do not modify the plug provided with the appliance - if it will not fit the outlet,
have a proper outlet installed by a qualified electrician.
This appliance is for use on a normal 120 volt circuit, and has a grounded plug that looks like the plug
illustrated in sketch A. A temporary adapter that looks like the adapter illustrated in fig B and C may be
used to connect this plug to a 2-pole receptacle as shown in fig B if a properly grounded outlet is not
available. The temporary adapter should be used only until a properly grounded outlet (fig A) can be
installed by a qualified electrician, The green colored rigid ear, lug, or the like extending for the
adapter must be connected to a permanent ground such as a properly grounded outlet box cover.
Whenever the adapter is used, it must be held in place by a metal screw.
Note: In Canada, the use of a temporary adapter is not permitted by the Canadian Electrical Code.
3
APRIL-09
II.- SAFETY PRECAUTIONS
Do not vacuum water or liquids.
Do not vacuum up hard or sharp objects, as they may damage the hose, vacuum bag or the
vacuum motor.
Do not drop the vacuum on the floor.
Do not operate the vacuum while it is standing on high-pile carpet. It is essential that the
exhaust airflow is not restricted.
Do not wash or launder the cloth vacuum bag. It would destroy the filtration capacity of the
fabric.
Do not kink or twist the power cord.
Do not attempt to service the vacuum yourself. Repair by anyone other than an authorized
repair service center may void the warranty.
III.- SPECIFICATIONS
POWER
AMPER
FILTRATION
Hz
1400 W
11.5
4 STAGE
60
IV.- MAINTENANCE
Clean the cloth vacuum bag regularly. After emptying the vacuum bag, turn it inside out and shake
as much dust out of the fabric as possible. Optimum performance is achieved by using a paper
vacuum bag with the cloth bag.
Check the power cord for damage. Always unwind the cable completely.
Ensure that the vacuum hose, the extension wand and the vacuuming accessories are not blocked.
Ensure that the electrical outlet and the plug are securely connected. Incorrect connections may
cause sparking and damage to the cable socket.
Have your Backpack Vacuum served by an authorized repair service center if you suspect any
potential problems.
Use only approved paper vacuum bags.
Ensure that the flexible vacuum bag ring provides a proper seal
4
APRIL-09
V.- TROUBLE SHOOTING CHART
1.- MOTOR DOES NOT RUN
PROBLEM
Bad ON-OFF switch.
Line cord open.
Motor open.
There is no voltage line.
POSSIBLE CAUSE
Replace switch.
Replace cord.
Check motor and wiring.
Check voltage line.
2.- LOW SUCTION
PROBLEM
Full paper bag
Closed hose or wand
Slow motor
Capped secondary filter
POSSIBLE CAUSE
replacement
Clean obstruction
Check carbon brushes
Clean filter
3.- LOW-POWER
PROBLEM
Suction control dial
Motor damaged
Bad electrical connection.
Filters obstructed
POSSIBLE CAUSE
Check position of suction control dial
Replace motor
Check wiring.
Change of filters
ELECTRICAL CHARACTERISTICS
VOLTAGE
Hz
127 V ~
60 Hz
5
Amper
11.5
APRIL-09
VI.- OPERATING INSTRUCTIONS
Please read the following operating instructions
carefully. They will help you to get the best
performance from this professional quality vacuum
cleaner and to maintain it in optimum condition.
Follow these simple steps for easy and
effective
operation of the Backpack vacuum.
Open the lid and ensure that the cloth bag is
correctly located and the flexible ring provides a
proper seal when the lid is closed. For optimum
filtration and maximum hygiene, it is advisable to
use a paper vacuum bag in addition to the
standard cloth bag.
If you use a paper vacuum bag, simply insert it into
the cloth bag, making sure that the cardboard disk
is centered on the flexible sealing ring.
When you replace the lid, the short nozzle in the
center of the lid will be forced into the central hole
of the cardboard disk of the paper vacuum bag
thus providing a tight seal. Make sure the paper
vacuum bag is tightly secured over the short
nozzle before vacuuming.
Lock the lid down with the two latches. Always
ensure that the vacuum bag is empty before
vacuuming. Your Backpack vacuum has been
fitted with a thermal overload switch to protect the
motor against damage should the airflow be
blocked for extended periods. This may occur if the
vacuum bag is overfull or if the vacuum hose is
blocked. The vacuum motor will stop before it can
get too hot. If this happens, empty and thoroughly
clean the vacuum bag or free any blockage and
ensure that adequate
airflow is restored. The motor will automatically
restart after it has
cooled to a safe operating temperature.
1. The vacuum hose is fitted into the cuff in the lid.
It should not be necessary to remove the hose in
normal operation.
2. Place the Backpack vacuum on your back,
adjust the shoulder straps until you feel
comfortable and then tighten the waist belt. The
Backpack vacuum is designed to ride higher on
your back for maximum comfort.
3. Plug the cord into a 120 volt, grounded outlet.
Always unwind the cord completely before
vacuuming. It is important to maintain the power
cord in good condition. This unit ships with a 50'
16AWG x 3 conductor
SJT extension cord. Always use a 16x3 SJT
extension cord when
operation this unit. Use care when pulling the cord
around sharp
edges and through doorways
Never operate the Backpack vacuum if the
power cord is damaged in any way.
4. Attach the extension wand to the hose and fit
the floor tool or
any of the other vacuuming accessories on the
wand.
5. Turn the vacuum on. The toggle switch is
located on the switch box.
You may clip the switch box to the waist belt.
6
APRIL-09
VII.- REPLACEMENT PROCEDURES
1. - TO REPLACE PAPER BAG (9 )
1.1.- To change the bag of paper (9) release the cover side latches (2)
1.2.- Lift up the cover (18).
1.3.- Replace the paper bag and reassemble the cover(9).
2.- TO REPLACE CLOTH BAG (28)
2.1.- Follow the steps indicated on point 1.1 and 1.2.
2.2.- Remove the cloth bag.
2.3.- Change the fabric bag and reassemble again.
3.- TO CHANGE THE SECONDARY FILTER FRAME(HEPA)(22).
3.1.- Follow the steps indicated on point 1.1, 1.2 and 2.2.
3.2.- Remove the framework of the secondary filter (hepa)(22).
3.3.- Remove the secondary filter (hepa).(22) and reasemble again.
4.- TO CHANGE THE MOTOR (30)
4.1.- Follow the steps indicated on point 1.1;1.2;2.2;3.2 and 3.3.
4.2.- Remove screws (3) from the back rest (7), screws (6) of the Cabinet support (17) and the front cabinet (16).
4.3.- Remove the secondary filter plate and the seal body philips screws(5).
4.4.- Remove the motor cover (20) with the top motor mount (35) and the motor shroud top (37) and motor seal
(38)
4.5.-Disconnect the harness switch and the line cable
4.6.-Change the motor (30) and reassemble again.
5.- TO CHANGE THERMAL PROTECTION(1)
5.1.- Follow the steps indicated on point 1.1 , 1.2 ,3.2,4.2 to 4.4.
5.2.- Remove the shroud engine (31) together with the lower shroud for engine.
5.3.- Withdraw the philips screws bread head screw (4) and remove the thermal protection.
5.4.- Replace and reassembly again.
6.- TO CHANGE SWITCH HARNESS (29)
6.1.- Follow the steps indicated on point 1.1,1.2,2.2,3.2,4.2 to 4.5
6.2.- Remove the nut heyco (13) and the safe heyco (12) to be able to remove the harness switch.
6.3.- Replace and reassembly again
.
7.- TO CHANGE POWER HARNESS (10) ,FIG 2.
7.1.- Follow the steps indicated on point 1.1,1.2,2.2,3.2,4.2 to 4.5
7.2.- Remove the the nut heyco (13) and the safe heyco (12) to be able to remove the harness switch
7.3.- Replace and reassembly again.
8.- TO REPLACE POST FILTER (8)
8.1.- Remove the front cover (24) and the port filter (8).
8.2.- Replace and reassemble again.
7
APRIL-09
VIII.- ASSEMBLY VACUUM
8
APRIL-09
IX.- LIST PART
No.
PART N.
DESCRIPTION
1
2
3
4
5
6
7
8
9
10
11
12
13
14
15
16
17
18
19
20
21
22
23
24
25
26
27
28
29
30
31
32
33
34
35
36
37
38
39
40
49-5800-01-3
49-5800-5
49-5800-02-1
49-5800-03-9
49-5800-04-7
49-5800-05-4
49-5800-06-2
49-5802-1
49-5803-9
49-5804-7
49-5805-4
49-5800-07-0
49-5800-08-8
49-5800-09-6
49-5800-10-4
49-5806-2
49-5807-0
49-5808-8
49-5809-6
49-5800-11-2
49-5800-12-0
49-5800-13-8
49-5800-14-6
49-5800-15-3
49-5800-16-1
49-5800-17-9
49-5800-18-7
49-5810-4
49-5811-2
49-5812-0
49-5800-19-5
49-5813-8
49-5800-20-3
49-5800-21-1
49-5800-22-9
49-5800-23-7
49-5800-24-5
49-5814-6
49-5800-25-2
49-5800-26-0
THERMAL PROTECTION SWITCH
LATCH
#10 .750 TYPE B PHI LIPS PAN HEAD SCREW
#6 X .375 HI-LO PHI LIPS PAN HEAD SCREW
#8-16 X 2.500 PHI LIPS PAN HEAD SCREW
#8 X .625 HI-LO PHI LIPS PAN HEAD SCREW
BACK REST
POST FILTER
PAPER BAG 10 PACK
POWER HARNESS
BAG COMPARTMENT SEAL
HEYCO FITTING
HEYO FITTING NUT
MOTOR COMPARTMENT
BUMPER
FRONT PLATE
BACK PLATE
COVER
HOSE INLET
MOTOR COVER
SECONDARY FILTER PLATE
SECONDARY FILTER FRAME
SECONDARY FILTER CAP
POST FILTER FRAME
BODY SEAL
BOTTOM MOTOR MOUNT
INLET SEAL
SHAKE OUT BAG
SWITCH HARNESS
5.1" SINGLE STAGE TEK MOTOR
TEK MOTOR SHROUD PC
SHOULDER HARNESS STRAP
WAIST BELT
SHOULDER STRAP BUCKLE
TOP MOTOR MOUNT
MOTOR SHROUD BOTTOM 5.1 - 1 STAGE
MOTOR SHROUD TOP 5.1 - 1 STAGE
MOTOR SEAL
RIGHT SHOULDER HARNESS
LEFT SHOULDER HARNESS
42
43
44
45
46
47
48
49
50
51
52
49-5818-7
49-5817-9
49-5819-5
49-5820-3
49-5822-9
49-5823-7
49-5824-5
49-5825-2
49-5816-1
49-5800-27-8
49-5800-28-6
NOT ILLUSTRATED
CREVISE TOOL
UPHOLSTERY TOOL
DUST BRUSH TOOL BODY
DUST BRUSH BRISTLES
CARPET TOOL BODY
CARPET TOOL BUMPER
BARE FLOOR TOOL BODY
BARE FLOOR TOLL BRUSH
HOSE
TELESCOPE WAND
50' CABLE-EXTENSION 16
9
QTY
1
1
4
2
4
4
1
1
1
1
1
1
1
1
1
1
1
1
1
1
1
1
1
1
1
1
1
1
1
1
1
2
1
2
1
1
1
1
1
1
APRIL-09
FACTORY AUTHORIZED SERVICE
Thorne Electric Company
610 Lanark Suite 205
San Antonio TX, 78218
Tel (210) 590-1226
Fax (210)590-1258
1-800-548-5741
FACTORY
KOBLENZ ELECTRICA S.A. DE C.V.
AV. CIENCIA NO.26
CUAUTITLAN IZCALLI
ESTADO DE MEXICO 54730
Web site : http://www.koblenz.com.mx
KOBLENZ ELECTRICA S.A. DE C.V.
E-: [email protected]
10
APRIL-09