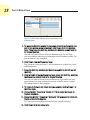
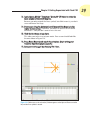
1
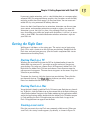
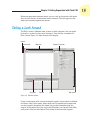
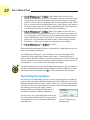
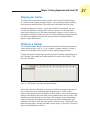
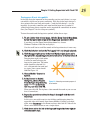
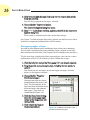
1
In This Chapter
䊳 Introducing Flash
MA
䊳 Figuring out what you can create with Flash CS4
䊳 Knowing when not to use Flash CS4
䊳 Starting Flash
D
䊳 Perusing the screen
O
GH
䊳 Closing Flash
TE
䊳 Using Help
䊳 Creating your first animation
TE
RI
AL
Getting Acquainted
with Flash CS4
CO
PY
RI
nce upon a time in a galaxy that seems far, far away
by now, there was the Internet, which contained
only plain, unformatted text. Then came the Web, and
we gained text formatting and graphics. Then the
Web grew up a little, and Web page graphics got
fancier with things such as small animations in
banner ads. But people, being used to movies and
TV, wanted an even more animated and interactive
Web experience. Along came Flash.
Flash, once from Macromedia but now from Adobe
Systems, is the software that runs some of the coolest
Web sites around. When you surf the Web and see sites
that contain animation across the entire page or buttons
that do spectacular stunts when you click them, you’re probably seeing some Flash magic. If you create a Web site, you can use
Flash to rev up the basics and actively respond to users’ choices so that your
viewers will say, “Wow!”
In this chapter, you find out what Flash is all about, what the Flash screen
looks like, and how to use Help. Then you create your first, simple animation
so that all the rest of this book makes sense.
10
Part I: A Blast of Flash
Discovering Flash
Flash offers a powerful system for creating animation for the Web. In a nutshell, here’s an overview of how you use the system:
1 . Cr e a t e a F l a s h m o v i e b y c r e a t i n g g r a p h i c s a n d a n i m a t i n g t h e m o v e r
the duration of the movie.
Besides animated graphics, you can add navigational buttons, check
boxes, and other user interface elements. You can add a few Flash components to a Web site or create an entire Web site.
2 . Use the Publish command in Flash to publish the movie into a Flash
Player file that a br owser can display.
At the same time, Flash creates the appropriate HyperText Markup
Language (HTML) code that you need for your Web page.
3 . I n s e r t H T M L c o d e i n t o y o u r H T M L d o c u m e n t t h a t r e f e r ences the Flash
Player file.
It’s similar to adding a graphic to a Web page. Or you can use the HTML
code alone as a new Web page for a fully Flashed page.
4 . Upload the new or edited HTML document and the Flash Player file to
the location wher e you keep other files for your Web pages.
5. Open your br owser, navigate to your Web page, and pr esto! — ther e’s
your cool animation, navigation, or other Flash element on your Web
page.
You need the Flash Player to see the effects that Flash creates. These days,
the Flash Player comes installed with most computer systems and browsers,
so most people can view Flash-driven Web sites immediately without any special download or preparation. When you display a Web site that contains
Flash effects, your system uses the Flash Player to play the animation.
Users who don’t have a Flash Player can download it for free from Adobe at
www.adobe.com/go/flashplayer.
Web sites are getting more and more sophisticated. By using animation, special effects, and interactive techniques, you can distinguish your Web site
from the also-rans. Creating animation isn’t hard, and you don’t have to be a
professional graphic artist, either. Anyone can create simple animations to
enhance a Web site; it just takes a little time.
To find Web sites that have successfully used Flash, check out the Adobe
site at www.adobe.com/products/flash/flashpro/productinfo/
customers and look at some of the examples. Don’t get discouraged by
seeing some of the truly sophisticated results at these sites. You can start
with a simple, animated site and go from there. (Chapter 16 lists ten great
Flash designers and where you can find their work.)
Chapter 1: Getting Acquainted with Flash CS4
Understanding What You Can Create
with Flash CS4
You can use Flash CS4 to create simple animation to add to your Web page.
Or you can create an entire Web page or site with Flash and incorporate text,
graphics, interactive buttons, user interface components, and animation. You
can even program applications in Flash.
This book helps you use Flash to create a simple or complex Web site. The
following list describes some ways that you can manipulate text, graphics,
and sound by using Flash CS4:
⻬ Cr eate still or animated text on your Web page. You can choose to stop
the animation after a few seconds or repeat it while your viewers view
the page.
⻬ Use Flash tools to cr eate your own graphics for your Web page or to
impor t graphics. You can lay out an entire Web page graphically or add
graphics to only a part of a Web page, as shown in Figure 1-1.
Thanks to the New York Philharmonic, www.nyphil.org, for permission to display its Web site.
Photo by Chris Lee
Figure 1-1: The New York Philharmonic Web site uses Flash to create an ever-changing
display on its home page.
11
12
Part I: A Blast of Flash
⻬ Animate graphics and make objects appear and disappear by using
the transpar ency featur e. Objects can move, get bigger or smaller, or
rotate. Flash also lets you morph — that is, transform — shapes into new
shapes.
⻬ Fill shapes and text with g r a d i e n t s , w h i c h a r e colors that gradually
change into new colors. You can even fill shapes and text with bitmap
images that you import into Flash. For example, you could fill the
letters of your name with dozens of flowers. (You aren’t a flower child
any more?)
⻬ Cr eate Web page buttons that not only lead your viewers wher ever
you want them to go but also change shape or color at the same time.
You can make buttons change when you pass your mouse over them.
People who view your page can click a button to display a movie (animation) or start a small application.
⻬ Add sound or video to your movie. It’s easy to add sound effects in
Flash. You can control how long the sound or music plays and whether
it loops to play continuously. You can play video files as well.
⻬ Cr eate menus that viewers can use to navigate your site. You can
create navigation tools as well as forms, check boxes, and other interface elements that look a lot more stylish than plain HTML ones.
As you can see, you can go far with Flash if you want. And why not? It’s
great fun!
Determining When Not to Use Flash CS4
If Flash CS4 is so wonderful, why doesn’t every Web site designer use it? Why
aren’t most Web sites created completely with Flash?
Here’s the other side of the story.
Although the vector graphics and animation of Flash load quickly, they don’t
load as quickly as plain text and simple graphics. Adding a movie to your
Web page creates some overhead. There’s no point in using Flash if you want
simple pages consisting of mostly text and a few graphics that you want to
stay put and not move.
You can create certain graphic effects more easily by using bitmap graphics.
Painted brush stroke and textured effects are examples. Artists create these
types of graphics by using graphics editing software, and the results are
bitmaps. Similarly, to add photographs to your Web page, you need to scan
the photographs as bitmaps. Flash creates vector graphics (defined mathematically), which are different from bitmap graphics (defined by lots of dots).
However, you can import bitmap graphics into Flash. Find out more about
bitmap and vector graphics in Chapter 2.
Chapter 1: Getting Acquainted with Flash CS4
If you want simple animation, such as a few blinking dots or a marquee effect,
animated GIFs (the animated bitmap graphics that you often see on the Web)
might be smaller than Flash movies, so they load faster. You can create animated GIFs by using animated GIF editing software.
Some sites don’t lend themselves to animation. Animation can distract from
your content, and overdoing animation can make a serious site seem silly.
Animation is great, but it has its place. Also, although Flash has some features that allow accessibility for people with disabilities, it still isn’t as accessible as plain HTML. You need to determine whether animation is right for
your Web site.
Getting the Right Start
Well begun is half done, as the saying goes. The easiest way to begin using
Flash CS4 is with a shortcut or alias right on your desktop. Double-click the
Flash icon, and you’re on your way. (See this book’s companion Web site for
information on installing Flash.)
Starting Flash on a PC
Whether you installed Flash from the DVD or by downloading it from the
Adobe Web site onto your PC, you might or might not have a shortcut on
your desktop. To create one, choose Start➪All Programs➪Adobe Flash CS4.
Right-click the Adobe Flash CS4 item and choose Create Shortcut from the
pop-up menu that appears. The new shortcut appears on the menu. Drag that
shortcut to your desktop.
To rename the shortcut, click the shortcut on your desktop. Then click the
text beneath the icon. Type Flash CS4 (or whatever you want) and press
Enter. Just double-click the icon to open Flash.
Starting Flash on a Mac
You might find it handy to add the Flash CS4 icon to your Dock for easy launching. To do this, click the Finder icon on the extreme left of the Dock to bring up
a new Finder window. Navigate in the Finder window to the Applications folder,
and in the Applications folder, double-click the Adobe Flash CS4 folder to open
it. Click and drag the Flash CS4 application icon to the Dock. A copy of the
Flash CS4 application icon appears on the Dock.
Creating a new movie
Files that you create by using Flash are commonly called movies. When you
start Flash, the startup screen appears (by default), as shown in Figure 1-2.
13
14
Part I: A Blast of Flash
In the Create New section, click one of several options to immediately open a
new movie file. These options let you create movies for various types of uses,
such as mobile devices and further programming. For the purposes of this
book, we assume that you want to create a general-use movie using the latest
technology, which is the Flash File (ActionScript 3.0) option. (ActionScript 3.0
is the latest version of Flash’s programming language.)
If you have already opened a movie and have the menus available, choose
File➪New. In the New Document dialog box, select Flash File (ActionScript 3.0)
on the General tab and then click OK. You usually start by creating or importing some graphics. (To find out more about working with graphics, see
Chapter 3.)
Opening an existing movie
If you want to work on a movie you’ve already created when you first open
Flash, choose the movie in the Open a Recent Item section or click Open to
find the file. If you’ve already opened a movie and have the menus available,
press Ctrl+O (Windows) or Ô+O (Mac) or choose File➪Open; then doubleclick the movie to open it. The first frame appears on your screen, and you
can edit the movie any way that you want.
Figure 1-2: The Startup screen.
Chapter 1: Getting Acquainted with Flash CS4
When you open more than one movie, you see a tab at the top for each movie.
You can click the tabs to move from movie to movie. The tabs appear in the
order you created or opened the movies.
Taking a Look Around
The Flash screen is different from screens in other programs that you might
be used to, so take the time to get to know it. You can also customize the
Flash screen. Figure 1-3 shows one possible display.
Edit bar
Filename tab
Menu bar
Playhead
Timeline
Property inspector
Stage
Tools panel
Figure 1-3: The Flash screen.
If your screen opens with several rectangular panels strewn about or docked
on various sides, don’t worry about them now. We explain how to open and
use these panels throughout this book, but you don’t need them for this
chapter. If they drive you crazy, right-click (Windows) or Control+click (Mac)
each panel’s title bar and choose Close Group in the menu that appears.
15
16
Part I: A Blast of Flash
Tooling around the toolbars
Flash contains two toolbars in the Mac version: the Edit bar and the Controller.
In Windows, Flash also offers the Main toolbar. To display or hide these toolbars, choose Window➪Toolbars and click the toolbar that you want to display
or hide. Here is a description of the toolbars:
⻬ Main toolbar (Windows only): Contains commonly used commands.
Many of these are familiar from the Standard toolbar in other Windows
programs. By default, Flash does not display the Main toolbar.
⻬ Contr oller: Lets you control the playback of movies. For more information, see Chapter 9.
⻬ Edit bar: Helps you work with the symbols, scenes, and the user interface. The bar, shown in Figure 1-4, appears below the menu. It includes a
button to access symbols (which we cover in Part III), a button for editing scenes, a drop-down list to manage workspaces, and a zoom control.
We discuss the workspaces and the Timeline later in the chapter, in the
“Following a timeline” section. For detailed information about the
Timeline and scenes, see Chapter 9.
Figure 1-4: The Edit bar.
Using panels
Panels give you access to the many Flash tools and settings. You access the
panels from the Window menu. We discuss the specific panels throughout
this book. In this section, we explain how to keep control over your panels.
Most panels are dockable, which means they can sit at the side or bottom of
your Flash window without covering up your work and they fit together in a
group with other panels. You can also stack undocked panels on top of each
other. You control panels by doing the following:
⻬ Dock a panel. Drag it by its title bar to the side or bottom of your
screen. When you see a blue bar highlight, release the mouse button.
⻬ Undock a panel. Drag it by its title bar.
⻬ Open or close a panel. Choose it from the Window menu.
⻬ Close an undocked panel. Click its Close button.
Chapter 1: Getting Acquainted with Flash CS4
⻬ Close a docked panel. Right-click (Windows) or Control+click (Mac) its
title bar and choose Close Panel.
⻬ Collapse a gr oup of panels to icons. Click the double right arrow at the
top of the group of docked panels.
You can also stack panels. Drag a
panel (by its title bar) to another
panel to stack it below the first one.
You can also collapse or expand
panels: A collapsed panel displays
only its title bar, so it doesn’t take
up much space. Just click its title
bar. Repeat the process to expand
the panel again.
Tab
Top bar
Collapse to Icons
The Tools panel contains all the
tools you need to draw and edit
objects. At the bottom of the Tools
panel are options that modify how
the tools function. (See Chapters 3
and 4 for a complete description of
the Tools panel.)
The Property inspector, shown in
Figure 1-5, is another important
panel. This panel displays information about selected objects, such as
size, name, and location. You can
modify objects in the Property
inspector as well. It is context sensitive, which means that its contents
change according to what you’re
doing. For example, if you select a
graphic object, the Property inspector provides settings relating to that
object, and you can use the Property
inspector to edit that object.
By default, the Property inspector is
grouped with the Library (which we
explain in Chapter 2) and the Tools
panel.
Figure 1-5: The Property inspector.
17
18
Part I: A Blast of Flash
The Property inspector has several controls for changing its configuration:
⻬ Tab: Double-click the tab to switch between collapsing the Property
inspector completely (you see just the tab) and displaying its previous
state.
⻬ Collapse to Icons button: Click the small double arrows at the top of the
Property inspector to switch between an icon and the open state.
⻬ Title bar: Click the gray bar at the top to minimize or maximize the
Property inspector. In the default configuration, the top bar also applies
to the Library and the Tools panel.
Discovering the Flash menus
Most drawing functions are available only in the Tools panel. You often use
the Timeline for creating animation, as we discuss in the “Following a timeline” section, later in this chapter. Almost every other function in Flash is on
a menu somewhere. You just need to find it. In general, we discuss the specific menu functions where appropriate throughout this book. Table 1-1 offers
an overview of the menus.
Table 1-1
Flash Menus
Menu
What It Does
Flash
(Mac only) Enables you to set preferences, create keyboard shortcuts, and quit Flash.
File
Enables you to open and close files, save files, import and export
files, print, publish movies for the Web, send a movie via e-mail, and
quit Flash.
Edit
Provides commands that let you undo and redo actions; cut, copy, and
paste to and from the Clipboard; delete, duplicate, select, and deselect
objects; find and replace; copy and paste entire frames and motions on
the Timeline; edit symbols (see Chapter 7 for the story on symbols); set
preferences (Windows only); customize the Tools panel; map fonts;
and create keyboard shortcuts for commands (Windows only).
View
Helps you get a better view by letting you zoom in and out; show or
hide the ruler, grid, and guides; choose a preview mode; and specify
snapping preferences for objects for easy placement.
Insert
Enables you to insert symbols (Chapter 7 explains this topic); insert
and delete Timeline features, such as frames and keyframes (see
Chapter 9 for more); insert layers (check out Chapter 6); and add
scenes (see Chapter 9).
Chapter 1: Getting Acquainted with Flash CS4
Menu
What It Does
Modify
Helps you modify symbols, bitmaps, shapes, frames, Timeline features
and effects, scenes, or the entire movie (called the document). Offers
tools for transforming, aligning, grouping, and ungrouping objects,
arranging objects, and breaking objects apart.
Text
Enables you to format text and check spelling.
Commands
Enables you to reuse and manage saved commands. A command is
any action that you take in Flash, such as drawing or editing an object.
You can save commands from the History panel. (See Chapter 4.)
Control
Provides options that let you control the playing of movies, test
movies and scenes, engage certain interactive functions, and mute
sounds.
Debug
Provides tools for debugging ActionScript code. (See Chapter 10 for
more on ActionScript.)
Window
Enables you to open lots of things, including a duplicate window,
panels that help you control objects, the Library (more on the Library
in Chapter 2), windows for creating interactive controls (which we
explain in Chapter 10), workspaces, and the Movie Explorer (to help
manage your movie — see Chapter 12).
Help
Comes to the rescue when you need help. You can find a wide variety
of resources, including Adobe online forums.
Many menu commands offer keyboard shortcuts. You can also create your
own keyboard shortcuts. (See this book’s companion Web site for instructions.) The shortcuts are displayed on the menus, next to the command
name. Here are some of the most commonly used keyboard shortcuts. (For
more shortcuts, see the tear-out Cheat Sheet at the front of this book.)
+N (Mac): Open the New Document dialog box so
⻬ Ctrl+N (Windows) or Ô+
you can start a new movie.
+O (Mac): Open an existing movie.
⻬ Ctrl+O (Windows) or Ô+
+S (Mac): Save your movie. Use this shortcut often!
⻬ Ctrl+S (Windows) or Ô+
+X (Mac): Cut to the Clipboard. Chapter 4
⻬ Ctrl+X (Windows) or Ô+
explains more about using the Clipboard.
+C (Mac): Copy to the Clipboard.
⻬ Ctrl+C (Windows) or Ô+
+V (Mac): Paste from the Clipboard.
⻬ Ctrl+V (Windows) or Ô+
19
20
Part I: A Blast of Flash
+Z (Mac): Undo. Would you believe that by
⻬ Ctrl+Z (Windows) or Ô+
default Flash remembers your last 100 actions and can undo them? What
a relief! And if you choose Window➪Other Panels➪History, the History
panel lists each action so you know what the next Undo will undo. Think
of it as a journey into the long-forgotten past. (See Chapter 4 for more on
the History panel, and see this book’s companion Web site for details on
customizing the number of Undos that Flash remembers.)
+Y (Mac): Redo. This redoes actions that you
⻬ Ctrl+Y (Windows) or Ô+
undid by using the Undo button. (Got that?) This button remembers just
as many actions as the Undo button. If you undo more actions than you
want, click Redo (or press Ctrl+Y or Ô+Y) until you’re back where you
want to be. Using the Undo and Redo buttons is like traveling through
Flash time — and it gives you lots of slack while you’re working.
+Q (Mac): Exit Flash.
⻬ Ctrl+Q (Windows) or Ô+
We mention other keyboard shortcuts throughout this book when we discuss
their corresponding commands.
You should note, although it’s not a shortcut, that you can find the Zoom
Control box in the upper-right corner of the Stage — when the Edit bar is
open. (Choose Window➪Toolbars➪Edit Bar if necessary.) Click the arrow and
choose a zoom factor to zoom in and out. Zooming doesn’t change the actual
size of objects — it just makes them look bigger or smaller.
You aren’t limited to the choices on the Zoom drop-down list. Type a number in
the Zoom Control box and press Enter (Windows) or Return (Mac) to set your
own zoom factor. For example, type 8 5 to set the zoom factor to 85 percent.
Customizing the workspace
For the best in customization, you can save any layout of panels you like. Set
up the panels and choose Window➪Workspace➪New Workspace. In the New
Workspace dialog box that opens, shown in Figure 1-6, give the layout a name
and click OK. To restore that layout at any time, choose Window➪Workspace
and choose your very own layout. Choose
Window➪Workspace➪Manage Workspaces if
you need to rename or delete a workspace.
You can access the same workspace features on
the right side of the Menu bar. It’s easy to choose
a new workspace by just clicking the Workspace
drop-down list.
Figure 1-6: Make your very
own workspace.
Chapter 1: Getting Acquainted with Flash CS4
Staging your movies
The white box in the center of your screen is the Stage. Think of the Stage
as a movie screen where you place objects. You can place graphics and text
there and then animate them. Flash also plays back movies on the Stage.
Around the edge of the Stage is a gray area called the Pasteboard. You can
use the Pasteboard to store graphics that you plan to use soon but don’t
want on the Stage just yet. (For more permanent storage, use the Library, as
we explain in Chapter 2.) You can also store data and other nongraphical content on the Pasteboard. Content that you put on the Pasteboard doesn’t
appear in your Flash movie.
Following a timeline
The Timeline window divides your movie into frames. Each frame represents
a tiny stretch of time, such as ƒ 1⁄24 of a second. Creating a movie is simply a
matter of assembling frames, which are then quickly played in order.
Chapter 9 explains in detail how to make using the Timeline completely painless. For now, you should just understand the essentials. See Figure 1-7 for
the basic Timeline.
Figure 1-7: The Timeline is your key to managing animation.
On the left side of the Timeline is the layer list. When you open a new movie,
you see only one layer, unimaginatively named Layer 1. A layer is like a
sheet of transparent acetate on which you draw objects. Layers help you keep
objects from running into each other, causing unfortunate, messy results. You
organize your entire movie by using layers. For example, if you want to keep
some text constant throughout the movie but animate a bouncing dot, you
would give the dot its own layer and animate it on that layer. The layer list has
room for more layers, and you can add as many layers as you want. (Chapter 6
gives you the lowdown on layers.)
21
22
Part I: A Blast of Flash
You can drag the upper edge of the Timeline to make room for more layers.
Hover the mouse cursor over the top of the Timeline’s gray title bar until you
see the two-headed arrow and drag upward.
To the right of Layer 1, you see a bunch of rectangles, each representing a
frame. (Actually, before you start using the Timeline, they’re just potential
frames, like unexposed frames on a roll of film.) By default, each frame lasts
1
⁄24 of a second. Each layer has its own row of frames because you can have
different animations or objects on each layer.
A keyframe is a frame that defines some change in your animation. In some
animations, every frame is a keyframe. Other animations need keyframes for
only the first and last frames.
The playhead indicates the current frame in the animation and consists of a
red rectangle as well as a vertical hairline that crosses a frame on all of the
layers. Before you create any animation, the playhead is always on Frame 1.
You don’t use the Timeline until you’re ready to animate. While you work,
however, you should organize your objects on separate layers. Don’t worry —
you can always move an object from one layer to another.
Next to the Timeline’s tab is the Motion Editor’s tab. We discuss the Motion
Editor in Chapter 9. For now, it’s good to know that the Motion Editor gives
you detailed control over your animations.
Getting Help in a Flash
This book is all that you need to start creating great animations, but we
would be remiss if we didn’t tell you about the Flash Help system. To use
Flash Help, choose Help➪Flash Help.
Help’s multiple manuals
Flash Help contains several sections:
⻬ Using Flash is the main Help manual.
⻬ ActionScript 3.0 and Components is a manual on the latest version
of ActionScript, Flash’s programming language. (See Chapter 10 to
find out more.)
You don’t need to program Flash to use it, if you are interested only in
graphics and animation.
⻬ ActionScript 2.0 and Components is a user’s guide for ActionScript 2.0,
Flash’s previous programming language. You can still use this language.
Chapter 1: Getting Acquainted with Flash CS4
⻬ Adobe AIR explains how to use Flash CS4 to create desktop applications.
⻬ Flash Lite explains how to create Flash movies for mobile devices.
⻬ Extending Flash describes how to use JavaScript to create scripts to
help automate your work.
To search for a term, click the Search button. Then type the term and click
Search. You can then choose from the list of topics.
Finding more help on the Web
Adobe offers support on its Web site. Choose Help➪Flash Support Center,
which takes you to www.adobe.com/support/flash. There you can search
the knowledge base and tutorials for answers to your questions.
Try It; You’ll Like It
Perhaps by now you’re getting impatient to try out Flash. Getting started is
easy. You collect a few ideas, put together some art, add animation, save your
movie, and publish it. Then you view it in a browser either online or offline.
That’s the gratifying part. In the following sections, you get to try out Flash
by working through a basic animation. The rest of the book explains these
concepts in more detail.
Conceiving your first animation
Suppose that you want to add an animated logo to
a home page that you’ve already set up. You want
the animation to run when the page loads and then
stop. Figure 1-8 shows the Rainbow Resources
company logo — unanimated, of course — that
you can find on this book’s Web site, at www.
dummies.com/go/flashcs4fd.
Suppose that you want the word Rainbow to fly into Figure 1-8: A company logo
your page from the right and the word Resources to that could stand some
fly in from the left. At the same time, you want the
animation.
graphic to rotate 180 degrees. The following section
shows you how to create this animation.
Creating flashy drawings
You can use Flash to create a company logo, but importing one from this
book’s Web site is simpler. Often, you import existing graphics (such as a
23
24
Part I: A Blast of Flash
company logo) from a file rather than create them from scratch. (Chapter 3
explains how to import and manipulate graphics.)
If you’re going through the steps and make a mistake, choose Edit➪Undo (or
press Ctrl+Z or Ô+Z) and try again. You can use Undo repeatedly to undo several steps, if necessary.
To import the Rainbow Resources logo into Flash, follow these steps. (The
steps might vary if you’re importing some other graphic in a different format.)
1 . Star t F l a s h .
See the instructions in the section “Starting Flash on a PC” or “Starting
Flash on a Mac,” earlier in this chapter, if you need help.
2. In the Cr eate New section of the Star tup scr een, choose Flash File
(ActionScript 3.0).
You see a spanking-new movie on your screen.
3. Go to www.dummies.com/go/flashcs4fd and download the Bonus
Content, which contains the rainbow.gif image file.
You’ll need to unzip the file and extract the image file. Extract this image
file to the location where you plan to save your Flash movie.
4. Choose File➪IImpor t➪IImpor t to Stage.
The Import dialog box opens.
5. Br owse the dialog box until you find rainbow.gif in the location
w h e r e you saved it, and then double-click the file to open it.
You see the logo on your screen. You need to break the logo into pieces
and make it a vector graphic so that you can animate sections of it
separately.
6. Choose Modify➪B
Bitmap➪T
Trace Bitmap.
The Trace Bitmap dialog box appears.
7 . In the T race Bitmap dialog box, set the color thr eshold to 100, the
m i n i m u m a r e a t o 1 , t h e c u r v e f i t t o P i x e l s , a n d t h e c o r n e r t h r eshold
to Many Cor ners. Click OK.
In our example, we chose to use settings that reproduce the bitmap as
faithfully as possible. Flash creates a vector graphic and breaks up the
graphic into individual components. The entire graphic, however, is
selected.
8 . C l i c k a n y w h e r e outside the graphic to deselect it.
You’ve got your logo! Now you need to set it up for animation.
Chapter 1: Getting Acquainted with Flash CS4
Turning your objects into symbols
In the logo that you imported in the preceding section, each letter is a separate object, which can get pretty confusing. Each line in the logo’s design is
also separate. But you want your words — and the little design — to stay
together. So you must combine each word and the logo into a symbol. A
symbol helps keep objects together and is required for some kinds of animation. (See Chapter 7 for the scoop on symbols.)
To turn the words and the logo into symbols, follow these steps:
1. To get a better view of your image, click the Zoom Contr ol dr op-down
list (at the upper - r i g h t c o r n e r o f t h e S t a g e a r e a ) a n d c h o o s e 2 0 0 % .
If you don’t see the Zoom Control drop-down list, choose
Window➪Toolbars➪Edit Bar to display it.
Use the scroll bar to scroll the words of the logo into view, if necessary.
2. Click the Selection tool on the Tools panel if it’s not alr eady selected.
3. Click the upper -right cor ner of the wor d R a i n b o w (just above and to
the right of the w ) and drag to the lower -left cor ner of the first letter, R.
Dragging from right to left makes
it easier to avoid selecting the
logo at the same time. The entire
word should be selected. If it
isn’t, click outside the word and
try again. Your screen should
look like Figure 1-9.
4. Choose Modify➪C
Conver t to
Symbol.
5 . I n t h e C o n v e r t to Symbol
dialog box, choose Graphic
f r om the T y p e d r o p - d o w n l i s t ,
enter Rainbow in the Name
text box, and then click OK.
Figure 1-9: Selecting some text to prepare it
for animation.
When you click OK, Flash places a box around the word so you can see
that it’s one object.
6 . R e p e a t t h e p r ocedur e o u t l i n e d i n S t e p s 3 t h r o u g h 5 w i t h t h e w o r d
R e s o u rces.
In this case, you might want to start clicking and dragging from the
upper-left area of the word; then choose Modify➪Convert to Symbol
again, enter Resour ces in the Name text box, and click OK. Now all the
letters of the word Resources are a single object.
7 . Click above and to the left of the logo and drag to the lower right to
select the entir e l o g o .
25
26
Part I: A Blast of Flash
8. Hold down the Shift key and click each wor d to r emove both wor ds
f r om the selection.
Now the design portion of the logo is selected.
9. Choose Modify➪C
C o n v e r t to Symbol.
The Conver t to Symbol dialog box opens.
1 0 . Enter Lines in the Name text box, and then click OK in the Conver t to
Symbol dialog box.
Flash creates a symbol from the lines of the logo’s design.
See Chapter 7 to find out more about what symbols are and how to use them.
Symbols are important building blocks in Flash movies.
Putting your graphics on layers
You need to place different pieces on different layers when you’re animating.
You use layers to organize your movie and keep shapes separate so that they
don’t interfere with each other. (See Chapter 6 for the complete story on layers.)
To split your three symbols onto three separate layers, you can use a convenient feature of Flash CS4: Distribute to Layers. Follow these steps:
1. Click the Selection tool on the Tools panel if it’s not alr eady selected.
2. Drag diagonally acr oss the entir e logo, including the two wor ds, to
select it.
You should see two rectangles inside one bigger rectangle. All three
objects in the logo are selected.
3. Choose Modify➪T
Ti m e l i n e➪
Distribute to Layers.
You now have three new layers,
named Rainbow, Resources, and
Lines. The three objects of the
logo have been distributed to the
three new layers and removed
from Layer 1. Your layer list
should look like Figure 1-10.
4. Click the Zoom Contr ol dr opd o w n l i s t ( a t t h e u p p e r -right
cor ner of the Stage ar ea) and
choose 100%.
5 . Click outside the Stage to
deselect any objects.
Figure 1-10: In addition to the original Layer 1,
you now have three new layers.
Chapter 1: Getting Acquainted with Flash CS4
6. To save the file, choose File➪S
Save and choose the same location you
used for the rainbow.gif image file.
We don’t recommend saving the file in the Flash CS4 program folder — it
might get lost among your Flash program files.
7 . Give your movie a name, such as Movie of the Ye a r, and click Save.
Flash creates a file named Movie of the Year.fla. Flash adds .fla
for you because that’s the filename extension for Flash movies.
You’re now ready for the animation process.
Making graphics move
We explain earlier in this chapter that your goal is to have the word Rainbow
fly in from the right and the word Resources fly in from the left. You also want
the graphic to rotate 180 degrees at the same time. What you see now is how
the animation should end — the last frame of the movie.
Now go back and create the beginning of your movie. Flash can fill in all the
blanks in between. This type of animation is called a motion tween. Follow
these steps to create the animation:
1 . R i g h t - c l i c k ( W indows) or Contr ol+click (Mac) the wor d R a i n b o w a n d
choose Cr e a t e M o t i o n T w e e n .
Oops! The other two symbols disappear! That’s OK. Flash created the
motion tween and automatically set the length of the animation to 24
frames, or one second. The playhead is now on Frame 24, but the other
two symbols don’t exist at the 24th frame yet. Note that the Rainbow
row in the Timeline turns blue to indicate that it has a motion tween.
2 . Click Frame 1 on the T i m e l i n e .
You can click Frame 1 on any layer. Whew! The other two symbols
reappear.
3 . R e p e a t S t e p s 1 a n d 2 f o r t h e w o r d R e s o u r ces a n d f o r t h e l i n e s .
Your Timeline should now look like Figure 1-11. Be sure to click Frame 1
to place the playhead on that frame.
4. To move the Rainbow symbol to its pr oper location for Frame 1, pr ess
and hold down the Shift key while you drag the wor d R a i n b o w to the
right, just of f t h e S t a g e i n t o t h e g r a y a r e a .
You might need to use the horizontal scroll bar or choose a lower zoom
percentage in the Zoom drop-down list to see the gray area. Pressing
Shift keeps the object from moving up or down while you drag to the
right. By clicking the first frame and moving the word, you set its position at the beginning of the animation.
27
28
Part I: A Blast of Flash
Figure 1-11: The Timeline indicates three motion tweens, each
lasting 24 frames.
5. To move the Rainbow symbol to its pr oper location for Frame 24 (the
end of the motion tween animation), click Frame 24 in the Rainbow
layer. Then pr ess the Shift key and drag the Rainbow symbol back to
its original position.
You now see a dot in Frame 24 on the Rainbow layer. On the Stage,
you see a red line indicating the movement of the Rainbow symbol. The
motion tween is now complete.
6. Click Frame 1 on the Resour ces layer.
The playhead is now on Frame 1, and the Resources symbol has a blue
selection border.
7 . P r e s s t h e S h i f t k e y a n d d r a g t h e R e s o u r ces symbol to the left just of f
the Stage.
8. Click in Frame 24 on the Resour ces layer, pr ess the Shift key, and drag
the Resour c e s s y m b o l b a c k t o i t s o r i g i n a l l o c a t i o n .
You now see a dot in Frame 24 on the Resources layer and a red, horizontal line on the Stage showing the motion of the Resources symbol.
The motion tween is now complete.
9. To r etur n to Frame 1 and select the Lines symbol, click in Frame 1 of
the Lines layer.
1 0 . Choose Modify➪T
Transfor m➪R
Rotate 90 ° CW to r otate the design 90
d e g r ees clockwise.
1 1 . Repeat the Modify➪T
Transfor m➪R
R o t a t e 9 0 ° C W c o m m a n d t o r otate the
design a total of 180 degr ees.
This sets up the desired position of the Lines symbol at Frame 1.
1 2 . Click Frame 24 of the Lines layer.
Chapter 1: Getting Acquainted with Flash CS4
1 3 . Again choose Modify➪T
Transfor m➪R
R o t a t e 9 0 ° C W t w i c e t o r otate the
Lines symbol a total of 180 degr ees.
Because you only rotated the Lines symbol, but didn’t move it, you don’t
see a red line on the Stage.
1 4 . If necessar y, drag the horizontal scr oll box until the Stage is in the
center of your scr een. Otherwise, you won’t be able to see the entire
animation — and you don’t want to miss this one!
1 5 . Click the first frame of any layer.
This takes you to the start of your movie. Your screen should look like
the one shown in Figure 1-12.
1 6 . P r ess Enter (Retur n ) a n d w a t c h t h e a n i m a t i o n . ( S t a r t w r i t i n g y o u r
Academy Awar d acceptance speech.)
1 7 . Save your movie again by choosing File➪S
Save.
Figure 1-12: Before you run the animation, Rainbow appears to the right and Resources to the
left, and the Lines symbol is rotated.
29
30
Part I: A Blast of Flash
Publishing your first animation for posterity
You can’t watch the animation in a Web browser until you publish your movie
and insert it into an HTML document. To do so, follow these steps:
1. Click an empty ar ea of the Stage to change the display of the Pr oper ty
inspector.
If the Property inspector isn’t open, choose Window➪Properties. You
may need to click the Property inspector’s label to expand it or bring it
to the forefront. You should see the Edit button in the Publish section.
2. Click the Edit button in the Pr oper ty inspector.
The Publish Settings dialog box opens. (We cover publish settings in
detail in Chapter 13.)
3 . Click the HTML tab.
4 . Deselect the Loop check box in the Playback section.
We want the animation to play only once.
5 . Click the Publish button, and then click OK to close the dialog box.
With scarcely a blip, Flash publishes your movie and creates two files,
named Movie of the Year.swf (assuming you used that name) and
Movie of the Year.html. They’re in the same folder as your .fla
movie file. Movie of the Year.swf is the file your browser reads to
play the animation. Movie of the Year.html contains the HTML
code required to display your movie on a Web page.
6. Open your Web br owser.
7. Choose File➪O
Open (or Open File) and find Movie of the Year.html
(or whatever you named your movie file).
You might need to click Browse and navigate to the file.
8 . Double-click the file.
Your browser opens the HTML document and reads its instructions to
play the Flash movie.
9 . Sit back and watch it r o l l .
Don’t blink or you’ll miss it. (If you do miss it, click the Refresh or
Reload Current Page button in your browser.) You can see the movie in
Figure 1-13.
1 0 . When you finish watching the movie, close your br owser.
You can find the Movie of the Year files (.fla, .html, and .swf) on this
book’s Web site, www.dummies.com/go/flashcs4fd.
Chapter 1: Getting Acquainted with Flash CS4
Exiting Flash
When you finish creating something in Flash, choose File➪Exit (Windows) or
Flash➪Quit (Mac).
1
2
3
4
5
6
7
Figure 1-13: The Movie of the Year animation in detail.
31
32
Part I: A Blast of Flash