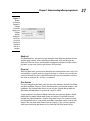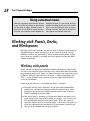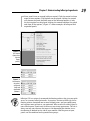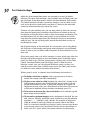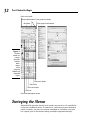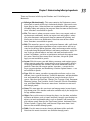
1
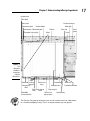
Chapter 1
RI
AL
Understanding InDesign
Ingredients
TE
In This Chapter
The InDesign approach
MA
Understanding global and local control
Basic InDesign vocabulary
Discovering the document window
D
Surveying the top tools
Becoming familiar with tools and panels
GH
S
TE
Surveying the menus
PY
RI
tarting to use a new software application is not unlike meeting a new
friend for the first time. You take a long look at the person, maybe ask a
few questions, and begin the process of becoming acquainted. Just as it’s
worthwhile to learn the likes and dislikes of a new friend, it’s also worth your
time to wrap your head around InDesign’s unique style and approaches. When
you do so, you’ll find it much easier to start using InDesign to get work done.
CO
This chapter explains where to look in InDesign for the features and capabilities
you need to master. I introduce you to the process that InDesign assumes you
use when laying out documents, explain some of the terms you’ll encounter
throughout the book, describe the unique interface elements in the document
window, survey the most commonly used tools, and explain how InDesign packages much of its functionality through an interface element called a panel.
The InDesign Approach
Publishing programs have some similarities and some differences in their various approaches to the publishing task. One way to describe a program’s
approach to publishing is to talk about its metaphor, or the overall way that it
handles publishing tasks.
10
Part I: Before You Begin
Some programs use a free-form metaphor, which means that the method used
to craft a document is based on assembling page elements as you would if they
were placed on a traditional pasteboard until you were ready to use them. This
is also called the pasteboard metaphor, which is an imprecise term because
software that uses other metaphors can still include a pasteboard. The nowdefunct PageMaker is the best-known example of the free-form approach.
Other programs approach page layout by using a frame-based metaphor, in
which frames (or boxes) hold both the page elements and the attributes that
control the appearance of those elements. QuarkXPress is the best-known
example of the frame-based approach.
InDesign offers the best of both worlds because it incorporates both the freeform and the frame-based metaphors.
The frame-based metaphor
When you work with a frame-based metaphor, you build pages by assembling a
variety of frames that will contain your text and graphics. First, you set up the
basic framework of the document — the page size and orientation, margins,
number of columns, and so on. You then fill that framework with text, graphics,
and lines.
These frames and lines need not be straight or square. With InDesign, you
can create frames that are shaped by Bézier curves. (In the 1970s, French
engineer Pierre Bézier created the mathematics that make these adjustable
curves work.)
Why would you want to use frames? Publishers find several reasons why
frames come in handy:
To create a template for documents, such as newsletters and magazines, that use the same basic layout elements across many articles.
You create the frames and then add the text and graphics appropriate
for each specific article, modifying, adding, and deleting frames as necessary for each article.
To get a sense of how you want your elements to be placed and sized
before you start working with the actual elements. This is similar to
sketching a rough layout on paper with a pen or pencil before doing a
formal layout with InDesign.
To set up specific size and placement of elements up front. You often
work with a template or with guidelines that limit the size and placement
of elements. In many cases, you can copy an existing frame because its
size is the same as what you use in several locations of your layout. For
Chapter 1: Understanding InDesign Ingredients
structured or partly structured documents, such as newsletters and magazines, it is usually easier to set up documents up front so that elements
are sized and placed correctly; the less favorable alternative is resizing
elements one at a time later on.
Whether you start by creating frames to hold graphics or text or you simply
place the text and graphics directly on your page, you’re using frames. When
you directly place elements on the page, InDesign creates a frame automatically for each element. The frame that InDesign creates is based on the
amount of text or the size of the graphic, rather than on your specific frame
specifications. Of course, in either case, you can modify the frames and the
elements within them.
The free-form metaphor
Working under a free-form metaphor, you draw a page’s content as if you’re
working on paper. If you’ve been in the publishing business for a while, you
might once have used wax to stick strips of type, camera-ready line drawings,
and halftone pictures to a pasteboard. You would then assemble and
reassemble all those pieces until you got the combination that looked right to
you. The free-form metaphor encourages a try-as-you-go, experimental layout
approach, which is particularly well suited to one-of-a-kind documents such
as ads, brochures, annual reports, and some marketing materials.
If you use a frame-based approach to page layout, you can experiment with
using the frames as placeholders for actual text and graphics. Visual thinkers
like to work with actual objects, which is why the free-form metaphor works
much better for them. With InDesign, you pick the metaphor that works for
your style, your current situation, and your mood. After all, both approaches
can lead to the same great design.
Understanding Global and Local Control
The power of desktop publishing in general, and InDesign in particular, is that
it lets you automate time-consuming layout and typesetting tasks while at the
same time letting you customize each step of the process according to your
needs.
This duality of structure and flexibility — implemented via the dual use of the
frame-based and free-form layout metaphors — carries over to all operations,
from typography to color. You can use global controls to establish general
settings for layout elements, and then use local controls to modify those elements to meet specific publishing requirements. The key to using global and
local tools effectively is to know when each is appropriate.
11
12
Part I: Before You Begin
Global tools include
General preferences and application preferences (see Chapter 2)
Master pages and libraries (see Chapter 6)
Character and paragraph styles (see Chapter 14)
Table and cell styles (see Chapter 20)
Object styles (see Chapter 10)
Sections and page numbers (see Chapter 4)
Color definitions (see Chapter 7)
Hyphenation and justification (see Chapter 15)
Styles and master pages are the two main global settings that you can expect
to override locally throughout a document. You shouldn’t be surprised to
make such changes often because, although the layout and typographic functions that styles and master pages automate are the fundamental components of any document’s look, they don’t always work for all the specific
content within a publication. (If they did, who’d need human designers?!)
Local tools include
Frame tools (see Part III, as well as Chapter 17)
Character and paragraph tools (see Chapters 15 and 16)
Graphics tools (see Part V)
Keep your bearings straight
A powerful but confusing capability in InDesign
is something called a control point. InDesign
lets you work with objects from nine different
reference points — any of the four corners, the
middle of any of the four sides, or the center —
such as when positioning the object precisely
or rotating the object. You choose the active reference point, or control point, in the Control
panel or Transform panel, using the grid of nine
points arranged in a square.
By default, InDesign uses the central reference
point as the control point, which is great for
rotating an object, but can lead to confusion
when you enter in the X and Y coordinates to
place it precisely. That’s because most people
use the upper-left corner of an object when
specifying its coordinates, not the center of the
object. Be sure to change the control point to
the upper-left reference point whenever entering X and Y coordinates in the Control or
Transform panels.
How do you change the control point? That’s
easy: Just click the desired reference point in
that preview grid. The control point will be
black, whereas the other reference points will
be white.
Chapter 1: Understanding InDesign Ingredients
Choosing the right tools for the job
Depending on what you’re trying to do with InDesign at any given moment,
you may or may not immediately know which tool to use. If, for example, you
maintain fairly precise layout standards throughout a document, using
master pages is the way to keep your work in order. Using styles is the best
solution if you want to apply standard character and paragraph formatting
throughout a document. When you work with one-of-a-kind documents, on
the other hand, it doesn’t make much sense to spend time designing master
pages and styles — it’s easier just to format elements as you create them.
For example, you can create drop caps (large initial letters set into a paragraph of type, like the drop cap that starts each chapter in this book) as a
character option in the Character panel, or you can create a paragraph style
(formatting that you can apply to whole paragraphs, ensuring that the same
formatting is applied each time) that contains the drop-cap settings, and then
apply that style to the paragraph containing the drop cap. Which method you
choose depends on the complexity of your document and how often you
need to perform the action. The more often you find yourself taking a set of
steps, the more often you should use a global tool (like character and paragraph styles) to accomplish the task.
Fortunately, you don’t need to choose between global and local tools while
you’re in the middle of designing a document. You can always create styles
from existing formatting later. You can also add elements to a master page if
you start to notice that you need them to appear on every page.
What to do when you make a mistake
InDesign is a very forgiving program. If you
make a mistake, change your mind, or work
yourself into a complete mess, you don’t have to
remain in your predicament or save your work.
InDesign offers several escape routes. You can
Undo your last action by choosing
Edit➪Undo or pressing Ô+Z or Ctrl+Z.
(Some actions, particularly actions such as
scrolling that do not affect any items or the
underlying document structure, cannot be
undone.) You can undo multiple actions in
the reverse order in which they were done
by repeatedly choosing Edit➪Undo or
pressing Ô+Z or Ctrl+Z; each time you
undo, the previous action is undone.
Redo an action you’ve undone by choosing
Edit➪Redo or pressing Shift+Ô+Z or
Ctrl+Shift+Z. Alternatively, choosing Undo
and Redo is a handy way of seeing a
before/after view of a particular change. As
with undo, you can redo multiple undone
actions in the reverse of the order in which
they were undone.
13
14
Part I: Before You Begin
Specifying measurement values
Another situation in which you can choose between local or global controls
is specifying measurement values. Regardless of the default measurement unit
you set (that is, the measurement unit that appears in all dialog boxes and
panels), you can use any unit when entering measurements in an InDesign
dialog box. For example, if the default measurement is picas, but you’re new
to publishing and are more comfortable with working in inches, go ahead and
enter measurements in inches.
InDesign accepts any of the following codes for measurement units. Note that
the x in the items listed below indicates where you specify the value, such as
2i for 2 inches. It doesn’t matter whether you put a space between the value
and the code. Typing 2inch and typing 2 inch are the same as far as InDesign
is concerned:
xi or x inch or x" (for inches)
xp (for picas)
xpt or 0px (for points)
xc (for ciceros)
xag (for agates)
xcm (for centimeters)
xmm (for millimeters)
The ability to specify measurements in agates is new to InDesign CS3. Agates
are typically used in newspaper publishing.
You can enter fractional picas in two ways: in decimal format (as in 8.5p) and
in picas and points (as in 8p6). Either of these settings results in a measurement of 81⁄2 picas (there are 12 points in a pica).
Basic InDesign Vocabulary
Not too long ago, only a few publishing professionals knew — or cared about —
what the words pica, kerning, crop, and color model meant. Today, these words
are becoming commonplace because almost everyone who wants to produce a
nice-looking report, a simple newsletter, or a magazine encounters these terms
in the menus and manuals of their layout programs. Occasionally, the terms are
used incorrectly or are replaced with general terms to make nonprofessional
users feel less threatened, but that substitution ends up confusing professional
printers, people who work in service bureaus, and Internet service providers.
Throughout this book, I define other publishing terms as they come up.
Chapter 1: Understanding InDesign Ingredients
Altered keystrokes: Revised shortcuts
InDesign CS3 has changed a few shortcuts that
users of previous versions of InDesign should
know, so they can adapt accordingly:
on the Mac, but the old shortcut of Shift+F10
still works. In Windows, the shortcut remains
Shift+F10, but Ctrl+Shift+F10 also works.
Type➪Paragraph Styles: The new shortcut is
Ô+F11 on the Mac, but the old shortcut of F11
still works (though the Mac OS X’s Exposé
program also uses this shortcut and thus may
appear instead). In Windows, the shortcut
remains F11, but Ctrl+F11 also works.
Window➪Pages: The new shortcut is
Ô+F12 on the Mac, but the old shortcut of
F12 still works. In Windows, the shortcut
remains F12, but Ctrl+F12 also works.
Type➪Character Styles: The new shortcut
is Shift+Ô+F11 on the Mac, but the old
shortcut of Shift+F11 still works. In
Windows, the shortcut remains Shift+F11,
but Ctrl+Shift+F11 also works.
Type➪Paragraph: The new Windows shortcut is now Ctrl+Alt+T, no longer Ctrl+M, to
match the Mac’s Option+Ô+T. Adobe let
Ctrl+Alt+T work as an alternative in InDesign
CS2; now the menu has changed to make
Ctrl+Alt+T the official shortcut. But the old
Ctrl+M continues to work if you want to still
use it.
View➪Show/Hide Frame Edges: The new
shortcut for the Mac only is Control+Ô+H.
The Windows shortcut remains Ctrl+H.
View➪Display Performance➪Fast Display:
The new shortcut is Option+Shift+Ô+Z or
Ctrl+Alt+Z, replacing Shift+Ô+0 or Ctrl+
Shift+0.
View➪Display Performance➪High Quality
Display: The new shortcut, for the Mac only,
is Control+Option+Ô+H. The Windows shortcut remains Ctrl+Alt+H.
Window➪Effects: The new shortcut to the
renamed Transparency panel is Shift+Ô+F10
Window➪Stroke: The new shortcut is
Ô+F10 on the Mac, but the old shortcut of
F10 still works. In Windows, the shortcut
remains F10, but Ctrl+F10 also works.
For consistency, this book uses the new shortcut for both Mac and Windows for the new
shortcuts involving the F10, F11, and F12 keys,
such as Ô+F10 and Ctrl+F10 for opening the
Stroke panel. They changed to accommodate
Mac OS X’s Exposé program, which uses the
F10, F11, and F12 keys in its shortcuts, causing it
to launch when InDesign users entered shortcuts using them. The new InDesign shortcuts
don’t step on Exposé’s toes.
New shortcuts include the following:
Type➪Glyphs: Option+Shift+F11 or Alt+
Shift+F11.
Type➪Insert Special Character➪Quotation
Marks➪Straight Double Quotation Marks:
Command+Shift+' or Alt+Shift+'.
Type➪Insert Special Character➪Quotation
Marks➪Straight Single Quotation Mark
(Apostrophe): Command+' or Alt+'.
Notes➪Notes Mode: Ô+F8 or Ctrl+F8.
Window➪Automation➪Scripts:
Option+Ô+F11 or Ctrl+Alt+F11.
15
16
Part I: Before You Begin
Like all great human endeavors, InDesign comes with its own terminology,
much of it adopted from other Adobe products. Some general terms to know
include the following:
Frame: The container for an object. A frame can hold text, a graphic, or
a color fill.
Link: The connection to a file that you import, or place (defined below),
into an InDesign document. The link contains the file’s location and its
last modification date and time. A link can reference any graphics or text
file that you have imported into a layout. InDesign can notify you when a
source text or graphics file has changed so you can choose whether to
update the version in your layout.
Package: The collection of all files needed to deliver a layout for printing.
PDF: The Adobe Portable Document Format, which has become the standard for sharing electronic documents. No matter what kind of computer
it is viewed on (Windows, Macintosh, Palm, or Unix), a PDF document
displays the original document’s typography, graphics representation,
and layout. With InDesign, you can place PDF files as if they were graphics, and you can also export its InDesign pages to PDF format.
Place: To import a graphics or text file.
Plug-in: A piece of software that loads into, and becomes part of,
InDesign to add capabilities to the program.
Stroke: The outline of an object (whether a graphic, line, or individual
text characters) or frame.
Thread: The connections between text frames that let a story flow from
one frame to another.
Discovering the Document Window
In InDesign, you spend lots of time working in document windows — the
“containers” for your documents. Each document, regardless of its size, is
contained within its own document window.
The best way to get familiar with the InDesign document window is by opening a blank document. Simply choosing File➪New➪Document, or pressing
Ô+N or Ctrl+N, and clicking OK opens a new document window. Don’t worry
about the settings for now — just explore.
Figure 1-1 shows all the standard elements of a new document window. I won’t
bore you by covering interface elements that are standard to all programs.
Instead, the rest of this section focuses on InDesign-specific elements.
Chapter 1: Understanding InDesign Ingredients
Control panel
Tools dock
Panel flyout menu
Tools panel
Reference points
Restore button
Close button Minimize button
Zero point (ruler origin)
Main dock
Title bar
Rulers
Panel tab
Panel
group
Panel
Figure 1-1:
The
document
window is
where you
work on
documents.
Pageturning
Zoom field
Pasteboard
Version Cue
Scroll bars
buttons
status
Zoom pop-up
Page boundary
Pasteboard Size box
menu
Page Page pop-up
Page margins
menu
field
Show/Hide
Version Cue
Scroll buttons
Structure button
pop-up menu
The Version Cue pop-up menu lets you see the current status of a document
in a shared workgroup setup. This is an expert feature you can ignore.
17
18
Part I: Before You Begin
Rulers
Document windows display a horizontal ruler across the top and a vertical
ruler down the left side. As shown in Figure 1-1, the horizontal ruler measures
from the top-left corner of the page across the entire spread, and the vertical
ruler measures from the top to the bottom of the current page. These rulers
are handy for judging the size and placement of objects on a page. Even experienced designers often use the rulers while they experiment with a design.
Both rulers display increments in picas unless you change the measurement
system for each ruler in the Units & Increments pane of the Preferences dialog
box. Choose InDesign➪Preferences➪Units & Increments or press Ô+K on the
Mac, or choose Edit➪Preferences➪Units & Increments or press Ctrl+K in
Windows, to open the Preferences dialog box. Your choices include inches,
picas, points, decimal inches, ciceros, agates, millimeters, and centimeters. If
you change the ruler measurement system when no documents are open, the
rulers in all new documents will use the measurement system you selected. If a
document is open when you make the change, the rulers are changed only in
that document.
You can also create your own measurement system by choosing Custom.
Most people should ignore this option, but sometimes it can make sense,
such as setting the ruler to match the line spacing, so you can measure
number of lines in your ruler.
If your computer has a small monitor and the rulers start to get in your way,
you can hide them by choosing View➪Hide Rulers or by pressing Ô+R or
Ctrl+R.
Zero point
The point where the rulers intersect in the upper-left corner of the page is
called the zero point. This is the starting place for all horizontal and vertical
measurements. If you need to place items in relation to another spot on the
page (for example, from the center of a spread rather than from the left-hand
page), you can move the zero point by clicking and dragging it to a new location. Notice that the X: and Y: values in the Control panel update as you drag
the zero point so you can place it precisely. If you change the zero point, it
changes for all pages or spreads in the document. You can reset the zero
point to the upper-left corner of the left-most page by double-clicking the
intersection of the rulers in the upper-left corner.
If you move the zero point, all the objects on the page display new X: and Y:
values even though they haven’t actually moved. Objects above or to the left
of the zero point will show negative X: and Y: values, and the X: and Y: values
of other objects will not relate to their actual position on the page or spread.
Chapter 1: Understanding InDesign Ingredients
You can lock the ruler origin (the zero point), making it more difficult to accidentally change it. Control+click or right-click the ruler origin and choose
Lock Zero Point from the menu that appears. (The Unlock Zero Point command is right there as well, so you can just as easily unlock it.) Locking the
zero point is a good idea because it will remind anyone working on your document that you prefer that they not fiddle with the zero point.
Pasteboard
The white area that surrounds the page is called the pasteboard. It is a workspace for temporarily storing objects. Above and below each page or spread
is about an inch of pasteboard, and on the left and right a pasteboard space
as wide as a page. For example, a spread of two 8-inch-wide pages will have 8
inches of pasteboard to the left and 8 inches of pasteboard to the right.
Pages and guides
Pages, which you can see onscreen surrounded by black outlines, reflect the
page size you set up in the New Document dialog box (File➪New➪Document,
or Ô+N or Ctrl+N). If it looks like two or more pages are touching, you’re looking at a spread.
InDesign uses nonprinting guides, lines that show you the position of margins
and that help you position objects on the page. Margins are the spaces at the
outside of the page, whereas columns are vertical spaces where text is supposed to go by default. Magenta lines across the top and bottom of each page
show the document’s top and bottom margins. Violet lines show left and right
columns (for single-page documents) or inside and outside columns (for
spreads).
You can change the location of margin and column guides by choosing
Layout➪Margins and Columns. You can create additional guides — such as
to help you visually align objects — by holding down your mouse button on
the horizontal or vertical ruler and then dragging a guide into the position
you want.
Zoom field and pop-up menu
At the lower-left corner of the document window dwells the Zoom field,
which shows the current zoom percentage. You can type in a new value any
time. Immediately to its right is the Zoom pop-up menu, which also lets you
change the document’s view. The view can be between 5 percent and 4,000
percent in 0.01-percent increments.
19
20
Part I: Before You Begin
To change the view without taking your hands off the keyboard, press
Option+Ô+5 or Ctrl+Alt+5, enter a new zoom value, and press Return or
Enter. Or press Ô+= or Ctrl+= to zoom in, or Ô+– or Ctrl+– to zoom out.
Page controls
If you feel like flipping through pages of the document you are creating,
InDesign makes it easy with page-turning buttons and the Page field and popup menu. Controls for entering prefixes for the page numbers of sections, and
for indicating absolute page numbers in a document that contains multiple
sections, are also handy. (An absolute page number indicates a page’s position in the document, such as +1 for the first page, +2 for the second page,
and so on.)
Next to the Zoom pop-up menu is a combined page-number field and pop-up
menu encased by two sets of arrows. These arrows are page-turning buttons
that take you to, from left to right, the first page, the previous page, the next
page, and the last page. Just click an arrow to get where you want to go.
You can also jump directly to a specific page or master page. To jump to a specific page, highlight the current number in the page number field (by selecting
it with your cursor, or by pressing Ô+J or Ctrl+J), enter a new page number,
and press Return or Enter. (To jump to a master page, select the Page Number
field and enter the first few characters of the master page’s name.)
Opening Multiple Document Windows
If you like to work on more than one project at once, you’ve come to the right
program. InDesign lets you open several documents at once. It also lets you
open multiple windows simultaneously for individual documents. A large
monitor (or having multiple monitors connected) makes this multi-window
feature even more useful. By opening multiple windows, you can
Display two (or more) different pages or spreads at once. You still have
to work on the documents one at a time, but no navigation is required —
you have only to click within the appropriate window.
Display multiple magnifications of the same page. For example, you
can work on a detail at high magnification in one window and display the
entire page — and see the results of your detail work — at actual size in
another window.
Display a master page in one window and a document page based on
that master page in another window. When you change the master
page, the change is reflected in the window in which the associated document page is displayed.
Chapter 1: Understanding InDesign Ingredients
To open a new window for the active document, choose Window➪Arrange➪
New Window. The new window is displayed in front of the original window.
To show both windows at once, choose Window➪Arrange➪Tile. When you
choose the Tile command, all open windows are resized and displayed side
by side. (If you choose Window➪Arrange➪Cascade, all open windows are displayed stacked and staggered on top of each other. The front-most document
window is visible; the title bars of the other windows are visible above the
front-most document.)
When multiple windows are open, you activate a window by clicking on a
window’s title bar or anywhere within the window. Also, the names of all
open documents are displayed at the bottom of the Window menu. Choosing
a document name from the Window menu brings that document to the front.
If multiple windows are open for a particular document, each window is displayed (they’re displayed in the order in which you created them) in the
Window menu.
To close all windows for the currently displayed document, press Shift+Ô+W
or Ctrl+Shift+W. To close all windows for all open documents, press
Option+Shift+Ô+W or Ctrl+Alt+Shift+W.
Tooling around the Tools Panel
You can move the InDesign Tools panel — the control center for 32 of
InDesign’s 33 tools, as well as for 13 additional functions — by clicking and
dragging it into position. The Tools panel usually appears to the left of a document (see Figure 1-2).
The one tool not directly accessible from the Tools panel is the Marker tool.
But you can switch to it from the Eyedropper tool by holding Option or Alt.
(Chapter 7 explains its use.)
To discover each tool’s “official” name, hover the mouse pointer over a tool
for a few seconds, and a Tool Tip will appear, telling you the name of that
tool. If the Tool Tips do not display, make sure that the Tool Tips pop-up
menu is set to Normal or Fast in the Interface pane of the Preferences dialog
box (choose InDesign➪Preferences➪Interface or press Ô+K on the Mac, or
choose Edit➪Preferences➪Interface or press Ctrl+K in Windows).
The Interface pane is new to InDesign CS3. In previous versions, the Tool Tips
control was in the General pane of the Preferences dialog box.
InDesign gives you one — and only one — tool for each specific job. The
Tools panel includes tools for creating and manipulating the objects that
make up your designs. The tools in the Tools panel are similar to those in
other Adobe products (such as Photoshop, Illustrator, and Dreamweaver). I
cover what each tool does in the following sections.
21
22
Part I: Before You Begin
Panel display toggle button
Selection tool
Pen tool
Pencil tool
Rectangular Frame tool
Button tool
Rotate tool
Gradient tool
Note tool
Hand tool
Fill button
Default Fill and Stroke button
Format Affects Container button
Apply Color button
Apply Gradient button
Normal View Mode button
Direct Selection tool
Type tool
Line tool
Rectangle tool
Scissors tool
Scale tool
Free Transform tool
Eyedropper tool
Zoom tool
Swap Fill and Stroke button
Stroke button
Format Affects Contents button
Apply None button
Preview Mode button
Figure 1-2:
The
InDesign
Tools panel.
The small arrow in its lower-right corner of some tools is a pop-out menu
indicator. A tool that displays this arrow is hiding one or more similar tools.
To access these “hidden” tools, click and hold a tool that has the pop-out
menu indicator, as shown in Figure 1-3. When the pop-out displays, click one
of the new tools. (Figure 1-2 shows all the pop-out tools.)
You don’t need to worry about all the tools, so I highlight just those that
you’ll need to know to start using InDesign. You’ll likely come across the
others as you work on specific tasks, so I cover those in the chapters that
introduce those functions.
Using the Selection tools
To work with objects, you have to select them. InDesign provides three tools
to do that, letting you select different aspects of objects.
Selection tool
This is perhaps the most-used tool in InDesign. With the Selection tool, you
can select objects on the page and move or resize them. You might want to
think of this tool as the Mover tool because it’s the only tool that lets you
drag objects around on-screen.
Chapter 1: Understanding InDesign Ingredients
Figure 1-3:
If a small
triangle
appears in
the lowerright corner
of a tool,
click and
hold it to
display popout tools.
After you’ve selected the Selection tool, here’s how it works:
To select any object on a document page, click it. If you can’t seem to
select it, the object might be placed by a master page (a preformatted
page used to format pages automatically), or the object might be behind
another object.
To select an object placed by a master page, press Shift+Ô or Ctrl+Shift
while you click.
To select an object that is completely behind another object, Ô+click it
or Ctrl+click it.
Direct Selection tool
The Direct Selection tool is what you use to work on the contents of a frame,
not the frame itself. For example, you can use the Direct Selection tool to
select individual handles on objects to reshape them, or to move graphics
within their frames.
Here’s how the Direct Selection tool works:
To select an object to reshape it, click the object to display anchor
points on the edges (the anchor points are hollow handles that you can
select individually, as shown in Figure 1-4). You can drag the anchor
points to reshape the object.
23
24
Part I: Before You Begin
To select objects placed by a master page, Shift+Ô+click or Ctrl+Shift+
click, as with the Selection tool. The Direct Selection tool lets you easily
select objects behind other objects and select items within groups.
To move a graphic within its frame, click inside the frame and drag the
graphic.
To move a frame but leave the graphic in place, click an edge of the
frame and drag it.
Figure 1-4:
Reshape an
item with
the Direct
Selection
tool by
clicking and
dragging an
anchor
point.
Position tool
Meant to mimic PageMaker’s Crop tool to help former PageMaker users
adjust to InDesign, the Position tool, which you access from the pop-out
menu in the Direct Selection tool, combines some aspects of the Selection
tool with some aspects of the Direct Selection tool:
As with the Selection tool, you can resize an object’s frame by dragging
its handles.
As with the Direct Selection tool, you can click a graphic and reposition
it within the frame by dragging — and that has the effect of cropping the
graphic.
Using the Type tool
A very frequently used tool, the Type tool lets you enter, edit, and format
text. The Type tool also lets you create rectangular text frames.
Here’s how the Type tool works:
To create a rectangular text frame, click and drag; hold the Shift key to
create a perfect square.
Chapter 1: Understanding InDesign Ingredients
To begin typing or editing text, click in a text frame or in any empty
frame and type away.
I explain stories and threaded text frames in Chapter 12.
Using the object-creation tools
InDesign has a bunch of tools for creating shapes. Part V covers them in more
depth, but you should know about a few of them now because they create
objects that can contain either text or graphics. Plus, you can also use them
to draw your own shapes that you then color or otherwise embellish in your
layout.
Pen tool
With the Pen tool, you can create simple illustrations. You use the Pen tool,
which is modeled after the pen tools in Illustrator and Photoshop, to create
paths (both open, such as lines, and closed, such as shapes) consisting of
straight and curved segments. Give it a try — it’s fun!
Here’s how the Pen tool works:
To create straight lines, click to establish an anchor point, and then move
the mouse to the next location, click again, and so on. To move an anchor
point after clicking, press the spacebar and drag the anchor point.
To create curved lines, click and drag, and then release the mouse
button to end the segment.
To close a path and create a frame, click the first anchor point created
(the hollow one).
To leave a path open and create a line, Ô+click or Ctrl+click away from
the path or select another tool.
Type tool
The Type tool lets you draw rectangular text frames, as well as type text
inside them.
Line tool
The Line tool lets you draw freestanding lines (paths) on your page. After
selecting this tool, simply click and drag the mouse to draw the line. Holding
the Shift key while you click and drag constrains the line angle to 45-degree
increments, which is useful for creating straight horizontal and vertical lines.
25
26
Part I: Before You Begin
Frame and shape tools
InDesign has three frame tools — Rectangle Frame, Ellipse Frame, and
Polygon Frame — and three shape tools — Rectangle, Ellipse, and Polygon.
The frame and shape tools are redundant because both frames and shapes
can hold text or graphics or be empty.
Because the frame and shape tools really do the same thing, you might use
the frame tool when creating frames that will have their content added later.
Why? Because they display with a big X through them, making them easier to
spot when looking for frames to fill. The shape tools create frames without
that X, so it’s easier to overlook them.
To create a rectangle or ellipse, choose the appropriate tool, click somewhere
in the document window, and drag the mouse to another location. The rectangle or ellipse fills the area. But creating a polygon works differently:
1. Double-click the Polygon or Polygon Frame tool to display the
Polygon Settings dialog box, shown in Figure 1-5.
2. Enter a value between 3 and 100 in the Number of Sides field to specify the number of sides on your polygon.
3. To create a star shape, use the Star Inset field to specify the size of the
spikes.
The percent value specifies the distance between the polygon’s bounding box and the insides of the spikes (for example, entering 50% creates
spikes that are halfway between the bounding box and the center of the
polygon).
4. Click OK to close the Polygon Settings dialog box.
The settings are saved with the active document for the next time you
use the Polygon or Polygon Frame tool.
5. Click and drag to create the polygon, using the rulers or the
Transform panel or Control panel to judge the size and placement.
To create a symmetrical polygon in which all the sides are the same size,
press the Shift key while you click and drag the Polygon or Polygon
Frame tool.
Using the navigation tools
Several tools help you navigate your document, which means moving around
your pages, moving your pages around the screen, and changing the degree
of magnification to see just part of a page or to see several pages at once.
Chapter 1: Understanding InDesign Ingredients
Figure 1-5:
Doubleclicking the
Polygon or
Polygon
Frame tool
displays the
Polygon
Settings
dialog box,
which you
can use to
specify the
number of
sides on a
polygon.
Hand tool
The Hand tool lets you move a page around to view different portions of it or
another page entirely. After selecting the Hand tool, click and drag in any
direction. You can access the Hand tool temporarily without actually switching tools by pressing Option+spacebar or Alt+Spacebar.
Zoom tool
With the Zoom tool, you increase and decrease the document view scale. You
can highlight a specific area on a page to change its view or you can click onscreen to change the view scale within InDesign’s preset increments, which is
the same as pressing Ô+= or Ctrl+= to zoom in.
View buttons
The very bottom of the Tools panel has two view buttons: Normal View Mode
and Preview Mode. The first shows the document’s pasteboard, margins, and
guidelines; the second hides those so you can get a better idea of how the
document will look when it’s printed or saved as a PDF.
A pop-up menu in the Preview Mode button has two preview options: Bleed
mode and Slug mode. Bleed mode shows any objects that bleed (extend)
beyond the page boundaries, whereas Slug mode shows the space reserved
for information such as crop marks and color separation names used in final
output. You can read more about these in Chapter 3. You set these options
when you create new documents or by choosing File➪Document Setup.
27
28
Part I: Before You Begin
Using contextual menus
InDesign’s contextual menu interface element
is very useful. By Ctrl+clicking or right-clicking
the document, an object, elements listed in a
panel (such as a list of files or styles), the rulers,
and so on, you can display a menu of options for
modifying whatever it is you clicked. InDesign
provides a lot of options this way, and it is often
easier to use the contextual menus to access
InDesign functions than to hunt through the
many regular menu options and panels.
Working with Panels, Docks,
and Workspaces
InDesign has so many controls and features that its designers have long ago
stopped relying on menu commands to access them all. Instead, most of
InDesign’s features are presented as sort of miniature dialog boxes, called
panels, that are “windows” of readily accessible options to consider when
working in InDesign.
Working with panels
Panels provide an interactive method of working with features, one that lets
you access the controls quickly. In many cases, panels offer the only method
for performing many tasks. Figure 1-1 shows the panels that appear on-screen
by default. Note that you can access all panels — except Quick Apply and
Tabs — via the Window menu, whether or not the panel is displayed onscreen at the moment.
Panels typically have two — but sometimes three — controls:
All panels but the Tools, Attributes, Script Label, and Command Bar
panels have a flyout menu (formerly called the palette menu), which
provides a pop-up menu of controls relevant to that panel. Figure 1-6
shows an example of a flyout menu.
Any active panel — meaning it is displayed in front of any others in its
panel group, so you can actually modify its settings — has a close control to remove the panel from the panel group. This is not a way to
switch to another panel in that panel group — to do that, just click the
tab of the panel you want to work with. (If you remove a panel by mistake, go to the Window menu to open it again.)
Chapter 1: Understanding InDesign Ingredients
Some panels have an expand/collapse control. Click the control to show
more or fewer options (if all options are displayed, clicking the control
will shorten the panel and hide some of the advanced options; if only
the basic options are displayed, clicking the control lengthens the panel
and show all the options.) Figure 1-7 shows examples of collapsed and
expanded panels.
Figure 1-6:
An sample
flyout menu
(for the
Pages
panel).
Figure 1-7:
An example
of a panel
collapsed
(top) and
expanded
(bottom).
InDesign CS3 has seriously revamped the floating palettes that give you quick
access to so many InDesign features. In previous versions of InDesign, these
floating palettes contained one or more tabbed panes, and you could group
and separate most of them as you preferred. What used to be called a pane is
now called a panel. Panels now also have a consistent appearance: The tab is
always on top, not either on the top or at left depending on whether it was
free-floating or docked to the side of your monitor. Like the panes of yore,
panels can be combined and separated into groups.
29
30
Part I: Before You Begin
Adobe has also changed how panels are arranged on screen. By default,
InDesign CS3 comes with two docks, one that holds only the Tools panel, and
one that holds all the other panels, which I call the main dock. (Well, almost.
The Control panel also displays separately, though it’s not in a dock, just by
itself at the top of the screen unless you move it.) Note that the main dock
cannot be moved from the right side of the screen.
To better suit your working style, you can drag panels by their tabs to move
them from one panel group to another, drag them out of a dock so they are
free-floating, or drag them into a dock so they are no longer free-floating. The
new dock feature lets you keep panel groups in one contained area, which
helps keep the interface from getting too cluttered. But you’re not forced to
work this way: You can still drag panels outside the main dock so they are
free-floating on screen.
Not all panels display in the main dock; less-used panels such as Data Merge
will show up in a free-floating panel group when you open it via the Window
menu. Of course, you can always add such panels to the main dock if you use
them a lot.
All but four panels have a tab, which contains its name, to help you select the
desired panel without having to go to the Window menu. To quickly select a
panel, just click its tab. The four special panels (without tabs) are the Tools,
Control, Command Toolbar, and Quick Apply panels. Unlike the rest of
InDesign’s panels, they can’t be grouped with other panels, so there’s no
need for a tab to select them. (And for some reason, the Tools panel resides
in a dock of its own, whereas the other three do not.)
When a panel is active, its controls have the following characteristics:
To display and select an option, click a pop-up menu or an iconic
button; the changes take effect immediately.
To place a new value in a field, highlight the value that’s already in the
field and enter the new value. Note that fields accept values in all supported measurement systems, as described earlier in this chapter. To
implement the new value, press Shift+Return or Shift+Enter. To get out of
a field you’ve modified, leaving the object unchanged, press Esc.
To increase or decrease the value in the field, use the clickable up and
down arrows where available.
To use math to perform changes, enter calculations in the field. You can
add, subtract, multiply, and divide values in fields by using the following
operators: +, –, * (multiply), and / (divide). For example, to reduce the
width of a frame by half, type /2 after the current value in the Width
field. Or, to increase the length of a line by 6 points, you can type +6 next
to the current value in the Length field. You can also use percentages in
fields, such 50%, which adjusts the current value by that percentage.
Chapter 1: Understanding InDesign Ingredients
You can tell that the developers of InDesign have a passion for panels.
Because there are so many of them, you might want to consider hooking up a
second monitor for displaying them. As with the tools, if you make sure Tool
Tips are enabled in the Interface panel of the Preferences dialog box (choose
InDesign➪Preferences➪Interface or press Ô+K on the Mac, or choose
Edit➪Preferences➪Interface or Ctrl+K in Windows), you’ll get some ideas as
to what the panel iconic buttons and fields do.
InDesign CS3 adds the Assignments panel, which provides access to the
optional InCopy CS3 program’s features; these expert features are beyond
the scope of this book. InDesign CS3 also adds the Cell Styles and Table
Styles panels, which provide additional control over table formatting, as
covered in Chapter 20. The new Notes panel lets you insert nonprinting
reminders in your text, as explained in Chapter 13.
If panels are getting in your way, you can make them all disappear by pressing Tab — as long as the Type tool is not active and the text cursor is active
within a text frame, of course. Press Tab to get your panels back.
Working with docks
Docks have controls to collapse and expand them — a new approach in
InDesign CS3. Click the double-arrow iconic button at a dock’s upper corner
to collapse or expand the dock; you can also click the dark depression at the
top of the main dock to collapse it. The main dock also can be resized by
dragging the resize handle. Figure 1-8 shows the dock controls and what they
look like when expanded and collapsed.
Working with workspaces
Although you can rearrange InDesign’s panels to suit your needs, doing this
again and again as you switch from one task to another can be a real chore.
For example, you may open several of the table- and text-oriented panels
when working on text, but then close them and open the graphics- and
positioning-oriented panels when refining layout placement. That’s why
InDesign lets you create workspaces, which are essentially memorized panel
collections. Display the panels you want, where you want them, and create
a new workspace by choosing Window➪Workspace➪Save Workspace. Give
the workspace a name that makes sense, such as Text Panels. That workspace is now available via Window➪Workspace➪workspace name, automatically displaying just those saved panels in their saved locations.
31
32
Part I: Before You Begin
Dock resize handle
Collapse Dock buttons Panel group close button
Main dock
Panel group minimize button
Figure 1-8:
The dock
controls on
a normal
dock (left)
and how
docks
appear
when
collapsed
(middle) and
expanded
(right).
Flyout menu button
Flyout menu
Panel close button
Panel tab
Panel hide/show options button
Surveying the Menus
Although InDesign relies heavily on its panels to present its rich capabilities,
it also uses traditional menus. In some cases, you can use menus instead of
panels; in others, you must use a menu command; in still others, you must
use a panel (such as for the data merge and object alignment features).
Chapter 1: Understanding InDesign Ingredients
There are 10 menus in InDesign for Windows and 11 in InDesign for
Macintosh:
InDesign (Macintosh only): This menu contains the Preferences menu,
where you set much of InDesign’s behavioral defaults. You can also configure plug-ins here. Other functions are standard for all Mac programs,
including hiding and quitting the program. Note that none of these menu
items’ functions are available in panels.
File: This menu is where you open, create, close, save, export, and set
up documents and books; where you import text and graphics; where
you print documents and prepare them for commercial printing; and
where you set basic user information. Note that none of these menu
items’ functions are available in panels.
Edit: This menu lets you cut, copy, and paste elements; edit, spell-check,
and do search-and-replace operations across entire stories and set up
story for the InCopy add-on program; adjust and manage color settings;
set up and change keyboard shortcuts and menu preferences; apply various styles to selected objects and text; and undo and redo recent
actions. In Windows, you also set preferences and quit the program from
this menu. Note that these menu items’ functions, except for Quick
Apply, are not available in panels.
Layout: With this menu, you add, delete, rearrange, and navigate pages;
change margins and guides; automatically resize a page and its objects;
set up page numbering and sections; and create and format tables of
contents. Note that these menu options’ functions — except for the
Pages, page-navigation, and Numbering & Section Options menus — are
not available in panels.
Type: With this menu, you adjust typographic attributes such as size
and font, insert special characters, work with footnotes, add placeholder
text; and control the on-screen display of special characters such as
spaces. Note that the Find Font, Change Case, Type on a Path, Document
Footnote Options, Text Variables, Insert Character, Fill with Placeholder
text, and Show Hidden Characters menu items’ functions are not available though panels.
Notes: This new menu lets you insert and manage notes in your layout
that do not print. This feature used to be available only if you bought the
InCopy add-on software.
Object: You use this menu to change the shape, size, location, and other
attributes of objects such as frames and lines; to apply special effects to
objects; to insert multimedia effects such as buttons; and control display redraw speed. Note that the Text Frame Options, Anchored Object,
Corner Options, Clipping Path, and Convert Shape menu items’ functions are not available through panels.
Table: Use this menu to create, change, and format tables and cells.
Note that this menu’s functions are available through panels.
33
34
Part I: Before You Begin
View: This menu lets you control the display of your document, from
zoom level to whether guides, rulers, and frame edges appear. Note that
none of these menu items’ functions, except for Screen Mode and the
zoom controls, are available in panels.
Window: This menu is where you manage the display of document windows and panels, as well as where you set up and work with workspaces. The window display and workspace functions are not available
via panels.
Help: Use this menu to access InDesign’s help system and manage product activation and registration. In Windows, this menu also lets you
manage plug-ins. Note that none of these menu items’ functions are
available in panels.
Among the new menu options in InDesign are InCopy and Menus in the Edit
menu; Text Variables and Bulleted & Numbered Lists in the Type menu;
Show/Hide Assigned Frames and Show/Hide Notes in the View menu; and
Assignment and Notes in the Window menu. Also, the Effects option replaces
the Drop Shadow and Feather options in the InDesign CS2 Object menu, and
the Compound Paths menu item in InDesign CS3’s Object menu used to be
submenu items in the InDesign CS2 Paths menu.