1
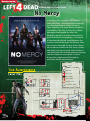
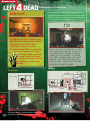
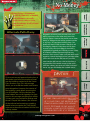
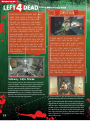
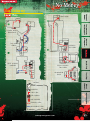
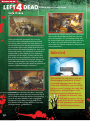
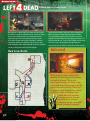
Downl
oadeGui
de
PRIMA Official Game Guide
No Mercy
In No Mercy, the survivors—Bill, Francis,
Louis, and Zoey—are tasked with traversing
an urban landscape in search of rescue.
Their objective is to reach Mercy Hospital in
the middle of the city. As the only suitable
helicopter landing pad for miles, the
hospital’s rooftop is the closest evacuation
point. But there’s one problem—thousands
of reanimated infected stand between the
survivors and the hospital. The journey takes
the survivors through the city streets, down
into a subway tunnel, into the sewer system,
and finally into the hospital. Each location is
swarming with the undead menace, requiring
constant vigilance among the survivors
during this nighttime trek through an
extremely hostile environment.
legend
Ammo
The Apartments
Weapons
First Aid
Level Map
Rooftop
Car Alarm
3rd Floor
Safe House
Critical Path
Alternate Path
2nd Floor
Dairy
Street
1st Floor
Alley
Subway
36
Downl
oadeGui
de
Apartment Building
No Mercy
Death Toll
The infected bosses cannot
spawn at the start point of
any level. So take this time to
gear up and talk with your
teammates, formulating a
plan for your trek. But in
versus mode, the longer
the time you spend at the
start point, the longer the
opposing team’s infected have
to stage elaborate ambushes
in the passages ahead. So
make sure you grab all the
pickups, but don’t linger too
long in these safe areas.
Weapons
& Supplies
Dead Air
Rooftop
note
The Survivors
and Infected
Rooftop
shotgun or the submachine gun (SMG). Both are
very competent weapons, but the pump shotgun
is a bit easier to use in the cramped apartment
below. Still, it’s a good idea to keep a balance
within the team. So check with your teammates
and consider going in with two submachine guns
and two pump shotguns. Also, don’t forget to max
out on ammo and grab one of the first aid kits.
Survival
Basics
At the start of No Mercy, the survivors find
themselves on the rooftop of an old apartment
building. Unbeknownst to them, this very
apartment building was quarantined early on
during the outbreak, meaning that dozens of
infected roam the rooms and halls below. From
this elevated position, Mercy Hospital can be seen
in the distance. While it doesn’t look very far away,
the path ahead is long and treacherous. For this
phase of the journey, the survivors must descend
through the infested apartment building and
make it to the subway station down the street.
No Mercy
Blood
Harvest
Achievements
Before moving out, gear up at the nearby table. All
survivors are armed with pistols at the beginning
of the level and can supplement their load-out
with one of two primary weapons: the pump
When your team has geared up and is ready to
move out, you must descend to the apartment’s
third floor. There are two paths downstairs. The most
obvious is the staircase at the center of the roof. But
your team can also drop down through the skylight,
landing in a bedroom below. Both entry points have
their advantages and disadvantages. The skylight
is the quickest way to reach the third floor, but it’s
tough to clear the room below before dropping in,
so your team is at risk. The staircase is a much safer
37
Downl
oadeGui
de
PRIMA Official Game Guide
route, allowing the lead player to clear a path while
descending the stairs—the pump shotgun is ideal for
this. Whatever your decision, keep the team together
while moving through the staircase or skylight.
Splitting up at this point could be disastrous.
Infected
Third Floor
3rd Floor
Regardless of which entry point your team has
chosen, be ready to open fire as soon as you
reach the third floor. Expect light to moderate
concentrations of common infected on this floor.
Quickly survey your surroundings and make sure all
your teammates have clear angles on the hostiles.
The lighting is poor on this floor so keep your
flashlights on to illuminate dark corners and rooms.
38
Make quick work of the zombies on the third floor
while pushing toward this stairway in the center of
the building. Be careful when turning the corner to
peer down the stairs. This is a popular ambush point,
particularly for Boomers hoping to trigger a swarm
attack. If you encounter one here, don’t shoot! Instead,
push the Boomer down the stairs with a melee strike
and make the kill a safe distance away.
When playing as the infected in versus
mode, look for this breakaway wall
near the kitchen. While in ghost mode,
you can move through this wall and
hide inside this otherwise inaccessible
space. Spawn inside this space and
wait for the survivors to enter the
third floor. As they pass your position,
knock down the wall with a melee
strike and attack them from behind.
This is a great tactic for picking off
lone stragglers, particularly when
playing as the Hunter or Smoker. But
a Boomer can also make use of this
space by spawning, breaking through
the wall, and vomiting on the
survivors while they’re all
bunched up in the staircase
leading down to the second floor.
Downl
oadeGui
de
Second Floor
CAUTION
No Mercy
Death Toll
Dead Air
Blood
Harvest
Achievements
Continue advancing through the second floor,
dispatching the undead as you go. When you
come to this hole in the floor, stop and wait for
everyone to catch up. There are usually multiple
zombies on the floor below, some climbing up
through the hole in an attempt to reach your
team. Clear the visible space below before
Weapons
& Supplies
The path through the second floor is completely
linear, but be sure to watch the side rooms for
infected attempting to blindside your team. The
side rooms can also be good sources for pickups
such as pills and molotov cocktails. If you haven’t
encountered a swarm attack by now, be ready for
one here. You can hear these attacks building up
before you can actually see them, so be ready to
take a stand when you hear an incoming horde
thundering through the building. Make sure
everyone in the team has a clear angle on the
hostiles and do your best to avoid friendly fire—if
a zombie is close to a teammate, move it away
with a melee attack before shooting.
Exercise extreme caution at
elevation transitions such as the
hole in the floor. These are oneway transitions, meaning that
when you drop through, there
is no way to get back up. This
makes them perfect places for
the infected to set up ambushes,
particularly during versus mode.
For example, if three survivors
drop through the hole and leave
a buddy upstairs, a Hunter or
Smoker can pin or ensnare the
straggler and pummel your
teammate to death. The victim’s
teammates on the first floor
have no way to stop the attack,
since there’s no way to get back
to the second floor. For this
reason, survivors should always
drop through areas like this
at the same time. If necessary,
initiate a voice countdown to
ensure everyone drops through
simultaneously. On the other
hand, if you’re playing as the
infected, exploit these areas as
much as possible in an effort to
split up the survivors.
The Survivors
and Infected
dropping through to reach the first floor. If you
have a molotov cocktail, toss it down through
the hole to incinerate the zombies below. When
the first floor looks clear, make sure everyone on
your team drops through the hole at the same
time. This will prevent anyone from getting stuck
or pinned on the second floor. Plus, it allows your
entire team to impose its firepower on any threats
lurking on the first floor.
Survival
Basics
2nd Floor
No Mercy
39
Downl
oadeGui
de
PRIMA Official Game Guide
Infected
Immediately after dropping through the hole, race
past the blinking alarm clock to spot the green glow
of the exit sign. Turn left and run out into the alley to
escape the apartment building.
TIP
In addition to lurking on the second
floor, the infected can easily ambush
the survivors on the first floor,
attacking as soon as they drop
through the hole. This is a good way
to soak a few survivors with
the Boomer’s bile, triggering
a swarm attack. Just make
sure you stay out of sight until
the survivors actually drop
through.
First Floor
While you may be anxious to leave
the dark and confined spaces of
the apartment behind, consider
taking a few seconds to scour
the first-floor rooms for some
pickups. The director may have
placed some items like pills and
molotovs in these rooms.
Alley
Street
Dairy
1st Floor
1st Floor
Alley
Subway
40
Once your team has reached the first floor, you’re
only a few paces away from the building’s exit.
Downl
oadeGui
de
No Mercy
Blood
Harvest
Achievements
www.primagames.com
Dead Air
When playing as the infected in
versus mode, utilize the climb
points in the alley to reach the
rooftops. Attacking from the
rooftops is the best way to attack
The alley empties into the street, the main artery
leading to the subway station and this map’s safe
house. Combat in the street differs significantly
from the action in the apartment or alley. For
one, the street is very wide and the infected can
attack from virtually any direction.
So stay on alert and keep moving
to avoid getting surrounded.
Submachine guns and
pistols work well for
eliminating threats at
intermediate to long
range, but shotguns
are essential for
dealing with the
inevitable swarm
attack.
Death Toll
Infected
No Mercy
Concentrating your firepower down these alleys
allows your team to dispatch zombies at long
range, mitigating the chance of close encounters.
However, there may be a few zombies huddled
near cars or dumpsters, so be ready to blast them
as they rush into view. While your team’s firepower
and the tall walls of the surrounding buildings
may make you feel secure in this alley, don’t linger
here too long. In versus mode, the infected can
attack from the rooftops, so make a concerted
effort to reach the street ASAP.
Weapons
& Supplies
Street
The Survivors
and Infected
the survivors moving through the
alley, particularly when playing as
the Hunter or Smoker. The rooftops
provide much better cover and
concealment than the alley, helping
you maintain the element of surprise.
Just make sure you remain
in ghost mode until you reach
the rooftop—otherwise you
may be spotted and eliminated
before you can attack.
Survival
Basics
Upon exiting the apartment building, the
survivors must pass through a narrow L-shaped
alleyway leading out to the main street. The length
of and long sight lines offered by these passages
favor the SMG and pistol over the shotgun. So
consider having your SMG-toting buddies lead the
way during this phase of the journey.
41
Downl
oadeGui
de
PRIMA Official Game Guide
circumvent the tanker truck choke
point in the street. Simply burst
through the double doors and make
a break for the subway station.
Immediately after exiting the alley, notice the chainlink fence blocking the street to the left, just beyond
the abandoned police car. Zombies on the other
side will climb this fence and attack your group, so
watch for attacks from this direction. In the event
of a swarm attack, toss a molotov at the base of the
fence to torch any zombies attempting to reach
you. But don’t linger here. Eliminate any immediate
threats and press on toward the subway station.
TIP
Follow the street, but be careful when passing
this tanker truck. There may be large numbers of
infected on the other side of the truck. Furthermore,
the truck creates a narrow choke point, ideal for
infected ambushes positioned in the buildings on
the sides. Quickly deal with any threats and move
past this area as fast as possible. For a safer path,
consider taking one of the alternate routes through
the abandoned building or dairy.
Infected
After exiting the alley, go through
the doorway on the right to enter
a dark abandoned building. Enter
the hall and open the first door
on the left to locate a first
aid station. Outside the subway
safe house, this is the only first
aid station on this map. However,
its contents are based on how
well your team is doing. If you’re
struggling, the director may place
first aid kits inside. But if you’re
doing well with only minor injuries,
the director may place only a
bottle of pills in here. After
stocking up on first aid supplies,
you can use this same building to
42
The area around the tanker truck is
one of the last great ambush spots
for the infected on this map. Instead
of attacking the survivors head on,
hide in the buildings flanking the
street. Buildings on both sides of the
street are accessible and provide the
perfect opportunity to overwhelm the
survivors as they make a break for the
Downl
oadeGui
de
No Mercy
Death Toll
Dead Air
Blood
Harvest
If your team has done really well
up to this point, the director may
spawn a Witch near the subway
steps. Depending on the Witch’s
position, it may not be possible
to sneak past her. If it becomes
www.primagames.com
Achievements
If you want to avoid potential ambushes at
the tanker, turn left at the truck and head
into the building marked with the Simon
Dairy Products sign. This side passage
allows you to avoid the tanker truck choke
point altogether. However, the interior of
the building is pitch black, requiring the
use of flashlights. Still, the director may
have hidden some useful goodies for your
team in this passage, including first aid kits.
So keep your eyes peeled for pickups and
threats. Despite the darkness, the chances
of the infected orchestrating a crippling
attack in here are quite slim. Still, quickly
advance to the exit and make a dash for the
subway station.
No Mercy
CAUTION
Weapons
& Supplies
Regardless of which path you took, limit your
team’s exposure in the street and race to the
subway station. However, be careful not to shoot,
bump, or antagonize the red car parked outside
in any way—it’s equipped with an alarm. Cars
fitted with alarms have windows that flash red.
Discharging weapons near them causes them
to emit a sharp but short beep. If the alarm is
completely triggered, you’ll face an instant swarm
of common infected approaching from any
direction. If this occurs, make sure your team sticks
together. It would be tragic to lose someone when
you’re this close to the safe house. If possible,
race into the safe house as soon as the alarm is
triggered. But if the attack comes up the stairs
from the subway, your team will have no choice
but to stay put and defeat the undead swarm.
The Survivors
and Infected
Alternate Path: Dairy
Survival
Basics
subway station. A combined
attack by Hunters, a Smoker,
and a Boomer can really
wreak havoc and give your
team the chance to kill at least
one survivor.
43
Downl
oadeGui
de
PRIMA Official Game Guide
necessary to eliminate her, make
sure your team is ready to open
fire simultaneously, and avoid
hitting the car with the alarm.
Once she’s startled, your team
won’t have much time to respond
before the Witch pounces on one
of your teammates and begins
clawing away. Finish her off fast
and get down into the safe house
before more infected can join the
attack. When you’re playing as the
infected, the Witch can be a very
useful distraction, so wait until
she attacks before triggering your
own ambush.
CAUTION
In your haste to reach the safe
house, keep tabs on all your
teammates and make sure they’re
not still up on the street. If
they’ve been pinned by a Hunter
or wrapped up by a Smoker, you’ll
need to go back and rescue them.
However, such tactics can be used
as traps by the infected to draw
survivors out of the safe house,
so proceed with caution. Where
there’s one, there are likely to be
others ready to pounce. At times
you may be better off sacrificing
one teammate to save the rest.
Subway Safe House
Descend the steps to the safe house and clear this
room of threats. For the most part, a few common
infected will be wandering around down here.
But this room could also be the site of a lastditch attempt by the infected to stop your team,
especially during versus matches. Watch out for
Boomers and other bosses lurking down here. Once
it’s clear, race into the safe house.
44
If you’re the first in the safe house, turn around and
provide covering fire from the doorway while the
rest of your teammates file inside. Encourage your
teammates to move as fast as possible so you can
shut the door and complete the level. The infected
cannot spawn in the room connecting to the safe
house, but they can spawn on the street above. So
aim at the staircase, as this is the only access point
to the safe house—any attackers will come racing
down these steps.
Downl
oadeGui
de
No Mercy
The Subway
Pawn Shop
Survival
Basics
Level Map
The Survivors
and Infected
Power House
Basement
Offices
1st Floor
No Mercy
Street
Control
Room/Offices
2nd Floor
Weapons
Car Alarm
Safe House
Critical Path
Achievements
First Aid
Blood
Harvest
legend
Ammo
Dead Air
Generator
Room
Death Toll
Holly Street
Station
Weapons
& Supplies
Red Line
North
Alternate Path
www.primagames.com
45
Downl
oadeGui
de
PRIMA Official Game Guide
Safe House
Having escaped the apartment, the survivors
must now travel underground, utilizing the Red
Line North subway tunnel. This leads directly to
the hospital, but given the damage aboveground,
it’s not certain if the entire stretch of the tunnel is
open to foot traffic. Before heading out, stock up on
ammo and health in the safe house. If you haven’t
already, heal up, then replenish your supplies by
grabbing a new first aid kit. There are always four
first aid kits in every safe house, so be sure not to
leave one behind. The SMG and pump shotgun are
both adequate weapons for clearing the subway
tunnels—just make sure your team has good mix of
weaponry before exiting the safe house.
Just outside the safe house the floor is damaged,
dropping down into a stairway. Pause at the top of
this big hole and blast any zombies lurking below.
If you or any team members have a pipe bomb,
consider tossing it down the steps to flush out
any infected skulking below. When it’s clear, drop
through the hole simultaneously.
46
After dropping through the hole, turn around and
clear out this dead-end area filled with concrete
pillars and zombies. This is a favorite hiding spot
for infected looking to pounce on your team early
on, so don’t turn your back on this area until it’s
clear. Watch for Boomers and other infected bosses
lurking down here.
Infected
Just outside the safe house, look for
this drainpipe climb point. It leads
to a small ledge just above the safe
house exit. From here you can attack
the survivors as soon as they exit. For
best results, wait until most of the
survivors have dropped through the
hole near the stairway, then
attack any stragglers on the
upper level. If you’re lucky and
patient, you may be able to kill
at least one survivor here.
Downl
oadeGui
de
No Mercy
Holly Street Station
No Mercy
Infected
Weapons
& Supplies
Two escalators lead up to the tunnel system
above. Although each escalator leads to a separate
platform, the same tunnel is accessible from either.
The escalator to the left leads to the Red Line
North platform, putting you close to the tunnel you
need to travel through. Whatever your decision,
stick together. If your team gets split up here, the
infected will have an easier time dispatching you.
The Survivors
and Infected
the table in front of one of the ticket booths. Use
this opportunity to grab an automatic shotgun,
Survival
Basics
Proceed down the steps and escalator to the Holly
Street Station turnstiles. Clear the area of threats
then scour the ticket booths for supplies. The
director may have spawned pills or pipe bombs in
one (or both) of the ticket booths. Smash the glass
Holly Street
windows
with a melee strike to grab the supplies
Station
within.
There may also be weapon upgrades on
Death Toll
Achievements
www.primagames.com
Blood
Harvest
While the survivors make their
decision on which escalator to take,
position your team on the platforms
above. When the opposing team
makes a move for one of the two
escalators, call it out so your team
can attack simultaneously.
For best results, wait until
they reach the platform. Or
if they have split up, organize
your team to eliminate any
loners.
Dead Air
assault rifle, or sniper rifle. If no weapon upgrades
appear here, the next best location is in the
subway tunnel below.
47
Downl
oadeGui
de
PRIMA Official Game Guide
Be ready for a fight when you reach the top of the
escalator. Even if no infected bosses show up, there
are usually plenty of common infected to mop
up before you can make a move for the tunnel.
Also, don’t linger around the escalators. Infected
spawning downstairs love to rush up these steps
and flank your team from behind. So remain vigilant
while pushing toward the tunnel ahead.
Red Line North
Red Line
North
48
Drop onto the tracks and start moving along the
Red Line North tunnel. Move quickly and drop
any infected that get in your way. But stay close
together and be ready for the inevitable attacks by
the infected bosses, such as the Smoker and Hunter.
The closer you stay together, the quicker your
teammates will be able to respond to these attacks.
Infected
While in ghost mode, continually
monitor the survivors as they move
through the tunnel. There are
many opportunities for them to get
separated here, giving your team the
perfect chance to attack. Watch for
stragglers, then immediately spawn
just out of sight and initiate your
attack. Hunters can dish
out some serious damage,
especially if the victim’s
teammates are far away and
unable to quickly respond.
Downl
oadeGui
de
No Mercy
Survival
Basics
No Mercy
Death Toll
Alternate Path:
Side Tunnel
Weapons
& Supplies
Continue down the tunnel and watch out for more
infected. An encounter with a Tank is possible in
this tunnel. If this occurs, mobility is your biggest
concern, so stay out of subway cars and other
cramped areas that prevent lateral movement.
The tunnel’s Y intersection is one of the best spots
to deal with such threats, offering some room to
sidestep the Tank’s advances and incoming rocks.
Keep firing while dodging the Tank’s attacks.
The Survivors
and Infected
Farther down the tunnel is a subway car with
a table next to it. This table always has ammo
and may even hold weapon upgrades. But
these supplies are in the middle of the tunnel
so be ready for ambushes. Cautiously clear the
area of threats before dashing for the ammo
and weapons. All the weapon upgrades are an
improvement over the SMG and pump shotgun.
Give the assault rifle or automatic shotgun a try
before moving on.
Blood
Harvest
Achievements
www.primagames.com
Dead Air
A large hole in the wall on the platform
near the ammo table leads into a narrow
passage that provides a slight shortcut
through the subway tunnel. It’s usually
a safe route, filled with few infected.
Consider taking it during single-player
games or the co-op campaign. But in
versus mode, it can be a trap, with the
infected team coordinating attacks from
both sides. So proceed with caution.
At the tunnel’s Y intersection stay to the right—
the left branch is caved in. In this branch of the
tunnel your team must move through a subway
car. Cars can actually work to your team’s favor,
preventing you from being flanked from the sides.
However, it’s important to keep weapons aimed
at the front and rear of the car—these are the
only entry points. Swarm attacks are particularly
easy to defeat in these cars, especially if a shotgun
or assault rifle is deployed against the incoming
horde.
49
PRIMA Official Game Guide
TABLE OF CONTENTS
Survival Basics . . . . . . . . . . . . . . 2
PRIMA Official Game Guide
Written by David Knight
The Survivors and Infected. . . . 12
Weapons & Supplies. . . . . . . . . . 26
Prima Games
No Mercy. . . . . . . . . . . . . . . . . . . .36
An Imprint of Random House, Inc.
Death Toll . . . . . . . . . . . . . . . . . .90
3000 Lava Ridge Court, Suite 100
Roseville, CA 95661
Dead Air . . . . . . . . . . . . . . . . . . 137
Blood Harvest . . . . . . . . . . . . . . 182
www.primagames.com
The Prima Games logo is a registered trademark
of Random House, Inc., registered in the United
States and other countries. Primagames.com is
a registered trademark of Random House, Inc.,
registered in the United States.
© 2007 by Prima Games. All rights reserved. No part of this
book may be reproduced or transmitted in any form or by
any means, electronic or mechanical, including photocopying,
recording, or by any information storage or retrieval system
without written permission from Prima Games. Prima Games
is an imprint of Random House, Inc.
Senior Product Marketing Manager: Donato Tica
Associate Product Manager: John Browning
Digital Product Manager: Lex Scheuble
Maps: James “No Relation” Knight
Manufacturing: Suzanne Goodwin
Acknowledgements: Special thanks to the people at Valve
that made this guide possible - Doug Lombardi, Katie Engel
and Marc Nagel. Thanks to Jayme Feldmann and Sasha for the
sugar to keep us awake.
© 2008 Valve, the Valve logo, Left 4 Dead, Left 4 Dead logo
are trademarks of Valve Corporation in the United States and
other countries.
All products and characters mentioned in this book are
trademarks of their respective companies.
Please be advised that the ESRB Ratings icons, “EC,”“E,”
“E10+,”“T,”“M,”“AO,” and “RP” are trademarks owned by
the Entertainment Software Association, and may only be
used with their permission and authority. For information
regarding whether a product has been rated by the ESRB,
please visit www.esrb.org. For permission to use the Ratings
icons, please contact the ESA at esrblicenseinfo.com.
2
Achievements . . . . . . . . . . . . . .222
Important: Prima Games has made every effort to determine
that the information contained in this book is accurate.
However, the publisher makes no warranty, either expressed
or implied, as to the accuracy, effectiveness, or completeness
of the material in this book; nor does the publisher assume
liability for damages, either incidental or consequential,
that may result from using the information in this book.
The publisher cannot provide any additional information or
support regarding gameplay, hints and strategies, or problems
with hardware or software. Such questions should be directed
to the support numbers provided by the game and/or device
manufacturers as set forth in their documentation. Some
game tricks require precise timing and may require repeated
attempts before the desired result is achieved.
Author Bio:
David Knight has been an avid gamer since
the days of the Atari 2600 and Commodore
64. His first foray into the gaming industry
came in 1995, as a scenario designer for
SSI’s WWII strategy game Steel Panthers.
As online gaming communities sprung up
across the Web, David lent his enthusiasm and design skills to
many fan sites. In 1998, he co-founded and co-hosted Game
Waves, a weekly webcast featuring industry news and game
reviews. David’s involvement with Prima Games began in the
late ‘90s as a technical editor. After co-authoring a couple of
guides with his brother Michael, David authored his first solo
game guide in 2002 for Rollercoaster Tycoon 2. Since then, he’s
written more than a dozen guides for Prima Games, including
books for Battlefield 1942, Star Wars Battlefront, and SWAT 4.
We want to hear from you! E-mail comments and feedback to
[email protected].
ISBN: 978-0-7615-5698-5