1
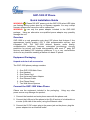
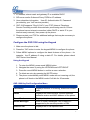
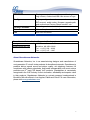
1
GXP-1200 IP Phone
Quick Installation Guide
WARNING:
Please DO NOT power cycle the GXP-1200 when LED lights
are flashing during system boot up or firmware upgrade. You may corrupt
firmware images and cause the unit to malfunction.
WARNING:
use only the power adapter included in the GXP-1200
package. Using an alternative non-qualified power adapter may possibly
damage the unit.
Overview
GXP-1200 is a next generation entry-level SIP phone that features 2 line
appearances, backlit graphic LCD, 3 XML programmable soft-key, and
integrated PoE. The GXP-1200 delivers superior audio quality,
comprehensive telephony features, automated provisioning, security
protection for privacy and broad interoperability with most 3rd party SIP
devices and leading SIP telephony platforms. It is a very cost-effective
choice for any business needing a feature rich basic IP phone.
Equipment Packaging
Unpack and check all accessories
The GXP-1200 phone package contains
1.
2.
3.
4.
5.
6.
7.
One GXP-1200 Main Case
One Handset
One Phone Cord
One Universal Power Adaptor
One Ethernet Cable
One Phone Stand
Two Wall Mount Spacers
Connect the GXP-1200 Video Phone
Please use the equipment included in the packaging.
power source may damage the product.
Using any other
1. Connect the handset and main phone case with the phone cord.
2. Connect the LAN port of the phone to the RJ-45 socket of a hub/switch or
a router (LAN side of the router) using the Ethernet cable.
3. Connect the 5V DC output plug to the power jack on the phone; plug the
power adapter into an electrical outlet.
2
4. The LCD will display provisioning or firmware upgrade information.
Before continuing, wait for the date/time icon to light up.
5. Using the phone embedded web server or keypad configuration menu,
you can further configure the phone using either a static IP or DHCP.
Figure 1: Connectors on the bottom of the GXP-1200
Wall Mount
GXP-1200 can be wall mounted. For proper wall mounting please place the
two wall-mount spacers into the proper holes on the bottom of the GXP-1200
as show below:
Figure 2: Attach the wall mount spacers to the GXP-1200
To position the phone on the wall, place two fixed hangers on the wall, hang
the back of the phone on the fixed hangers.
3
Figure 3: Location of the fixed hangers on GXP-1200
To use the handset, pull out the tab (extension downward) from the handset
cradle, rotate the tab and plug it back into the slot with the extension up to
hold the handset.
Figure 4: Placing tab for mounting phone to wall
Configuring the GXP-1200 using a Web Browser
1. Ensure your phone is connected to the Internet and the power socket.
2. Press MENU button to go into menu of the phone.
3. Press arrow down to Status and press MENU button to see IP address.
4. Using a PC on the same network, type the IP address (from the screen
display) in the URL of your browser.
5. The default administrator password is “admin”; the default end-user
password is “123”.
To configure the phone via the web browser, you will need the following
information:
4
1. IP address, subnet mask and gateway IP or available DHCP.
2. SIP server and/or Outbound Proxy FQDN or IP address.
3. User subscriber information: User ID, Authentication ID, Password
(provided by your VoIP service provider).
4. GXP-1200 supports “Plug N Call” if your ITSP (Internet Telephony
Service Provider) provides this automatic provisioning service. Ensure
the phone has an internet connection (either DHCP or static IP in your
internet ready network), then power up the phone.
5. Please contact your ITSP for additional settings that may be necessary to
configure the phone.
Configure the GXP-1200 using the Keypad
1. Make sure the phone is idle.
2. Press the “OK” button to enter the keypad MENU to configure the phone.
3. Follow MENU options to configure the basic features of the phone – for
example: the IP address if using a static IP. For details, please check
GXP Series User Manual.
Using the Keypad
1. To enter the MENU, press round MENU button.
2. Navigate the menu by using the UP/DOWN and LEFT/RIGHT.
3. Press the round MENU button to confirm a menu selection.
4. To delete an entry by pressing the MUTE button.
5. The phone automatically exits MENU mode with an incoming call, the
phone is off-hook or the MENU mode if left idle for 20 seconds.
GXP-1200 Key Pad Configuration Menu
Call History
Displays histories of incoming, dialed and missed
calls.
Status
Displays the network status, account statuses,
software version and MAC-address of the phone.
Phone Book
Displays the phonebook.
Instant Messages
Goes to Instant Messages if the Presence if
supported by the service provider or PBX.
Direct IP call
Displays the IP-call options menu.
5
Preference
Displays user preference sub-menu, like ring tone,
ring volume, customized XML idle screen or logo.
Config
Display configuration sub-menu, such as network,
SIP account, audio codec, firmware upgrade path
and method and Factory Reset function, etc.
Factory Functions
Extra diagnostic tools reside here.
Reboot
Makes the phone reboot itself.
Exit
Exit from this menu.
Grandstream Networks, Inc. Corporate Headquarters
www.grandstream.com
[email protected]
1297 Beacon Street, 2nd Floor,
Brookline, MA USA 02446
Tel : +1 (617) 566 – 9300
Fax: +1 (617) 247 – 1987
About Grandstream Networks
Grandstream Networks, Inc. is an award-winning designer and manufacturer of
next generation IP voice & video products for broadband networks. Grandstream’s
products deliver superb sound and picture quality, rich telephony features, full
compliance with industry standards, and broad interoperability with most service
providers and 3rd party SIP based VoIP products. Grandstream is consistently
recognized in the VoIP industry for their innovation, affordability and superior value
in their products. Grandstream Networks is a private company headquartered in
Brookline, MA with offices in Los Angeles, Dallas and China. For more information,
please visit www.grandstream.com.
6