Transcript
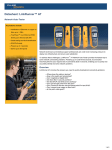
TestifierPRO™ TP650
Cable Tester
Quick Start Guide
Essentials of Cable Testing
A. Plug the cable into the correct input (1), Telco to RJ11,
Coax to F-connector, Network (Ethernet) to RJ45
B. Plug the opposite end into the Remote (10) for telco and
network tests, or the coax remote for coax tests.
C. Press the appropriate mode button (2, 3, 4) for the cable
being tested. Repeated presses of a mode button cycles
through all the tests available for that mode.
D. When the desired test option is displayed (such as tone or
length measurement), press SEL (6) to execute the test.
Functions
•
•
•
•
•
•
•
Cable ID: Use up to 8 full test remotes (included in TP655
kit) or up to 20 ID-only remotes (optional) to identify cable
runs.
Length Testing: Measure opens length of cable using
capacitance. SEL (6) to select pair, Up and down arrows
(5, 7) to select capacitive constant.
Toning: Send tone on individual pins, pairs or shield and
trace with a probe. SEL (6) cycles through available
tones, Up and down arrows (5, 7) select pin or pair (or
shield for coax) tone is sent on.
Cable Testing: With no remote connected, will test for
shorts, opens and split pairs. Full wiremapping with
remote connected.
Hub Blink: Flashes the Link LED on an Ethernet device.
Simple method of identifying which port a cable is
connected to.
Setup Button (8): Up and down arrows (5, 7) cycle
through three settings: Pass Beep on/off, Units –
Feet/Meters, Shielded or un-shielded telco and network
cables.
Backlight: Quickly pressing the Power Button (9) turns
the backlight on/off
1
3
2
4
5
7
8
6
9
10
Button Functions
1.
2.
3.
4.
5.
6.
7.
8.
9.
10.
Inputs (RJ11, Coax & RJ45)
Telco Mode Button
Coax Mode Button
Network Mode Button
Up Arrow
SEL (Select) Button
Down Arrow
SETUP Button
Power Button
Remote