1
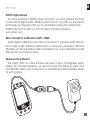
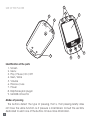
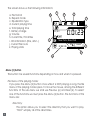
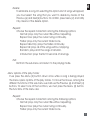
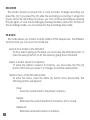
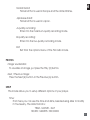
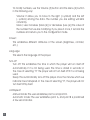
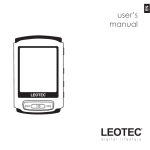
EN
user’s
manual
TABLE OF CONTENTS
First steps
3
Use of the player
4
Music, Video and Replays
5
Recorder
10
FM Radio 10
Photos
11
Setup
11
Drivers and Software
14
Safety instructions
14
More information, technical
service and support 15
EN
FIRST STEPS
LEOTEC digital lifestyle
You have acquired a LEOTEC player and with it you have opened the doors
to the world of digital audio. LEOTEC products do not only offer you the latest in
technology, but they also offer you an unbeatable quality-price relationship.
LEOTEC has much to offer you. Find out about the latest models in:
www.leotec.com
Basic concepts of codification in MP3 / WMA
Audio digital codification has meant a revolution in portable audio devices,
but in order to get maximum performance a computer is necessary. MP3 and
WMA files can be acquired by means of Internet or you can codify them yourself
directly from your Compact Discs.
Where are the batteries?
The player does not need batteries because it has a rechargable built-in
battery. To recharge the battery, you should connect the player by means of a
mini USB/USB cable to the computer or to a transformer (sold separately) ready
for such purpose.
5
USE OF THE PLAYER
3
8
1
9
7
4
6
2
Identification of the parts
1. Screen
2. Menu
3. Play / Pause / On / Off
4. Next / More
5. Volume
6. Previous / Less
7. Power
8. Earphones jack plug-in
9. MiniUSB connector
Modes of pressing
The buttons detect the type of pressing, that is, that pressing briefly does
not have the same function as if pressure is maintained. Consult the sections
dedicated to each one of the buttons to have more information.
EN
Turning the player on and off To turn the player on the button marked Power (7) must be moved to the right.
In the event of already being in this position, maintain the Play (3) button pressed
for a few seconds. Once turned on, to turn it off maintain the Play (3) button
pressed a few seconds or move the Power (7) button to the left.
The player’s Menu
Once the player is on, the menu will appear on the Screen (1). This menu
allows you to choose the mode of operation, that is:
• Music
• Video
• Recording
• Recorder
• FM Radio
• Photos
• Setup
• E-book
Note: To move among the different items of the menu, use the Next (4) and
Previous (6) buttons; and to select an item press the Menu (2) button.
MUSIC, VIDEO AND RECORDINGS
In the music or video play mode, you can play all MP3, WMA, WAV and AMV
files, that are found in the memory. While, in the recordings play mode, you will
play the recordings previously made.
The screen shows us the following information�:
a. File format
b. Repeat mode
c. Equalization type
d. Current playing time
e. Total playing time
f. Battery charge
g. Volume
h. Current file / Total files
i. ID3 information (title, artist...)
j. Current file route
k. Playing state
c
h
g
b
NOR
f
25
N
d
001/001
j
MP3
New York, New York
0:03:35
a
LY
RIC
192 KBPS
k
e
Menu (2) button
This button has several functions depending on how and when it is pressed.
File menu of the playing mode:
If you press the Menu (2) button once while it is NOT playing a song, the file
menu of the playing mode opens. To move the mouse, among the different
functions of this sub-menu we shall use Previous (6) and Next (4). To select
one of the functions we must press the Menu (2) button. The functions of this
menu are:
Directory:
This option allows you to select the directory that you want to play.
“Root” will play all of the directories.
i
EN
Delete:
To eliminate a song. On selecting this option a list of songs will appear;
you must select the song that you want to delete by means of the
Previous (6) and Next(4) buttons. To confirm, press Menu (2) and ratify
it by means of the delete option.
Repeat:
Choose the repeat mode from among the following options:
Normal: plays only the current file without repeating.
Repeat one: plays the current song continually.
Folder: plays only the current folder once.
Repeat directory: plays the folder continually.
Repeat all: plays all of the songs without stopping.
Random: plays all of the songs at random.
Introduction: plays the first 10 seconds of all songs.
Exit:
Exit from the sub-menu and return to the playing mode.
Menu options of the play mode:
If we press the Menu (2) button down once while a song is being played,
the menu opens options of the play mode. To move the mouse, among the
different functions of this sub-menu we shall use the Previous (6) and Next (4)
buttons. To select one of the functions, we must press the Menu (2) button.
The functions of this menu are:
Repeat:
Choose the repeat mode from among the following options:
Normal: plays only the current file without repeating.
Repeat one: plays the current song continually.
Folder: plays only the current folder once.
Repeat directory: plays the folder continually.
Repeat all: plays all of the songs without stopping.
Random: plays all of the songs at random.
Introduction: plays the first 10 seconds of all songs.
Equalizer:
Choose the type of equalization from among the following options:
Normal: equalization of the song is not modified.
Rock: more presence of the instruments is added.
Pop: the voice is made to stand out more.
Classical: recommended for many-stringed instrumental music.
Soft: perfect for “chillout” and other soft music.
Jazz: recommended for instrumental music with a lot of guitar.
DBB: maximum presence of bass and drums.
Speed:
This option is activated by default in normal mode (0). If you wish to
increase the play speed or reduce it, you can do this by means of the
Menu (2) button. Towards the left it reduces play speed and towards
the right it increases it.
A-B Repeat:
Enter in the A-B Repeat mode. This mode repeats as many times as
is stated in A-B Repeats function the segment between the point A
which we mark by pressing the Previous (6) button and point B which
we mark by pressing the Next (4) button.
A-B Repeats:
This establishes the number of times that the A-B Repeat mode is
repeated. To increase the number of times, just press the More (4)
button, and to reduce it press the Less (6) button.
EN
A-B Interval:
This establishes the duration of silence (seconds) between A-B repeats.
To increase the number of times, just press the More (4) button, and to
reduce it press the Less (6) button.
Exit:
Exit from the sub-menu and return to the playing mode.
Play/Pause (3) button
The playing of the song selected begins. Once the song is being played, if you
press this button again, the playing will go into pause. The pressing of this button
must be brief, since if it is maintained pressed, the player will turn itself off.
Next/More (4) and Previous/Less (6) buttons
Song change:
To change songs, you must press one of the buttons.
Advance or go back in the song:
If what you want is to go to a specific minute of the song that is being
played, you must maintain the button pressed.
Volume (5) button
The Volume (5) buttons increase and reduce the volume.
RECORDER
This mode converts our player into a voice recorder. To begin recording, just
press Play (3), if you press Play (3) while the recording is occurring, it will go into
pause. Once the recording is in pause, you can continue recording by pressing
Play (3) again, or save the recording by pressing the Menu (2) button. To listen to
the recordings made, you must enter into the recordings play mode.
FM RADIO
This mode allows you to listen to radio stations of FM frequencies. The different
functions that you can use in this mode are:
Search for a station in the FM band:
To do a search going up the bank, you must press the More (4) button, or
press the Less (6) button to do the same by going down the band.
Select a station saved in its memory:
To enter the stations saved in its memory, you must press the Play (3)
button. Each time you press it, it changes to another saved station.
Options menu of the FM radio mode:
To enter this menu, press the Menu (2) button once downwards. The
following options will appear:
Save:
Save the current band in the player’s memory.
Delete:
Eliminates the current band from its memory (if it is saved).
Delete all:
Eliminates all saved bands in its memory.
10
EN
Normal band:
FM band that is used in Europe and the United States.
Japanese band:
FM band that is used in Japan.
A-quality recording:
Enter into the maximum-quality recording mode.
B-quality recording:
Enter into the low-quality recording mode.
Exit:
Exit from the options menu of the FM radio mode.
PHOTOS
Image visualization:
To visualize an image, just press the Play (3) button.
Next / Previous image:
Press the Next (4) button or the Previous (6) button.
SETUP
This mode allows you to setup different options of your player.
Time:
From here you can see the time and date, besides being able to modify
it if necessary. The date format is:
YEAR - MONTH - DAY
HOURS : MINUTES : SECONDS
11
To modify numbers, use the Volume (5) button and the Menu (2) button
in the following way:
Volume: It allows you to move to the right (+ symbol) and the left
(- symbol) among the data. The number you are editing will blink
constantly.
More / Less: Increases (More (4)) or decreases (Less (6)) the value of
the number that we are modifying. If you press it once, it records the
numbers and returns you to the configuration mode.
Screen:
This establishes different attributes of the screen (brightness, contrast,
etc.).
Language:
This selects the language of the player.
Turn off:
Turn off: This establishes the time in which the player will turn itself off
automatically if it is not being used. The time is stated in seconds; in
the case of selecting “0” the player will not turn itself off if it is not being
used.
Sleep: This automatically turns off the player once the minutes which we
indicate have transpired. In the case of selecting “0”, the player will not
turn itself off by itself.
A-B Repeat:
Manual mode: The user establishes point A and point B.
Automatic mode: The user establishes point A, and point B is positioned
a few seconds later.
12
EN
Memory:
Shows information about the internal flash memory. The first number
indicates the quantity of free MB and the second one shows the
percentage that is equivalent to occupied memory.
Firmware:
Displays the firmware version installed in the player and the date of
installation.
Update:
To update the firmware, connect the device to the USB port of your
computer and execute the “Upgrade Tool” program included in the CD.
Follow the steps that the program indicates to you.
Exit:
Return to the general menu.
13
DRIVERS AND SOFTWARE
Drivers installation
It is not necessary to install drivers for the player as long as Windows 98, Second
Edition or superior, is used. In the event of being necessary, you will find the
necessary controllers in the drivers folder of the CD.
Conversion of video files to AMV
The MP4 player plays videos in the AMV format; it is possible to perform the
conversion of any video file to this format. For this, the CD includes software that
is very easy to use. Once installed, open the “AMV convert Tool” program by
means of the Start Menu. Follow the steps indicated on the screen to perform the
conversion.
SAFETY INSTRUCTIONS
Safety instructions
1. Read and understand all safety instructions carefully to avoid hurting
yourself or the device.
2. Avoid exposure of the device to extreme temperatures (above 55ºC or
below –5ºC).
3. Maintain the device away from humidity.
4. Avoid exposure of the device to direct sunlight.
5. Do not try to dismantle, repair or modify the device.
14
EN
MORE INFORMATION, TECHNICAL SERVICE AND SUPPORT
Warnings concerning royalties
Protection of intellectual ownership, also in the case of the music, is applied on
a worldwide basis. In the majority of the countries it is permitted to make a copy
for personal use of audio supports (for ex. previously recorded CD and MC) or
musical data (for ex. from Internet) that have been legally acquired.
In any case, it must be born in mind that it is not permitted to sell these copies
or transfer them to third parties for commercial reasons.
Take precautions during the downloading of MP3 files from Internet. Take
into account that the files must have their licenses in order, that is, that you also
possess the rights to the songs.
Guarantee and responsibility
The manufacturer gives a guarantee for 24 months for the player and the
accessories provided. The guarantee includes the damage and defects related
to defective materials and imperfect preparation. The guarantee does not cover
the damage that can occur for incorrect or inadequate use, or for repairs of
changes in the apparatus made without the authorization of the manufacturer.
The manufacturer does not assume the responsibility for damage incurred due
to redundant profit.
Support and Technical Service
For any technical consultation you can go to the place of purchase or contact
the technical service of LEOTEC. There is more available information in the
website: www.leotec.com or by means of the e-mail: [email protected]
15
www.leotec.com