1
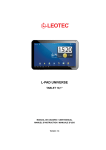
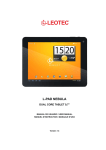
Action Sport Cam HD Manual de usuario Accessorios de montaje 1 Guia rápida 2 Funciones Este manual de usuario contiene la información más actualizada que se disponía en el momento que ser realizó. Las pantallas e ilustraciones son usadas con el propósito de mostrar los detalles de la cámara de manera más directa y específica. Pueden encontrarse diferencias entre las pantallas mostradas y las que tenga su dispositivo, debido a posibles cambios en la tecnología y la producción, en tal caso las funciones reales de su cámara prevalecen. Consejos Lea los consejos antes de usar la cámara para un funcionamiento correcto y seguro así como para conseguir su máximo rendimiento y extender su vida útil. No exponga la videocámara al sol directamente, ni apunte su lente a la luz solar. De lo contrario, el sensor de imagen de la cámara de vídeo se puede dañar. 3 Cuide bien de la cámara y evite que el agua y las partículas de arena entren en la cámara cuando se use en la playa o el agua. El agua, arena, polvo o sal pueden dañar la cámara. Mantenga la cámara libre de polvo y elementos químicos. Guárdela en lugar fresco, seco y bien ventilado. No coloque la cámara en sitios con temperaturas altas, humedad ni polvo. Compruebe que la cámara funciona de manera normal antes de usarla Si se acumula suciedad o manchas en la cámara o en la lente, use un paño suave, limpio y seco para limpiarlo suavemente. Si la cámara o la lente está manchada con partículas de arena, sóplelas suavemente, no use un paño para limpiarlas ya que podría arañar la superficie. Si necesita limpiar la superficie de la cámara, sople primero la arena y polvo acumulados y limpie después con un paño adecuado para equipos ópticos. Use un producto de limpieza adecuado si fuera necesario, no use disolventes. No toque la superficie de la lente con los dedos. Haga una copia de los datos contenidos en su tarjeta de memoria cuando la use por primera vez en la cámara. Las tarjetas de memoria contienen componentes electrónicos de precisión. Los datos pueden 4 perderse o dañarse bajo las siguientes circunstancias: 1. Uso inapropiado de la tarjeta de memoria. 2. La tarjeta se ha doblado o golpeado. 3. Se ha situado bajo altas temperaturas, ambientes húmedos o se ha expuesto al sol directo. 4. Existe un campo electrostático o electromagnético alrededor de la tarjeta. 5. Se ha interrumpido la energía o se ha extraído la tarjeta en el momento de la lectura, escritura o formateo de la misma. 6. Se ha tocado con los dedos o con un objeto metálico la superficie de contacto metálica. 5 Requisitos de sistema Sistema operativo CPU Requisitos Microsoft Windows2000, XP, Vista, 7 Intel Pentium III de más de 800MHz o otra CPU de rendimiento equivalente Memoria interna Más de 512MB Tarjeta de sonido Soporte DirectX8 o superior. y video Driver CD Disco duro Otros 4x o más rápido Más de 500MB libres Un puerto USB1.1 o USB2.0 estándar 6 Apariencia y teclas ⑺Cambio de modo: ⑻Lente ⑼LCD TFT ⑽Luz indicadora de funcionamiento ⑾Luz indicadora de carga ⑿Hendidura para correa ⑴Ranura de la tarjeta ⑵Reset ⑶Ranura USB ⑷Botón de encendido ⑸MIC ⑹Disparador 7 Uso 1. Carga de la batería El indicador de carga está encendido. Cable USB Conecte la video cámara apagada con el ordenador para cargarla. La luz indicadora de carga se encenderá y después de la carga se apagará. Generalmente la carga está completa tras 2-4 horas. 8 2. Uso de la tarjeta de memoria 1. Empuje suavemente la tarjeta de memoria en la ranura en la dirección indicada hasta que esté completamente insertada. 2. Para extraerla presione ligeramente hacia dentro, la tarjeta hará un click y saldrá. Nota: La cámara no dispone de memoria interna de almacenamiento. Asegúrese de introducir una tarjeta de memoria antes de usarla. 9 3. Encendido / apagado 3.1 Encendido: Pulse el botón de encendido, se muestra la pantalla inicial y la cámara se enciende. 3.2. Apagado: Pulse el mismo botón, la cámara se apagará. Apagado automático: tras un tiempo en espera la cámara se apagará automáticamente para ahorrar energía. Por defecto el tiempo está configurado en 5 minutos. 3.3. Apagado en caso de falta de energía: cuando la batería tenga poca carga se mostrará en pantalla el icono de batería baja. Cargue la batería a tiempo. Cuando la luz se vuelve roja e intermitente, la cámara se apagará automáticamente. 10 4. Alternar los distintos modos de función La cámara dispone de tres modos de uso: fotos, video y video en vehículo. Puede cambiar de un modo a otro mediante el interruptor tras iniciar la cámara. Modo foto: permite tomar fotografias; Modo video: permite grabar videos; Modo video en vehículo: graba una sección de video cada 5 minutos. Modo foto Modo video Botón Modo 11 Modo video en vehículo 5. Luz indicadora Luz de funcionamiento: cuando la cámara está en funcionamiento (grabando videos, tomando fotos, etc.) la luz de funcionamiento estará encendida. Luz de carga: se enciende cuando la camara se está cargando. 6. Modo de grabación de video Cuando el interruptor de modo se pone en modo de grabación de vídeo, pulse el botón disparador una vez, o haga clic en el centro de la pantalla LCD una vez para iniciar la grabación mientras se encuentra en vista previa; pulse el botón de disparo una vez más si desea detener la grabación, la cámara parará la grabación automáticamente cuando la tarjeta de memoria esté llena o no quede batería. 1 Temporizador: muestra el tiempo restante de grabación. 2 : icono de modo, muestra el modo en que está funcionando la cámara. 12 3 4 : tamaño de video, haga clic en este icono y podrá cambiar entre 720P/VGA. : indica que hay una tarjeta de memoria insertada. 5 : icono zoom digital, haga clic para acercar la imagen. 6 : icono zoom digital, haga clic para alejar la imagen. 7 : disparador visual, toque este marco visible para tomar fotos o grabar. 8 : icono de la batería, indica el estado de carga de la batería. 9 : indica el estado del zoom digital. 10 : haga clic en este icono para cambiar al modo de reproducción. 11 :haga clic en este icono para establecer la fecha y la hora, pulse el disparador para confirmar. 7 Modo foto: Cambie al modo foto, pulse el botón disparador o haga clic el centro de la pantalla LCD una vez en 13 el modo de previsualización para tomar una foto. 1 Contador: indica el número actual de fotos tomadas / número de fotografías que pueden tomarse. 2 : icono de modo foto. 3 : tamaño de foto, haga clic en el icono para seleccionar la resolución. 4 : indica que hay una tarjeta de memoria insertada. 5 : icono zoom digital, haga clic para acercar la imagen. 6 : icono zoom digital, haga clic para alejar la imagen. 7 : disparador visual, toque este marco visible para tomar fotos o grabar. 8 : icono de la batería, indica el estado de carga de la batería. 9 : indica el estado del zoom digital. 14 10 : haga clic en este icono para cambiar al modo de reproducción. 11 :haga clic en este icono para establecer la fecha y la hora, pulse el disparador para confirmar. 8 Modo de video en vehículo: Cambie al modo foto, pulse el botón disparador o haga clic el centro de la pantalla LCD una vez en el modo de previsualización para comenzar una grabación, se grabará una sección de video cada 5 minutos. Cuando la tarjeta de memoria esté llena borrará el clip más antiguo para liberar espacio y continuar grabando. 1 Temporizador: muestra el tiempo restante de grabación . 2 3 4 : icono de video en vehículo. : tamaño de video, haga clic en este icono y podrá cambiar entre 720P/VGA. : indica que hay una tarjeta de memoria insertada . 15 5 : icono zoom digital, haga clic para acercar la imagen. 6 : icono zoom digital, haga clic para alejar la imagen. 7 : disparador visual, toque este marco visible para tomar fotos o grabar. 8 : icono de la batería, indica el estado de carga de la batería. 9 : indica el estado del zoom digital. 10 11 : haga clic en este icono para cambiar al modo de reproducción. :haga clic en este icono para establecer la fecha y la hora, pulse el disparador para confirmar. Nota: la pantalla se apagará automáticamente durante la grabación para ahorrar energía; pulse brevemente la pantalla para encenderla de nuevo. 9 Modo de reproducción: 9.1 En el modo previsualización, haga clic en el icono de reproducción ( derecha de la pantalla para entrar en el modo de reproducción: 16 ) en la parte inferior 1 : indica que el archivo actual es de formato AVI. 2 : indica el número de archivos en la carpeta actual / cantidad total de archivos. 3 : nombre de la carpeta actual (como: I:\DCIM\100MEDIA 4 : selecciona archivos en adelante. 5 : selecciona archivos hacia atrás. 6 : borra el archivo de imagen actual. I: es la unidad de disco externo). 7 : reproduce el video actual. 8 : vuelve al modo de foto o video anterior. 9.2 Reproducción de videos: 17 Clic para pausar la reproducción, clic para avanzar, y clic para retroceder. 9.3 Borrado de archivos: Clic en SI (YES) para borrar el archivo actual inmediatamente, o click en NO para cancelar la 18 solicitud de borrado. Aplicación en ordenador Conecte la cámara a su ordenador La cámara dispone de función “plug & play”. Conecte la cámara encendida al PC a través de USB, entonces pasará al modo de disco externo.El icono de disco extraible aparecerá en su PC. Las fotos/videos tomadas se guardan en I:\DCIM\100MEDIA (I:\ es la unidad de disco) en el disco extraíble. Los archivos grabados en modo video en vehículo se guardan en I:\DCIM\RECORDER. Especificaciones Sensor de imagen Funciones Lente de cámara Zoom digital Disparador Pantalla LCD Resolución de imagen 1.3 mega pixel (CMOS) video, fotos, video en vehículo, disco extraíble F3.1 f=9.3mm 4x Electrónico 2.0” táctil 5M (2592×1944), 3M (2048×1536), 1M(1280×1024) 19 Resolución de video Balance de blancos Exposure Formatos de archivo Almacenamiento Interfaz USB Alimentación Dimensiones (largo × ancho × alto) Peso VGA: 640x480 (60 cuadros/segundo), 720P:1280x720 (30 cuadros/segundo) Automático Automático Imagen JPEG Video AVI Tarjeta MicroSD (Soporta hasta 32GB), (no dispone de memoria interna) USB 2.0 de alta velocidad Litio 3.7V recargable 66*45*25mm 48 gramos aprox. Garantía y responsabilidad Todos los productos LEOTEC tienen una garantía de 24 meses a partir de la fecha de factura a cliente final excepto en los accesorios incluídos. El fabricante garantiza al consumidor que sus productos se encuentran libres de defecto en materiales y mano de obra en el momento de su compra. 20 Las baterías dispondrán de 6 meses de garantía. Se consideran defectuosas aquellas baterías que dentro de ese periodo su máxima capacidad de carga sea igual o inferior al 50%. La garantía ofrecida únicamente cubre los defectos de fabricación o de materiales que el producto pudiera tener. Quedan excluidos los defectos o fallos ocasionados por un uso inadecuado, rotura, desgaste. Anularán la garantía la manipulación del producto por personal ajeno al servicio técnico de LEOTEC, actualizaciones de software no proporcionadas por LEOTEC, así como todos los fallos o averías ocasionados por catástrofes naturales. La garantía será válida siempre y cuando el usuario disponga del ticket o factura de compra y este se encuentre dentro de plazo. Soporte y Servicio técnico Para cualquier consulta técnica puede acudir a su punto de venta o contactar con el servicio técnico de LEOTEC. Visite nuestra web y manténgase siempre actualizado en la sección de descargas de su producto. Más información disponible en el sitio web: www.leotec.com o mediante el e-mail: [email protected] 21 DECLARACIÓN DE CONFORMIDAD Marca: LEOTEC Nombre del suministrador: World Driver S.A. Dirección: Ctra de l'Hospitalet 66 - 68 08940 - Cornellà de Llobregat – Barcelona Tel: +34 93 267 66 00 NIF: A62589130 Web: www.leotec.com Declaramos bajo nuestra exclusiva responsabilidad la conformidad del producto: Action Sport Cam HD LESPCAM01 País de fabricación: China Al que se refiere esta declaración, con la(s) norma(s) u otros documento(s) normativo(s) de acuerdo con las disposiciones de la Directiva 93/68/CEE, del Parlamento Europeo y del Consejo de 22 de julio de 1993, transpuesta a la legislación española mediante el Real Decreto 1950/1995, de 1 de Diciembre de 1995. El símbolo de referencia tanto en el producto como en su manual de usuario, indica que al final de la vida útil de los aparatos eléctricos y/o electrónicos, éstos deberán reciclarse por separado de sus residuos domésticos. Existen medios adecuados para recoger este tipo de material para su correcto reciclaje. Para obtener más información, póngase en contacto con la autoridad local o a su distribuidor donde adquirió el producto. 22 ENGLISH 23 Mounting Accessories 24 Quick User Guide 25 Functions This user's manual has referred to the latest information we had when this user’s manual was made. The screen display and illustrations are used in this user's manual for the purpose of introducing details of this digital camera in a more specific and direct way. Difference may arise between these displays and illustrations and the digital camera actually available for you due to difference in technological development and production batch, under which case, the actual functions of this video camera shall prevail. Announcements Please read the Announcements carefully before using this video camera for proper and safe operation, so as to bring its optimum performance into play and extend its service life. Do not expose the video camera to sunshine directly, nor point its lens to sunlight. image sensor of the video camera may be damaged. Take good care of the video camera and prevent water or sand particles from entering the video camera when it is used on the beach or water, because water, sand particles, dust or component containing salt may damage the video camera. 26 Otherwise, the Keep the video camera contaminated free of dust and chemical materials. Place it in a cool, dry and well ventilated place. Do not place the video camera in a high temperature, moist or dusty place. Please check if the video camera can operate normally before use. If dirt or stain is accumulated on the video camera or on its lens, use soft, clean and dry rag to wipe it away gently. If the video camera or its lens is stained with sand particles, blow them away gently. Do not use cloth to wipe arbitrarily. Otherwise, it may scratch the surface of video camera or its lens. If it is required to clean camera surface, firstly blow away the sand dust accumulated on this surface, and then wipe the camera gently with rag or tissue applicable to optical equipments. Please use the cleaning agent of video camera for wiping if necessary. Do not use organic solvent to clean the video camera. Do not touch the lens surface with fingers. Please back up the data if the memory card inside this video camera is used for the first time. The externally installed memory cards are manufactured from precise electronic components. Data may be lost or damaged under the following circumstances: 27 1. Improper use of the memory card. 2. The memory card is bent, dropped or collided. 3. Place it under high temperature or moist environment or expose to sunshine directly. 4. Electrostatic or electromagnetic field exists around the memory card. 5. This memory card is taken out or power supply is interrupted when this video camera or computer is connected to the memory card (i.e. during reading, writing and formatting). 6. Touch the metal contact surface of the memory card with fingers or metal materials. 28 System Requirements System Requirements Operating System Microsoft Windows2000, XP, Vista, 7 CPU Intel Pentium III of more than 800MHz or other CPU with equivalent performance Internal Memory Larger than 512MB Sound Card and The sound card and display card shall support DirectX8 or Display Card higher version. CD Driver Hard Disk Others Speed of 4 times or faster Free space of more than 500MB One standard USB1.1 or USB2.0 port 29 Introduction to Appearance and Keypad ⑺Mode Switch: ⑻Lens ⑼LCD TFT ⑽Working Indicator Light ⑾Indicator Light for charging ⑿ Wrist strap eyelet ⑴Memory card slot ⑵Reset ⑶USB slot ⑷Power button ⑸MIC ⑹Shutter button 30 Usage 1. Charge the built-in lithium battery Indicator Light for charging is on. USB Cable Connect the video camera with computer for charging in the shutdown state. The indicator light for charging is on at this time and will be off after charging. In general, it can be fully charged after 2-4 hours. 31 2. Use of Memory Card 1. Push the memory card into the card slot according to the concave lettering beside the slot of memory card till it is completely inserted. 2. To take out the memory card, gently press the end of the memory card inward and it will pop up. Note: No built-in memory is available in this video camera. Make sure to insert memory card before using. 32 3. Startup/Shutdown 3.1 Startup: Press the POWER button for 3 seconds, the screen is displayed and the camera is on. 3.2. Shutdown: Press the POWER Key, and the camera will be shut down. . Automatic shutdown: when the idle time of the video camera reaches the time for automatic shutdown, it will be shut down automatically to save power. The default time of this camera for automatic shutdown is 5 minutes. 3.3. Shutdown in case of power shortage: when the power of the battery is insufficient, the LCD display screen will display the low power icon. Please charge it in time. When indicate light turns red and flickering, the video camera will be shut down automatically. 33 4. Conversion between Function Modes Three modes are available for this video camera, i.e. picture taking mode, video recording mode and vehicle-mounted mode. Conversion is available via the mode switch after startup. Picture taking mode: pictures can be taken; Video recording mode: video can be recorded; Vehicle-mounted mode: videotape can be recorded. Picture taking mode (one section every 5 minutes) Mode Switch Video recording mode Vehiclemounted mode 34 5. Indicator light Busy light: when the camera is busy (such as, recording a film, taking photos, automatic off-screen), the busy light will be on. Charging light: when the light is on for a long time, it prompts the user that the camera is charging. 6. Video recording mode When the mode switch is turned to video recording mode, press the shutter button once or click the LCD center once to begin recording under previewing state; press the shutter button once again if you want to stop recording, and the camera will also stop recording, automatically when the memory card is full or the power is insufficient. 1 00:12:18: Timer means that video recording can still last for 12 minutes and 18 seconds. 2 : mode icon, represents that the video camera is in video recording mode. 3 : videoing size, clicks this icon and you can choose 35 720P/VGA. 4 5 : digital zoom icon, click it and enlarge it. 6 : digital zoom icon, click and minify it. 7 : visual shutter, touch this visible frame for taking photos or recording. 8 : battery icon, represents the power status of the battery. 9 : represents the status of digital zoom. 10 : click this icon to switch to the playback mode. 11 7 : means that the memory card is inserted at present. : click this icon to set the date and time, finished setting and press Shutter key to confirm. Picture taking mode: Switch the mode switch into the Picture taking mode, press the shutter button or click the LCD center once under the previewing state to take a photo: 36 1 0/1234: Counter, indicating current number of photos taken already /number of photos to be taken. 2 : mode icon, indicating that the camera is in photo taking mode. 3 : video size, click this icon to select the photo resolution. 4 : means that the memory is been inserted at present. 5 : digital zoom icon, click it to enlarge. 6 : digital zoom icon, click it to minify. 7 : visual shutter, touch this visible frame for taking photos or recording. 8 : battery icon, indicates the power status of the battery. 9 : represents the status of digital zoom. 10 : click this icon to switch to the playback mode. 37 11 8 : click this icon to set the date and time, finished setting and press Shutter key to confirm. Vehicle-mounted mode: Turn the mode switch to vehicle-mounted mode, press the shutter button or click the LCD center once under the preview state to begin recording, save a segment for recording every 5 minutes, then start to record the next segment of video. When the storage card is full, the earliest segment of video will be deleted to release the corresponding space for continuous recording. 1 00:12:18 timer, indicating that the camera can still record for 12 minutes and 18 seconds. 2 3 4 : mode icon, representing that the camera is in vehicle-mounted mode. : video size, click this icon to select 720P, VGA. : represents that the memory card has been inserted . 5 : digital zoom icon, click it to enlarge. 6 : digital zoom icon, click it to minify. 7 : visual shutter, touch this visible frame for taking photos or recording. 38 8 : battery icon, representing the current power status of the battery. 9 : represents the status of digital zoom. 10 11 : click this icon to switch into the playback mode. : click this icon to set the date and time, finished setting and press Shutter key to confirm. Note: the screen will be off automatically during recording process in order to save power; user can press the power button shortly to start the screen and restore display. 9 Playback mode: 9.1 After starting up and entering the previewing state, click the playback icon ( corner of the LCD to switch to the playback mode: Click 1 : represents that the current file is an AVI video file. 2 : represents that there is one file in the current folder/one file in total. 3 : current folder I:\DCIM\100MEDIA name (such 39 as: ) at the lower right I: is the movable disk of the device). 4 : Means that clicking can select files frontwards. 5 : Means that clicking can select files backwards. 6 : Means that clicking can activate to confirm the deletion of the current file picture. 7 : Means that clicking can play the current movie clips. 8 : Means that clicking can switch back to the previous photo mode (video mode). 9.2 Movie clips playing: Click to pause playing, click to play forward, and click 40 to play backward. 9.3 File deletion: Click YES to delete the current file immediately, or click NO to cancel the request of deletion. Apply on the personal computer Connect to personal computer The camera is provided with the plug and play function. Connect the device to the computer with USB line under turning-on state, then it will be switched into the movable hard disk mode. Icon of movable disk will appear on the window of “my computer”. Photos/videos you have taken are saved in folder I:\DCIM\100MEDIA (I is the movable disk of this device) in the movable disk. Files recorded in vehicle-mounted mode are saved in I:\DCIM\RECORDER. 41 Technical parameters Image sensor Function mode Camera lens Digital zooming Shutter LCD display screen 1.3 million pixel (CMOS) videoing, taking photos, vehicle-mounted mode, removable disk, F3.1 f=9.3mm 4 times Electronic shutter 2.0-inch touch screen Image resolution 5M (2592×1944), 3M (2048×1536), 1M(1280×1024) Video resolution White balance Exposure VGA: 640x480 (60 frames/second), 720P:1280x720 (30 frames/second) Automatic Automatic Image JPEG Video AVI microSD card (Supporting up to 32GB), (without built-in flash memory) High-speed USB 2.0 interface Built-in 3.7V rechargeable lithium File formats Storage medium USB interface Power Supply Dimension (length × width × height) Weight 66*45*25mm about 48 grams 42 Guarantee and responsibility All LEOTEC products have a 24 month warranty from the invoice date to the end customer, except in the included accessories. The manufacturer guarantees the consumer that its products are free from defects in materials and workmanship at the time of purchase. The batteries have 6 months warranty. Batteries whose maximum load capacity is equal to or less than 50% within that period are considered defective. The warranty offered only covers defects in workmanship or materials that the product could have. Defects or failures caused by misuse, breakage, wear are excluded. Manipulating of the product by anyone other LEOTEC technical service, software updates not provided by LEOTEC and all faults or defects caused by natural disasters will void the warranty. The warranty is valid only when the user has the ticket or proof of purchase and it is within the deadline Support and Technical Service For any technical consultation you can go to the place of purchase or contact the technical service of LEOTEC. Visit our website and stay always updated in the download section of your product There is more available information in the website: www.leotec.com or by means of the e-mail: [email protected] 43 DECLARATION OF CONFORMITY Brand: LEOTEC Supplier name: World Driver S.A. Address: Ctra de l'Hospitalet 66 - 68 08940 - Cornellà de Llobregat – Barcelona Tel: +34 93 267 66 00 NIF: A62589130 Web: www.leotec.com We declare under our sole responsibility that the product: Action Sport Cam HD LESPCAM01 Country of manufacture: China Referred to this statement, with the standard (s) or other document (s) policy (s) in accordance with the provisions of Directive 93/68/EEC, the European Parliament and of the Council of 22 July 1993, transposed into Spanish law by Royal Decree 1950/1995, of December 1, 1995. Reference symbol both in the product and its user manual, indicates that at the end of life electrical and / or electronic, they should be recycled separately from your household waste. There are adequate means to collect this material for proper recycling. For more information, contact the local authority or your retailer where you purchased the product. 44 www.leotec.com 45