1
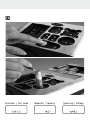
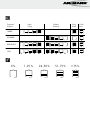
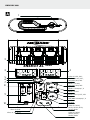
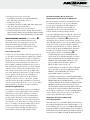
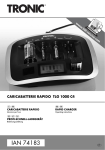
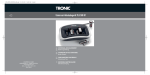
"LLV]#BUUFSZ.BOBHFNFOU4ZTUFN
&/&3(: 9$
D GB
★★★★★
D
TEST
TEST
-BEFO
$IBSHF
EST
TEST
TEST
&OUMBEFO
%JTDIBSHF
TEST
TEST
5FTUNPEVT]5FTUNPEF
TEST
TEST
TEST
'FSUJH
3FBEZ
TEST
TEST
,BQB[JU¼U]$BQBDJUZ
%
TEST
'FIMFS
&SSPS
TEST
4QBOOVOH]7PMUBHF
E
TEST
TEST
1SPHSBNN
1SPHSBN
-BEFO
$IBSHF
TEST
&OUMBEFO
%JTDIBSHF
TEST
TEST
'FSUJH
3FBEZ
'FIMFS
&SSPS
$)"3(&
%*4$)"3(&
#"55&3:5&45
TEST
TEST
TEST
TEST
TEST
TEST
TEST
TEST
TEST
TEST
$:$-&
F
5FTUNPEVT]5FTUNPEF
TEST
TEST
&OUMBEFO
%JTDIBSHF
TEST
,BQB[JU¼U]$BQBDJUZ
%
TEST
'FSUJH
3FBEZ
4QBOOVOH]7PMUBHF
TEST
'FIMFS
&SSPS
Energy xc 3000
A
&/&3(: 9$ 1
5
2
5&45
7
-J*PO
5&45
6
3
5&45
%*4$)"3(&
7
4
5&45
#"55&3: 5&45
70-5"(&
$633&/5
$"1"$*5:
5*.&
108&3
$:$-&
N7
N"
N"I
NJOI
8T
8
1
5&45
7
5
2
5&45
-J*PO
7
5&45
-J*PO
5&45
6
3
5&45
%*4$)"3(&
7
#"55&3:5&45
70-5"(&
$633&/5
$"1"$*5:
5*.&
108&3
8
4
5&45
5&45
7
$:$-&
N7
N"
N"I
NJOI
8T
-J*PO
5&45
-JUIJVN7$3$31
"MLBMJOF7-3-3
-3-3-3-3
0,
7
$3
7
-3
7
$31
7
-3
"MLBMJOF7-3
-3-3-3-3
7"MLBMJOF
"""""$%
7
7
7
"
"MLBMJOF7"""""$%
"MLBMJOF7"
7
$37
7
7/J$E/J.)
"""""$%
$3
$3
1VTI
-JUIJVN7$37
-JUIJVN7$3$3
;JOD"JS7777
/J$E/J.)7"""""$%
7
7
$3
$3
7&#MPDL
-JUIJVN7$3
$3$3$3
$3$3
-JUIJVN7$3
$3$3
$3$3
Energy xc 3000
B
C
1
2
Energy xc 3000
D BEDIENUNGSANLEITUNG
VORWORT
Sehr geehrte Kundin, sehr geehrter Kunde,
herzlichen Dank, dass Sie sich für das Ladegerät
Energy XC3000 von ANSMANN entschieden haben. Die
vorliegende Bedienungsanleitung wird Ihnen helfen,
die Funktionen Ihres Energy XC3000 optimal zu nutzen.
Bitte lesen Sie diese Bedienungsanleitung bevor Sie das
Ladegerät in Betrieb nehmen. Wir wünschen Ihnen viel
Freude mit Ihrem neuen Energy XC3000 Ladegerät.
Ihr ANSMANN Team
LIEFERUMFANG
> Ladegerät Energy XC3000
> Netzgerät
> Netzleitung
> Universal-Adapterplatte zur Kontaktierung von Li-Ion/Li-Po Akkus
> Bedienungsanleitung
SICHERHEITSHINWEISE
> Vor Inbetriebnahme Bedienungsanleitung sorgfältig lesen und Sicherheitshinweise beachten!
> Bei Beschädigung des Gehäuses, des Netzsteckers oder des Kabels das Gerät nicht in Betrieb nehmen, wenden Sie sich an den autorisierten Fachhandel!
> Für die Ladung von Rundzellen und 9V Akkus dürfen nur Nickel-Cadmium (NiCd) bzw. Nickel-Metallhydrid (NiMH) Akkus verwendet werden, bei anderen Batterien besteht Explosionsgefahr! Beim Einlegen dieser Akkus Polarität
(+/-) beachten!
> Für die Ladung von Lithium-Ionen (Li-Ion) oder Lithium-
Polymer (Li-Po) Akkupacks muss die mitgelieferte
Universal-Adapterplatte verwendet werden!
> Es dürfen nur schnellladefähige Marken-Akkus in dem Gerät geladen werden, welche für die jeweiligen Ladeströme des Ladegerätes ausgelegt sind. Minderwertige Akkus können zur Zerstörung der Akkus und des Gerätes führen,
da diese Akkus nicht für Schnellladung geeignet sind.
Bei Verwendung nicht geeigneter Akkus in diesem Gerät kann leider kein Garantieanspruch gewährt werden!
> Gerät darf nur in geschlossenen, trockenen Räumen betrieben werden!
> Um Brandgefahr bzw. die Gefahr eines elektrischen Schlages auszuschließen, ist das Gerät vor Feuchtigkeit
und Regen zu schützen!
> Reinigungs- und Wartungsarbeiten nur bei gezogenem Netzstecker durchführen!
> Gerät nicht öffnen!
> Von Kindern fernhalten!
> Gerät nicht unbeaufsichtigt betreiben!
> Nach Gebrauch das Gerät vom Netz trennen!
> Nichtbeachtung der Sicherheitshinweise kann zu Schäden am Gerät, an den Akkus oder zu gefährlichen Verletzungen
von Personen führen!
> Wir empfehlen die Verwendung von ANSMANN-Akkus!
FUNKTIONSÜBERSICHT LADEGERÄT
> Tisch-Ladestation für 1-8 Micro AAA oder Mignon AA; für 1-4
Baby C oder Mono D sowie für 1-2 St. 9V E-Block oder 1 Li-Ion/LiPo Akkupack (3,6/3,7V-7,2/7,4V) über die mitgelieferte UniversalAdapterplatte
> Für NiCd, NiMH, Li-Ion/Li-Po Akkus geeignet
> Multifunktionale, übersichtliche LCD Anzeige
> Einstellbarer Ladestrom (2-stufig) für Rundzellen vor dem
Kontaktieren der Akkus
> Automatische Ladestromanpassung
> Der Ladezustand vor Ladebeginn ist ohne Bedeutung
> Kapazitäts-Schnelltest des eingelegten Akkus
> Individuell auswählbare Ladeprogramme pro Ladeschacht
• CHARGE (Laden)
• DISCHARGE (Entladen)
• BATTERY-TEST (Laden, Entladen, Laden)
• CYCLE (1-10 Zyklen Entladen, Laden einstellbar)
> Automatischer Ladebeginn innerhalb von 10 Sekunden nach
Kontaktierung der Akkus falls keine Programmauswahl erfolgt
> Einfache Erkennung der jeweils ausgewählten
Ladeprogramme über LCD-Anzeige
> Mikrocontrollergesteuerte Aufladung und Überwachung des
Ladezustandes jedes einzelnen Akkus
> Individuelle Abfrage aktueller Parameter während des Ladevorgangs
• VOLTAGE (Lade-/Entladespannung)
• CURRENT (Lade-/Entladestrom)
• CAPACITY (Lade-/Entladekapazität)
• TIME (Lade-/Entladezeit)
> Mehrfacher Überladeschutz pro Akku
> Impulserhaltungsladung für NiCd/NiMH Akkus
> Akku-Defekt- und Alkaline-Erkennung
> Verpolschutz
> Weltweit einsetzbar dank Weitbereichsnetzteil
(100-240V AC / 50-60Hz)
FUNKTIONSÜBERSICHT AKKU/BATTERIE-TESTER
> Zuverlässiges Testgerät für alle gängigen Akku/Batterie-Typen
> Sekundenschnelles Messergebnis
> Anzeige der Batterie-Spannung und der
Kapazität (in 10%-Schritten) über LCD-Display
Folgende Zellen können getestet werden:
> 1,5V Alkaline Rundzellen & 1,2V NiCd/NiMH Akkus:
Micro AAA, Mignon AA, Baby C, Mono D
> 9V E-Block / 12V A23
> 1,5V Alkaline Knopfzellen: LR43, LR44, LR45, LR48, LR54, LR55, LR57, LR58, LR59, LR60, LR66
> 1,44V Zink-Luft Knopfzellen: V13, V675, V312
> 3V Lithium Knopfzellen: CR1025, CR1216, CR1220, CR1616, CR1620, CR2016, CR2025, CR2032, CR2320, CR2430, CR2450
> Lithium Photobatterien: 3V: CR2, CR123A, CR-V3 / 6V: CR-P2, 2CR5
INBETRIEBNAHME LADEGERÄT (siehe Abbildung A )
Das Gerät auf einen ebenen Untergrund stellen und
darauf achten, dass die Lüftungsschlitze frei sind. Das
Netzgerät mit dem Ladegerät verbinden und an die
Stromversorgung anschließen (100-240V AC 50-60Hz).
Die Displays sowie das ANSMANN Logo leuchten.
Ladestrom einstellen
Es kann nun, sofern kein Akku in das Ladegerät eingelegt
ist, der Ladestrom für die Ladung von Rundzellen geändert
werden. Hierzu die Bedientaste (5) „OK“ 1x drücken. Im
Display (3) wird nun der aktuell eingestellte Ladestrom
(Auslieferungszustand: 2000mA) für die Ladung von
Mono D, Baby C und Mignon AA Akkus angezeigt. Dieser
kann durch Drücken der Bedientaste (6) ◂ auf 1000mA
reduziert werden. Durch Drücken der Bedientaste (7) ▸
wird er wieder auf 2000mA erhöht. Der gewählte Wert
muss durch Drücken der Bedientaste (5) „OK“ bestätigt
werden, danach erlischt die Anzeige im Display. Der
ausgewählte Ladestrom wird nun für alle künftigen
Ladungen verwendet sofern er nicht wieder geändert
wird! Der Ladestrom für Micro AAA Akkus beträgt immer
25% des eingestellten Ladestroms. Für Li-Ion/Li-Po Akkus
und 9V E-Blocks ist der Ladestrom nicht veränderbar.
Kontaktierung Rundzellen
Zum Einlegen von Rundzellen die silbernen Kontaktbügel
(2) nach hinten ziehen und die Akkus auf den Grund des
Ladeschachtes einlegen. Bitte beachten Sie, dass die
Akkus polrichtig eingelegt werden (siehe Akkusymbole
im Ladeschacht). Das Gerät ist mit vier Dual-Schächten
für Rundzellen ausgestattet. In jeden Ladeschacht lassen
sich entweder je 2 St. Micro AAA- / 2 St. Mignon AA- oder
aber je 1 St. Baby C- oder Mono D- Akkus einlegen. Beim
Einlegen eines Baby C- oder Mono D-Akkus beachten
Sie bitte, dass beide Kontaktbügel am Akku anliegen
und die Akkus sich mittig im Ladeschacht befinden.
Kontaktierung 9V E-Block, UniversalAdapterplatte und Li-Ion/Li-Po Akkupacks
Das Ladegerät kann zusätzlich zu den Rundzellen auch
1-2 Stück 9V E-Blocks oder 1 Li-Ion/Li-Po Akkupack
(3,6/3,7V-7,2/7,4V) laden. Die Ladeschächte für
die 9V E-Blocks (9) befinden sich unterhalb des
LCD Displays (3). Hier können die zu ladenden 9V
E-Blocks einfach polrichtig kontaktiert werden.
Li-Ion/Li-Po Akkupacks können nur über die mitgelieferte
Universal-Adapterplatte geladen werden. Die UniversalAdapterplatte wie in Abbildung C kontaktieren und
im Ladegerät fixieren. Hierbei ist zu beachten, dass die
Universal-Adapterplatte zuerst in die zwei Halterungsnasen
(8) am oberen Ende geschoben und dann in Richtung
Ladestation gedrückt wird bis sie einrastet. Danach den
korrekten Halt der Universal-Adapterplatte überprüfen.
Nun kann der zu ladende Li-Ion/Li-Po Akkupack wie
folgt kontaktiert werden (siehe Abbildung B ):
1. REAR SLIDER (11) mittels SIZE ADJUSTOR (12)
entsprechend der zu ladenden Akkugröße einstellen.
Dazu den Abstand zwischen den Akkuladekontakten
CONTACTS (14) und dem REAR SLIDER (11) etwas
geringer wählen als die Akkugröße, damit der
Akku beim Laden fest positioniert ist.
2. REAR SLIDER (11) nach hinten schieben, Akkupack
mit der Kontaktseite in Richtung Akkuladekontakte
CONTACTS (14) an GUIDE WALL (13) anlegen
und mit REAR SLIDER (11) klemmen.
3. Akkupack etwas nach hinten in Richtung REAR SLIDER
(11) schieben und Akkuladekontakte CONTACTS (14) mittels
CONTACT ADJUSTER (15) auf Akkukontakte „+“ und „-“
einstellen. Akkupack wieder in Richtung Akkuladekontakte
CONTACTS (14) schieben und loslassen. Bei korrekter
Einstellung und Kontaktierung wird der Akku erkannt. Das
Ladegerät erkennt die Polarität des Akkus automatisch.
Um 9V E-Blocks zu laden muss die Universal-Adapterplatte
entfernt werden. Hierzu die Taste (10) „Push“ drücken
und die Universal-Adapterplatte entnehmen.
Kapazitätsschnelltest und Auswahl
der Ladeprogramme
Nach dem Einlegen eines jeden Akkus blinkt in der LCD Anzeige
das entsprechende Akkusymbol und es wird die Nummer „1…8“
bzw. der Akkutyp „9V“ oder „Li-Ion“ oberhalb des Akkusymbols
angezeigt. Zusätzlich erscheint im Display „TEST“ unterhalb des
Akkusymbols und es wird die Spannung des Akkus im Display (3)
angezeigt. Über die 4 Balken innerhalb des Akkusymbols wird
Energy xc 3000
der Ladezustand des Akkus angezeigt (siehe Abbildung F ).
0 Balken = Akku entladen
1 Balken = Kapazität unter 25% der Nennkapazität
2 Balken = Kapazität zwischen 26 und 50% der Nennkapazität
3 Balken = Kapazität zwischen 51 und 75% der Nennkapazität
4 Balken = Kapazität über 75% der Nennkapazität
Während dieser Anzeige blinkt das Ladeprogramm CHARGE
(Voreinstellung). Durch Drücken der Bedientasten (6) ◂
oder (7) ▸ kann nun zu den anderen Ladeprogrammen
DISCHARGE, BATTERY-TEST oder CYCLE gewechselt werden. Die
Programmauswahl wird für 10 Sekunden blinkend angezeigt und
danach wird das ausgewählte Programm automatisch gestartet
wenn nicht zuvor die Bedientaste (5) „OK“ gedrückt wird.
Jeder weitere Tastendruck auf die Bedientasten (6)
◂ oder (7) ▸ innerhalb der 10 Sekunden oder jedes
Einlegen von Zellen startet die 10 Sekunden erneut. Wenn
mehrere Zellen in dieser Zeit eingelegt werden, wird das
gleiche Ladeprogramm für diese Zellen gestartet.
Beschreibung der Ladeprogramme:
(siehe Abbildung E )
CHARGE
Akku wird geladen (Batteriesymbol wird von unten nach oben
aufgefüllt); wenn der Akku geladen ist wird im Display (3) die
eingeladene Kapazität angezeigt
DISCHARGE
Akku wird entladen (Batteriesymbol wird von oben nach unten
entleert); wenn der Akku entladen ist wird im Display (3) die
entladene Kapazität angezeigt
BATTERY-TEST
Akku wird geladen, entladen und wieder geladen; wenn der
Akku geladen ist wird im Display (3) die entladene Kapazität
angezeigt
CYCLE
Akku wird mit der eingestellten Zyklenzahl (1-10) geladen und
entladen; die voreingestellte Zyklenzahl ist 3, kann aber durch
Drücken der Bedientaste (6) ◂ verringert bzw. durch Drücken
der Bedientaste (7) ▸ erhöht werden. Nach dem letzten
Zyklus wird der Akku geladen; wenn der Akku geladen ist wird
im Display (3) die zuletzt entladene Kapazität angezeigt
Beschreibung der LCD Anzeige:
Die Nummer „1…8“ bzw. der Akkutyp „9V“ oder „Li-Ion“
oberhalb des Akkusymbols signalisiert, welcher Akku
momentan ausgewählt ist. Der im Display (3) angezeigte
Wert bezieht sich immer auf den momentan ausgewählten
Akku. Durch Drücken der Bedientaste (6) kann der vorherige
Akku bzw. durch Drücken der Bedientaste (7) ▸ kann
der nächste Akku ausgewählt werden. Wenn man den
jeweiligen Akku erreicht hat, selektiert man diesen mit
der Bedientaste (5) „OK“. Das Symbol des ausgewählten
Akkus und der momentan angezeigte Wert im Display (3)
blinken nun. Durch Drücken der Bedientasten (6) ◂ oder
(7) ▸ kann nun ein anderer Parameter angezeigt werden.
Folgende Parameter können ausgewählt werden:
VOLTAGE Anzeige der aktuellen Zellenspannung in V
CURRENT Anzeige des aktuellen Lade-/Entladestromes in mA
CAPACITY Anzeige der aktuell eingeladenen/
entladenen Kapazität in mAh
TIME Abgelaufene Zeit des aktuellen Vorgangs
Während ein Ladeprogramm läuft wird immer die Spannung des
selektierten Akkus angezeigt. Sobald das Ladeprogramm für
eine Zelle endet, wird automatisch in die Detailansicht dieser
Zelle geschaltet und deren Kapazität im Display (3) angezeigt.
Anschließend kann jederzeit über die Bedientasten (6) ◂
oder (7) ▸ wieder eine andere Zelle ausgewählt werden.
Zusatzinfos
Die Kühlung des Ladegerätes erfolgt durch eingebaute
Lüfter. Die Lüfter laufen, sobald mindestens eine Rundzelle
geladen oder entladen wird. Eine Erwärmung der Akkus
während des Ladevorganges ist normal. Nach der Aufladung
von Rundzellen und 9V E-Blocks erfolgt automatisch
eine Umschaltung auf Impuls-Erhaltungsladung.
INBETRIEBNAHME AKKU/BATTERIE-TESTER
Der Akku/Batterie-Tester ist funktionsfähig, sobald das
Ladegerät an der Stromversorgung angeschlossen ist. Es
ist möglich Akkus im Ladegerät zu laden und gleichzeitig
Batterien oder Akkus in der Teststation zu überprüfen.
Durchführung von Messungen:
In der Frontseite des Ladegerätes befindet sich die Messspitze
(1), welche zum Prüfen von Rundzellen benötigt wird.
1. Wählen Sie den entsprechenden Prüfkontakt um die zu
prüfende Zelle zu kontaktieren (siehe Abbildung A ).
2. Positionieren Sie die Zelle unter Beachtung der Polarität
an dem entsprechenden Prüfkontakt (beide Pole müssen
kontaktiert sein). Beim Prüfen von Rundzellen wird die
Messspitze (1) immer am Minuspol der Zelle kontaktiert!
3. Nach der Kontaktierung beider Pole einer Zelle erscheint
im Display (4) „CALC“ (ca. 2 Sekunden). Dann wird für
ca. 2 Sekunden der Energiegehalt der Zelle in % (10%
Schritte) angezeigt und danach für weitere 2 Sekunden
die Zellenspannung in Volt. Solange die Zelle kontaktiert
bleibt, wechselt die Anzeige im Display zwischen
Energiegehalt und Zellenspannung (siehe Abbildung D ).
Achten Sie darauf, dass die Prüfkontakte am Gerät sowie
die Kontaktflächen der Zellen frei von Verschmutzungen
sind. Es kann bei neuen Batterien vorkommen, dass nicht die
volle Kapazität angezeigt wird. Dies liegt unter Umständen
daran, dass die Batterie noch nicht „aktiviert“ ist. Bitte
den Testvorgang in diesem Fall häufiger wiederholen.
UMWELTHINWEISE
Werfen Sie das Gerät keinesfalls in den normalen
Hausmüll. Entsorgen Sie das Gerät über einen
zugelassenen Entsorgungsbetrieb oder über Ihre
kommunale Entsorgungseinrichtung. Beachten Sie
die aktuell geltenden Vorschriften. Setzen Sie sich
im Zweifelsfall mit Ihrer Entsorgungseinrichtung in
Verbindung. Führen Sie alle Verpackungsmaterialien
einer umweltgerechten Entsorgung zu.
WARTUNG/PFLEGE
Um eine einwandfreie Funktion des Gerätes sicherzustellen,
halten Sie bitte die Kontakte von Ladegerät und Akkus frei von
Verschmutzungen. Reinigung des Gerätes nur bei gezogenem
Netzstecker und mit einem trockenen Tuch durchführen.
Eine Reparatur darf nur durch eine Fachkraft erfolgen!
TECHNISCHE DATEN
Eingangsspannung: 100-240V AC / 50-60Hz (Netzteil)
Ausgangsspannung: 8x 1.45V DC; 2x 10.15V DC; 1x 3.6-7.4V DC
(Ladegerät)
Ladestrom:
Mono D: 4x 2000mA oder 1000mA
Baby C: 4x 2000mA oder 1000mA
Mignon AA:
8x 2000mA oder 1000mA
Micro AAA: 8x 500mA oder 250mA
9V E-Block: 2x 75mA
Li-Ion/Li-Po: 1x 700mA
FEHLERDIAGNOSE
Ladegerät zeigt keine Funktion:
> Überprüfen Sie, ob das Netzkabel richtig in die Steckdose eingesteckt ist und das Netzteil mit dem Ladegerät verbunden ist
> Überprüfen Sie, ob die Steckdose Strom führt;
schließen Sie dazu ein anderes funktionstüchtiges Elektrogerät an die Steckdose an
Akku wird nicht geladen:
> Überprüfen Sie bei Rundzellen, ob die Akkus polrichtig
eingelegt wurden; Rundzellen müssen gemäß dem Akkusymbol im Ladeschacht eingelegt sein
> Überprüfen Sie bei Li-Ion/Li-Po Akkupacks, ob die Adapterplatte richtig kontaktiert wurde und ob die Kontakte
der Adapterplatte auf die richtige Position zur Kontaktierung des Akkupacks eingestellt wurden
> Überprüfen Sie, ob Sie zum Aufladen geeignete Akkus in das Ladegerät eingelegt haben; zum Aufladen eignen sich
ausschließlich NiCd/NiMH Akkus der Typen AAA, AA, C, D
und 9V E-Block sowie Li-Ion/Li-Po Akkupacks welche nur über die mitgelieferte Universal-Adapterplatte geladen
werden können
> Erscheint im Display das Fehlersymbol (siehe Abbildung E ),
ist der Akku defekt oder es wurde eine
Alkaline Batterie zum Laden eingelegt
Andere Funktionsstörungen:
> Wenden Sie sich bitte an unsere Service-Hotline
HAFTUNGSAUSSCHLÜSSE
Die in dieser Bedienungsanleitung enthaltenen Informationen
können ohne Vorankündigung geändert werden. ANSMANN
übernimmt keine Haftung für direkte, indirekte, zufällige
oder sonstige Schäden oder Folgeschäden, die aus
dem Gebrauch oder durch die Verwendung der in dieser
Bedienungsanleitung enthaltenen Informationen entstehen.
GARANTIEHINWEISE
Auf das Gerät bieten wir eine dreijährige Garantie. Bei
Schäden am Gerät, welche von minderwertigen Akkus
verursacht werden, kann keine Garantie gewährt werden.
Sollten irgendwelche Fragen in der Handhabung auftauchen
oder eine Einsendung des Gerätes notwendig sein, bitten
wir Sie, sich zuerst an unsere Service-Hotline unter Tel.
06294 4204 34 zu wenden. Wir helfen Ihnen schnell und
unkompliziert weiter. Im Falle einer Reklamation legen Sie
bitte neben dem Garantienachweis (Kaufbeleg) eine kurze
Fehlerbeschreibung sowie Ihre genaue Anschrift, möglichst
mit Telefonnummer bei und senden das Gerät an uns zurück
(Adresse siehe Rückseite der Bedienungsanleitung).
Technische Änderungen vorbehalten. Für Druckfehler
übernehmen wir keine Haftung. 08/2008
Energy xc 3000
GB OPERATING INSTRUCTIONS
FOREWORD
FUNCTIONAL OVERVIEW OF CHARGER
Dear Customer,
> Desktop charger for 1-8 AAA or AA cells; for 1-4 C or D cells in addition to 1-2pcs 9V E-Block or 1 Li-Ion/Li-Po battery pack
(3.6/3.7V-7.2/7.4V) connected by the universal adapter plate provided.
> Suitable for NiCd, NiMH, Li-Ion/Li-Po batteries
> Multifunctional clear LCD display
> Adjustable charging current (2 steps) for all round cells
> Automatic charging current adjustment
> Charge condition is irrelevant before charging
> Capacity quick test of the inserted cells
> Individually selectable charging programs per charging slot
• CHARGE
• DISCHARGE
• BATTERY-TEST (charging, discharging, charging)
• CYCLE (1-10 cycles discharging/charging adjustable)
> Automatic start of charging within 10 seconds after contact with the battery if no charging program is selected.
> The selected charging program is displayed on the LCD display
> Microprocessor controlled charging and supervision of each cell
> Individual monitoring of critical parameters during charging
• VOLTAGE (charge/discharge voltage)
• CURRENT (charge/discharge current)
• CAPACITY (charge/discharge capacity)
• TIME (charge/discharge time)
> Multiple over charging protection
> Trickle charging for NiCd/NiMH batteries
> Faulty cell detection and Alkaline detection
> Wrong polarity protection
> Switch mode power supply for world wide use
(100-240V AC / 50-60Hz)
Thank you for deciding to buy the ANSMANN Energy XC3000
charger. These operating instructions will help you to use all
features of your Energy XC3000 charger in an optimum way.
Please read the operating instructions carefully before use. We
hope you are happy with your new charger.
Your ANSMANN Team
INCLUDED IN SET
> Charger Energy XC3000
> Power supply
> Mains lead
> Universal adapter plate for connecting Li-Ion/Li-Po batteries
> Operating instructions
SAFETY INSTRUCTIONS
> Please read the operating instructions carefully before using the charger!
> Do not use the device if there are signs of any damage to the housing, mains plug or cable. Please contact an
authorised dealer!
> For charging of round cells and 9V batteries use only with NiCd/NiMH cells. Other types could cause an explosion!
Observe polarity (+/-) prior to use!
> For charging of Li-Ion/Li-Po batteries the universal adapter plate provided must be used!
> Please note that due to the high charging current, use only good quality batteries from a well known brand in this
charger. Using inferior quality batteries could cause damage to the batteries themselves, and/or the charger,
if they are not suitable for fast charging. If unsuitable cells are inserted in the charger, warranty claims cannot be
accepted and the warranty will become void!
> Keep the charger in a dry place!
> In order to avoid the risk of fire and/or electric shock, the charger must be protected against high humidity and water!
> Before cleaning the unit, disconnect it from the mains and only use a dry cloth!
> Never attempt to open the charger!
> Keep away from children's reach!
> Do not leave the device unattended when in operation!
> Disconnect device from mains supply after use!
> If the safety instructions are not followed, it may lead to damage to the device or battery and could cause injury!
> We recommend the use of ANSMANN rechargeable batteries!
FUNCTIONAL OVERVIEW BATTERY TESTER
> Reliable tester for all common batteries
> Ultra fast testing result
> Indication of the battery voltage and capacity
(in 10% steps) by the LCD display
The following cells can be tested:
> 1.5V Alkaline cylindrical cells & 1.2V NiCd/NiMH batteries: AAA, AA, C, and D cells
> 9V E-block / 12V A23
> 1.5V Alkaline button cells: LR43, LR44, LR45, LR48, LR54, LR55, LR57, LR58, LR59, LR60, LR66
> 1,44V Zinc-Air button cells: V13, V675, V312
> 3V Lithium button cells: CR1025, CR1216, CR1220, CR1616, CR1620, CR2016, CR2025, CR2032, CR2320, CR2430, CR2450
> Lithium photo batteries: 3V: CR2, CR123A, CR-V3 / 6V: CR-P2, 2CR5
CHARGER OPERATION (see picture A )
Place the charger on a level surface and make sure that the
ventilation slots are not covered. Connect the power adaptor
to the charger, then connect the power supply to mains
(100-240V AC 50-60Hz). The LCD displays and ANSMANN
logo glows.
Charging current setting
Before inserting any battery into the charger, it is possible
to change the charging current for round cell charging by
pushing the button "OK" (5) one time. In the LCD display
(3) you will now see the adjusted charging current (delivery
status: 2000mA) for charging Mono D, Baby C and Mignon
AA batteries. By pushing the button ◂ (6), the charging
current can be decreased to 1000mA. By pushing the button
▸ (7), the charging current can be increased to 2000mA. The
selected value has to be confirmed by pushing the button
"OK" (5) and then the indication in the display is blank. Now
the selected current will be used for all future charges, unless
changed again! The charging current for Micro AAA batteries is
always 25% of the adjusted charging current. For Li-Ion/Li-Po
and 9V E-blocks the charging current is not adjustable.
Contact - round cells
To insert round cells, move the silver contact bridge (2)
backwards and put in the rechargeable battery at the
bottom of the charging slot. Always connect the cells in the
right direction for polarity (according to the symbols in the
charging slots). The charger is equipped with 4 dual slots for
round cells. In each of these charging positions you can either
insert 2pcs of Micro AAA or Mignon AA cells or 1pc of Baby C
or Mono D cells. When inserting Baby C or Mono D cells both
contact bridges must fit closely on the battery and the cells
must be located centrally.
Contact - 9V E-block, universal adapter plate and LiIon/Li-Po battery packs
In addition to round cells, the charger can also charge 1-2pc 9V
E-blocks or 1 Li-Ion/Li-Po battery pack (3.6/3.7V-7.2/7.4V).
The charging slots for the 9V E-blocks (9) are located below
the LCD display (3). Here the 9V E-blocks to be charged can be
easily connected in the right polarity.
Li-Ion/Li-Po battery packs can only be charged by using
the provided universal adapter plate. Connect the universal
adaptor plate to the charger as shown on picture C.
Please move the universal adapter plate first into the two
projections (8) at the upper end and push it in the direction
of the charge station until locked in place. Afterwards
please check the correct fixing of the universal adapter
plate. Now the Li-Ion/Li-Po battery pack can be connected
as follows (see picture B ):
1. By pushing SIZE ADJUSTOR (12) you can move the REAR
SLIDER (11) to adjust it according to the size of the battery
pack. The distance between CONTACTS (14) and REAR
SLIDER (11) has to be shorter than the size of the battery
pack so that the battery pack will be firmly positioned
during charging.
2. Move the REAR SLIDER (11) backwards and insert the
battery pack so that the side of the battery pack will touch
the GUIDE WALL (13) and the contacts of the battery pack
will be in direction of CONTACTS (14). The battery pack will
be held now by the REAR SLIDER (11).
3. Move the battery pack in direction REAR SLIDER (11)
and adjust the position of CONTACTS (14) by the CONTACT
ADJUSTER (15) to the “+“ and “-“ contact of the battery
pack. Push the battery pack back in direction CONTACTS
(14) and release. If the adjustment and contacting is
correct, the charger will identify the battery pack. The
charger will detect the polarity of the battery pack
automatically.
To charge 9V E-blocks, the universal adapter plate has to be
removed. Therefore press the button “Push” (10) and remove
the universal adapter plate.
Capacity quick test and charging programs
After insertion of each battery, the appropriate battery icon
in the LCD display flashes and its number “1…8” or battery
type “9V” or “Li-Ion” is indicated above the battery icon. In
addition “TEST” appears in the display below the battery icon
and the voltage of the battery is indicated in display (3). The
charge state of the battery will be indicated by the 4 bars
inside the battery icon (see picture F ).
0 bar = battery discharged
1 bar = capacity below 25% of the nominal capacity
2 bars = capacity between 26 and 50% of the nominal capacity
3 bars = capacity between 51 and 75% of the nominal capacity
4 bars = capacity over 75% of the nominal capacity
During this indication, the program CHARGE is flashing (preadjustment). By pushing the button ◂ (6) or ▸ (7), you can
change to the other programs like DISCHARGE, BATTERY-TEST
or CYCLE. The selection will flash for 10 seconds and then
the selected program starts automatically if the button
“OK” (5) is not pushed before. Each push of the button ◂
(6) or ▸ (7) within 10 seconds or each insert of any battery
re-starts the 10 seconds again. If several batteries are
inserted consecutively, the same charge program will be
Energy xc 3000
used for these batteries.
Additional information
Description of charging programs:
(see picture E )
The charger is cooled by built-in fans. The fans run when at
least one round cell is charged or discharged. It is normal that
batteries may become warm during charging. After charging
of round cells and 9V E-Blocks is complete, the charger
switches automatically to trickle charge.
CHARGE
Battery will be charged (battery icon is filled up from bottom
to top); when the battery is fully charged, the charged
capacity will be shown in the LCD display (3)
BATTERY TESTER OPERATION
DISCHARGE
Battery will be discharged (battery icon is emptied from top
to bottom); when the battery is discharged, the discharged
capacity will be shown in the LCD display (3)
Once the charger is connected to mains, the battery tester is
ready for use. It is possible to charge rechargeable batteries
in the charger and to test batteries or rechargeable batteries
at the same time.
BATTERY-TEST
Battery will be charged, discharged and charged; when the
battery is fully charged, the discharged capacity will be shown
in the LCD display (3)
How to make measurements:
CYCLE
Battery will be charged and discharged with the adjusted
number of cycles (1-10); the pre-adjustment of cycles is 3
but by pushing the button ◂ (6), the number of cycles can
be reduced and by pushing the button ▸ (7), the number
of cycles can be increased. After the last cycle, the battery
will be fully charged and the last discharged capacity will be
shown in the LCD display (3)
1. Select the appropriate test terminal for the battery under
test (see picture A ).
Description of the LCD display:
The number “1…8” or battery type “9V” or “Li-Ion” above
the battery icon indicates which battery currently is selected.
The display (3) indicated value always refers to the currently
selected battery. By pushing the button ◂ (6), the previous
battery or by pushing the button ▸ (7) the next battery can
be selected. After choosing the respective battery, it can be
selected by pushing the “OK” (5) button. Then the icon of the
selected battery and the currently indicated value in the LCD
display (3) will flash. By pushing the button ◂ (6) or ▸ (7)
another parameter can be indicated. The following parameters
can be selected:
VOLTAGE Indication of the current battery voltage in V
CURRENT Indication of the current charge-/discharge current in mA
CAPACITY Indication of the current charged/discharged capacity in mAh
TIME
Elapsed time of the current process
While a charge program is running, always the VOLTAGE of
the selected battery is indicated. When the charge program
for one battery ends, the indication switches automatically
in the view of this battery and shows the CAPACITY in the LCD
display (3). Another battery can be selected at any time by
pushing the button ◂ (6) or ▸ (7).
In the front of the charger is the test pin (1), which is only
needed for testing of round cells.
2. Place the battery on the corresponding test terminal,
paying attention to the polarity (both contacts must be
connected). When checking round cells, the test pin (1)
always has to be connected to the negative pole of the
battery!
3. After both poles of a battery are contacted, in the display
(4) appears "CALC" (for about 2 seconds). Then the capacity
of the battery will be shown in 10% steps for approx.
2 seconds and for further 2 seconds the voltage of the
battery will be shown. As long as the battery is contacted,
the display changes between capacity and voltage (see
picture D ).
Make sure that the contacts of the test terminals and the
contacts of the batteries are clean. With a new battery it is
possible that the full capacity may not be shown. The battery
needs to “wake up”. In this case please repeat the test again.
ENVIRONMENTAL COMMENTS
Do not dispose of the device in the normal household waste.
Please return it to your dealer or to your nearest recycling
centre or collection point. Please recycle all packing materials
for the sake of the environment.
CARE & MAINTENANCE
To make sure that the charger works properly, please
keep the contacts in the charging slots free from dust or
contamination. To clean the unit, disconnect it from the mains
and use only a dry cloth. Repair may only be undertaken by
competent authorised dealers!
TECHNICAL DATA
WARRANTY NOTICE
Input voltage: 100-240V AC 50-60Hz (power supply)
We hereby offer a 3 year warranty on this charger. This does
not apply to damage caused by low-quality batteries leaking
inside the charger.
Output voltage: 8x 1.45V DC; 2x 10.15V DC; 1x 3.6-7.4V DC
(charger)
Charging current:
Mono D:
4x 2000mA or 1000mA
Baby C:
4x 2000mA or 1000mA
Mignon AA:
8x 2000mA or 1000mA
Micro AAA:
8x 500mA or 250mA
9V E block:
2x 75mA
Li-Ion/Li-Po:
1x 700mA
FAULT DIAGNOSIS
The charger has no function:
> check if the mains lead of the power supply is correctly connected to the power outlet and if the output cable
of the power supply is correctly connected to the charger
> check if the outlet has power; connect another functional electrical device to check the power outlet
The inserted battery is not being charged:
> check if the batteries are inserted with the correct polarity; cylindrical batteries have to be inserted as per the battery symbol engraving in the charging slot
> ensure that you inserted suitable rechargeable batteries into the charging slot; suitable batteries for charging are only NiCd/NiMH battery types of AAA, AA, C, D, and 9V
block as well as Li-Ion/Li-Po battery packs which can only be charged by using the provided universal adapter plate
> check for Li-Ion/Li-Po battery packs whether the universal adapter plate is connected in the right way and whether the contacts of the adapter plate are in the correct position to contact the battery pack
> when the display shows the error symbol
(see picture E ), the battery is defective or a non rechargeable battery was inserted
Other problems
> please contact us
(address see last page of this operating instructions)
DISCLAIMER
Information in these operating instructions can be changed
without prior notice. ANSMANN cannot accept liability for
direct, indirect, accidental or other claims or consequential
damages originated by using this charger and information
given in these operating instructions.
Technical details subject to change without prior notice.
No liability accepted for typographical errors or omissions.
08/2008
V1 0805
ANSMANN AG
Industriestr. 10
97959 Assamstadt
Germany
www.ANSMANN.de