1
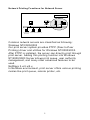
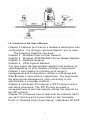
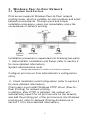
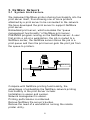
Fast Ethernet Print Server
User’s Manual
Version: 1.0(July, 2005)
COPYRIGHT
Copyright ©2005/2006 by Edimax Technology. All rights reserved. No part of this
publication may be reproduced, transmitted, transcribed, stored in a retrieval system, or
translated into any language or computer language, in any form or by any means,
electronic, mechanical, magnetic, optical, chemical, manual or otherwise, without the prior
written permission of this company.
Federal Communication Commission
Interference Statement
This equipment has been tested and found to comply with the limits for a Class B digital
device, pursuant to Part 15 of FCC Rules. These limits are designed to provide
reasonable protection against harmful interference in a residential installation. This
equipment generates, uses, and can radiate radio frequency energy and, if not installed
and used in accordance with the instructions, may cause harmful interference to radio
communications. However, there is no guarantee that interference will not occur in a
particular installation. If this equipment does cause harmful interference to radio or
television reception, which can be determined by turning the equipment off and on, the
user is encouraged to try to correct the interference by one or more of the following
measures:
1. Reorient or relocate the receiving antenna.
2. Increase the separation between the equipment and receiver.
3. Connect the equipment into an outlet on a circuit different from that to which the
receiver is connected.
4. Consult the dealer or an experienced radio technician for help.
FCC Caution
This equipment must be installed and operated in accordance with provided instructions
and a minimum 20 cm spacing must be provided between computer mounted antenna and
person’s body (excluding extremities of hands, wrist and feet) during wireless modes of
operation.
This device complies with Part 15 of the FCC Rules. Operation is subject to the following
two conditions: (1) this device may not cause harmful interference, and (2) this device
must accept any interference received, including interference that may cause undesired
operation.
An y changes or modifications not expressly approved by the party responsible for
compliance could void the authority to operate equipment.
Federal Communication Commission (FCC) Radiation Exposure Statement
This equipment complies with FCC radiation exposure set forth for an uncontrolled
environment. In order to avoid the possibility of e xceeding the FCC radio frequency
exposure limits, human proximity to the antenna shall not be less than 20cm (8 inches)
during normal operation.
The antenna(s) used for this transmitter must not be co-located or operating in conjunction
with any other antenna or transmitter.
R&TTE Compliance Statement
This equipment complies with all the requirements of DIRECTIVE 1999/5/EC OF THE
EUROPEAN PARLIAMENT AND THE COUNCIL of March 9, 1999 on radio equipment
and telecommunication terminal Equipment and the mutual recognition of their conformity
(R&TTE)
The R&TTE Directive repeals and replaces in the directive 98/13/EEC
(Telecommunications Terminal Equipment and Satellite Earth Station Equipment) As of
April 8, 2000.
Safety
This equipment is designed with the utmost care for the safety of those who install and use
it. However, special attention must be paid to the dangers of electric shock and static
electricity when working with electrical equipment. All guidelines of this and of the
computer manufacture must therefore be allowed at all times to ensure the safe use of the
equipment.
EU Countries Intended for Use
The ETSI version of this device is intended for home and office use in Austria, Belgium,
Denmark, Finland, France, Germany, Greece, Ireland, Italy, Lu xembourg, the Netherlands,
Portugal, Spain, Sweden, and the United Kingdom.
The ETSI version of this device is also authorized for use in EFTA member states: Iceland,
Liechtenstein, Norway, and Switzerland.
EU Countries Not intended for use
None.
DISCLAIMER
This company makes no representations or warranties, either expressed or implied, with
respect to the contents hereof and specifically disclaims any warranties, merchantability or
fitness for any particular purpose. An y software described in this manual is sold or
licensed "as is". Should the programs prove defective following their purchase, the buyer
(and not this company, its distributor, or its dealer) assumes the entire cost of all
necessary servicing, repair, and any incidental or consequential damages resulting from
any defect in the software. Further, this company reserves the right to revise this
publication and to make changes from time to time in the contents hereof without
obligation to notify any person of such revision or changes.
Contents
1. PRODUCT INTRODUCTION
1.1 PRODUCT
INTRODUCTION................................................................................1
1.3 Network Printing Architecture.............................................2
Print Server Network Functions...................................................................2
Network Printing Functions for Clients .......................................................3
Network Printing Functions for Network Server.........................................5
1.4 Network Printing Environment............................................6
1.6 Firmware & Printing Function.............................................8
3. WINDOWS PEER-TO-PEER NETWORK 3.1 SYSTEM
ARCHITECTURE...............................................................................9
3.2 Administrator Installation and Setup.................................10
3.4 Client Installation and Setup ............................................16
3.5 Client Utilities...................................................................20
3.5.1 Network Ports Quick Setup...........................................................20
3.5.2 Remote Ports (Utility)......................................................................21
3.6
Windows Add Printer Procedure ...................................24
4. WINDOWS NT/2000/2003 NETWORK 4.1 SYSTEM
ARCHITECTURE.............................................................................28
4.2 Windows NT/2000/2003 Server Installation and Setup.....29
4.3 User Installation and Setup..............................................30
5. NETWARE NETWORK
5.1 SYSTEM
ARCHITECTURE.............................................................................31
5.2.1 Installation Using PCONSOLE .......................................................32
6. UNIX SYSTEM NETWORK
6.1 INTRODUCTION ....35
6.3.1 DHCP...............................................................................................36
6.3.2 BOOTP.............................................................................................36
7. CONFIGURATION UTILITY
7.1 INTRODUCTION ..39
7.3 Status of Print Server.......................................................41
7.4 Setup the Print Server......................................................42
7.5 AppleTalk Configuration...................................................43
7.6 General Configuration......................................................44
7.7 Netware Print Server Configuration..................................45
7.8 System Configuration.......................................................46
7.9 TCP/IP Configuration.......................................................48
7.10 Wireless Configuration...................................................50
7.11 SNMP Configuration ......................................................57
8. WEB MANAGEMENT
8.1 INTRODUCTION.......62
8.3 Device Status ..................................................................63
8.3.1
8.3.2
8.3.3
8.3.4
8.3.5
8.3.6
8.3.7
8.4.1
8.4.2
8.4.3
8.4.4
8.4.5
8.4.6
8.4.7
8.4.8
8.5
System..............................................................................................63
Printer..............................................................................................63
TCP/IP.............................................................................................64
SM B................................................................................................64
SNM P..............................................................................................65
NetWare ..........................................................................................65
AppleTalk........................................................................................66
System...........................................................................................66
Advanced Settings............................................................................67
TCP/IP............................................................................................68
SM B..............................................................................................69
SNM P............................................................................................69
NetWare ........................................................................................70
AppleTalk......................................................................................71
Save Settings .................................................................................72
System Tools................................................................73
8.5.1
8.5.2
Load Default .................................................................................73
Upgrade Firmware from Browser .................................................73
9.2 System Setup .................................................................75
9.2.1
9.2.2
Print Server Side ...........................................................................75
Client Side.....................................................................................75
10. WINDOWS XP SP2 SETUP..................................................78
1. Product Introduction
1 .1 P r o d u c t In t r o d u c t io n
Thank yo u for p urc hasi ng a nd using o ur p rint ser ver . This
print ser ver a llo ws yo ur pri nter to become a s hared device
on the network. It o ffers printing flexibility a nd
manageability o n yo ur Local Area Ne two rk at a n e xtremely
low cos t a nd with a n absolute minim um setup a nd
mainte na nce req uired.
This print ser ve r pro vides IEEE 802.11g/b wireless LAN ( up
to 54Mbps data trans fer rate) , a n E the r net ne twork port
(10/100Mbps Ether net) a nd o ne p rint por t fo r pri nter .
This print ser ve r s uppor ts IPX/SPX, NetBEUI, TCP/IP a nd
AppleTalk protoco ls. It is the bes t network printing
solutions for various commo n ne two rk operati ng s ys tems
suc h as Windows 95/98/Me/NT/2000/XP/2003, NetWare ,
Uni x/Li nux a nd MAC OS, e tc.
With the help of Insta lla tion Wizard , yo u ca n easily a nd
insta ntly comp lete the se ttings for the printing enviro nme nt,
and s tart e njo ying the fa ntastic features pro vided by the
print ser ver.
In the followi ng c hapte rs, we will introd uce i n detail the
printi ng fea tures, ins tallation methods, a nd s ys tem
config uratio n for differe nt ne twork e nvironme nts.
If yo u wo uld like to set up a nd i nsta ll print ser ve r q uickly,
please refer to the Quick Ins tallation Guide tha t comes
along with this pri nt se r ver.
1.2 Prod uct Package
This package contains the followi ng compo ne nts :
z
z
z
z
z
One Print Server
One Antenna
One Power Adapter
One Quick Installation Guide
One CD-ROM (Including all the software utilities, drivers and User’s Manual)
1
1.3 Network Print ing Architecture
This section illus trates how print ser ve r func tions and
operates o n the netwo rk. Before yo u i nsta ll a nd use pri nt
server , it is strong ly recomme nded tha t yo u read this
section comp lete ly, and select o nly the c hap ters yo u need
according to your network operating s ystem b y “Conte nts of
the User’s Ma nua l” in next sec tion.
This section will first introd uce the role e ver y co mpone nt
plays in the ne twork -printing enviro nme nt.
Print Ser ver
Client User
Netwo rk Ser ver (optio nal)
Network Printing Environment
Print Server
Network Server
Client User
Unix
Pr int Server
NetWare ServerWindows NT Server
Windows NT Windows 2000 Windows 98
Workstation
Pr in t Server Ne two rk Fu n ction s
Print Server
Unix
Print Server
NetWare ServerWindows NT Server
Windows NT Windows 2000 Windows 98
Wor kstation
Because print se r ver s uppor ts IPX/SPX, NetBEUI, TCP/IP
and Apple Talk network pro tocols , a ny ne tworked comp uter
2
can directly p rint to the p rint ser ver from a ny of its ins talled
protocol.
Ne twor k Pr in tin g F u nctio n s for Clien ts
Client User
Unix
Print Server
NetWare ServerWindows NT Server
Windows NT Windows 2000 Windows 98
Wor kstation
Common opera ting s ystems for clie nts are c lassified as
follo wing :
Windows 95 /98/Me /NT/2000/XP/2003
Our pri nt ser ver s ystem pro vides PTPP (Peer- to-Peer
Printing ) dri ver a nd utilities fo r Wi ndows
95/98/Me/NT/2000/XP/2003 users. PTPP (Peer -to-Peer
Printing ) s upports TCP/IP protoco l.
3
In the c lient i nsta lla tion p rocedure , a fter PTPP (Peer- toPeer Printi ng Drive r) is i nsta lled into Windo ws, the s ys tem
will automatically (ma nual co nfiguration is also allowed)
search a ll the print ser ve rs o n the network, a nd the n add
their printing po rts into Windo ws’ printing port (see be low) .
PTPP
P1
Windows 98
Print Server
MIS-2
P1
P2
P3
Print Server
MIS-1
UNIX / Linux
UNIX (inc lude HP/UX, SCO Unix, S unOS, So laris, Unixware
DECUnix, IBM A IX a nd others ) a nd Li nux use the s yste mstandard LPR to pri nt thro ug h p rint ser ver .
MAC OS
MAC OS can use the s ystem -sta ndard Apple Ta lk network to
print thro ug h p rint ser ver .
4
Ne twor k Pr in tin g F u nctio n s for Ne two rk Se rver
Network Server
Unix
Print Server
NetWare ServerWindows NT Server
Windows NT Windows 2000 Windows 98
Wor kstation
Common ne twork ser vers are c lassified as fo llo wing :
Windows NT/2000/2003
Our pri nt ser ver s ystem pro vides PTPP (Peer- to-Peer
Printing ) dri ver a nd utilities fo r Wi ndows NT/2000/2003.
After P TPP is insta lled , the ser ver can directly pri nt thro ug h
print ser ver. Adding this printing function into Wi ndows
NT/2000/2003 Ser ver a llo ws p rint q ueue , user a uthority
manageme nt, a nd ma ny other ad va nced features to be
used.
NetWare 3.x/4 .x/5.x
In Ne tWare e nviro nme nt, p rint ser ver offers vario us pri nti ng
modes like pri nt q ue ue, remo te pri nter , e tc.
5
1.4 Network Print ing Environment
Common ne twork e nvironment a re classified as followi ng:
Windows Peer- to-Peer Network
The c lient’s P TPP drive r will use TCP/IP pro tocol to pri nt
throug h print se r ver.
Windows NT/2000/2003 Network
Netwo rk pri nti ng func tion will become availab le a fter PTPP
driver is i nsta lled into Windo ws NT/2000/2003. Adding this
printi ng func tion i nto Windo ws NT/2000/2003 Ser ver a llo ws
print que ue , user authority manageme nt, and ma ny o ther
adva nced fea tures to be used.
NetWare Network (see be low)
6
1.5 Con ten ts o f the User ’s M an u al
Chapter 2 e xplains pri nt se r ver’s hardwa re ins tallatio n a nd
config uratio n. It is strong ly recomme nded fo r yo u to read.
The fo llo wing c hapters introduce :
Chapter 3 . Windo ws Peer- to-Peer Netwo rk
Chapter 4 . Windo ws NT/2000/2003 Ser ver-Based Network
Chapter 5 . Ne tWare Network
Chapter 6 . UNIX S yste m Network
You ma y select the appropriate c hapters a nd sectio ns to
read depending on yo ur ne twork pri nti ng’s require ment.
Chapter 7 a nd c hapter 8 introd uce p rint ser ver’s
manageme nt a nd co nfig uratio n utilities o n Windo ws a nd
Web Browser’s e nviro nme nt respecti vely. Yo u ma y se lect
the appropriate ma nageme nt utility according to the
administrator’s co mp uter platform .
Chapter 9 introd uces Print Ser ver’s IPP Printing function
and setup proced ure. The IPP Printing pro vides a
conve nient wa y to print doc ume nts across the Inter net b y
the IPP protoco l.
Chapter 10 introd uces how to dea l with the proble m tha t if
yo u ca n’t find a ny pri nt ser ver listed o n the “A vailab le
Ports” i n “ Network Por ts Quick Setup” i n Wi ndows XP SP2.
7
1.6 Firmware & Print ing Function
The pri nt ser ver p ro vides a comple te network printing
solution. The feature se t is listed belo w:
PTPP (Peer-to-Peer-Pri nti ng)
TCP/IP (LPR)
IPP Pri nti ng
NetWare Binder y Pri nti ng
AppleTalk
SMB Printing
2. Hardware Installation
Unpack the p rint ser ver package a nd verify that all the
items listed i n the sectio n 1 .2 are p ro vided.
Connec t the print se r ver to the printer yo u wa nt to s hare o n
the netwo rk.
Connec t the print se r ver to yo ur ne two rk b y a ttac hed the
network cab le to the UTP por t of the print ser ve r.
Connec t the power adapter to the pri nt ser ver. The pri nt
server wi ll perfor m the Power -On-Self- Test (POS T) a fter it
is powered o n. Duri ng the POST, the Status a nd Read y
LEDs will be o n. W he n the LEDs are unlighted , the print
server is read y.
NOTE1: MUST use the power adapter shipped with the print server, do
NOT use any other power adapter from any sources.
NOTE2: To prevent the compatibility problem between print server and
a few printer, it is recommended that you power on the print server
before the printer.
8
3 . W i n d o w s Pe e r - t o - Pe e r Ne tw o r k
3 .1 S y s t e m A r c h it e c t u r e
Print se r ver s uppor ts Wi ndows Peer -to-Peer ne twork
printi ng mode, whic h is s uitable for mos t medi um a nd small
network e nviro nme nts. Thro ug h q uick a nd simp le
installatio n proced ure , users can immediately enjo y the
conve nience o f network printing.
Ins tallation proced ure is separa ted into followi ng two par ts:
1. Admi nistrator Ins tallation a nd Setup (refer to section 2
for mo re detailed info rmatio n).
System administrators m ust:
In s ta ll a dm in is tra to r’s u til i ti es in to h is /h e r comp u te r.
Configure pri nt se r ver from administrator ’s configura tion
utility.
2. Client Ins tallatio n a nd Configuration (re fer to sec tion 3
for mo re detailed info rmatio n).
Client users m us t ins tall Wi ndows PTPP dri ver (Peer-to Peer Printi ng) for ne twork pri nting .
In addition, after P TPP is insta lled , the s ystem will
automa tically searc h for a ll pri nt se r vers o n the ne twork ,
and add the pri nti ng port of the p rint ser vers into Wi ndows’
printi ng port ( refer to Network Printi ng Arc hitecture in
section 1.4 fo r mo re detailed i nfor mation).
9
3.2 Adminis trator Installation and Setup
The Administrator Ins tallation can be per formed on
Windows 95 /98/Me /NT/2000/XP/2003 with the same user
inter face. Befo re the insta lla tion, please verify that yo ur
network p rotocol is ins talled o n yo ur PC ( TCP/IP, IPX
and/or Ne tBEUI) .
Inse rt the CD s hipped along with the p rint ser ver into yo ur
CD-ROM dri ve. The Autor un.e xe program sho uld be
exec uted a utomatically. If not, r un Autor un.e xe ma nua lly
from CD-ROM drive’s root directo r y.
The “ Insta llatio n Manager ” will be displa yed o n the scree n
as followi ng. C lick “Admin Uti lity” the n click “Eng lish
Version” .
10
The “ Utilities Setup” wi ndow will be displayed . Click “Ne xt”.
Click “Ne xt” to ins tall the utilities i n the defa ult folder or
click “Browse ” to specify the destina tion folde r whe re yo u
would like to i nsta ll the utilities.
Select the compo nents yo u wa nt to i nsta ll. It is highly
recomme nded to insta ll all p rovided compo ne nts . Click
“Ne xt” to co ntinue .
Specify the program fo lder where the program icons will be
added to, c lick “ Ne xt”
11
.
The s yste m will star t to i nsta ll the utilities automatically.
12
You ha ve comp leted the ins tallatio n p hase a nd prepare to
config ure the Print Ser ver . The “Choose Pri nt Serve r” will
list all Pri nt Ser vers within the ne twork . Selec t the Print
Server you wo uld like to co nfigure and click “Ne xt”.
NOTE 1: If this is the first time you configure the Print Server, the “Print Server
Name” is the last 6-digit of MAC ID with prefix “PS”. Please check
the MAC ID on the print server.
NOTE 2: The list can only display the devices from the same manufacturer.
Specify a recogni zable na me fo r the Print Ser ver and click
“Ne xt”.
13
Specify the IP Address for the Pri nt Ser ve r ma nua lly or
click “Ne xt” to keep de fa ult IP Address, i.e. 192.168.2 .2.
The co nfig uratio n s um mar y is displayed in the wi ndow. No w,
yo u ha ve co mpleted the “Print Ser ver Setup ”. Click “Finis h”
and yo ur s ystem will add netwo rk por t of the Print Ser ver to
yo ur PC auto matically.
The Administrator Ins tallation procedure is totally
completed. Click “Finis h” .
14
The Administrator Ins tallation Program ha ve exec uted the
installatio n proced ure that perfor ms the fo llo wing tasks:
Ins tall a ll utilities a nd dri vers to the admi nistrato r’s PC.
Configure the print ser ve r (i ncludi ng the print ser ve r name
and network protoco l)
Add the netwo rk por t of the print ser ve r to the
administrator’s PC.
If yo u wa nt to print from this admi nistrator’s PC to the print
server , a ll yo u need to do is to perfo rm Windows’ s ta ndard
“Add Printer ” proced ure (please refer to Section 3.6) .
3.3 Administrator Utilities
After Admi nistrator Ins tallation is comp leted, there will be
four utilities i n pri nt ser ver’s p rogram folder .
.
15
3.4 Client Insta llat ion and Setup
The Client Insta lla tion ca n be perfo rmed o n Windows
95/98/Me/NT/2000/XP/2003 with the sa me user inte rface.
Before the i nsta lla tion p rocedure , p lease co nfirm that yo ur
PC has co nnected to the netwo rk a nd i nsta lled a t least o ne
network p rotocol.
Inse rt the CD s hipped along with the p rint ser ver into yo ur
CD-ROM dri ve. The Autor un.e xe program sho uld be
exec uted a utomatically. If not, r un Autor un.e xe ma nua lly
from CD-ROM drive’s root directo r y.
The " Insta lla tion Ma nager" wi ll be displa yed o n the scree n
as follows . Click “Client Utility” the n c lick “E nglis h Version”.
The “ Utilities Setup” wi ndow will be displayed . Click “Ne xt”.
16
Click “Ne xt” to ins tall the utilities i n the defa ult folder or
click “Browse ” to specify the destina tion folde r whe re yo u
would like to i nsta ll the utilities.
Specify the program fo lder where the program icons will be
added to, c lick “ Ne xt” .
The s yste m will star t to i nsta ll the utilities automatically.
17
Now, the insta lla tion procedure is comp leted, yo u are read y
to set up the client’s comp ute r. All network ports of the
Print Ser vers detec ted o n the netwo rk will be added to yo ur
PC automatically, click “Continue” .
The Client Insta lla tion p rocedure is comple ted. Click
“Finish” .
18
After the ins tallatio n, yo u have comple ted the fo llo wing
tasks:
Ins tall a ll utilities a nd dri vers to the c lient’s PC.
Add all the pri nt ser ver’s network ports of the network to
the clie nt’s PC.
You ca n then perfo rm the Wi ndows’ sta ndard “Add Printer”
procedure to add ne twork pri nters to yo ur PC. Please refer
to Section 3.6.
19
3.5 Client Utilities
After Clie nt Insta lla tion is comple ted, there will be three
tools i n pri nt ser ver’s Progra m fo lder.
Network Ports Quick Setup
Remote Ports
Uninstall Network Driver
z
z
z
3.5.1
Networ k Por ts Qu ick Se tup
Network Ports Quick Setup Utility offe rs a ve r y simple
method to add or remo ve pri nt ser ver’s pri nte r por t from the
client’s co mputer.
During the c lient’s ins tallation procedure, the s ys tem will
automa tically searc h for a ll pri nt se r vers o n the ne twork ,
and add them i nto the pri nte r por ts of the client’s comp ute r
20
If yo u ha ve jus t i nstalled a nother new print se r ver i n the
network, yo u m us t r un this prog ram first. This program will
search for ne w p rint ser vers a nd allow yo u to add the new
network p rinter por t i nto client’s comp ute r co nve niently.
Perform the sta ndard Add Printer proced ure , then yo u ca n
print directly to the pri nte r throug h the ne wly ins talled pri nt
server .
Please be aware that Ne twork Ports Quick Setup Utility ca n
only detect a nd co nfig ure a ll print ser ve rs o n the same
network, it ca nnot searc h a nd co nfigure print se r vers o n
other s ub nets ac ross network seg ments. Yo u m ust use
Remote Por ts Utility described in the ne xt sectio n to
manage remote (across ne twork segme nts ) pri nt ser vers.
3.5.2 Re mote Por ts (Utility)
Remote Por ts Utility offers a conve nie nt wa y for yo u to
manage a nd add printer por t o f the remo te pri nt ser ver .
From the assista nt of this utility, you ca n pri nt to o ther p rint
servers o utside the s ubne t across netwo rk segme nt.
Howe ver , please note that this functio n o nly s upports
TCP/IP network p rotocol.
Please follow the p rocedures described belo w:
Step1. Run Re mote Por ts Utility. Clicks “Add” to add a
remote pri nt port.
21
Step2. E nter print se r ver’s name, IP address , selec t used
ports, a nd enter LPR q ue ue name o f eac h po rt. Click “ Ok” .
Step3.
The new remo te pri nt port is displayed as follows.
In order to use the remote printing functio n, yo u will ha ve to
proceed with nor mal Add Printe r proced ure a nd select yo ur
printer port as the newly added re mote p rinter por t.
22
23
3.6
Windows Add Printer Procedure
After adding a “ Network Port” of the pri nt ser ver to yo ur PC
by Admi nistrato r or Client Ins tallatio n Program , yo u ca n
follo w the proced ure described below to add printer to the
Windows. No te tha t followi ng “Add Pri nter ” steps are
running in Windo ws XP, the steps in other Operati ng
Systems are simila r.
Step1. Click “Star t” , c hoose “Settings ” a nd se lect “Printers
and Fa xes”.
Step2. Click “Add a Pri nter ”.
Step3. The “Add Printer Wizard ” is displa yed. C lick “Ne xt” .
Step4. Select “Local printer a ttac hed to this co mputer”
and make s ure that “Automatically de tect a nd insta ll m y
Plug a nd Pla y pri nte r” is no t selec ted. C lick “Ne xt” .
24
Step5. C hoose the s uitab le “Pri nt Ser ver Network Por t”
whic h was c reated b y the Administrator Ins tallation or
Client Insta llatio n p rocess a nd click “Ne xt”.
Step6. Select a s uitable p rinter manufacture r a nd the
printer model a nd c lick “Ne xt” . If yo ur pri nter is not i n the
list, c lick “ Ha ve Disk…” to ins tall the dri ver o f the printer .
After i nsta llatio n, the p rinter model will be added to the list.
25
Step7. Name yo ur p rinte r a nd se tup the defa ult pri nter ,
click “Ne xt” .
Step8. Choose to pri nt the test page or not. It is
recomme nded to print a test page. Click “Ne xt”.
26
Step9. Yo u ha ve added the p rinte r to the PC successfully.
The informa tion of the pri nter is displa yed in the wi ndows.
Click “Finish” .
27
4 . W i n d o w s N T / 2 0 0 0 / 2 0 0 3 Ne tw o r k
4 .1 S y s t e m A r c h it e c t u r e
In Windo ws network enviro nme nt, other tha n the Peer-to Peer network printing arc hitecture described in the pre vio us
chapter , we a lso offer the Ser ver -Based Printi ng
architecture fo r Wi ndows NT/2000/2003 se r ver. Only o ne
Windows NT/2000/2003 is required to ha ve Wi ndows PTPP
(Peer-to-Peer Pri nti ng) d river ins talled a nd s hare the
printi ng ser vice o n the network. Other ne twork users ca n
simply co nnec t to the ser ver and access the s hared pri nter
(see below).
28
4.2 W indows NT/2000/2003 Server Installat ion and
Setup
Please follow the p rocedures described belo w fo r
installatio n a nd co nstr uct a peer- to-peer co nnectio n (PTPP)
between Windo ws NT/2000/2003 Ser ver a nd Print Ser ver .
Step1.
If this is your first time i nstalli ng pri nt se r ver, please i nsta ll
the administrator software on Windo ws NT/2000/2003
server firs t. Refe r to sectio n 3.2 for ins tallation ins tr uctio ns.
If yo ur network has alread y insta lled a working print ser ve r
and yo ur Windo ws NT/2000/2003 ser ver has not yet
installed the PTPP dri ver , please insta ll the clie nt so ftware.
Refer to sec tion 3.4 a nd 3 .5 fo r i nstallatio n i nstr uc tions .
Step2.
Please add/configure the Peer -to-Peer Printi ng o f the
Windows NT/2000/2003 network printer a nd verify that yo u
can pri nt from Wi ndows NT/2000/2003 to the pri nt ser ver b y
the ins talled PTPP dri ver .
Step3.
Share the abo ve ser ver’s p rinte r to the ne two rk b y
performi ng the sta ndard Wi ndows printer s ha ring p rocess.
29
4.3 User Installa tion and Setup
After ser ve r side’s insta lla tion is comple ted, c lient side wi ll
be able to fi nd the ser ver’s s hared p rinter i n Network
Neighbor hood. Yo u o nly need to per form Window’s
standard Add New Printer procedure, select “Network
Printer” s hown in the sc reen belo w, a nd comple te the
config uratio ns after wards to access the s hared p rinte r.
30
5 . N e t Wa re Ne tw o r k
5 .1 S y s t e m A r c h it e c t u r e
We impleme nt Ne tWare pri nte r s hari ng func tionality into the
print ser ver itse lf, thus allowi ng o ne o r mo re pri nters
attac hed b y a print ser ve r to be co nnected to the network.
We ha ve deve loped the print ser ve r to s upport Ne tWare
print ser ver.
Embedded print se r ver, whic h em ulates the “q ue ue
manageme nt func tionality” of Ne tWare p rint ser ver ,
PSERVER program r unning o n the Ne tWare ser ve r. A user
first pri nts a job at a worksta tion, the job is routed to a
NetWare ser ver, the Ne tWare ser ve r s tores the job in a
print que ue and the n the pri nt se r ver ge ts the print job from
the que ue to p rinters.
Print Queue
Windows 98
Netware Server
Print Server
Windows 2000
Compare with NetWare printing functio nality, the
adva ntages o f embedding the NetWa re network p rinti ng
func tionality in the print ser ve r inc lude:
Ins tallation is easier a nd q uicker.
Netwo rk ma nageme nt is easier.
Printing perfor ma nce is e nhanced .
Relieve Ne tWare file se r ver’s b urde n.
Relieve the need of a works tatio n r unni ng the remote
printer utility.
31
Impro ve prod uc tivity b y locating the pri nte r near the
workgro up.
Each pri nt se r ver s ho uld log into a NetWa re ser ver before
servicing the pri nt jobs . Eac h pri nt ser ver will occ up y a user
account with which it ca n log i nto the NetWare ser ver .
5.2 NetWare 3.x/4.x/5.x Installation & Setup
Once your pri nt ser ver is co nnec ted to yo ur Ethe r net
network, yo u ca n se t it up fo r use with yo ur networking
softwa re.
5.2.1 In stallatio n Usin g PCONSOLE
5.2.1.1
Configuring as Print Server Mode
1. Run the NetWa re PCONSOLE prog ram.
2. Cha nge the c ur rent file ser ve r, if necessar y, using the
Change C ur rent File Serve r me nu selectio n.
3. Choose the Pri nt Que ue Informa tion me nu selec tion.
4. Press the Inser t ke y to add a new print q ue ue.
5. Type in a pri nt que ue na me, s uc h as “PQ” or “Q1 ”.
6. Yo u ha ve no w s uccess fully crea ted the print q ue ue tha t
yo ur print ser ve r will ser ve. Press the Escape ke y until the
Available Optio ns mai n me nu is displayed .
7. Select Pri nt Ser ver Infor mation.
8. Press the Inser t ke y to add a new NetWa re pri nt ser ver
object. The print ser ve r name can be identical to the
PSxxxxxx name pri nted on the label of the p rint ser ver .
32
9. Press E nter to select the ne wly created print ser ve r.
10. Select Print Ser ver Config uratio n.
11. Select Printer Co nfiguration.
12. Select Printer 0 (or Printe r 1, Printer 2 ), and press
Enter , the n selec t LPT1 (or LPT2, LPT3) in the Type field.
If yo ur pri nt se r ver is with o nly o ne por t, you do not need to
config ure this Type field.
13. Press Escape, a nd a ns wer Yes to the Sa ve Cha nges
question.
14. Select Que ues Ser viced b y Pri nter , the n selec t Printer
0 (or Pri nter 1, Printer 2 ) a nd press Enter.
15. Press Inse rt a nd add yo ur ne wly created print q ue ue to
the list of q ue ues se r viced by the p rinter. E nter a priority
33
number for the que ue se r vice, or press E nter to accept the
default.
16. Repeated ly press Escape to e xit the PCONSOLE
program.
17. Reset the print ser ve r to ha ve the c hanges take e ffect.
NOTE: If the pri nt ser ver yo u ha ve is with m ultiple printer
connectors , yo u ma y crea te m ultiple print q ue ues a nd
printer objects .
Your pri nt ser ver s hould no w be ready to use. Yo u s hould
be able to redirect printing to yo ur print se r ver usi ng a
CAPTURE comma nd suc h as the o ne s hown in the p revio us
section.
34
6 . U N I X S y s te m Ne tw o r k
6 .1 In t r o d u c t io n
The pri nt ser ver is a vailab le for TCP/IP pri nti ng b y Unix
LPD (Line Printe r Daemo n) p rotocol. The LPD protoco l
originated with Uni x re lease is based o n the BSD ve rsion o f
Uni x a nd suppo rted under most versions of Uni x.
This c hapter e xp lains how to co nfig ure the pri nt ser ver for
TCP/IP operatio n, and how to modify co nfig uratio n fi les o n
yo ur Uni x s yste m to allow pri nting to the pri nt ser ver . The
config uratio n e xamp les in this manua l follow the s yntax fo r
BSD based Unix s yste ms. P lease refe r to the rela ted
syste m doc ume nta tion for the co rrect s ynta x o f yo ur
syste ms.
To co nfig ure the pri nt ser ver for LPD printi ng, perfor m the
procedures be low:
1. E nable Print Ser ver’s TCP/IP S upport.
2. Set up Print Ser ver’s IP address.
3. Verify Print Ser ver’s IP Address.
4. Co nfigure re mote LPD pri nting o n the host.
5. Pri nt a tes t page.
In the ne xt sec tions, we will describe these fi ve proced ures
step b y step .
6.2 Enable Print Server’s TCP/IP Support
The defa ult configura tion of the pri nt ser ver is with TCP/IP
support e nabled. Anywa y, you ca n co nfig ure the pri nt
server to enab le TCP/IP s uppor t using the co nfigura tion
program.
6.3 Setup Print Server’s IP Address
The pri nt ser ver m ust have a unique IP address in o rder to
be recogni zed b y the network.
You ca n se t up the IP address o n the various Uni x s ys tems
using any o ne of the followi ng methods:
1. DHCP (D ynamic Host Co nfig uratio n Protoco l)
2. BOOTP (Bootstrap Protoco l)
35
The pri nt ser ver will use the last three methods to obtai n its
IP address a utoma tically if its IP address is configured as
Auto (0.0.0 .0).
6.3.1 DHCP
Th e re a re m a n y U n i x s ys tems th a t s up p o rt D HC P p ro to col , a n d th e
p ro ce du res to co n fi gu re th e D HC P se rve r d a ta b as e a re d i ffe re n t. Th i s
m an u al d o es no t d es cri be th e D H C P s e rve r co n fi gu ra ti on o n th e U n i x
s ys tems . It i s h i gh l y re co mme n de d th a t th e D H C P s e rve r sh o ul d b e lo ca te d
o n th e sam e n e two rk as th e p ri n t s e rve r.
6.3.2 BOOTP
If yo u h a ve th e BO OTP d a e m o n , b oo tp d , ru n ni n g o n yo u r U N IX s ys te m th a t
i s a ccess i bl e b y th e p ri n t s e rve r, yo u ca n u s e th e BOOTP p ro to co l to s e t u p
th e IP a d d ress o f th e p ri n t se rve r. We re co mm e nd th a t th e BOOTP s e rve r
s ho u ld b e l o ca te d o n th e s ame su b ne t a s th e p rin t s e rve r. If yo u u s e
N e tw o rk In fo rm a ti on Se rvi ce s (N IS) i n yo u r s ys tem , yo u m a y n e e d to re bu i ld
th e N IS m a p wi th th e BOOTP s e rvi ce s b e fo re d o in g th e fo l lo w in g BOOTP
co n fi g u ra ti o n . To re b ui l d th e N IS m a p , p le as e re fe r to yo u r s ys tem
d o cum en ta ti o n .
To co n fi g u re th e IP a d d ress d a ta fo r th e BOOTP s e rve r, yo u w i l l n e e d to l og
i n th e h os t o f BOOTP s e rve r a s th e s up e ruse r (ro o t). Pe rfo rm th e fo ll o wi n g
s te ps to a dd a d d ress e n tri es ,
1. Optiona lly, assig n a name correspo nding to the pri nt
server ’s IP address. Yo u ca n add this address to the
/etc/hosts file , b y adding a line s uc h as:
203.66.191.12
pserver
2. Add a n e ntr y to the host ’s /e tc/bootp tab file , similar to
the fo llo wing:
hostname:\
:ht=1:\
:ha=print_server_ethernet_address:\
:ip=print_server_ip_address:
L i n es s ho u ld b e i nd e n ted w i th ta bs .
Wh e re h os tn ame is th e d e vi ce n am e o f a p rin t s e rve r, th e h t=1 ta g s p e ci fi es
th e h a rd wa re typ e i s Eth e rne t, th e h a = ta g s pe ci fi es th e Eth e rne t a d d ress o f
a p ri n t se rve r, w h i ch is th e N o de ID l o ca te d on th e p ri n t s e rve r. Th e h a ta g
36
m us t b e p re ce de d b y th e h t ta g . Th e i p = ta g s h o u ld co rres po n d to th e IP
a d d ress yo u w a n t to ass i gn to th e p ri n t se rve r.
Fo r e xa m p l e , a p rin t s e rve r w i th th e fo l lo w in g co n fig u ra tio n :
N o d e ID : 0 0 00 B4 01 0 10 1 (th is im pl i es Eth e rn e t
a d d ress is 00 0 0 B4 0 10 1 01 ),
IP a d d ress : 2 0 3 .6 6 .19 1 .1 2
Th e e n try fo r th i s p rin t s e rve r i n th e /e tc/b o o tp ta b fi le sh o ul d b e :
PS010101:\
:ht=1 :\
:ha=0000B4010101:\
:ip=203.66.191.12:
6.4 Verify Print Server’s IP Address
To verify that yo ur p rint ser ve r is respo nding to the newly
assigned IP address usi ng a P ING com mand :
ping ip-address
6.5 Configure Remote LPD Printing on the Host
The proced ure you use to co nfigure yo ur Uni x host(s) to
allow pri nting to your network remo te pri nt se r ver va ries
between diffe rent varieties o f Uni x. The p rocedure belo w
can be used for Uni x varia nts that are related to BSD Uni x,
suc h as SunOS or Li nux. For o ther versio ns o f Unix,
cons ult yo ur s ystem doc ume ntatio n, keeping i n mi nd that:
1. The pri nt ser ver s hould be trea ted as a BSD networked
print ser ver hos t.
2. The host name s ho uld be the name (or IP address) that
yo u ha ve assig ned to the p rint ser ver .
3. The pri nte r name (or que ue na me) o n the remote hos t
sho uld be lp t1, lpt2 or lpt3 , the name o f the printer port on
the print ser ve r.
You wi ll need to pe rfor m the tasks be low, logged in as the
super user (root). To co nfigure your Unix hos t for p rinti ng,
37
1. Optiona lly, assig n a name correspo nding to the pri nt
server ’s IP address. Yo u ca n add this address to the
/etc/hosts file , b y adding a line s uc h as:
203.66.191.186
pserver
2. Create a spool director y for the p rinte r i n the same
directory where spool directories are nor mally kept o n the
machi ne, s uc h as /va r/spool or /var /spool/lpd:
mkdir /var/spool/lpd/pserverd
chown daemon /var/spool/lpd/pserverd
chgrp daemon /var/spool/lpd/pserverd
chmod 775 /var/spool/lpd/pserverd
3. Add a n e ntr y to the host ’s /e tc/pri ntcap file, similar to
the fo llo wing:
printer-name:\
:lp=:\
:rm=203.66.191.186:\
:rp=lpt1:\
:lf=/var/spool/lpd/pserverd.log:\
:sd=/var/spool/lpd/p serverd:\
:mx#0:
Lines s hould be inde nted with tabs. More than o ne pri nter
name ca n be used, with va riants separated by ver tical bars
(name1 |na me2).
The r m= e ntr y s ho uld cor respond to the IP address yo u
ha ve assigned to the pri nt ser ver . You ca n a lso use a hos t
name if yo u ha ve assig ned o ne in the /etc /hosts file.
The sd= e ntr y s hould co rrespond to the spoo l director y yo u
created in the p re vious s tep.
The rp = e ntr y s ho uld correspo nd to the port name of the
remote pri nte r. The values s ho uld be o ne o f lpt1, lp t2 or
lpt3 depe nds o n the pri nter port.
The pri nt ser ver s ho uld now be a vailable for pri nting from
yo ur Uni x host.
38
7. Configuration Utility
7 .1 In t r o d u c t io n
This c hapter i ntroduces print se r ver’s s ystem co nfiguratio n
utility in Windo ws e nviro nme nt. This utility is automatically
installed d uri ng Wi ndows Admi nistrato r Utility ins tallation
procedure - refer to sec tion 3.2 a nd 3 .3.
This utility pro vides the most co mplete ma nageme nt and
config uratio n func tions on the p rint ser ve r side. This utility
only pro vides co nfiguration functio ns for p rint ser ver itself;
it does no t i nclude co nfigura tion functio ns fo r c lient side or
other file ser ver or NetWa re ser ver in the ne twork
environme nt.
The Configura tion Utility pro vides the fo llo wing
config uratio n a nd manageme nt func tions :
Search Print Server: Searc h All Availab le Pri nter Ser vers
on the Ne two rk.
Print Server Status : Display Print Ser ver Ne twork Status .
AppleTalk Configuration: AppleTa lk Pro tocol Setting .
General Configuration: Ge nera l Info rmatio n of print se r ver.
NetWare Configuration: NetWare Printing Co nfig uratio n.
System Configuration: Pri nt Ser ve r Netwo rk Ability
Setting a nd Firm ware Upgrade.
TCP/IP Configuration: IP Address a nd DHCP Serve r
Configura tion.
Wireless Configurat ion: Wireless LAN Co nfig uratio n.
SNMP Configuration: SNMP Informa tion Config uratio n.
Setup Wiz ard: Guide Yo u Thro ug h A ll the Settings.
Report: List the S tatus o f All A vailable Print Ser vers on the
Netwo rk.
We will e xplai n eac h function separate ly i n the fo llo wing
section.
39
7.2 Search for All Available Pr int Server
Ever y time whe n yo u r un print ser ve r’s configura tion utility,
click the “Search” icon
o n the too l bar . The
config uratio n uti lity will dela y for se ve ral seco nds because
the utility is usi ng s ys tem’s a vailable ne two rk pro tocols to
search for all pri nt ser vers on the ne twork . A ll availab le
print ser vers will be listed under “Print Ser ver Group ” o n
the le ft side o f the wi ndow.
You m us t selec t the pri nt ser ver yo u wo uld like to co nfig ure
from the list. The s ystem will, at the sa me time , displa y the
selected pri nt ser ver’s s tatus o n the rig ht side of the
window.
40
7.3 Status o f Print Server
Click “Status” icon
on the tool bar, the s tatus o f the
cur rent se lected p rint ser ver will be s howed o n the right
side of the windo w.
The informa tion of the pri nt ser ver displayed are MAC ID,
Model Type, Firm ware Version, sta tus of each printer port,
NetWare file se r ver name , NetWa re file ser ver polling
inter va l, NetWa re pri nter q ueue names, IP address , s ub net
mask, defa ult gatewa y, Apple Talk printer type, AppleTa lk
zo ne a nd p rint ser ver printing ability…etc.
You ca n re fres h the pri nt ser ver’s s tatus b y pressing the
“Refresh” b utto n
.
You ca n res tar t the print ser ve r b y p ressing the “ Reboot”
button
.
41
7.4 Setup the Pr int Server
Click “Setup ” icon
on the tool ba r, the setup items o f the
cur rent se lected p rint ser ver will be s howed o n the right
side of the windo w.
Double c lick o ne of the ico ns to set up the selected print
server . A sc reen wi ll pop up to verify “Use r Name” a nd
“Password” o f the pri nt se r ver. The defa ult va lues are as
follo ws.
y
y
User Name: admin
Password: 1234
42
7.5 AppleTalk Configuration
Double Click “AppleTa lk” icon a nd the Apple Talk
config uratio n window wi ll pop-up .
AppleTalk is a data comm unication protocol ofte n used b y
Macintos hes. The print se r ver ca n use these para meters to
join the Apple Talk netwo rk a nd s hare the p rinter to other
AppleTalk works tatio ns. Yo u ha ve to se tup the “ Zone
Name” a nd “Printer Type” fo r eac h pri nter port of this pri nt
server .
Zone Name: Pri nt se r ver has to join zo nes of AppleTa lk
before it ca n be s hared to other wo rkstatio ns. Only
worksta tions i n the same zone can s hare the pri nter . If you
want to s hare the pri nte r to all worksta tions in a ll Zo nes,
yo u s ho uld e nter o nly “*” in the “ Zone Name ” field.
Printer Type, the type of p rinter a ttac hed to eac h pri nter
port. Yo u ca n get the pri nter type from the ma nufacturer o f
the printer.
43
7.6 General Configuration
Double Click “Ge nera l” ico n a nd the Ge nera l co nfigura tion
window will pop- up .
You ca n see basic pri nt ser ver informatio n i n this page.
You also ca n co nfig ure the “Pri nt Serve r Name” , “SMB
Gro up Na me”, “ User Name” a nd “Passwo rd” here .
Printer Server Name, the na me of the p rint ser ver . Yo u
can use this name to identify the pri nt se r ver whe n yo u a re
searching for the print ser ve r b y the admi nistratio n a nd
client utilities.
SMB Group Name, the na me of SMB gro up that this print
server belo ngs to. All PC sho uld join the same gro up befo re
the y can use this print ser ve r b y SMB p rotocol.
User Name / Password is used to a uthe nticate the
administrator b y the Web admi nistra tion tool.
44
7.7 Netware Print Server Configuration
Double Click “NetWare” ico n a nd the NetWare configuration
window will pop- up .
This print se r ver s uppor ts NetWa re Binder y Printing method.
The pri nt ser ver pe riodically polls the NetWare ser ver
printer q ueues for pri nting jobs . You ha ve to assign the
NetWare ser ver na me, p rint ser ver polling inte r val and the
name o f q ue ue o n the NetWare ser ver for each pri nter port.
Polling Time is the po lli ng inter va l of the p rint ser ver fo r
waiting pri nti ng jobs o n the Ne tWare se r ver.
NetWare Server is the name of the NetWare file ser ver that
provides pri nter q ueues .
45
7.8 System Configurat ion
Double Click “Sys tem” icon and the S yste m co nfig uratio n
window will pop- up .
In the S ys tem co nfigura tion page, yo u ca n se lect to
enable/disable each printing or ma nagement pro tocol,
upgrade the new firm ware for this pri nt se r ver, a nd
enable/disable wire less func tion.
Upgrade Firmware: Yo u ca n use this “ Upgrade Firm ware”
tool to update the newes t firmwa re of the print ser ve r. C lick
“ ” b utto n a nd se lect the cor rect firm ware i n yo ur PC. Afte r
selecting the firmwa re file, c lick the “ Upgrade” b utto n to
finish the firm ware update process. If yo u want to reset the
Print Ser ver to defa ult factor y setti ngs, please c lick “Load
Default”.
Wireless Function: Yo u ca n selec t “E nable” or “Disable” to
manually e nab le or disable the wireless functio n. If yo u
manually e nab le wireless func tion, the pri nt se r ver’s
wireless LAN will be alwa ys e nabled a nd Ether net will be
alwa ys disabled. If yo u ma nua lly disable the wire less
func tion, the print ser ve r’s wire less LAN will be a lwa ys
disabled and Ether ne t will be alwa ys e nab led. Yo u a lso ca n
select “Auto” to let the pri nt ser ver automatically decide to
46
enable o r disable the wireless func tion. The pri nt ser ver
only ca n work i n e the r Ether ne t or wire less LAN mode. It
cannot work in both Ether ne t a nd wireless LAN mode at the
same time. W hen the print ser ve r s tarts up, it will a utodetect if the LAN port is co nnec ted to a n acti ve ne twork b y
an Ether ne t cab le. If the p rint ser ver is co nnected to a n
active network b y Ether ne t cable whe n s tarti ng up , the print
server wi ll r un i n Ether ne t mode. If the pri nt se r ver is no t
connected to a n ac tive ne two rk b y Ethe r net cab le whe n
starti ng up, the p rint ser ver will r un in wire less LAN mode.
The pri nt ser ver de fa ult is in “A uto” mode.
Domain Country: The wireless c ha nne ls are differe nt from
countr y to co untr y. Gene rally, the c ha nnels are from 1 to 11
in USA a nd from 1 to 13 i n E urope. The Domain Co untr y
setting is for yo u to set the a vailable c ha nne ls accordi ng to
yo ur locatio n.
47
7.9 TCP/IP Configuration
Double Click “TCP/IP” icon a nd the TCP/IP configura tion
window will pop- up .
You ca n co nfig ure the pri nt ser ver to a utomatically get IP
from D HCP serve r or ma nually specify static IP . The p rint
server also has a b uilt-in DHCP ser ver . You ca n e nable this
DHCP server and le t it ma nages IP for you.
Click the “ IP ” b utto n to e nter the IP setting page . If yo u
need the print se r ver to a utoma tically get a n IP from DHCP
server , se lect “Auto IP ”. Yo u also ca n select “Sta tic IP” to
manually assig n “ IP Address” , “S ub net Mask” a nd
“Gate way” for the pri nt ser ver .
Click the “DHCP Ser ver” b utto n to enter the DHCP ser ver’s
setting page. Yo u ca n “Enable /Disable” the DHCP ser ver o r
48
set “A uto” a nd assign a ra nge o f IP addresses here. The
DHCP server is disabled b y defa ult. If “Auto” is se lected,
the DHCP Serve r of pri nt se r ver will be e nabled only whe n
the re is no o the r DHCP Ser ver within the ne twork . W he n
“Enable” or “Auto” is selected , yo u ha ve to co nfigure
“Starti ng Address”, “ Ra nge”, “Sub ne t Mask ”, “Ga tewa y
Address” and “DNS”. The pri nt ser ver will assign a unique
IP for each clie nt.
49
7.10 W ireless Configurat ion
If yo u w a n t to u s e th e p ri n t s e rve r th ro u g h wi re less L AN , p l e as e s e t u p th e
p ri n t se rve r th ro u g h Eth e rne t fi rs t a n d m a ke su re yo u r w i re less L AN s e tti n g
i s co rre ct. Afte r s e tti n g th e w i rel ess L AN , u n p l ug th e Eth e rn e t ca b le a n d
re s ta rt th e p rin t s e rve r, th e n yo u ca n s ta rt to u se th e p ri n t s e rve r th ro u g h
w i re less L AN . If th e w i re l ess co n fig u ra tio n d oes n o t w o rk, p l eas e p l ug th e
Eth e rn e t ca b le a g ai n , res ta rt th e p ri n t se rve r a n d co n fi g u re th e p ri n t s e rve r
th ro u g h Eth e rn e t u n ti l th e wi re less L AN s e tti n gs a re co rre ct.
The defa ult setti ngs of the print ser ve r wireless function are
as follows .
y
y
y
Mode: Ad-Hoc
SSID: Default
Channel: 11
Double Click “Wireless” icon a nd the wireless configura tion
window will pop- up .
If yo u use access point to b uild up wireless network, you
ha ve to selec t “ Infrastr uc ture Mode”. If yo u do no t ha ve a ny
access point a nd wa nt to use peer- to-peer co nnectio n to
build up wireless network, you ha ve to selec t “Ad- Hoc
Mode”.
After selecti ng the operation modes of the wireless func tion,
click “Ne xt” to go to furthe r detailed configura tion.
Infrastr ucture Mode:
50
In the Infrastr uc ture mode, yo u ha ve to let the p rint ser ver
associate with a n access poi nt. You le t the pri nt ser ver
scan for a n a vailable access poi nt automatically o r
manually assig n the SS ID of the access poi nt you wa nt to
use.
If yo u select to le t the print ser ve r sca n for a n a vailable
access point, the followi ng windo w will pop up.
The list is the sca nned a vailable access poi nts . Selec t a n
access point i n the list a nd c lick “ Next” . If yo u canno t find
the access point tha t yo u wa nt to use , c lick “Sca n” to let
the print ser ve r sca n agai n.
Ad Hoc Mode:
51
In the Ad- Hoc mode, yo u ca n le t the print se r ver
automa tically associate with other wire less sta tion o r
manually assig n the SS ID of yo ur wireless network . Yo u
can let the p rint ser ver a utoma tically select the c ha nne l
tha t is the sa me with the peer or ma nually assig n a c ha nne l.
If yo u select to le t the print ser ve r sca n for a n acti ve
wireless s tation, the fo llo wing wi ndow will pop up .
The list is the sca nned acti ve wire less s tations . Selec t a
wireless s tation in the list a nd click “ Ne xt”. If yo u ca nnot
find the wire less s tation that yo u want the pri nt ser ver to
communicate with, click “Scan” to le t the pri nt se r ver sca n
again.
Both “ Infrastr uc ture” a nd “Ad- Hoc” mode ha ve to go
throug h the followi ng proced ure :
52
This print ser ve r s uppor ts WEP a nd WPA-PSK security
mode. If yo u wa nt to use WEP enc r yption to protec t yo ur
wireless network , yo u ha ve to se lect “WEP(ASCII)” or
“WEP(HEX)”. If yo u want to use WPA-PSK, yo u ha ve to
select “WPA-shared ke y”. The wire less sec urity setti ng
sho uld be the same with other wire less de vices in the sa me
network.
WEP Security Mode :
53
You ca n se lect “64 bit” or “128 bit” le ngth a nd
“He xadecimal” or “ASCII” format fo r the e ncr yptio n ke y.
Longer ke y le ngth can pro vide stronge r sec urity but worth
communicatio n per forma nce.
Enter fo ur ke y va lues b y following the r ules below a nd
select o ne ke y as the defa ult ke y.
y
PassPhrase – A passphrase simplifies the WEP encryption process by
automatically generating the WEP encryption keys for the print server.
This setting is only valid when the security mode is in “WEP(HEX)”.
y
Key 1 to Key 4 – If the key length is 64-bit, enter 10-digit Hex values
or 5-digit ASCII values as the encryption keys. For example:
“0123456aef“ or “Guest“.
If the key length is 128-bit, enter 26-digit Hex values or 13-digit ASCII
values as the encryption keys. For example:
“01234567890123456789abcdef“ or “administrator“.
WPA-shared ke y Sec urity Mode:
54
Whe n “WPA-shared ke y”, also named “WPA-PSK” req uires
users to se lect the ad va nced e ncr yp tion methods, i.e. TK IP
and e nte r a se t o f s hared ke y.
y
TKIP – TKIP (Temporal Key Integrity Protocol) changes the temporal
key every 10,000 packets. This insures much greater security than the
standard WEP security.
y
Shared Key – Enter 8 to 63 digits of ASCII format to be the key for the
authentication within the network.
Whe n yo u finis h co nfiguri ng the wire less sec urity, click
“Ne xt” to go to ne xt step.
55
You ca n se lect to let the pri nt ser ver automa tically obtain
IP setti ngs with DHCP clie nt or manua lly assign the IP
settings .
If yo u ma nually assign the IP settings , yo u ha ve to e nte r IP
address, s ub net mask a nd defa ult gatewa y address.
Whe n yo u finis h co nfiguri ng the IP se ttings , c lick “ Ne xt” to
confirm the IP Address co nfigura tion.
Click “Save” to sa ve the wireless configuration.
56
7.11 SNMP Configuration
Double Click “SNMP” icon a nd the SNMP co nfiguratio n
window will pop up.
Contact: Yo u ca n e nter the pri nt ser ver administra tor’s
contac t informa tion here. This i nfor mation will be displa yed
in the SNMP manageme nt tool.
Location: Yo u ca n enter the i nsta lled location of the p rint
server here. This i nfo rmatio n will be displa yed in the SNMP
manageme nt too l.
7.12
Wizard
57
Click “Wizard ” icon
on the tool ba r, the setup wi zard
item of the c ur re nt se lected p rint ser ver wi ll be s howed o n
the right side of the wi ndow.
Double c lick the “Print Ser ver Setup Wi zard” the setup
wizard will g uide yo u thro ugh all the setup process.
Step 1: Set up the na me of this pri nt ser ver and the SMB
Gro up Na me fo r the pri nt se r ver. Also se t up “Enab le”,
“Disable” or “A uto ” for the wireless func tion here. Please
refer to sectio n 7 .6 a nd 7.8 for detail informatio n.
Step 2: Selec t to e nable required p rinting p rotocol. Please
refer to sectio n 7 .8 fo r detail informa tion.
58
Step 3: Setup the IP of this print se r ver a nd the DHCP
server . P lease refe r to sectio n 7.9 for detail i nfo rmatio n.
Step 4: Setup the Apple Talk printing . Please refer to
section 7.5 fo r detail informatio n.
Step 5: Setup the NetWare printing . Please refer to section
7.7 for detail info rmatio n.
59
Step 6: Selec t the Wireless Adapter mode a nd comple te
wireless LAN settings. The other proced ures are the same
with “Wire less” Setting in “Setup” sc reen. P lease refe r to
section 7.10 for detail info rmatio n.
Step 7: Click “Save” to fi nish se tti ng.
60
7.13
Report
Click “Report” ico n
on the tool bar, the Report wi ndow
will pop up.
The repor t lists basic i nfor mation of a ll a vailable p rint
servers o n the network. The informa tion i ncludes Device
Name, MAC ID, Model Type , Firmwa re Version a nd Status
of print se r ver.
61
8 . W e b M a n a ge m e n t
8 .1 In t r o d u c t io n
Print se r ver ca n be co nfigured a nd ma naged o n the Web.
Thro ug h Local Area Netwo rk, or e ve n Inter ne t,
administrator ca n easily configure a nd ma nage pri nt
server’s va rious main functio ns i n bro wsers. Simply e nte r
print ser ver’s IP address into yo ur browse r’s address field
to ma nage a p rint ser ver b y pri nt ser ver’s b uilt-in Web
Server .
The defa ult IP Address, User Na me a nd Password settings
of the Pri nt ser ver are as fo llo ws.
IP Address: 192.168.2 .2
User Name: Admin
Password: 1234
8.2 Login
Yo u m a y u s e a n y We b Bro ws e r to re vi e w th e s ta tus o r con fi g u re th e s e tti ngs
o f th e p ri n t s e rve r. Af te r e n te ri n g th e IP a d d ress o f th e p rin t s e rve r, a l o g i n
p a g e dis p la y. Yo u h a ve to e n te r co rre ct “U s e r N am e ” an d “Pass w ord ” b e fo re
g o i ng to th e We b Ma n a g em e n t p ag es .
N o tes : D e fa u l t Us e r Nam e is “a dmi n ”, d e fa ul t p ass w o rd is “1 2 34 ”.
62
8.3 Device Status
8.3.1 Syste m
Sys te m In fo rm a ti on i n clu d es “De vi ce N am e ”, “Pri n t Se rve r N a me ”, “Mo d e l
Typ e ”, “S ys te m U p Tim e ”, “Fi rmw a re Ve rsi o n ”, “MAC Ad d re ss ”, “Wi re l ess
L AN Sta tu s ” a n d th e p ro to co ls e na b le d s ta tus , e tc.
8.3.2
Prin ter
Th i s pa g e lis ts in fo rm a ti on o f p ri n te rs co nn e cte d to a ll p ri n te r p o rts .
63
8.3.3
TCP/IP
Th i s pa g e lis ts al l TC P/IP s e tti n gs o f th e p rin t s e rve r i n clu d in g “IP Ad d re ss ”,
“Su b n e t Ma s k” a nd “Ga te w a y”. It a l s o lis ts DH C P s e rve r s e tti ng .
8.3.4
SM B
Th i s pa g e lis ts th e SMB g ro u p s e tti n g o f th e p rin t s e rve r.
64
8.3.5
SNM P
Th i s pa g e lis ts th e SN MP s e tti ngs o f th e p ri n t se rve r. It i n cl u d es th e s e tti n gs
o f “SN MP S ys te m C o n ta ct” a nd “SN MP S ys te m Lo ca ti on ”.
8.3.6
NetWare
Th i s pa g e lis ts Ne tWa re se tti n gs , i n clu d in g “Po ll i ng Ti me ”, “U se Bi n de ry
Mo d e ”, “N a m e o f th e Fi l e Se rve r” a n d “Po rt Atta ch e d Qu e u e ”.
65
8.3.7
Ap p le Talk
Th i s pa g e lis ts Ap p l e Tal k se tti n gs , i n clu d in g “Ap p l e Ta l k Zo ne N am e ” a nd
“Pri n te r Typ e ” o f p ri n te rs co nn e cte d to a ll p ri n t p o rts .
8.4
8.4.1
Setup W iz ard
Syste m
You ca n c ha nge the print se r ver name a nd password of the
print ser ver from here.
66
Print Server Name, the name of the pri nt ser ver . Yo u ca n
use this na me to identify the print ser ve r when yo u are
searching for the print ser ve r b y the admi nistratio n a nd
client utilities.
Password, enter the passwo rd yo u wa nt to c ha nge to the
print ser ver. The passwo rd ca n be up to 7 -digit
alpha nume ric for mat. The defa ult pass word is “1234” .
Re-type Password, enter the pass word yo u wa nt to c ha nge
to the p rint ser ve r again.
8.4.2 Adv ance d Se tting s
You ca n e nable /disable the p rinting p rotocols from the
screen. To e nable the func tion, p lease selec t “E nable” ; to
disable the func tion, please se lect “Disable”.
67
8.4.3
TCP/IP
You ca n co nfig ure the pri nt ser ver to a utomatically get IP
from D HCP serve r or ma nually specify static IP . The p rint
server also has a b uilt-in DHCP ser ver . You ca n e nable this
DHCP server and le t it ma nages IP for you.
If yo u need the p rint ser ver to automatically ge t a n IP from
DHCP server , se lect “Enab le Ob tain TCP/IP Settings
Automa tically (Use DHCP/ BOOTP) ”. Yo u also ca n select
“Disable Use the fo llo wing TCP/IP Settings ” to ma nually
assign “ IP Address”, “Sub ne t Mask ” a nd “ Gate wa y” for the
print ser ver.
You ca n e nable /disable or se t a uto fo r the print ser ve r’s
DHCP server . The DHCP ser ver is disabled b y defa ult. If
the DHCP Serve r is e nabled o r set Auto, you ha ve to
assign a ra nge o f IP addresses here. Fill in the “Star t IP” ,
“Ra nge”, “DNS” , “S ub net Mask” and “Ga tewa y” , a nd the
print ser ver will assign a unique IP for eac h c lient. No te
tha t when “A uto” is selec ted, the DHCP Ser ver o f the pri nt
server wi ll be e nabled o nly whe n there is no other DHCP
Server within the netwo rk.
68
8.4.4
SM B
You ca n e nable /disable the SMB protoco l from he re. If SMB
is enabled, e nter the “SMB Group Na me” to specify the
SMB group that this pri nt ser ver be lo ngs to . All PC s ho uld
join the same gro up before the y ca n use this p rint ser ver b y
SMB protocol.
8.4.5
SNM P
69
The pri nt ser ver s uppor ts S NMP co nfig uratio n. If it is
enabled, please se t up the followi ng parame ters.
SNMP System Contact: Yo u ca n enter the pri nt ser ver
administrator’s co ntact info rmatio n here . This informatio n
will be displa yed in the SNMP manageme nt too l.
SNMP S ys te m Loc a tion : Yo u ca n e n te r th e i n s tal l ed l o ca tio n o f th e p ri n t
s e rve r h e re . Th is i n fo rma ti o n wi l l be d is pl a ye d i n th e SN MP m a na g em en t
to o l .
8.4.6
NetWare
This print se r ver s uppor ts NetWa re Binder y Printing method.
The pri nt ser ver pe riodically polls the NetWare ser ver
printer q ueues for pri nting jobs . You ha ve to assign the
NetWare ser ver na me, p rint ser ver polling inte r val and the
name o f q ue ue o n the NetWare ser ver for each pri nter port.
Polling Time is the po lli ng inter va l of the p rint ser ver fo r
waiting pri nti ng jobs o n the Ne tWare se r ver.
Name of the File Server is the name o f the Ne tWare file
server tha t pro vides pri nter q ueues .
70
8.4.7
Ap p le Talk
AppleTalk is a data comm unication protocol ofte n used b y
Macintos hes. The print se r ver ca n use these para meters to
join the Apple Talk netwo rk a nd s hare the p rinter to other
AppleTalk works tatio ns. Yo u ha ve to se lect to e nable or
disable AppleTalk , a nd se tup the “ Zo ne Na me” a nd “Printer
Type” for eac h printer po rt o f this print ser ve r.
AppleTalk Enable: E nable or disable “AppleTa lk” .
AppleTalk Zone Name: Print se r ver has to join zones of
AppleTalk before it ca n be s hared to o ther works tations .
Only works tations in the sa me zo ne ca n s hare the p rinter. If
yo u wa nt to s hare the p rinter to all works tations in all
Zo nes, yo u s hould e nte r o nly “* ” i n the “ Zo ne Name” field.
Printer Type, the type of p rinter a ttac hed to eac h pri nter
port. Yo u ca n get the pri nter type from the ma nufacturer o f
the printer.
71
8.4.8
Save Se ttin gs
You ca n c lick the “Save Setti ngs” to sa ve the settings and
restart the s ys tem .
72
8.5
8.5.1
System Tools
Load Defau lt
You ca n use this page to restore the facto r y defa ult
settings . All o f yo ur pre vious setup will be c leared.
8.5.2
Up gr ade F ir mware fro m Br owser
73
Yo u ca n u p g ra de n e w fi rm wa re fo r th is p ri n t s e rve r i n th is p a ge . C l i ck
“Bro ws e ” to se l e ct th e n ew fi rmw a re in yo u r s to ra ge a n d th en cl i ck “OK”, th e
fi rm wa re w il l b e up d a ted i n s e ve ra l m i nu tes .
Be a w a re th a t i f yo u h a ve s ta rte d u p g ra d in g fi rm w a re , yo u h a ve to fo l l o w a l l
th e u p g rad i ng s teps o r th e p ri n t s e rve r ca n ’ t tu rn b a ck to n o rm a l
co n fi g u ra ti o n .
9.
9.1
IPP Print ing
Introduction
IPP ( Inte rne t Pri nti ng Protoco l) Pri nti ng pro vides a
conve nient wa y of remote printing ser vice b y TCP/IP. The
print ser ver ca n s upport IPP printing b y defa ult. It is
needless to do any setting. Any PC that can s upport IPP
printi ng, for e xa mple Windows 2000/XP, ca n directly uses
the print ser ve r b y IP. By using the IPP pri nti ng, you ca n
share the pri nte r to all the PC’s tha t ca n access the p rint
server b y IP . Yo u ca n e ve n sha re yo ur printer to Inter net
users .
74
9.2
System Setup
9.2.1
Pr int Se rver Side
It is needless to do a ny setting on the print ser ve r side.
Make sure the pri nt se r ver has correct IP se tti ngs. If yo u
want to s hare the pri nte rs to Inter net use rs, yo u ha ve to set
a real IP to the print ser ve r. Yo u a lso ha ve to make s ure
tha t a ny ga tewa y, ro ute r or fire wall does not block IPP
protocol if yo u ha ve these gatewa y de vices insta lled in your
network.
9.2.2
Clie nt Side
You o nly need to perfor m Wi ndow’s sta ndard Add New
Printer proced ure .
Step1. Click “Star t” , c hoose “Settings ” a nd se lect “Printers
and Fa xes”.
Step2.
Click “Add a Pri nter ”.
Step3.
The “Add Printer Wizard ” is displa yed. C lick “Ne xt” .
Step4. Select “A network p rinter, or a printer a ttac hed to
another comp uter ”. Click “ Ne xt” .
75
Step5. Selec t “Co nnect to a printer o n the Inter ne t or on a
home o r office network” and e nter the URL of print ser ve r.
The URL forma t is “http ://IP:631/Por t Name” . The IP sho uld
be the pri nt ser ver’s IP . The number 631 is IPP sta ndard
port number . Por t Name is the port name o f pri nt ser ver
tha t yo ur printer is connec ted to . The defa ult port na me is
“lpt1” . One e xamp le of the URL is
http://192.168.3 .66:631/lpt1. Afte r e nteri ng the URL o f pri nt
server , c lick “ Ne xt” .
Step6. Select a s uitable p rinter manufacture r a nd the
printer model a nd c lick “Ne xt” . If yo ur pri nter is not i n the
list, c lick “ Ha ve Disk…” to ins tall the dri ver o f the printer .
After i nsta llatio n, the p rinter model will be added to the list.
76
Step7. Choose to set the p rint whe ther as a defa ult printer
or not. Click “ Ne xt” .
Step8. Yo u ha ve added the ne twork printer to the PC
successfully. The i nfor mation of the pri nte r is displa yed i n
the wi ndows. Click “Fi nish” .
77
10.
W i n d o w s X P S P 2 Se t u p
In Windo ws XP SP2, XP SP2’s firewall wo uld block the
unk nown co mm unications . This print ser ve r has a llo wed the
communicatio ns data passed thro ug h the XP SP2’s firewall.
In case tha t yo u do not find any pri nt se r ver listed o n the
“Available Ports” in “ Network Por ts Quick Setup” , p lease
follo w the steps belo w.
Step1. Click “Star t” , c hoose “Settings ” a nd se lect
“Network Co nnections ”.
Step2. Rig ht c lick “Loca l Area Co nnec tion” a nd se lect
“Properties”.
Step3.
Select “Adva nced” tab a nd click “Se ttings… ”.
78
Step4. Selec t “E xceptio ns” tab a nd c lick “Add Program… ”.
79
Step5.
Click “Browse ” to add a ne w prog ram.
Step6. Ope n the “ NPUti l” file from “C:\Prog ram
Files\PrintSer ver Utilities” ( where C:\ is the s yste m dri ve) .
Step7. A new program “Ne two rk Ports Quick Setup” is
displayed i n the list, c lick “Ok ”.
80
Step8. Click “Ok ”. Yo u have comple ted the setti ng. The
Windows XP SP2 will a llow the i ncoming ne two rk
connections acti vated b y the p rogram.
81