1
Reviewer’s Guide
Copyright 2005 Corel Corporation. All rights reserved.
CorelDRAW® Graphics Suite X3 Reviewer's Guide
Protected by U.S. Patents 5652880; 5347620; 5767860; 6195100; 6385336; 6552725; 6657739; 6731309;
6825859; 6633305; Patents Pending.
Product specifications, pricing, packaging, technical support and information ("specifications") refer to
the retail English version only. The specifications for all other versions (including other language
versions) may vary.
INFORMATION IS PROVIDED BY COREL ON AN "AS IS" BASIS, WITHOUT ANY OTHER WARRANTIES OR
CONDITIONS, EXPRESS OR IMPLIED, INCLUDING, BUT NOT LIMITED TO, WARRANTIES OF
MERCHANTABLE QUALITY, SATISFACTORY QUALITY, MERCHANTABILITY OR FITNESS FOR A PARTICULAR
PURPOSE, OR THOSE ARISING BY LAW, STATUTE, USAGE OF TRADE, COURSE OF DEALING OR
OTHERWISE. THE ENTIRE RISK AS TO THE RESULTS OF THE INFORMATION PROVIDED OR ITS USE IS
ASSUMED BY YOU. COREL SHALL HAVE NO LIABILITY TO YOU OR ANY OTHER PERSON OR ENTITY FOR
ANY INDIRECT, INCIDENTAL, SPECIAL, OR CONSEQUENTIAL DAMAGES WHATSOEVER, INCLUDING, BUT
NOT LIMITED TO, LOSS OF REVENUE OR PROFIT, LOST OR DAMAGED DATA OR OTHER COMMERCIAL OR
ECONOMIC LOSS, EVEN IF COREL HAS BEEN ADVISED OF THE POSSIBILITY OF SUCH DAMAGES, OR THEY
ARE FORESEEABLE. COREL IS ALSO NOT LIABLE FOR ANY CLAIMS MADE BY ANY THIRD PARTY. COREL'S
MAXIMUM AGGREGATE LIABILITY TO YOU SHALL NOT EXCEED THE COSTS PAID BY YOU TO PURCHASE
THE MATERIALS. SOME STATES/COUNTRIES DO NOT ALLOW EXCLUSIONS OR LIMITATIONS OF LIABILITY
FOR CONSEQUENTIAL OR INCIDENTAL DAMAGES, SO THE ABOVE LIMITATIONS MAY NOT APPLY TO
YOU.
Corel, the Corel logo, CorelDRAW, Corel PHOTO-PAINT, Corel CAPTURE, DESIGNER, Paint Shop, Paint
Shop Pro, and Painter are trademarks or registered trademarks of Corel Corporation and/or its
subsidiaries in Canada, the U.S., and/or other countries.
Adobe, Illustrator, Photoshop, and PostScript are registered trademarks of Adobe Systems Incorporated
in the United States and/or other countries. Microsoft and Windows are registered trademarks of
Microsoft Corporation in the United States and/or other countries. PANTONE® is the property of
Pantone, Inc. Pentium is a registered trademark of Intel Corporation or its subsidiaries in the United
States and other countries. Pixmantec, the Pixmantec logo, and RawShooter are trademarks of
Pixmantec ApS. in Denmark and/or other countries.
Table of Contents
1 | Introducing CorelDRAW Graphics Suite X3 ....................1
More than 20 Years of Innovation...................................................................... 1
Putting the Customer First .................................................................................. 1
2 | CorelDRAW Graphics Suite X3 Customer Profiles..........3
Design Professionals ............................................................................................ 3
Occasional Business Users .................................................................................... 3
Teachers and Students ......................................................................................... 3
3 | What’s Included with CorelDRAW Graphics Suite X3? ..5
Main Applications................................................................................................ 5
Supporting Applications...................................................................................... 5
Content................................................................................................................. 5
Documentation .................................................................................................... 6
Training................................................................................................................. 6
Minimum System Requirements ......................................................................... 6
4 | Top New Features for Design Professionals...................7
Illustrate — It’s about Productivity ..................................................................... 7
Trace — It’s about Accuracy............................................................................... 12
Photo Editing — It’s about Efficiency ............................................................... 13
Layout — It’s about Quality Results .................................................................. 18
Compatibility — It’s about Seamless Workflow ............................................... 21
5 | Top New Features for Occasional Business Users ........23
Ease of Use ......................................................................................................... 23
Create Professional Results ............................................................................... 24
Compatibility...................................................................................................... 29
6 | Summary of New and Enhanced Features ...................31
1
Introducing CorelDRAW® Graphics Suite X3
More than 20 Years of Innovation
In 1985, Corel was founded on the promise of CorelDRAW®. Back then, a
small development team building desktop-publishing solutions realized that
there should be a better way to create graphics with a computer. Their
eureka moment became CorelDRAW, a startlingly original application that
set a new standard for graphics software.
Now, more than 20 years later, and based on unprecedented input from our
customers, Corel proudly unveils CorelDRAW Graphics Suite X3. This
significant update includes more than 40 new and enhanced features that
directly benefit the workflows of design professionals and occasional
business users. Whether they’re creating company logos or working toward
demanding production schedules, users can transform ideas into professional
results with the help of this integrated suite of applications.
Putting the Customer First
Throughout the development cycle for CorelDRAW Graphics Suite X3, Corel
consulted with its customers to better understand their needs and concerns.
To gain fresh insights into customers’ use of the suite, Corel employees
observed as users worked on various projects. As a result, the design process
has been simplified to save time for customers in their day-to-day work.
Application stability, speed, and ease of use were top priorities during the
development process, resulting in dramatically improved performance.
Support for transparency and spot colors has undergone a major revision,
resulting in significant improvements. In addition, compatibility with other
industry-standard software and formats, such as Adobe® Illustrator®,
Portable Document Format (PDF), PhotoShop®, Corel® Paint Shop Pro®, and
Microsoft® Office, is second to none. This ensures that users can collaborate
and exchange files with confidence.
Text handling has been significantly enhanced with the addition of the new
Character and Paragraph Formatting dockers. Now, all of the controls are just
a mouse click away. To ease the challenge of repurposing low-quality bitmap
Reviewer’s Guide [ 1 ]
images, the new Corel® PowerTRACE has been added. This makes bitmap-tovector conversion quick and easy. In addition, the new, integrated Image
Adjustment Lab simplifies the process of correcting image color and tone —
with professional results.
CorelDRAW Graphics Suite X3 also introduces several new tools that help
design professionals and occasional business users achieve their intended
result faster. The new Star, Complex Star, Crop, and Smart Fill tools are sure to
save users valuable time. In addition, the enhanced interactive Fit Text to
Path tool makes it simple to add text along a curved path — a dream come
true for design professionals who frequently create logos.
Corel PHOTO-PAINT® X3 provides increased support for spot color channels
to make it easier to work with multichannel and multicolor images. Built on
the power of Corel® KnockOut, the enhanced Cutout Lab makes the process
of cutting out image areas easier than ever before. When applying photo
effects, users benefit from the increased application performance that
provides faster real-time results. In addition, the new CorelDRAW®
Handbook – Insights from the Experts features artwork, helpful advice, and
design techniques from professional designers in advertising, printing, signmaking, engraving, and other industries.
CorelDRAW Graphics Suite X3 simplifies the design process for projects of any
scale, from logo creation and Web graphics to multipage marketing
brochures and eye-catching signs. With powerful bitmap-to-vector tracing,
helpful new learning tools, and enhanced illustration, page layout, and
photo editing features, CorelDRAW Graphics Suite X3 delivers a combination
of superior design capabilities, speed, ease of use, and affordability that's
unmatched in the graphics software industry.
[ 2 ] Reviewer’s Guide
2
CorelDRAW® Graphics Suite X3 Customer Profiles
Design Professionals
Design professionals in the advertising and printing industries spend much of
their time creating and editing graphics, working with text, and retouching
photos. These users frequently work on layout and design projects, such as
creating logos and multipage brochures.
Other design professionals focus primarily on sign making, screen printing,
and engraving, and they may also work on other projects. These productionoriented professionals spend most of their time repurposing and combining
content, such as graphic designs, scanned logs, clipart images, and fonts. They
pay particular attention to output preparation and optimization of designs.
Occasional Business Users
Entrepreneurs are often interested in creating marketing materials in-house.
Self-taught in graphic arts, they spend most of their time modifying existing
designs for reuse, retouching photos and creating ads, flyers, and other
marketing collateral. Small businesses may print their work on a desktop
printer or send it to a commercial printer.
Business users in medium to large enterprises also value this comprehensive
graphics suite, which enables them to work with more than 100 file formats
and create professional, graphically rich projects — from sales presentations
to Web graphics.
Teachers and Students
Teachers and students at school or at home are looking for creative ways to
deliver projects and reports. They use CorelDRAW for school projects and
activities, to create special event calendars and training courseware, and to
publish newsletters.
Reviewer’s Guide [ 3 ]
3
What’s Included with CorelDRAW® Graphics Suite X3?
Main Applications
•
CorelDRAW® X3: CorelDRAW X3 is an intuitive graphic design and page
layout application that meets the demands of today’s busy design
professionals and occasional business users. It delivers results fast,
whether users are creating a company logo or working toward
demanding production schedules.
•
Corel PHOTO-PAINT® X3: Corel PHOTO-PAINT X3 is a professional
image-editing application that lets users quickly and easily retouch and
enhance photos. It is specifically designed for use as part of a graphic
workflow.
Supporting Applications
•
NEW! Corel® PowerTRACE X3: Professional designers often receive
poor-quality bitmap images from clients and face the challenge of
turning these into high-quality vector images for business cards,
brochures, promotional items, or signs. The new Corel PowerTRACE solves
this problem by letting users quickly and accurately convert bitmaps into
editable vector graphics.
•
Corel CAPTURE™ X3: Corel CAPTURE™ X3 is a one-click screen capture
utility that lets users capture images from their computer screen.
•
NEW! Pixmantec® RawShooter™ essentials: This raw workflow tool
provides the highest-quality output and fastest conversion time of any
raw converter on the market today. It gives designers and business users
excellent results with minimum effort.
Content
•
More than 10,000 clipart and digital images individually selected to meet
the needs of design professionals and business users
•
1,000 OpenType fonts, plus 35 Windows® Glyph List 4 (WGL4) fonts
•
NEW! 100 creative templates included free of charge
Reviewer’s Guide [ 5 ]
Documentation
•
User Guide
•
New! CorelDRAW® Handbook – Insight from the Experts: This new
book provides insights from CorelDRAW experts and showcases practical,
real-world examples of accomplished designs. By deconstructing designs
and sharing their wisdom and best practices, experts from a variety of
industries demonstrate the power of CorelDRAW Graphics Suite X3.
•
Digital Content Guide
•
Quick Reference Card
•
Help files
Training
•
Training videos by lynda.com included on CD
Minimum System Requirements
•
Windows® 2000 with latest SP, Windows XP Tablet PC, Windows XP with
latest SP, Windows XP Home, Windows XP Professional, Windows XP
Media Edition, or Windows XP 64-bit version
•
256 MB of RAM, 200 MB of hard disk space
•
Pentium® III, 600MHz processor
•
1,024 × 768 or better monitor resolution
•
CD-ROM
•
Mouse or tablet
[ 6 ] Reviewer’s Guide
4
Top New Features for Design Professionals
CorelDRAW Graphics Suite X3 provides more than 40 new and enhanced
features that benefit the workflow of design professionals, whether they
work in advertising, printing, sign-making, engraving, or manufacturing.
Illustrate — It’s about Productivity
Professional designers often work toward demanding production schedules,
sometimes for multiple projects simultaneously. They need intuitive tools that
give them expected results the first time. With CorelDRAW Graphics Suite X3,
designers can take advantage of new tools and features that increase their
productivity without compromising on their creativity and flexibility.
New! Star tool: With CorelDRAW X3, the new Star tool lets users quickly
and easily draw perfect stars.
New! Complex Star tool: In industries such as advertising, sign-making,
engraving, and trophies and awards, stars are a common design effect. The
new Complex Star tool makes it easy for CorelDRAW X3 users to create
complex stars that have intersecting sides and produce unique results with an
applied fill. Users can also specify the number of points and can sharpen the
points of a complex star.
Give it a try
Using the Complex Star tool
•
Open the Object
flyout, click the Complex Star
tool,
and drag in the drawing window until the star is the size you want.
To draw a star from its center, hold down Shift as you drag.
To draw a symmetrical star, hold down Ctrl as you drag.
New! Smart Fill tool: The unique, new Smart Fill tool lets CorelDRAW X3
users apply a fill to any enclosed area by creating a new object from an
enclosed area. Unlike conventional fill tools that fill only objects, the Smart
Fill tool detects the edges of an area and creates a closed path so that the
Reviewer’s Guide [ 7 ]
area can be filled. For example, the Smart Fill tool can fill the loops of a
freehand line that crosses over itself. The Smart Fill tool creates a path
around the area, so the filled object can be moved, copied, or edited.
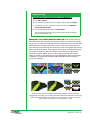
The Smart Fill tool was used on a freehand sketch (left) to color the objects (center),
and to color the entire sketch (right).
Give it a try
Using the Smart Fill tool
1 Click the Freehand
2 Open the Smart tools
tool, and draw some concentric circles.
flyout, and click the Smart Fill
tool.
3 On the property bar, choose one of the following options from the Fill
Options list box:
• Use default — lets you fill the area with the default Fill tool setting
• Specify — lets you fill the area by choosing a solid color from the
Fill Color color picker on the property bar
• No fill — applies no fill to the area
4 From the Outline Options list box, choose one of the following
options:
• Use default — lets you apply the default outline setting
• Specify — lets you choose a line width and line color
• No outline — applies no outline to the area
5 Click inside the enclosed area that you want to fill.
A new object is created from the enclosed area, and the current fill
and outline styles are applied to it. The new object appears on top of
the existing objects in the layer.
New! Bevel effect: Bevels are often used in the creative design and signmaking industries to outline and emphasize designs. CorelDRAW X3
dramatically reduces the amount of time required to apply bevel effects to
graphic or text objects. The new Bevel effect docker gives users quick access
to Bevel styles and to controls that determine the effect’s intensity.
[ 8 ] Reviewer’s Guide
Original text (top), the Emboss effect (middle), and the Bevel effect (bottom).
Give it a try
Using the Bevel docker
1 Click the Text
type.
tool, click anywhere in the drawing window, and
2 Select the text, and click a green color swatch on the on-screen color
palette.
3 Click Window ` Dockers ` Bevel.
4 On the Bevel docker, choose Shaded from the Style list box.
5 In the Bevel offset area, enable the To Center option.
6 From the Shadow Color list box, choose a color.
7 In the Light Controls area, choose a color from the Light Color list
box.
8 Click Apply.
You can further control the result by adjusting the Intensity,
Direction, and Altitude sliders.
New! Crop tool: A significant time-saver, the new Crop tool quickly lets
users remove unwanted areas in objects and imported graphics — both
bitmap and vector. This handy addition to the CorelDRAW X3 toolbox
eliminates the need to ungroup objects, break linked groups apart, or
convert objects to curves.
The new Crop tool was used to crop separate objects in one step.
Reviewer’s Guide [ 9 ]
Enhanced! Interactive Contour tool: With the enhanced Interactive
Contour tool, users can quickly and easily contour objects with optimal curve
results.
Enhanced! Optimize nodes in existing objects: CorelDRAW X3
provides convenient, new options on the property bar for optimizing the
nodes of currently selected objects. Professional designers often encounter
vectorized images and other content containing curves with extra nodes. The
extra nodes can sometimes number in the thousands. The new Reduce Nodes
button and the enhanced Curve Smoothness slider make it easy to optimize
object nodes without changing the shape of the curve, saving considerable
time. The Reduce Nodes button automatically removes the most nodes
possible, and the Curve Smoothness slider lets designers manually remove
nodes while seeing the trade-off between the original curve shape and the
reduced node count.
Enhanced! Spot color support: With CorelDRAW X3, spot color support
has been improved so that effects, such as drop shadow, transparency, and
mesh and fountain fills, now support spot colors. The application’s import
and export filters also provide improved spot color support for Adobe
Illustrator (AI), PDF, encapsulated PostScript® (EPS), and PhotoShop (PSD)
files. In addition, spot color effects are now preserved when files are sent to a
printer that supports spot colors, or exported to PDF, EPS, PSD, and AI.
Enhanced! Shaping curve objects: Users can now shape curve objects
much more easily. The newly designed control handles help users quickly
select and edit nodes. In addition, the new Selection Mode list box lets users
choose either the traditional square marquee or a freehand marquee to
select nodes.
Give it a try
Shaping curve objects
1 Open an image that contains curve objects.
2 Open the Shape edit
then click a curve object.
flyout, click the Shape
tool, and
3 On the property bar, choose one of the following from the Shape
Tool Selection Mode list box:
• Rectangular
• Freehand
4 Drag around the nodes you want to select.
5 Drag any node to reshape the object.
Enhanced! Changing the order of objects: Users can easily change
the stacking order of objects on a layer or a page. For this release, the new
Front of Page and Back of Page commands have been added. These
[ 10 ] Reviewer’s Guide
commands work across layers, making it simple to position objects precisely in
the stacking order and reducing the need to use the Object Manager docker.
Give it a try
Changing the order of objects
1 Select an object.
2 Click Arrange ` Order, and click one of the following:
• To front of page — moves the selected object in front of all other
objects on the page
• To back of page — moves the selected object behind all other
objects on the page
• To front of layer — moves the selected object in front of all other
objects on the active layer
• To back of layer — moves the selected object behind all other
objects on the active layer
• Forward one — moves the selected object forward one position
• Back one — moves the selected object back one position
• In front of — moves the selected object in front of the object that
you click in the drawing window
• Behind — moves the selected object behind the object that you
click in the drawing window
New! Create Boundary command: The new Create Boundary command
instantly creates a boundary around selected objects in CorelDRAW X3.
Particularly useful for sign-making or engraving, the boundary can be used
for various purposes, such as keylines, cut lines, or outlines around groups of
selected objects.
Enhanced! Miter limit per object: Miter limit determines at which
angle a pointed corner becomes a blunt end. If there were only a 0.5-degree
separation between two corner lines, the outermost point could extend
halfway across the page. For increased flexibility, professional designers can
now set miter limit per object, which also means that text and graphics can
have different settings for miter limit.
New! Step and Repeat docker: With the new Step and Repeat docker,
CorelDRAW X3 users can more easily and precisely create a series of objects.
This new docker lets users quickly set horizontal and vertical offset
preferences when repeating objects. These offset preferences determine
where objects created by repeating steps are placed.
Enhanced! Duplicate Offset control: With CorelDRAW X3, the new
Duplicate Offset dialog box makes it easy for users to control the placement
of duplicate objects. The first time they use the Duplicate command (Ctrl + D),
users can set Horizontal and Vertical Offset distances for duplicate objects.
New! Fillet / Scallop / Chamfer: Users can now easily shape curve
objects by using the new Fillet / Scallop / Chamfer docker. Filleting produces a
rounded corner; scalloping rounds and inverts the corner to create a notch;
and chamfering bevels the corner so that it appears flat.
Reviewer’s Guide [ 11 ]
Enhanced! Clone command: The Clone command has been added to
the Edit menu, allowing users to access it more quickly. A clone is a copy of an
object, or image area, that is linked to a master object or image area.
Changes made to the master object are automatically applied to its clones.
Trace — It’s about Accuracy
CorelDRAW Graphics Suite X3 provides a more streamlined, integrated
tracing solution that delivers accurate and optimized bitmap-to-vector
tracing results.
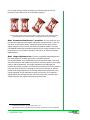
New! Corel® PowerTRACE: Integrated with CorelDRAW X3, the new
Corel PowerTRACE allows users to quickly and easily convert bitmaps into
editable vector graphics. Design professionals typically face the challenge of
turning bitmap images into high-quality vector images to create logos for
business cards, brochures, signs, and promotional items. For control and
flexibility, Corel PowerTRACE generates a color palette enabling users to
easily pick which colors appear in the traced result and quickly convert them
to the appropriate color mode, including spot colors. Users can also choose
from several preset tracing styles, color modes, and background options.
With three different preview modes — Before and After, Large Preview, and
Wireframe Overlay — Corel PowerTRACE makes it easy to analyze the result
and adjust the settings used to trace your image.
Use Corel PowerTRACE to vectorize low-resolution logos.
Give it a try
Using the Trace Lab
1 Click File ` Import.
2 In the Import dialog box, select a bitmap, click Import, and then click
where you want to place the image.
3 Click Bitmaps ` Trace Bitmap, and choose one of the following:
• Line art — to trace black-and-white sketches and illustrations
• Logo — to trace simple logos with little detail and few colors
• Detailed logo — to trace logos with fine detail and many colors
• Clipart — to trace ready-to-use graphics of varied detail and colors
• Low quality image — to trace photos that lack fine detail
• High quality image — to trace photos in which detail is important
[ 12 ] Reviewer’s Guide
Give it a try
4 In the Trace dialog box, adjust either of the following sliders in the
Trace Control area:
• Smoothing — to smooth curved lines and control the number of
nodes in the traced result
• Detail — to control preservation of original detail
5 To adjust the colors of the traced result, click the Colors tab, click a
color swatch, and then click Edit. Use the Select Color dialog box to
pick a new color, and click OK.
6 To change the color mode, choose a new color mode from the Color
Mode list box.
For example, you can easily change a trace automation to US
PANTONE, or choose CMYK colors to create a vector trace more
suitable for screen or offset printing.
7 To specify the number of colors used, type a value in the Number of
colors list box.
For example, to easily eliminate slight color variations and lessen the
cost of printing, you can reduce the number of spot colors to three.
8 Experiment with the available preview modes, and when you are
satisfied with the traced result, click OK.
Merge different colors into the same color by selecting the colors
and clicking Merge or Edit.
Photo Editing — It’s about Efficiency
Feedback about our customers’ workflow revealed a need for more efficient,
intuitive, and accurate photo editing. Often, design professionals were using
multiple tools to edit photos, which presented compatibility challenges. They
were also spending considerable time working with advanced effects and
correction features, which affected the timelines for their project
deliverables. To that end, CorelDRAW Graphics Suite X3 provides enhanced
performance and several intuitive features that increase efficiency at every
stage of the workflow.
Enhanced! Corel PHOTO-PAINT® performance: Corel PHOTO-PAINT
X3 is now significantly faster when working with large images and applying
photo effects, resulting in better real-time feedback and improving overall
workflow efficiency. Improved object handling gives designers more precise
control in rotating, skewing, or distorting objects. For large images, improved
Reviewer’s Guide [ 13 ]
use of image cache provides significantly increased response time for
previewing most effects and for manipulating objects.
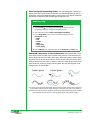
Left to right: original object with handles; original object with rotate handles;
rotated object with rotate handles; rotated object with resize handles.
New! Pixmantec® RawShooter™ essentials: This raw workflow tool
provides the highest-quality output and fastest conversion time of any raw
converter on the market today.1 Design professionals can easily convert
digital images in raw format to edit with Corel PHOTO-PAINT or use with
CorelDRAW. RawShooter essentials supports the raw image formats of many
manufacturers, such as Nikon, Olympus, and Canon, as well as the Adobe
DNG standard.
New! Image Adjustment Lab: The new, integrated Image Adjustment
Lab saves designers valuable time and is accessible from both
Corel PHOTO-PAINT and CorelDRAW. Design professionals often work with
files that have poor color balance and contrast, and they need to use multiple
tools to make adjustments. The Image Adjustment Lab addresses this
problem by uniting a number of manual and automatic controls for common
color and tone corrections, providing an intuitive and fast way to achieve
professional image adjustments. The Image Adjustment Lab also lets users
create snapshots of their adjustments with just one click. The snapshots
appear below the working preview, which lets users easily compare each
snapshot against the original and choose the best result.
1. According to Pixmantec. For more information, visit:
http://www.pixmantec.com/pdf/Competitive_Matrix_RawShooter_essentials_2005.pdf
[ 14 ] Reviewer’s Guide
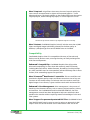
The Image Adjustment Lab provides a before and after preview,
snapshots, and image correction controls.
Give it a try
Using the Image Adjustment Lab in Corel PHOTO-PAINT® X3
1 Click File ` Open.
2 In the Open An Image dialog box, select an image, and click Open.
3 Click Adjust ` Image Adjustment Lab.
4 In the Image Adjustment Lab, adjust one of the following sliders:
• Temperature — to “warm” or “cool” the image’s color to
compensate for different lighting conditions
• Tint — for use after the Temperature slider, to correct color casts by
adjusting the image’s green or magenta
• Saturation — to adjust the vividness of colors
• Brightness — to brighten or darken an entire image
• Contrast — to adjust the tone difference between light and dark
image areas
• Highlights — to adjust the brightness in the lightest image areas
• Shadows — to adjust the brightness in the darkest image areas
• Midtones — to adjust the brightness of midrange image tones
5 When you are satisfied with the result, click OK.
Reviewer’s Guide [ 15 ]
Give it a try
Using the Image Adjustment Lab in CorelDRAW® X3
1 Click File ` Import.
2 In the Import dialog box, select an image to adjust, click Import, and
click where you want to place the image.
3 Click Bitmaps ` Image Adjustment Lab.
4 In the Image Adjustment Lab, click Auto-adjust.
This automatically corrects color and contrast by setting the image’s
white point and black point.
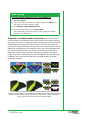
Enhanced! Corel PHOTO-PAINT® Cutout Lab: Built on the power of
Corel KnockOut, the enhanced Cutout Lab includes new controls to simplify
the process of cutting out image areas and to improve accuracy. The new Add
Detail and Remove Detail tools make it easy to refine the cutout area. For
easy reference when defining the cutout area, users can preview their cutout
against the original image, or transparent, white, gray, or black backgrounds.
For maximum flexibility, users can choose to save the cutout object and
discard the original image, save the cutout object and keep the original
image, or save the cutout object as a clip mask added to the original image.
In addition, the Cutout Lab includes Undo and Redo buttons to quickly
correct any mistakes.
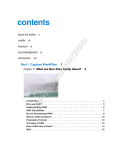
Original image (top left); highlight and fill (top middle); preview of different
backgrounds (top right); cutout refined with the Add Detail and Remove Detail tools
(bottom left and middle); and comparison of cutout results – Cutout and original
image, Cutout, and Cutout as clip mask (bottom right).
[ 16 ] Reviewer’s Guide
Give it a try
Using the Cutout Lab
1 Start Corel PHOTO-PAINT X3, and open an image.
2 Click Image ` Cutout Lab.
3 In the Cutout Lab dialog box, click the Highlighter
tool.
4 In the preview window, draw a line along the edges of the image area
that you want to cut out.
5 Click the Inside Fill
out.
tool, and click inside the area you want to cut
6 Click Preview.
7 If necessary, use the Add Detail
refine your cutout object.
and Remove Detail
tools to
8 From the Cutout Results area, choose any of the following options:
• Cutout — creates a cutout object and discards the original
• Cutout and original — creates a cutout object and preserves the
original
• Cutout as clip mask — creates a clip mask attached to original
9 When you are satisfied with the result, click OK.
New! Spot color channels: Corel PHOTO-PAINT X3 now lets users create
and modify images that contain spot colors. This is particularly useful for twocolor images, multi-channel spot color images, and images for printing that
require a gloss layer over areas of the image.
Give it a try
Creating a new spot color channel
1 In Corel PHOTO-PAINT X3, click Window ` Dockers ` Channels.
2 On the Channels docker, click the Flyout arrow
Spot Color Channel from the menu.
, and choose New
3 In the New Spot Color Channel dialog box, select a color from the
Color list box.
4 In the Ink Properties area, choose one of the following options from
the list box:
• Solid
• Transparent
5 Click OK.
The new channel appears in the image and is listed in the Channels
docker.
6 Paint on the new channel with the Paint
tool.
Reviewer’s Guide [ 17 ]
Enhanced! Brush size and shape controls: Corel PHOTO-PAINT X3
now provides controls on the property bar that make it quick and easy for
users to adjust brush size and shape. Users can quickly choose from many
squared, rounded, and patterned nib shapes.
Layout — It’s about Quality Results
When designing logos, multipage brochures, signs, and posters, text is often
a critical design element. CorelDRAW Graphics Suite X3 provides considerable
enhancements to text formatting that give professional designers better
layout capabilities, increased control, and more flexibility.
Enhanced! Text handling: CorelDRAW X3 provides significant
improvements to text handling that make it easier for users to select, edit,
and format text. New controls have been added for alignment, drop caps,
tabs, bullets, and columns. For more flexibility and accuracy in design, users
can now specify text size in inches and create hyperlinks for specific
characters. In addition, the application works better with text from other
sources.
New! Visually control the flow of text: When working with text,
professional designers need to control text flow to achieve their desired look
and feel. With CorelDRAW X3, the Text menu includes the new Insert
Formatting Code menu that lets users insert specialized characters to help
better control text flow. Users can choose from em dash, em space, en dash,
en space, 1/4 em space, optional hyphen, non-breaking hyphen, nonbreaking space, and column/frame break. In addition, users can create custom
optional hyphens.
Enhanced! Font matching: CorelDRAW Graphics Suite X3 gives
designers improved font matching and more options when they work with
files that use fonts not installed on their system. In such cases, both
CorelDRAW and Corel PHOTO-PAINT now offer more accurate suggestions
for replacement fonts. In addition, users can choose to save their work with
the replacement font or with the original font.
Enhanced! Font selection: An element used in virtually all designs, text
helps to tie graphics to a message. To save time for designers when choosing
fonts, the Font list now includes a preview of each available font type.
New! Character Formatting docker: With CorelDRAW X3 and
Corel PHOTO-PAINT X3, the new Character Formatting docker makes
formatting artistic and paragraph text easier than ever before. This
convenient new docker includes easy-to-use controls for adjusting kerning,
changing the angle of selected characters, and applying character effects,
such as Underline, Strike-Through, Uppercase.
[ 18 ] Reviewer’s Guide
Give it a try
Using the Character Formatting docker
1 Click the Text
type.
tool, click anywhere in the drawing window, and
2 With the text selected, click Text ` Character Formatting.
3 To change the font type, choose a font from the Font list.
4 To adjust the kerning, type a value in the Range Kerning box.
5 Click the down arrow beside Character Effects, and choose one of
the following options from the Underline list box:
• Single Thin
• Single Thin Word
• Single Thick
• Single Thick Word
• Double Thin
• Double Thin Word
• Double Thick
• Double Thick Word
New! Paragraph Formatting docker: The new Paragraph Formatting
docker gives users quick access to common formatting settings for paragraph
text, such as alignment, word and paragraph spacing, and indents. This
simplifies the process of adjusting the paragraph text formatting.
Give it a try
Using the Paragraph Formatting docker
1 Click the Text
tool, drag in the drawing window to size the
paragraph text frame, and type a paragraph or two.
2 Select the text, and click Text ` Paragraph Formatting.
3 In the Alignment area, choose one of the following from the
Horizontal list box:
• None
• Left
• Center
• Right
• Full justify
• Force justify
4 In the Indents area, adjust the value in the First Line and Left boxes.
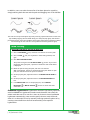
Enhanced! Interactive Fit Text to Path tool: With CorelDRAW X3, it’s
never been easier to attach text to a path with precision — a common effect
used in creating signs and logos. The interactive Fit Text to Path tool lets users
simply select text, move the pointer along a path, and click to set the text’s
position. Users can also easily control the text’s offset distance from the path.
Reviewer’s Guide [ 19 ]
In addition, users can scale the text after it has been placed on a path by
simply selecting both the text and the path and dragging one of the handles.
Text and curve as separate objects (top left); choosing a path with Fit Text to Path tool
(top middle); aligning the text while fitting it to the path (top right); text fitted to
path (bottom left); interactive feedback while setting offset distance (bottom middle);
and stretching the text and the curve by 200% horizontally (bottom right).
Give it a try
Using the interactive Fit Text to Path tool
1 Click the Freehand
2 Click the Text
type.
tool, and draw a curved line to use as a path.
tool, click anywhere in the drawing window, and
3 Click Text ` Fit Text To Path.
The pointer changes to the Fit Text to Path
pointer. As you move
the pointer along the path, a preview of where the text will be fitted
is displayed.
4 Move the pointer along the path, and click to fit the text.
With a closed path, the text is centered along the path. With an open
path, the text flows from the point of insertion.
5 On the property bar, adjust the value in the Distance From Path list
box.
6 On the property bar, adjust the value in the Horizontal Offset list
box.
7 In the Mirror Text area on the property bar, use the Mirror
Horizontal
orientation.
or Mirror Vertical
buttons to choose the text’s
Enhanced! Hyphenation: Hyphenation has been significantly improved
with CorelDRAW X3. Hyphenation breaks words between lines when the
whole word does not fit on one line. Users can choose to have CorelDRAW
hyphenate automatically. Users can also specify where a word will break
when it is at the end of a line by manually inserting optional hyphens or by
creating custom definitions that will automatically insert optional
hyphenation.
[ 20 ] Reviewer’s Guide
New! Preview overprints: With CorelDRAW X3, the new Enhanced With
Overprints viewing mode simulates the color of areas where overlapping
objects were set to overprint. This helps users to output projects for printing
with confidence.
Cyan, magenta, and yellow overlapping circles (left); the same circles with the
Enhanced with Overprints viewing mode activated (right).
Give it a try
Viewing overprints
1 Click View ` Enhanced with Overprints.
2 Click the Ellipse
window.
tool, and draw a circle anywhere in the drawing
3 Press Ctrl + D to duplicate the circle.
4 In the Duplicate Offset dialog box, adjust the value in the Horizontal
and Vertical list boxes to 0.5.
This lets you control the distance between the original object and the
duplicate.
5 Press Ctrl + D again to create a third circle.
6 Select the first circle, and click the Cyan color swatch on the on-screen
color palette.
7 Select the second circle, click the Yellow color swatch on the on-screen
color palette, and then click Edit ` Overprint Fill.
8 Select the third circle, and click the Red color swatch on the on-screen
color palette, and then click Edit ` Overprint Fill.
Compatibility — It’s about Seamless Workflow
Professional designers rely on the ability to seamlessly exchange files
between their various software tools, and with colleagues and clients.
CorelDRAW Graphics Suite X3 gives users several new and enhanced features
that ensure that they can easily exchange files without missing a beat.
Enhanced! Compatibility: CorelDRAW Graphics Suite X3 provides
enhanced compatibility for more than 100 commonly used file formats,
including Adobe Illustrator, Photocells, Corel Paint Shop Pro, Microsoft Office,
JPEG, and PDF. Users can now seamlessly edit and exchange files in those
Reviewer’s Guide [ 21 ]
formats. Outstanding support for spot colors has been added for Adobe
Illustrator, PhotoShop, and PDF.
Enhanced! Color Management: Color management has been enhanced
so that users can now control whether the color mode used for effects is RGB
or CMYK. In addition, support for CMYK compositing color space has been
added. When proper device profiles are used, this results in more accurate
matching between the on-screen display and printed output of CMYK colors.
This is particularly beneficial for designs that use transparencies and drop
shadows.
New! Support for password-protected PDF files: CorelDRAW and
Corel PHOTO-PAINT now let users set security options to protect their PDF
output. This lets users control whether, and to what extent, a PDF file can be
accessed, edited, and reproduced. In addition, users can set a password that
lets them control who can access a PDF file.
Enhanced! Publish To PDF: Corel continues to help professional
designers ensure that their designs are portable with updated Publish To PDF
functionality. New enhancements include full transparency and spot color
support. In addition, users can now convert text in their designs to curves in
the resultant PDF file.
Enhanced! EPS filter selection: CorelDRAW X3 includes a new dialog
box that offers users more intuitive options when importing EPS files.
Designers can choose to set the position of the EPS file in their design, or they
can convert the EPS file into editable objects.
Enhanced! PANTONE® color palette: The PANTONE spot color palette
now includes Transparent White to give users more color options for their
designs. In addition, the CMYK equivalents of many PANTONE spot colors
have been updated according to the latest PANTONE libraries.
Enhanced! Printing: Printing has been enhanced so that transparencies
and spot colors output flawlessly. Whether it’s composite or separated
output, users can trust CorelDRAW Graphics Suite X3 to do it right.
[ 22 ] Reviewer’s Guide
5
Top New Features for Occasional Business Users
Powerful and easy to use, CorelDRAW Graphics Suite X3 provides many new
and enhanced features to help occasional business users achieve professional
results when producing marketing collateral, flyers, newsletters, brochures,
Web graphics, and other projects.
Ease of Use
CorelDRAW Graphics Suite X3 includes many new features that simplify the
creation of professional-looking marketing and sales materials.
New! Hints docker: The new Hints docker provides both CorelDRAW and
Corel PHOTO-PAINT users with context-sensitive information on the currently
selected tool. The Hints docker makes it easier for users to learn to use the
tools in the toolbox. When users select a tool, the Hints docker dynamically
displays relevant information for that tool. When applicable, the Hints docker
includes links to additional topics related to the tool. The Hints docker
appears by default and features a home page with links to generic topics. For
quick reference, users can easily navigate the Hints docker by using the
Forward, Back, and Home buttons.
The new Hints docker
New! Highlight What’s New command: Users now have a simple way
to identify the features added between versions. From the Help menu, the
Highlight What’s New command lets users highlight new tools and features
from different versions of CorelDRAW or Corel PHOTO-PAINT. For example,
users can highlight the features added since versions 9, 10, 11, or 12.
Reviewer’s Guide [ 23 ]
New! CorelDRAW® Design Collection: The CorelDRAW Design
Collection provides 100 creatively varied templates that are easily customized
to suit specific needs. For business users, particularly small business owners
that prefer to create marketing and sales materials in-house, these templates
offer an easy way to carry a creative theme over multiple projects, such as
business cards, brochures, and letterhead.
New! CorelDRAW® Handbook – Insight from the Experts: This new
book provides insights from CorelDRAW experts and showcases practical,
real-world examples of accomplished designs. By deconstructing designs and
sharing their wisdom and best practices, experts from a variety of industries
demonstrate the power of CorelDRAW Graphics Suite X3.
Create Professional Results
With CorelDRAW Graphics Suite X3, it’s never been easier for occasional
business users to transform ideas into professional results.
Enhanced! Image Adjustment Lab: Business users often work with
images that are later incorporated into projects like a brochure or Web site.
These images, often taken with a user’s digital camera, may have poor color
balance and contrast. The new, integrated Image Adjustment Lab lets users
professionally adjust image color and tone with a single click. The Image
Adjustment Lab also lets users create snapshots of various adjustments,
making it easy to compare multiple adjustments and choose the best result.
The Image Adjustment Lab provides a before and after preview
and image correction controls.
[ 24 ] Reviewer’s Guide
Give it a try
Using the Image Adjustment Lab in CorelDRAW® X3
1 Click File ` Import.
2 In the Import dialog box, select an image to adjust, and click Import.
3 Click where you want to place the image, and then click Bitmaps `
Image Adjustment Lab.
4 In the Image Adjustment Lab, click Auto-adjust.
This automatically corrects color and contrast by setting the image’s
white point and black point.
Enhanced! Corel PHOTO-PAINT® Cutout Lab: Built on the power of
Corel KnockOut, the enhanced Cutout Lab includes new controls to simplify
the process of cutting out image areas and to improve accuracy. The new Add
Detail and Remove Detail tools make it easy to refine the cutout area. For
easy reference when defining the cutout area, users can preview their cutout
against the original image, or transparent, white, gray, or black backgrounds.
For maximum flexibility, users can choose to save the cutout object and
discard the original image, save the cutout object and keep the original
image, or save the cutout object as a clip mask added to the original image.
In addition, the Cutout Lab includes Undo and Redo buttons to quickly
correct any mistakes.
Original image (top left); highlight and fill (top middle); preview of different
backgrounds (top right); cutout refined with the Add Detail and Remove Detail tools
(bottom left and middle); and comparison of cutout results – Cutout and original
image, Cutout, and Cutout as clip mask (bottom right).
Reviewer’s Guide [ 25 ]
Give it a try
Using the Cutout Lab
1 Start Corel PHOTO-PAINT X3, and open an image.
2 Click Image ` Cutout Lab.
3 In the Cutout Lab dialog box, click the Highlighter
tool.
4 In the preview window, draw a line along the edges of the image area
that you want to cut out.
5 Click the Inside Fill
out.
tool, and click inside the area you want to cut
6 Click Preview.
7 If necessary, use the Add Detail
refine your cutout object.
and Remove Detail
tools to
8 From the Cutout Results area, choose any of the following options:
• Cutout — creates a cutout object and discards the original
• Cutout and original — creates a cutout object, preserves original
• Cutout as clip mask — creates a clip mask attached to original
9 When you are satisfied with the result, click OK.
New! Character Formatting docker: With CorelDRAW X3 and Corel
PHOTO-PAINT X3, the new Character Formatting docker makes formatting
artistic and paragraph text easier than ever before. This convenient new
docker includes easy-to-use controls for changing the angle of selected
characters, adjusting kerning, and applying character effects, such as
Underline, Strike-Through, and Uppercase.
Give it a try
Using the Character Formatting docker
1 Click the Text
type.
tool, click anywhere in the drawing window, and
2 With the text selected, click Text ` Character Formatting.
3 To change the font type, choose a font from the Font list.
4 To adjust the kerning, type a value in the Range Kerning box.
5 Click the down arrow beside Character Effects, and choose one of
the following options from the Underline list box:
• Single Thin
• Single Thin Word
• Single Thick
• Single Thick Word
• Double Thin
• Double Thin Word
• Double Thick
• Double Thick Word
[ 26 ] Reviewer’s Guide
New! Paragraph Formatting docker: The new Paragraph Formatting
docker gives users quick access to common text formatting settings, such as
alignment, word and paragraph spacing, and indents. This dockers simplifies
the process of adjusting the formatting of paragraph text.
Give it a try
Using the Paragraph Formatting docker
1 Click the Text
tool, drag in the drawing window to size the
paragraph text frame, and type a paragraph or two.
2 Select the text, and click Text ` Paragraph Formatting.
3 In the Alignment area, choose one of the following from the
Horizontal list box:
• None
• Left
• Center
• Right
• Full justify
• Force justify
4 In the Indents area, adjust the value in the First Line and Left boxes.
Enhanced! Interactive Fit Text to Path tool: With CorelDRAW X3, it’s
never been easier to attach text to a path with precision. The interactive Fit
Text to Path tool lets users simply select text, move their pointer along a path,
and then click to set the text’s position. Users can also easily control the text’s
offset distance from the path. In addition, users can scale the text after it has
been placed on a path by simply selecting both the text and the path, and
dragging one of the handles.
Text and curve as separate objects (top left); choosing a path with Fit Text to Path tool
(top middle); aligning the text while fitting it to the path (top right); text fitted to
path (bottom left); interactive feedback while setting offset distance (bottom middle);
and stretching the text and the curve by 200% horizontally (bottom right).
Reviewer’s Guide [ 27 ]
Give it a try
Using the interactive Fit Text to Path tool
1 Click the Freehand
2 Click the Text
type.
tool, and draw a curved line to use as a path.
tool, click anywhere in the drawing window, and
3 Click Text ` Fit Text To Path.
The pointer changes to the Fit Text to Path
pointer. As you move
the pointer along the path, a preview of where the text will be fitted
is displayed.
4 Move the pointer along the path and click to fit the text.
With a closed path, the text is centered along the path. With an open
path, the text flows from the point of insertion.
5 On the property bar, adjust the value in the Distance From Path list
box.
6 On the property bar, adjust the value in the Horizontal Offset list
box.
7 In the Mirror Text area on the property bar, use the Mirror
Horizontal
orientation.
or Mirror Vertical
buttons to choose the text’s
Enhanced! Changing the order of objects: Users can easily change
the stacking order of objects on a layer or a page by sending objects to the
front or back, or behind or in front, of other objects. It is also simple to
position objects precisely in the stacking order.
Give it a try
Changing the order of objects
1 Select an object.
2 Click Arrange ` Order, and click one of the following:
• To front of page — moves the selected object in front of all other
objects on the page
• To back of page — moves the selected object behind all other
objects on the page
• To front of layer — moves the selected object in front of all other
objects on the active layer
• To back of layer — moves the selected object behind all other
objects on the active layer
• Forward one — moves the selected object forward one position
• Back one — moves the selected object back one position
• In front of — moves the selected object in front of the object that
you click in the drawing window
• Behind — moves the selected object behind the object that you
click in the drawing window
[ 28 ] Reviewer’s Guide
New! Crop tool: A significant time-saver, the new Crop tool quickly lets
users remove unwanted areas in objects and imported graphics — both
bitmap and vector. This handy addition to the toolbox eliminates the need to
ungroup objects, break linked groups apart, or convert objects to curves.
The new Crop tool was used to crop separate objects in one step.
New! Content: CorelDRAW Graphics Suite X3 includes more than 10,000
clipart and digital images individually selected for the best quality. In
addition, 1,000 OpenType fonts and 35 WGL4 fonts are included.
Compatibility
CorelDRAW Graphics Suite X3 is compatible with many of the tools and
devices used by business users, ensuring that they can easily exchange files
with clients and partners.
Enhanced! Compatibility: CorelDRAW Graphics Suite X3 provides
enhanced compatibility for more than 100 commonly used file formats,
including Microsoft Office, Adobe Illustrator, PhotoShop, Corel Paint Shop
Pro, JPEG, and PDF. Users can now seamlessly edit and exchange files in those
formats, with outstanding support for spot colors.
New! Pixmantec® RawShooter™ essentials: This raw workflow tool
provides the highest-quality output and fastest conversion time of any raw
converter on the market today. For business users who need to work with
digital images in raw format, it gives excellent results with minimum effort.
Enhanced! Color Management: Color management is the process of
matching colors between devices, such as scanners, digital cameras, printers,
and monitors. For CorelDRAW X3 and Corel PHOTO-PAINT X3, the color
management controls have been designed to help users achieve the best
possible color matches without requiring extensive knowledge of color and
color systems.
New! Support for password-protected PDF files: CorelDRAW X3 and
Corel PHOTO-PAINT now let users set security options to protect their PDF
output. Users can control whether and to what extent a PDF file can be
Reviewer’s Guide [ 29 ]
accessed, edited, and reproduced. In addition, users can set a password that
lets them control who can access a PDF file.
Enhanced! Publish To PDF: Corel continues to help business users ensure
that their designs are portable with updated Publish To PDF functionality.
New enhancements for CorelDRAW Graphics Suite X3 include full
transparency and spot color support. In addition, users can now convert text
in their designs to curves in the resultant PDF file.
[ 30 ] Reviewer’s Guide
6
Summary of New and Enhanced Features
Illustrate — It’s about Productivity
•
Create perfect five-point stars every time with the new Star tool.
•
Quickly and easily create intricate stars with intersecting sides with the
new Complex Star tool.
•
Use the unique, new Smart Fill tool to apply fills to any enclosed object
area, such as the loops of a freehand line that crosses over itself.
•
Save time and steps when removing unwanted object areas with the new
Crop tool.
•
Create outstanding bevel effects in a fraction of the time with the new
Bevel effect.
•
Specify the distance between duplicate objects with the new Duplicate
Offset dialog box.
•
Experience improved spot color support for effects, such as drop
shadow, transparency, and mesh and fountain fills.
•
Quickly and precisely create a series of objects with the new Step and
Repeat docker.
•
Easily shape curve objects with the new Fillet / Scallop / Chamfer
docker.
•
Contour objects with optimal curve results with the enhanced
Interactive Contour tool.
•
Quickly reduce nodes in existing objects by using the automatic
Reduce Nodes button or the manual Reduce Nodes slider.
•
Instantly create a boundary around selected objects with the new Create
Boundary command.
•
Quickly reshape curve objects by using the newly designed control
handles for selecting and editing object nodes.
•
Use different miter limit settings for text and graphic objects.
•
Quickly access the Clone command, which has been added to the Edit
menu.
•
Get helpful tips on any tool in the toolbox with the new Hints docker.
Reviewer’s Guide [ 31 ]
•
Easily discover new and enhanced features added since versions 9, 10, 11,
and 12 with the new Highlight What’s New menu command.
•
View breathtaking projects and learn from the masters with the new
CorelDRAW® Handbook - Insights from the Experts.
•
Take advantage of the new CorelDRAW Design Collection, which
includes 100 customizable creative templates.
•
Leverage extra content for your designs with 10,000 individually
selected images, 1,000 OpenType fonts, and 35 WGL4 fonts.
Layout — It’s about Quality Results
•
Easily format artistic character text with the new Character Formatting
docker, which groups easy-to-use controls.
•
Quickly access common settings for formatting paragraph text, such as
alignment, word and paragraph spacing, and indents, with the new
Paragraph Formatting docker.
•
With just three clicks, easily rearrange object stacking order.
•
Visually control the flow of text easier than ever before with the new
Insert Formatting Code menu.
•
Enjoy enhanced text handling, which makes it easier to work with text
from other sources, and adjust alignment, bullets, columns, tabs, and
drop caps.
•
Easily control hyphenation by using automatic and optional settings.
•
Experience improved font matching when fonts are not installed.
•
Get more flexibility when laying out text by setting using inches to set
text size.
•
Preview available font types from the enhanced Font list before
making a selection.
•
Easily create hyperlinks for specific text characters.
•
Add text along a path with ease by using the enhanced, interactive Fit
Text to Path tool.
•
Use the new Enhanced With Overprints viewing mode to preview
overprints and output print projects with confidence.
Trace — It’s about Accuracy
•
Save time and get more control over bitmap-to-vector conversion with
the new, integrated Corel® PowerTRACE.
Photo Editing — It’s about Efficiency
•
Enjoy faster response times when adding photo effects thanks to
improved Corel PHOTO-PAINT performance.
•
Achieve professional-quality color and tone correction with the new
Image Adjustment Lab.
[ 32 ] Reviewer’s Guide
•
Quickly and easily choose brush shapes and sizes with the new
property bar options.
•
Obtain excellent results with minimum effort from the new Pixmantec®
RawShooter™ essentials when working with digital images in raw
format.
•
Gain control, improve accuracy, and simplify the process when cutting out
image areas with the enhanced Cutout Lab.
•
Easily create new spot color channels for any image.
Compatibility — It’s about Seamless Workflow
•
Experience enhanced compatibility with commonly used file formats,
including Adobe® Illustrator®, PhotoShop®, Corel® Paint Shop Pro®,
Microsoft® Office, JPEG, and PDF.
•
New support for password-protected PDFs makes it easy to secure
output.
•
The enhanced Publish To PDF feature now includes full transparency
and spot color support, as well as the ability to convert text to curves.
•
Easily output projects with professional results, thanks to the enhanced
color management controls that require minimal knowledge of color
and color systems.
•
Use spot colors with confidence thanks to improved spot color
support for effects, import and export filters, and printed output.
•
Achieve more accurate PDF output with new support for spot colors
and transparency.
•
Use more intuitive options when importing EPS files.
•
Go to print with confidence by using composite printing, which
preserves spot colors, and level settings, and by simulating overprints.
•
Use the updated PANTONE® color palette, which now includes
transparent white.
Reviewer’s Guide [ 33 ]
About Corel
Corel Corporation provides innovative software solutions that help millions of value-conscious businesses
and consumers in more than 75 countries improve their productivity. The company is renowned for its
powerful software portfolio, which combines innovative photo-editing, graphics-creation, vectorillustration, and technical-graphics applications with office and personal productivity solutions. Corel’s
flagship products include CorelDRAW® Graphics Suite, WordPerfect® Office suite, Corel® Paint Shop
Pro®, Corel® Painter™, and Corel DESIGNER® Technical Suite. For more information, please visit
www.corel.com.
Media Contact North America
Jessica Gould
PR Manager, CorelDRAW Product Line
Corel Corporation
613-728-0826 Ext. 5405
[email protected]
Media Contact EMEA & APAC
Deborah Thomas
PR Manager, EMEA & APAC
Corel UK Limited
+44 (0) 1628 589850
[email protected]
Printed in Canada
Corel Corporation
Corel UK Limited
Corel Minneapolis
1600 Carling Ave.
Ottawa, ON
Canada K1Z 8R7
Sapphire Court
Bell Street
Maidenhead
Berkshire SL6 1BU
United Kingdom
7905 Fuller Road
Eden Prairie, MN
55344 USA