1
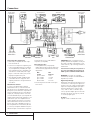
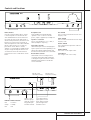
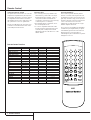
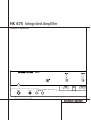
HK 675 Integrated Amplifier
OWNER’S MANUAL
HK 675
Power for the Digital Revolution®
Table of Contents
3 Introduction
4 Connections
DECLARATION OF CONFORMITY
DECLARATION OF CONFORMITY
5 Controls and Functions
6 Remote Control
7 Operating Instructions
7 Troubleshooting
8 Specifications
We, Harman Consumer International
2, route de la Tour
F-72500 Château-du-Loir
France
We, Harman Consumer International
2, route de la Tour
F-72500 Château-du-Loir
France
declare in own responsibility, that the
declare in own responsibility, that the
product described in this owners manual
product described in this owners manual is
is in compliance with technical standards:
in compliance with technical standards:
EN60065:1998
CB Certificate
EN55013/A 12/8.1994, EN55020/12.1994
EN60555 Part 2 & 3/4.1987
Carsten Olesen
Harman Kardon Europe
01/04
Carsten Olesen
Harman Kardon Europe
01/04
The appliance conforms with EEC directive
(73/23 EEC) regarding interference suppression.
2 TABLE OF CONTENTS
The appliance conforms with EEC directive
(89/336/EEC) regarding interference suppression.
Introduction
Congratulations on your choice of the
Harman Kardon HK 675 Integrated Amplifier.
In order to obtain the best performance from
this integrated amplifier, please be sure to read
this owner's manual and use your integrated
amplifier only in accordance with its instructions.
The special features of this unit include:
HCC
(High Instantaneous Current Capability)
The amplifier sections react rapidly to musical
transients, providing the instantaneous current
necessary to precisely drive and control nearly
any loudspeaker system.
Ultrawide Bandwidth
The bandwidth of this unit is exceptionally wide
and is independent of negative feedback. This
improves transient accuracy and phase linearity.
Low Negative Feedback
This unit has been designed to have low distortion and wide bandwidth without high negative
feedback. This further improves its dynamic
accuracy.
Discrete Component Circuitry
In order to achieve the above goals, all discrete
electronic circuitry has been employed. No
available integrated circuits could provide this
high level of performance.
Sophisticated Electronic
Protection Circuitry
Harman Kardon's unique protection circuitry
guards the amplifier from short circuit or
damaged speakers and wires, without impairing
sound quality by the use of current limiting or
output relays.
General instructions
Always Use at 230V AC
This unit is designed for operation with 230VAC.
Use only domestic AC outlets. Connecting the
unit to an outlet supplying a higher voltage may
create a fire hazard.
Handle the Power Cord Gently
Do not disconnect the plug from the AC outlet
by pulling the cord; always pull the plug itself.
Pulling the cord may damage it. If you do not
intend to use your unit for any considerable
length of time, turn the unit off completely by
pressing the round Power button above “Power”
(see page 5). Do not place furniture or other
heavy objects on the cord, and try to avoid dropping heavy objects on it. Also do not tie a knot
in the power cord. Not only may the cord be
damaged, it can also cause a short circuit with a
consequent fire hazard.
Place of installation
Place the unit on a firm and level surface.
Avoid installing your unit under the following
conditions:
■ Moist or humid places.
■ Places exposed to direct sunlight or
close to heating equipment.
■ Extremely cold locations.
■ Places subject to excessive vibration
or dust.
■ Poorly ventilated places.
Do not obstruct the ventilation slots on the top
surface of the unit by placing objects on them.
Otherwise, the temperature inside the unit may
rise, possibly affecting its long-term reliability.
To maintain proper ventilation, make sure there
is at least 10 cm of space above and around
the amplifier.
Do not place a CD player or other equipment
on top of the amplifier.
Do not expose the amplifier to dripping or
splashing. Do not place objects filled with liquids,
such as vases, on or near the amplifier.
Moving the Unit
Before moving the unit, be sure to pull out the
power cord from the AC outlet and disconnect
the interconnection cords with other units.
Do Not Open the Cabinet
To prevent shock hazard, do not tamper with
internal components for inspection or maintenance. Harman Kardon does not guarantee
against performance degradation resulting from
any modification. If water, a hairpin or wire accidentally enters the unit, immediately pull the
plug from the AC outlet to prevent shock and
consult an authorized Harman Kardon service
station. If you use the unit under this condition,
it may cause a fire shock hazard.
Cleaning
If the unit gets dirty, wipe it with a soft dry cloth.
If necessary, wipe it with a soft cloth dampened
with mild soapy water and then with a dry cloth.
Never use benzene, thinner, alcohol or other
volatile agents, and avoid spraying an insecticide
near the unit.
Warning Signs
If you detect an abnormal smell or smoke,
immediately turn the amplifier off and unplug
the power cord. Contact your dealer or nearest
Harman Kardon service center.
Packaging
Save all packing material. It is essential for
shipping, should you move, or in the event the
unit ever needs repair.
INTRODUCTION 3
Connections
Speaker System 1
Right channel
Record Player
CD Recorder
Cassette Tape Deck
Speaker System 1
Left channel
Right channel
Speaker System 2
Left channel
Speaker System 2
Video Player 2
Connecting Other Components
1. Make sure your amplifier and other components are turned off.
2. Connect each component's Output/Play jacks
to the corresponding Input jacks on the back
of your amplifier and, if available, the component’s Input/Record jacks to the Output jacks
of the HK 675. Use the white, black or gray
plugs to connect Left channel jacks; use the
red plugs for Right channel jacks.
3. A record player with MM cartridge must be
connected to the Phono Input jacks and a
separate ground wire to the ground terminal
screw above.
Wired Remote Control
To control your amplifier with an external
infrared remote sensor, connect the wire from
the remote sensor to the REMOTE IN jack on the
back panel. Or, if another stereo component has
a built-in infrared remote sensor and a Remote
Output jack, it may be possible to connect this
jack to the REMOTE IN jack of your amplifier. All
Harman Kardon products with »Remote In« and
»Remote Out« jacks are compatible with one
another, except for the Citation 22, 24 and 25.
Other manufacturers' remote sensors and components may not be compatible, but it will not
hurt to experiment. A second wire may be used
to connect your amplifier's REMOTE OUT jack to
the Remote Input of another stereo component.
4 CONNECTIONS
Video Player 1
Tuner
Continue this process to include additional
components (if compatible).
Connecting Speakers
1. For best performance, use high quality
speaker cables. However, ordinary copper wire
can be used if the gauge meets the following
requirements:
Wire
Length
Up to 2.5 meter
Up to 4 meter
Up to 6 meter
Above 6 meter
Min.
Diameter
1 mm
1.25 mm
1.6 mm
2-2.5 mm
2. Avoid rolling excess wire with or near signal
interconnects.
Compact Disc Player
IMPORTANT: When connecting two pairs of
speakers, determine the impedance of each pair
by looking on the back of the speakers, in your
owner's manual, or by contacting your dealer or
manufacturer.
You can listen to two pairs of speakers at
the same time ONLY if the impedance of
EACH speaker is NOT LESS THAN 8 Ohms.
WARNING: Do not play sets of speakers
simultaneously except as recommended above.
Amplifier may overheat.
Digital Loop-Through
Digital inputs and outputs are provided only as a
convenience for connecting various digital components to the “CD”, “CDR” and “AUX” digital
inputs. The corresponding digital input signal is
fed to the “DIGITAL OUT” connector when
“CD”, “CDR” or “AUX” is selected as input
source, to provide a digital signal for CD or MD
Recorders. The HK 675 cannot process, decode
or convert any digital signal.
AC Power
Plug the cord into a 230 VAC wall socket.
Controls and Functions
HK 675
Power switches
Press the round Power button (above “Power”)
to turn the amplifier on for the first time. The
status LED behind the flat “Power” button will
turn orange. Once the unit has been turned on
with the round power button, this button should
be left on for normal use and only turned off
when the amplifier will not be used for extended
periods of time (vacation, etc.). For daily use,
press the flat “Power” button to turn the
amplifier on or off (Standby). In Standby the LED
will glow orange, indicating that the unit is still
connected to AC mains and can be turned on
from the remote control or with the flat “Power”
button.
Headphone Jack
Plug in headphones if desired. With both
”Speaker 1” and ”2” selectors in the Off
position, output is supplied only to headphones.
Speaker 1 / 2 Selectors
Press to select speaker pair 1 or 2, or both, or
neither (headphone output only).
Input Source Selector
Select desired input source for listening by pressing the ”Input Source” button repeatedly (on the
left will select upwards, right downwards) until
the indicator for the desired source is illuminated.
Record Source Selector
Select desired source for recording to device
connected to the rear panel Tape and CDR Out
sockets by pressing the ”Record Source” button
repeatedly until the indicator for the desired
source is illuminated.
Indicates source
selected for listening
Bass Control
Turn to increase or decrease the amount of low
frequency sound.
Treble Control
Turn to increase or decrease the amount of high
frequency sound.
Balance Control
Turn to adjust relative output level of left and
right speakers.
Volume Control
Turn to raise or lower output volume.
Source Direct
Press to bypass tone control circuitry.
Indicates source
selected for recording
HK 675
LED Power Mode indication
Red
= Protection
Orange
= Standby
Blue
= ON
Speaker 1 and 2
indicators light up
when the corresponding speaker pairs
have been selected.
Source Direct indicator
lights up when “Source
Direct” button has been
pressed to bypass bass
and treble controls.
CONTROLS AND FUNCTIONS 5
Remote Control
Independent Remote Control
The system remote of the HK 675 can control the
amplifier and compatible Tuners, CD Players and
CD Recorders. The remote In jack of units without
an integrated IR receiver must be connected to
the amplifier's remote control output jack so that
the system remote control can operate them.
The Function Table below will show all functions
of the HK 675 and external devices that can be
controlled by the HK 675 remote.
Important Notes:
• For controlling a tuner (only needed for the
numeric buttons), CD Recorder or CD Player
the appropriate input (”TUNER”, ”CDR” or
”CD”) must have been selected with the
source buttons of the remote control (selecting
on the front panel is not sufficient).
• Note that DVD players or tape decks cannot
be controlled by the remote.
• To control a compatible CD Recorder ”CDR”
must be selected as input and the drive to be
controlled (CDP or CDR) must be selected
appropriately with the ”CDP SELECT” or ”CDR
SELECT” buttons.
Operating Conditions
The control unit operates effectively within a
distance of 7 meters and an angle of 30° from
the amplifier. Using the control near fluorescent
lights may shorten this range, as will any dust or
dirt that accumulates on the front of the remote
control or the remote sensor area of the
amplifier. Also avoid blocking the line of sight
between amplifier and remote.
The control unit is powered by two AA batteries,
included with your amplifier. When you replace
weak batteries, replace both at the same time.
When the remote is to be unused for an
extended period, remove the batteries to prevent
damage from corrosion.
Remote button functions
Button
POWER/OFF
II (Fast Forward)
HH (Fast Reverse)
JH (Skip Reverse)
IK (Skip Forward)
A (Stop)
I (Play)
0 ~ 9 (Numeric Buttons)
CD
CDR
AUX
TV
TUNER
PHONO
TAPE
CDP SELECT
CDR SELECT
RDS
TUNER D
TUNER E
VOLUME D
VOLUME E
1)
HK 675
Power On/Off
Source Select
Source Select
Source Select
Source Select
Source Select
Source Select
Source Select
Volume Up
Volume Down
CD Player
Fast Forward
Fast Reverse
Skip Reverse
Skip Forward
Stop
Play
Track Select
-
CD Recorder
Fast Forward
Fast Reverse
Skip Reverse
Skip Forward
Stop
Play
Track Select
CDP Drive Select 1)
CDR Drive Select 1)
-
Tuner
Preset Select
RDS Display Select
Tuning Up
Tuning Down
-
1
2
3
POWER
4
5
6
OFF
7
8
9
CD
0
RDS
AUX
CDR
CDR
TV
SELECT
CDP
TUNER
CD / CDR
TUNER
PHONO
VOLUME
TAPE
Only needed with CD Recorders
HK 675
6 REMOTE CONTROL
Operating Instructions
Listening to your CD player, tape
deck, tuner or other source
4. Begin playing the desired source.
Making a recording
5. Adjust the Volume control to the desired level.
1. Turn Volume control to minimum level and
press the round Power button (above
”Power”) to turn the unit to Standby, the
power indicator below will light orange. Then
press the flat Power switch to turn on the
amplifier. The power indicator lights red for a
few seconds, while the protection circuitry
checks for short circuit or other problems, and
then it lights blue.
6. Adjust Bass, Treble and Balance controls as
desired (the Source Direct function must be
turned off).
You may record any source to tape or to CD-R or
to both simultaneously. You may also connect a
second tape deck to the CDR inputs and outputs
to record from tape to tape (in either direction).
2. Press ”Speaker 1” to hear loudspeakers
connected to the rear Speakers 1 terminals.
Press ”Speaker 2” to hear loudspeakers
connected to the rear Speakers 2 terminals.
Press both to hear both speaker pairs at once.
To listen to headphones only, press to turn off
any active speaker pair.
7. Press ”Source Direct” until the ”Source
Direct” indicator lights up to bypass the tone
control and balance circuitry to ensure purest
sound performance. Press again to turn the
bypass function off and to make the tone and
balance controls function again.
3. Select desired source for listening by pressing
the front panel Source button repeatedly until
the indicator for the desired source is
illuminated or by pressing the desired Source
button on the remote.
To select the desired source for recording (this
can be a different source than the one being
listened to), press the ”Record Source” button
on the front panel repeatedly until the indicator
for the desired record source is illuminated.
NOTE: The record output signal is taken directly
from the program source and is unaffected by
the Volume, Bass, Treble or Balance controls.
Important Notes:
• The functions ”Source Direct” and ”Record
Source” can be selected on the front panel
only, not from the remote control.
• 3-head cassette decks with monitoring function can be connected to ”Tape” or ”CDR”
connectors too, but their monitoring function
cannot be used.
Troubleshooting
This unit is designed for trouble-free operation; most problems users encounter are due to operating errors. So if you have a problem, first check this list for a
possible solution. If the problem persists, consult your authorized Harman Kardon service center.
If the problem is...
No lights illuminate when power cord is plugged into AC outlet.
Make sure that...
• The unit is plugged into a live outlet.
• The round power button above "Power" on the front panel is pressed in.
No sound is heard.
• Speaker switches corresponding to the desired speakers are pressed.
• Correct source button has been pressed.
• Volume is turned up.
• Speaker wires are connected properly.
• Hook-up wires to source component are connected properly.
Sound is not heard from the speaker system on one side.
• The speaker wires and connection wires are connected correctly.
• The balance control knob is set to the center.
When listening to stereo sound, the left and right sounds are reversed. • The speaker wires are connected correctly.
• The wires between components are connected correctly.
Intermittent or continuous buzzing or hissing.
• The unit is away from fluorescent lights, TV, motors and other electrical appliances.
The remote control and front panel controls don't appear to work.
• Disconnect the AC line cord from the wall socket, wait 5 minutes and then re-connect it.
Humming noise when listening to LP
• Ground wire from record player has been connected to ground terminal on amplifier.
• Cable from record player is away from power cords and speaker cables.
• Record player is not to close to speakers.
• Record player is on stable surface.
• Cable from record player is connected to the Phono jacks.
• The phono cartridge is MM, not MC.
Howl or ringing when listening to LP.
Low sound level when listening to LP.
OPERATING / TROUBLESHOOTING 7
Specifications
Continuous Average Power Per Channel (FTC)
20 Hz – 20 kHz, both channels driven
8 Ohms:
4 Ohms:
NOMINAL
80 Watts@<0.09%THD
120 Watts@<0.3%THD
Dynamic Power (IHF, 1 kHz Tone Burst)
8 Ohms:
4 Ohms:
2 Ohms:
1 Ohms:
115 Watts
200 Watts
295 Watts
380 Watts
High instantaneous current capability (HCC)
±80 Amps
Power Bandwidth @ Half-Rated output, 8Ω
<10 Hz - 150 kHz
Frequency response @ 1W (+0/-3dB)
5 Hz - 150 kHz
Damping factor (20Hz-20k Hz)
>125
Signal-to-noise Ratio (Reference rated power output, A-WTD)
Tuner/CD
Phono (MM):
95 dB
75 dB
Input sensitivity/Impedance
Tuner/CD
Phono (MM):
270mV/43k Ohms
4.0mV/47k Ohms
Overload:
Tuner/CD
Phono (MM):
6V
110 mV
Tone control range, Bass @ 50 Hz/Treble @ 10 kHz
±10 dB/±10 dB
Power supply:
AC 230V, 50/60 Hz
Power consumption:
345 W
Dimensions (Width x Height x Depth):
439 x 110 x 395 mm
Weight:
10.35 kg
250 Crossways Park Drive, Woodbury, New York 11797
www.harmankardon.com
Harman Consumer International:
2, Route de Tours, 72500 Château-du-Loir, France
© 2004 Harman Kardon, Incorporated
Part 5100-675000-000