1
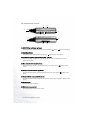
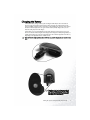
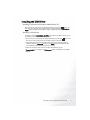
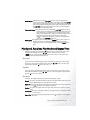
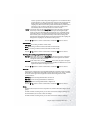
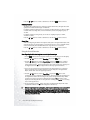
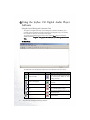
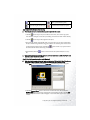
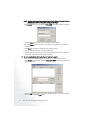
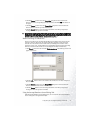
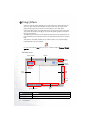
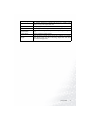
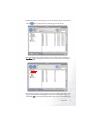
Joybee 150 (DA-150)
Digital Audio Player
User Manual
Welcome
Copyright
Copyright 2003 by BENQ Corporation. All rights reserved. No part of this publication may be reproduced, transmitted, transcribed, stored in a retrieval system or translated into any language or computer language, in any form or by any means, electronic, mechanical, magnetic, optical, chemical,
manual or otherwise, without the prior written permission of this company.
Disclaimer
BENQ Corporation makes no representations or warranties, either expressed or implied, with respect
to the contents hereof and specifically disclaims any warranties, merchantability or fitness for any
particular purpose. Further, BENQ Corporation reserves the right to revise this publication and to
make changes from time to time in the contents hereof without obligation of this company to notify
any person of such revision or changes.
*Windows, Internet Explorer and Outlook Express are trademarks of Microsoft Corporation. Others
are copyrights of their respective companies or organizations.
Handling Instructions
1. This player is a highly precise electronic product. Please do not disassemble it.
2. Do not format the memory of the player in FAT32 file format.
3. Do not attempt to alter any part of the player.
4. Do not subject the player to severe impact.
5. Keep the player away from water or direct sunlight.
6. Use damp cloth to clean the player. Do not use any chemical solution.
7. Use only chargers and accessories for use with this particular player model. The use of any other
types will invalidate any approval or warranty applying to the player, and may be dangerous.
8. Keep proper volume while listening or it may cause eternal harm to listening capacity.
9. Dispose of unused player and its accessories according to local environmental regulations.
Table of Contents
Your Joybee 150 Digital Audio Player ....................1
Introduction .......................................................................... 1
Package Contents .................................................................. 1
System Requirements ............................................................ 2
Touring the Joybee 150 Digital Audio Player ...................... 3
Buttons/Ports ....................................................................................... 3
The Wired Remote Control ................................................................ 6
The LCD Display ................................................................................. 7
Getting the Joybee 150 Digital Audio Player Ready 8
Connecting Earphone and Remote Control ........................ 8
Charging the Battery ............................................................. 9
Installing Joybee 150 Digital Audio Player Software ........... 10
Installing the USB Driver ...................................................... 11
Installing in Windows ME/Windows 2000/Windows XP ................. 11
Installing in Windows 98 .................................................................... 11
Using the Joybee 150 Digital Audio Player .............12
Turning the Player On and Off ............................................. 12
Playing Music ........................................................................ 12
Lyrics Synchronization .......................................................... 12
Section Repeat, Time Length Repeat and Frame Repeat .... 12
Play Speed, Equalizer, Play Mode and Repeat Time ........... 13
Play Speed ............................................................................................ 13
Equalizer .............................................................................................. 13
Play Mode ............................................................................................ 13
Repeat Time ......................................................................................... 14
Recording and Related Setup ................................................ 14
Record Setup ........................................................................................ 14
Using the Record Function ................................................................. 16
FM Radio ............................................................................... 17
Entering and Exiting the FM Radio Mode ......................................... 17
Tuning preset Radio Stations .............................................................. 17
Deleting Preset Radio Stations ............................................................ 17
Setting up Tuning Level ...................................................................... 17
Setting up Frequency Step ................................................................... 18
Viewing eBook ....................................................................... 18
Table of Contents
i
Listening to FM Radio While Reading eBooks .................................. 18
Memory Management ...........................................................19
Inquiring Memory Status .................................................................... 19
Deleting Files ........................................................................................ 19
Clearing Folder .................................................................................... 19
Quick Format ....................................................................................... 19
Complete Format ................................................................................ 19
System Setup ..........................................................................20
Selecting Display Language ................................................................. 20
Adjusting Display Contrast ................................................................. 20
Setting up Display Backlight ............................................................... 20
Lyrics Sync ........................................................................................... 21
Updating Firmware and Display Font ................................................ 21
Setting Up the Startup and Shutdown Screen ................................... 25
System Reset ......................................................................................... 25
Viewing System Information .............................................................. 25
Using the Joybee 150 Digital Audio Player as a USB Flash Drive 25
Using the Joybee 150 Digital Audio Player Software 26
Using the Lyrics Editing and Conversion Tool .................................. 26
Batch Converting .txt eBook Files ...................................................... 29
Using the Startup/Shutdown Screen Editing Tool ............................ 29
Using QMusic ...........................................................32
The Main Screen! ////////////////////////////////////// 43
Adding songs to the Joybee 150 Digital Audio Player using QMusic 34
Notes, FAQ and Troubleshooting Tips ...................42
Notes .......................................................................................42
FAQ and Troubleshooting Tips ............................................43
ii
Table of Contents
Your Joybee 150 Digital Audio Player
Introduction
Congratulations on your purchase of the Joybee 150 Digital Audio Player!
The Joybee 150 Digital Audio Player not only provides multiple functions for high quality
music playback and voice recording but consumes lower power to extend your good time. It
supports MP3 and WMA music formats, multi-language display and 8 pre-set EQ modes (5
EQ modes for WMA music).
Besides, it also features language repeated reading, making it an ideal tool for language
learning. The FM radio function allows you to preset 30 radio stations for quick and easy
selection. The eBook reading function enables you to read your favorite articles while
listening to the radio anywhere. With its lyric-music sync function, you can even read the
lyric line-by-line while a song is playing . What's more, you can use the Joybee 150 Digital
Audio Player as a flash drive, thus you can not only make your music mobile, but also move
your important data with you.
In addition to the Joybee 150 Digital Audio Player itself, its bundle software tools also
provide you with added convenience for converting and transferring music data, as well as
personalizing the power on and power off screen on the player, making it the most easy to!
use and highly personalized digital audio player ever available.
Package Contents
The Joybee 150 Digital Audio Player sales package should include the following items. Please
contact your dealer if any of them is missing or damaged.
Joybee 150 Digital Audio Player
Earphone
Wired remote control
Leather strap
USB cable
Line-In cable
Charger
Carrying pouch
CD-ROM (eManual / QMusic / Driver..., etc.)
Quick start guide
Warranty card
Your Joybee 150 Digital Audio Player
1
System Requirements
Microsoft Windows 98SE/ME/2000/XP
Pentium 200MHz or higher
USB port
CD-ROM drive
60MB hard disk space
32MB system memory
2
Your Joybee 150 Digital Audio Player
Touring the Joybee 150 Digital Audio Player
Buttons/Ports
(11)
(15)
(14)
(13)
(12)
(16)
(11)
(12)
(13)(14)
(15)
(16)
(1)
(7)
(5)
(8)
(6)
(3)
(2)
(9)
(10)
(4)
(1) LCD Display
Displays the status of the player. (e.g. song title, play time..., etc.)
(2) ON/OFF/Play ( )/Pause(
) Button
When player power is off, press this button to turn on the player and the startup screen
will appear.
When the player is in standby mode, press this button to start playing.
In a menu, press this button to enter or confirm your selection.
When player power is on, hold down this button for 2 seconds to turn it off.
When playing or recording, press this button to pause. The icon will appear on the display. When paused, press this button to resume playing or recording. The icon will
disappear.
(3) Stop(
)/Menu Button
While playing or recording, press this button to stop and put the player into standby
mode.
In a menu, press this button to return to previous menu level.
While playing, hold down this button for 2 seconds to bring up the on-line menu.
Your Joybee 150 Digital Audio Player
3
(4) Power Switch
Slide this switch to the ON position to turn on the power of the player, and to the OFF position to turn it off. Keep the switch in the ON position in normal conditions. Should the
player fail to respond to your operation and become freezed, slide this switch to the OFF
position and then to the ON position to reset it, and then press the
key to turn it back
on.
(5) Previous track/Fast rewind (
) Button
Skip to the previous track while playing music, or to the previous file while playing
recorded files. If current song or file is already the first one, pressing this button brings
you to the last song or file.
Hold down the button while playing to fast rewind through tracks.
During time length repeat set up, hold down the button to decrease the time length.
Scroll up in menus.
(6) Next track/Fast forward (
) Button
Skip to the next track while playing music, or to the next file while playing recorded files.
If current song or file is already the last one, pressing this button brings you to the first
song or file.
Hold down the button while playing to fast forward through tracks.
During time length repeat set up, hold down the button to increase the time length.
Scroll down in menus.
(7)/(8) Volume up (VOL +)/Volume down (VOL -) Button
Use the 2 volume control buttons to adjust playback volume: "+" to increase (up to level
17) it and "-" to decrease (down to level 0) it. The volume status is displayed on the display.
Press the VOL– button immediately followed by pressing the EQ/REP button to lock the
buttons on the player to prevent unwanted button operations (the icon will appear on
the display). Repeat the button pressing combination again to unlock the buttons
(the icon disappears).
(9) Section repeat/Time length repeat (A-B/TRP) Button
While playing, press this button to set the starting point for section repeat. The icon "An"
will appear on the display. Press this button again to set the ending point. The icon "AnB"
will appear on the display and meanwhile the player will start playing the section
repeatedly. Press this button to cancel section repeat. The icon "AnB" disappears and
resumes to normal playback mode.
When the TRP time length has been set, hold down this button for 2 seconds to start time
length repeat.
(10) Equalizer/Frame repeat (EQ/REP) Button
While playing MPR (music with lyrics) files, press this button to repeat the current frame.
In FM Radio mode, press this button to choose from the following settings: Select Chnl.,
Search Chnl., FM Level, and Frequency Step.
4
Your Joybee 150 Digital Audio Player
While playing, hold down this button for 2 seconds to change the EQ settings. There are 8
pre-set modes available: Normal, Classic, Live, Rock, Pop, Jazz, Treble and Bass (5 modes
available for WMA music: Normal, Classic, Live, Rock and Pop).
(11) Microphone
For voice recording.
(12) Wired remote control jack
For connecting the wired remote control.
(13) Earphone jack
For connecting the earphone.
(14) Hand strap hole
For installing the hand strap.
(15) USB/Charger port
As a USB port, you can connect the USB cable to this port and the USB port on your
computer to establish connection between both.
As a charger port, you can connect the battery charger to this port to charge the built-in
battery.
(16) LINE IN!jack
For connecting other sound signal sources such as CD player, MP3 player, PC..., etc. for
recording.
In standby mode, the player will shut down automatically if there is no operation for 3 minutes to save battery
power (this auto power off function will be disabled when the player is connected to PC).
Your Joybee 150 Digital Audio Player
5
The Wired Remote Control
(7)
(2)
(9)
(1)
(5)
(6)
(8)
(4)
(1) ON/OFF/Play ( )/Pause(
(3)
) Button
Executes the same actions as those by the ON/OFF/Play( )/Pause(
)button on the player.
(2) Stop/Menu Button
Executes the same actions as those by the Stop(
)/Menu button on the player.
(3)/(4) Volume up (VOL +)/Volume down (VOL -) Button
Executes the same actions as those by the Volume up (VOL +)/Volume down (VOL -)
button on the player.
(5) Next track/Fast forward (
) Button
Executes the same actions as those by the Next track / Fast forward (
player.
(6) Previous track/Fast rewind (
) button on the
) Button
Executes the same actions as those by the Previous track / Fast rewind (
player.
)button on the
(7) Equalizer/Frame repeat (EQ/REP) Button
Executes the same actions as those by the Equalizer/ Frame repeat ( EQ/REP ) button on the
player.
(8) Earphone jack
For connecting the earphone.
(9) Wired remote control jack
For connecting the wired remote control.
6
YourJoybee150 D igitalAudio Player
The LCD Display
(1) (3) (5)
(2) (4)
(6)
(7)
(8)
(9)
(11)
(10)
(12)
(13) (14)
(15)
(16)
No. Description
(1) Appearance of this icon indicates that the player is in playback mode.
(2) Appearance of this icon indicates that the player is in pause status.
Appearance of this icon indicates that the player is in language repeated reading
(3)
mode.
When this icon appears in combination with icon (3), the player is in single track
(4)
repeat mode .
When this icon appears in combination with icon (3), the player is in all tracks repeat
(5)
mode .
(6) Appearance of this icon indicates that the player is in A-B repeat mode.
(7) Appearance of this icon indicates that the player is in recording mode.
(8) Appearance of this icon indicates that the buttons on the player are locked.
(9) Shows remaining battery power.
(10) Page up/page down.
(11) Shows the bitrate of current playing song.
(12) Shows the sampling rate of current playing song.
Shows current track number in music playback mode, current channel no. in FM
(13)
Radio mode, or current file no. in eBook reading mode.
Shows total number of tracks in music playback mode, total number of channels in
(14)
FM Radio mode or total number of files in eBook reading mode.
(15) Shows playback mode.
(16) Shows current track elapsed time when playing or recording time when recording.
3 vertical bars in the battery status icon
indicate that the battery power is sufficient. Only one bar in the
icon
indicates that the power is weak. If there are no bars in the icon
, the battery is near empty and
you need to charge it immediately. The player will turn off automatically, and any recording in progress will be
saved.
Your Joybee 150 Digital Audio Player
7
Getting the Joybee 150 Digital Audio Player
Ready
Connecting Earphone and Remote Control
As illustrated, plug the earphone into the earphone jack on the wired remote control, and
then the wired remote control into the wired remote control jack on the Joybee 150 Digital
Audio Player.
8
G ettingtheJoybee150 D igitalAudio PlayerReady
Charging the Battery
Connect the battery charger to the Joybee 150 Digital Audio Player and a wall outlet as
shown to begin charging the built-in battery. When charging, the indicator light on the
charger will light up red. It will turn into amber as the charging time passes by. After about 3
hours, the indicator light turns into green and the battery is fully charged. Now you can
disconnect the player from the charger.
If time allows. it is recommneded that you keep the charging process going for one more
hour even when the indicator light on the charger turns into green. A fully charged battery is
capable of providing up to 10 hours of playback time. The maximum playback time will vary
depending on the playback volume and file format.
When the battery is completely drained after your first time use, extend the charging time for 2 more hours than
usual.
Depending on the location where you purchased
the Joybee 150 Digital Audio Player, the charger
may not have an indicator light on it. In such
case, please refer to the battery status icon on the
LCD display for the status of battery.
Getting the Joybee 150 Digital Audio Player Ready
9
Installing Joybee 150 Digital Audio Player Software
Insert the Joybee 150 Digital Audio Player CD-ROM into your CD-ROM drive. A few
seconds later, a software installation menu will appear on your computer screen. Click on an
item to select it and start installing the selected software.
If the autorun function of your CD-ROM drive is disabled, look for the file!#Setup.exe# in the CD-ROM
directory using Windows Explorer and double-click on it. The software installation menu will then appear.
Follow the on-screen instructions to install. Please refer to the table below for a brief
description of the contents on the CD-ROM and what you can do with these bundle
material.
Items on the !!!!!!!!
installation screen
Introduction
Click this item to install QMusic. QMusic is a powerful music
management software program that allows you to easily
convert CD music into .mp3 format, save the converted files or
update music in the Joybee Digital Audio Player through just a
Install QMusic
few clicks, or let it perform update automatically. Besides, you
can also use it as a standalone music player to play music and
create multiple playlists. For how to use QMusic in
combination with the Joybee 150 Digital Audio Player, plrese
see "Using QMusic" on page 32
Click this item to install Joybee 150 Digital Audio Player
software. The software consists of 3 different tools: System
Update Tool for updating firmware and display font in the
Joybee 150 Digital Audio Player, Lyrics Editing and Conversion Tool for editing and creating music-lyrics sync files, and
Install Joybee 150 Digital
Startup/Shutdown Screen Editing Tool for converting your
Audio Player Software
favorite pictures into the power on/off screen of the Joybee
150 Digital Audio Player. For more information about how to
use the Joybee 150 Digital Audio Player software, please see
"Using the Joybee 150 Digital Audio Player Software" on page
26.
Click this item to install Windows Media Player 9. Click this
Install Windows Media
item if you do not have such program in your computer, or
Player 9
what you have is an older version.
Click this item to install DirectX 8. Click this item if you do
Install DirectX 8
not have such program in your computer, or what you have is
an older version.
Click this item to install the Acrobat Reader software for
Install Acrobat Reader
viewing the on-line manual files.
Read User Manual
Click this item to access the electronic user manual files.
10
Getting the Joybee 150 Digital Audio Player Ready
Installing the USB Driver
Installing in Windows ME/Windows 2000/Windows XP
Turn on the power of the Joybee 150 Digital Audio Player by pressing the
button, and
then connect it to the USB port of your computer using the USB cable. A New Hardware
Found message will appear and installation will be completed automatically.
Installing in Windows 98
In addition to clicking Install Joybee 150 Driver on the software installation screen, you can
also install the USB driver following the steps below:
1. Turn on the power of the Joybee 150 Digital Audio Player by pressing the
then connect it to the USB port of your computer using the USB cable.
button, and
2. If the Adding New Hardware Wizard appearss, browse to select the files required for
installation under the Joybee 150 directory in the BENQ folder on the disk drive where
you installed the Joybee 150 Digital Audio Player software.
3. Follow the instructions of the wizard to complete the installation process.
A Removable Disk icon will appear in My Computer window if installation is successfully
completed.
Getting the Joybee 150 Digital Audio Player Ready
11
Using the Joybee 150 Digital Audio Player
Turning the Player On and Off
In power off status, press the
button to turn on the player.
In playback and recording modes, press the
standby mode.
In power on status, press and hold the
button to stop playing or recording and enter
button for about 2 seconds to turn off the player.
Do not use the power switch to turn on or off the player. Should you do so, please wait for 5 seconds before
turning the player on.
Playing Music
1. Press the
button to turn on the player and the main menu will appear on the display
automatically.
2. In the main menu, press the or button to scroll to Play Music and press
the
button. Directories currently in the Joybee 150 Digital Audio Player will appear on
the display.
3. Press the
button to enter music file list.
4. Press the or button to scroll to the music file you want to play, and then
the
button to start playing.
While playing music, you can press the
button to pause. The icon
display. Press the button again to continue playing.
will appear on the
You can also play music files by a playlist created by QMusic. To do so, follow the steps below:
1. Create a playlist in Joybee 150 following the steps described in see "Adding songs to the Joybee 150 Digital
Audio Player using QMusic" on page 34.
2. In the main menu, press the
3. Press the
4. Press the
or
button to scroll to Play Music and press the
or
button to scroll to “MP3” directory and press the
button.
button.
button.
Lyrics Synchronization
The Joybee 150 Digital Audio Player is capable of showing lyrics on the display
simultaneously while playing a song.
In order to use this function, you need to setup and convert the necessary files (Please see
"Using the Lyrics Editing and Conversion Tool" on page 26) and activate the Lyrics sync
function (Please see "Lyrics Sync" on page 21).
Section Repeat, Time Length Repeat and Frame
Repeat
The Joybee 150 Digital Audio Player provides 3 different repeat modes: Section Repeat, Time
Length Repeat and Frame Repeat.
12
Using the Joybee 150 Digital Audio Player
Section Repeat;While playing, press the A-B / TRP button to set the starting point for
section repeat. The icon "An" will appear on the display. Press the A-B / TRP
button again to set the ending point. The icon "AnB" will appear on the display and meanwhile the player will start playing the section repeatedly. Press
the A-B / TRP button to cancel section repeat. The icon "AnB" disappears
and resumes to normal playback mode.
Time Length Repeat:When playing music, press and hold the A-B / TRP button for about 2
seconds. The Joybee 150 Digital Audio Player will mark current time
as the ending time, go back the period as specified by Repeat Time
(Please see see "Repeat Time" on page 14 ) to where the period starts
and repeat the music in the set period of time. In this mode,
the icon will flash on the display. To return to normal playback
mode, press the A-B / TRP button again.
Frame Repeat:When playing lyrics sync files, press the EQ/REP button when a sentence is
finished. The Joybee 150 Digital Audio Player will play that sentence
repeatedly. To return to normal playback mode, press the EQ/REP button
again.
Play Speed, Equalizer, Play Mode and Repeat Time
When playing music, press and hold the button for about 2 seconds. The on-line menu
will appear on the display. Press the or button to scroll to an item, and then
the
button to confirm and select it. The on-line menu consists of 4 setup items: Play
Speed, Equalizer, Play Mode and Repeat Time.
Play Speed
You can select from the following play speeds: Normal Speed, Slow Speed 1, Slow Speed2,
Slow Speed 3, Slow Speed 4 and Slow Speed 5. Press the or button to scroll to a play
speed, and then press the button twice to select it.
Equalizer
You can select from the following equalizer modes: Normal, Classic, Live, Rock, Pop, Jazz,
Full-Treble and Full Bass. Press the or button to scroll to an equalizer mode, and then
press the button twice to select it.
Play Mode
The Joybee 150 Digital Audio Player provides the following play modes:
Normal: The Joybee 150 Digital Audio Player plays from the selected file to the last file in the
memory. ALL will appear on the display in this mode.
Repeat All: The Joybee 150 Digital Audio Player plays all files in the memory repeatedly. The
icon
will appear on the display in this mode.
Random: The Joybee 150 Digital Audio Player plays files in the memory without any fixed
order.
Introduction: The Joybee 150 Digital Audio Player only plays the first 15 seconds of each file
in the memory.
Repeat One: Play current playing song repeatedly. The icon
this mode.
will appear on the display in
Using the Joybee 150 Digital Audio Player
13
Press the
it.
or
button to scroll to a play mode, and then press the
button twice to select
Repeat Time
Here you can setup the length of time period for the Time Length Repeat function. The
selectable time period length ranges from 10 seconds to 254 seconds. Press
the or button to scroll to a time length , and then press the button twice to select it.
Recording and Related Setup
The Joybee 150 Digital Audio Player supports the following recording functions: FM radio
recording, recording using the built-in microphone, recording through the Line-In signal
source. The recordable time depends on the bitrate selected and remaining space in the
memory.
In order to ensure the recording quality, if the backlight of the display is on while recording, it will be turned
off automatically. When you finish recording, the backlight will resume its original status automatically.
The maximum number for recorded files is 1000.
Record Setup
1. In the main menu, press the
button.
2. Press the
or
or
button to scroll to Recording and press the
button to scroll to Record Setup and then press the
3. The record setup options will appear on the display. Press the
an option and press the
button to confirm and select it.
or
button.
button to scroll to
Rec. Source
MIC: Record using the built-in microphone of the Joybee 150 Digital Audio Player.
LINE IN: Record using the Line In connection to other signal source.
Press the
or
button to scroll to a desired item, and then the
button to select it.
Encoder Mode
MPEG1 Layer3;!This mode has higher sampling rates and provides better sound quality
even at moderate bitrates. The CD sound quality can be achieved when
recording with sampling rate at 44.1kHz and bitrate at 128kbps. The
higher the sampling rate and bitrate, the better the recorded sound
quality.
MPEG2 Layer3: This mode has lower sampling rate and is suitable for sound source with few
variation in frequency.
Press the
or
button to scroll to a desired item, and then the
button to select it.
Sync Mode (For Line In recording)
SYNC OFF: In this mode, when you select Record Now in the menu, the Joybee 150 Digital
Audio Player starts recording regardless of whether there is sound signal or not.
Recording will be stopped when the memory space is full.
SYNC ON: In this mode, when you select Record Now in the menu, the Joybee 150 Digital
Audio Player will not start recording unless the input sound signal strength
14
Using the Joybee 150 Digital Audio Player
reaches a preset level. Recording will be stopped and a new recorded file will be
created when there is a long period of silence in between the sound signal. The
length of silence period is determined by the sampling rate: the higher the
sampling rate, the shorter the silence period. When the silence period exceeds 1
minute, the Joybee 150 Digital Audio Player will exit the recording mode
automatically, otherwise it will continue to record the next file.
1 SYNC: In this mode, when you select Record Now in the menu, the Joybee 150 Digital
Audio Player will not start recording unless the input sound signal strength
reaches a preset level. Recording will be stopped and a new recorded file will be
created when there is a one-minute silence period in between the sound signal.
Afterwards the Joybee 150 Digital Audio Player will exit the recording mode
automatically. The length of the silence period is determined by the sampling rate:
the higher the sampling rate, the shorter the silence period.
Press the
or
button to scroll to a desired item, and then the
button to select it.
Channel Mode
Joint Stereo:for recording in MPEG1 LAYER3 mode.
Stereo:for recording in MPEG1 LAYER3 and MPEG2 LAYER3 modes.
Mono:for recording in MPEG1 LAYER3 and MPEG2 LAYER3 modes.
Press the
or
button to scroll to a desired item, and then the
button to select it.
VAD Setup (For recording using the built-in microphone)
VAD ON: In this mode, when you select Record Now in the menu, the Joybee 150 Digital
Audio Player will not start recording unless the sound signal from the built-in
microphone reaches the preset level.
VAD OFF: In this mode, when you select Record Now in the menu, the Joybee 150 Digital
Audio Player starts recording immediately, regardless of whether there is sound
signal from the built-in microphone or not.
Press the
or
button to scroll to a desired item, and then the
button to select it.
VAD Level
This setup item configures the sound signal threshold level by which the Joybee 150 Digital
Audio Player uses to determine the strength of sound signal in SYNC ON, 1 SYNC and VAD
ON modes. Sound signal with strength lower than the level configured here will be
considered silence.
LOW Level: Set the sound signal threshold to a lower level.
MID Level: Set the sound signal threshold to middle level.
HIGH Level: Set the sound signal threshold to a higher level.
Press the
or
button to scroll to a desired item, and then the
button to select it.
Bitrate
The higher the bitrate, the lower the compression rate and thus will result in higher sound
quality.
In MPEG1 LAYER3 recording mode, you can select a bitrate from 32kbps to 224kbps. It is
recommended that you record at a bitrate of 128kbps.
In MPEG2 LAYER3 recording mode, you can select a bitrate from 16kbps to 160kbps.
Using the Joybee 150 Digital Audio Player
15
Press the
or
button to scroll to a desired item, and then the
button to select it.
Sampling Frequency
The higher the sampling frequency (with larger number before kHz), the higher the sound
quality and it will also result in larger recorded files.
In MPEG1 LAYER3 recording mode, you can select a sampling frequency at 32kHz, 44.1kHz
or 48kHz. When recording music, it is recommend that you use a sampling frequency at
44.1kHz.
In MPEG2 LAYER3 recording mode, you can select a sampling frequency at 16kHz,
22.05kHz or 24kHz.
Press the
or
button to scroll to a desired item, and then the
button to select it.
Silence Time
When recording using the built-in microphone of the Joybee 150 Digital Audio Player, if the
VAD did not detect any sound signal at a period of time set here, a new recorded file will be
created automatically. The selectable silence time ranges from 0.5 to 1.5 seconds.
Press the
or
button to scroll to a desired item, and then the
button to select it.
Using the Record Function
Recording using the built-in microphone or sound signal source input
1. Press the
2. Press the
button to turn on the player and the main menu will appear on the display.
or
button to scroll to Recording and press the
button.
3. Press the or button to scroll to Record Setup and press the
button. Configure
record setup according to the sound signal input source, recording environment and
sound quality. Press the button several times to return to the record menu. This step can
be skipped if you have already configured the record setup options beforehand,
4. If you want to record from input sound signal source through the Line In connection,
plug one end of the Line In cable to the Line In jack of the Joybee 150 Digital Audio
Player, and the other end to the signal output device.
5. Press the or button to scroll to Record Now and press the
button to start
recording. If you are recording from Line In source, first start playing the sound signal on
the output device before start recoeding on the Joybee 150 Digital Audio Player. When
recording is in progress, the icon will flash on the display. Mic will appear on the
display if you are using the built-in microphone for recording, and Line In if you are using
Line In as the signal source.
6. To stop recording, press the button. The Joybee 150 Digital Audio Player will create a
recorded file and locate it behind all existing files in the memory.
When you record using the built-in microphone, a directory named MICIN will be created automatically in
the player. All files recorded using the built-in microphone will be saved in that directory automatically.
When you record from the external Line In source, a directory named LINE IN will be created automatically
in the player. All files recorded from the external Line In source will be saved in that directory automatically.
When recording is completed, you will be switched to current recording directory. To return to the previous
directory, press the A-B/TRP button.
16
Using the Joybee 150 Digital Audio Player
FM Radio
To ensure FM reception quality, the backlight of the display will be disabled automatically in the FM Radio
mode,
Please be sure to wear the earphone when searching for radio stations. The earphone cable is used as a signal
reception antenna in the FM Radio mode.
Entering and Exiting the FM Radio Mode
1. Press the
2. Press the
button to turn on the player and the main menu will appear on the display.
or
button to scroll to FM Radio and press the
button.
3. The preset radio station list will appear on the display. Press the or button to scroll to
a desired radio station and press the
button. While listening, you can also press
the or button to switch to another preset radio station.
If there are no existing preset radio stations, the preset radio station list will be empty.
Please refer to the method described below to setup the preset radio stations.
4. To exit FM Radio mode, press the
button.
Tuning preset Radio Stations
1. Press the
2. Press the
button to turn on the player and the main menu will appear on the display.
or
button to scroll to FM Radio and press the
button.
3. Press the EQ/REP button several times until Search Chnl. appears on the display.
4. Press the or button to search manually, or press and hold the or button for
about 2 seconds to let the Joybee 150 Digital Audio Player locate available radio stations
automatically. When a radio station is located, searching will be stopped automatically.
5. Press the A-B/REP button to save the radio station to the preset radio station list. You will
be asked if you want to overwrite current preset radio stations. To overwrite, press
button.To create a new preset radio
the or button to scroll to YES and press the
station, press the or button to scroll to NO and press the
button. You can create
up to 30 radio stations on the preset radio station list.
6. Press the button to return to the preset radio station list where you can continue
searching and setup other radio stations.
Deleting Preset Radio Stations
1. While listening to FM radio, press the
button to return to the preset radio station list.
2. Press the or button to select the radio station you want to delete, and the press the AB/TRP button. You will be asked if you are sure to delete it.
3. Press the
or
button to scroll to YES and press the
button.
Setting up Tuning Level
The tuning level setting allows the Joybee 150 Digital Audio Player to maximize radio station
searching performance in different locations and eliminate interferences.
Using the Joybee 150 Digital Audio Player
17
1. On the preset radio station list, press the EQ/REP button several times until FM Level
appears on the display.
2. Press the
it.
or
button to scroll to an appropriate level, and press the
button to select
Setting up Frequency Step
The frequency step setting allows the Joybee Digital Audio Player to be used in different
countries where the FM frequency steps are different.
1. On the preset radio station list, press the EQ/REP button several times until Frequency
Step appears on the display.
2. Press the
select it.
or
button to scroll to an appropriate step length, and press the
button to
Viewing eBook
1. Press the
2. Press the
button to turn on the player and the main menu will appear on the display.
or
button to scroll to eBook and press the
button.
3. If there are already eBook (.txt) files in the Joybee 150 Digital Audio Player memory, the
file list will appear on the display. Otherwise, the list will be empty. You need to convert
the contents of books or articles into .txt files (For example, save them as .txt files) and
transfer them to the player. Please see "Batch Converting .txt eBook Files" on page 29 for
details.
4. Press the or button to scroll to the file you want to read and press the
contents of the selected file will be opened to the display.
5. While reading the eBook, press the
Press and hold the
or
or
button. The
button to go to the previous or next page.
button to skip through pages.
Listening to FM Radio While Reading eBooks
While reading eBooks, press the A-B/TRP button to turn on FM Radio (The FM Radio
mode will not be displayed). You will go to the radio station you last listened to in the FM
Radio mode. You can press the VOL+ or VOL- key to adjust volume.
Press the A-B/TRP button again to turn off FM radio. Press the
return to the previous menu.
18
Using the Joybee 150 Digital Audio Player
button to exit eBook and
Memory Management
1. Press the
button to turn on the player and the main menu will appear on the display.
2. Press the
or
button to scroll to Memory Management and press the
button.
3. The memory management options menu will appear on the display. Press
the or button to sroll to an option and press the
button to access configuration
settings.
Inquiring Memory Status
1. On the memory management options menu, press the
Memory Info. and press the
button.
or
button to scroll to
2. The current memory status of the Joybee 150 Digital Audio Player will appear on the
display. Press the button to return to the memory management options menu.
Deleting Files
1. On the memory management options menu, press the
File and press the
button.
or
button to scroll to Delete
2. A list of directories will appear on the display. Press the
or button to scroll to the
directory of the file you want to delete and press the
button.
3. Press the
or
button to scroll to the file you want to delete and press the
4. You will be asked if you are sure to delete it. Press the
press the
button.
or
button.
button to scroll to YES and
Clearing Folder
1. On the memory management options menu, press the
Folder and press the
button.
2. Press the or
to select it.
or
button to scroll to Clear
button to scroll to the folder you want to clear and press the
3. You will be asked if you are sure to clear the selected folder. Press the
scroll to YES and press the
button.
or
button
button to
Quick Format
1. On the memory management options menu, press the
Format and press the
button.
or
button to scroll to Quick
2. You will be asked whether you are sure to proceed with format operation. Press
the
or
button to scroll to YES and press the
button.
All files in the memory will be cleared after quick format is performed.
Complete Format
Using the Joybee 150 Digital Audio Player
19
1. On the memory management options menu, press the
Format and press the
button.
or
button to scroll to Comp.
2. You will be asked if you are sure to proceed with format operation. Press
button.
the or button to scroll to YES and press the
All files in the memory will be cleared after format is performed.
The difference between Complete Format and Quick Format lies in the error checking process. Quick Format
does not perform error checking to the memory while Complete Format does. This also result in the difference
in formatting speed: it is quicker to perform Quick Format than Complete Format.However, if unstability frequently occurs to your Joybee 150 Digital Audio Player, it is recommended that you perform Complete Format
to correct possible memory error.
System Setup
1. Press the
2. Press the
button to turn on the player and the main menu will appear on the display.
or
button to scroll to System Setup and press the
button.
3. The system setup options menu will appear on the display. Press the or button to
scroll to an option and press the
button to access its configuration settings.
Selecting Display Language
1. On the system setup options menu, press the
press the
button.
2. Press the
or
or
button to scroll to Language and
button to scroll to a desired language and press the
button.
Adjusting Display Contrast
1. On the system setup options menu, press the
and press the
button.
2. Press the or
the
button.
or
button to scroll to LCD Contrast
button to adjust the display contrast to a satisfactory level and press
Setting up Display Backlight
1. On the system setup options menu, press the
press the
button.
or
button to scroll to Backlight and
2. You can choose from the following 3 options for backlight:
On: If this option is selected, after you turn on the power of the Joybee 150 Digital Audio
Player, the backlight of the display will remain on. It is suitable for occasions when you
read eBooks in a dark environment.
Off: If this option is selected, the backlight of the display will remain off even when the
power of the Joybee 150 Digital Audio Player is on. This is a useful feature when you
want to save battery power for longer playback time.
20
Using the Joybee 150 Digital Audio Player
Manual: If this option is selected, the backlight of the display will be turned on when you
press a button on the Joybee 150 Digital Audio player, and go off after 15 seconds if
there are no subsequent button operations.
Press the
or
button to scroll to an option and press the
button to select it.
Lyrics Sync
You can activate and deactivate the lyrics sync function with this option.
1. On the system setup options menu, press the
press the
button.
or
button to scroll to Lyrics Sync and
2. You will be prompted to select YES or NO. If YES is selected, the lyrics sync function will
be activated when the Joybee 150 Digital Audio Player plays an MPR file or MP3/WMA
and LYR files that have the same file name. If NO is selected, the lyrics sync function will
be disabled.
3. Press the
or
button to scroll to YES or NO and press the
button to select it.
Updating Firmware and Display Font
Firmware is the pre-programmed data stored internally in the Joybee 150 Digital Audio
Player and it controls the interface and functions of the player itself. Font is the appearance
of text that appears on the display. You can update the firmware and font of your Joybee 150
Digital Audio Player when an update firmware or font file is available from the BenQ
website.
Upgrading Firmware
1. On the system setup options menu, press the
the
button.
or
button to scroll to Update and press
2. Connect the Joybee 150 Digital Audio Player to the USB port of your computer using the
USB cable. You will be prompted by the display of the player if connection has been made
successfully.
After connecting the Joybee 150 Digital Audio Player to your computer, if the Add New Hardware Wizard
appears on the screen, please browse to select the files required for installation under the Joybee 150\drivers\update directory in the BENQ folder on the disk drive where you installed the Joybee 150 Digital Audio
Player software. Follow the instructions of the wizard to complete the installation process.
Using the Joybee 150 Digital Audio Player
21
3. Click the Start button on Windows Taskbar and select Programs, BenQ Joybee 150 Digital
Audio Player, System Update Tool to open the System Update Tool program.
4. Click the Browse... button in Upgrade Firmware to browse for the update firmware file.
5. When the file is located, click to select the file and click Open, Upgrade.
6. When the update operation is completed, a dialogue box will appear, asking you to
disconnect the Joybee 150 Digital Audio Player from the PC and restart the player.
Disconnect the player, move the power switch on the player to the OFF position and then
move it back to the ON position, then press the
button to turn on the player.
22
Using the Joybee 150 Digital Audio Player
Updating Font
1. On the system setup options menu, press the
the
button.
or
button to scroll to Update and press
2. Connect the Joybee 150 Digital Audio Player to the USB port of your computer using the
USB cable. You will be prompted by the display of the player if connection has been made
successfully.
After connecting the Joybee 150 Digital Audio Player to your computer, if the Add New Hardware Wizard
appears on the screen, please browse to select the files required for installation under the Joybee 150\drivers\update directory in the BENQ folder on the disk drive where you installed the Joybee 150 Digital Audio
Player software. Follow the instructions of the wizard to complete the installation process.
3. Click the Start button on Windows Taskbar and select Programs, BenQ Joybee 150 MP3
Player, System Update Tool to open the System Update Tool program.
4. Click the Browse... button in Update Font to browse for the update font file.
Using the Joybee 150 Digital Audio Player
23
5. When the update font file is located, click to select the file and click Open, Update.
Before performing firmware upgrade and font update, if the player can not be connected successfully, please do
the following:
1. Right-click on the System Update Tool program window and select “USB Driver”, “Install Driver” in the submenu that appears.
2. The computer will generate and execute a cmd.exe file automatically. When done, it is recommended that you
restart the computer.
If the connection problem still persists, please follow the steps below:
1. When the player is in update mode, connect the player to the computer using the USB cable.
2. Right-click on the “My Computer” icon on Windows Desktop and select “Properties” in the submenu that
appears.
3. Go to “Device Manager” and check if there is a “X” symbol beside “USB Device”. If yes, select the device and
delete it.
4. Click “Refresh” or “Scan for hardware changes”, and then re-connect the Joybee 150 Digital Audio Player to
the computer.
24
Using the Joybee 150 Digital Audio Player
Setting Up the Startup and Shutdown Screen
The Joybee 150 Digital Audio Player allows you to personalize the startup and shutdown
screens. To do so, first you need to convert the image file into the format that can be
accepted by the Joybee 150 Digital Audio Player using the Startup/Shutdown Screen Editing
Tool. Second, copy the converted file to the player and follow the steps below to select the file
to use. For more information on how to use the Startup/Shutdown Screen Editing Tool,
please see "Using the Startup/Shutdown Screen Editing Tool" on page 29.
1. On the system setup options menu, press the
press the
button.
or
button to scroll to Screen Setup and
2. Press the or button to scroll to Startup, Shutdown or Default, and then press
the
button to confirm.
3. You will see the preview of the screen files. Press the or button to scroll to a desired
file and then press the
button to select it. After a file is selected, you will return to the
previous menu. If you have selected Default in step 2, the startup and shutdown screen
will be reset to the default status.
System Reset
With this function, you can reset the settings of the Joybee 150 Digital Audio Player to its
factory default status.
1. On the system setup options menu, press the
press the
button.
or
button to scroll to System Reset and
2. You will be asked if you are sure to proceed with the reset. Press the
scroll to YES and then press the
button to reset.
or
button to
Viewing System Information
The system information is useful when your Joybee 150 Digital Audio Player needs servicing.
To system information of the Joybee 150 Digital Audio Player, on the system setup options
menu, press the or button to scroll to System Info and press the
button. Related
information will appear on the display.
Using the Joybee 150 Digital Audio Player as a USB
Flash Drive
In combination with the USB cable, you can use the Joybee 150 Digital Audio Player as a
handy USB flash drive.
1. Connect the Joybee 150 Digital Audio Player using the USB cable. The player will be recognized automatically and there will be a new removable disk icon in the My Computer
window.
2. Now you can manage files by using the cut/copy/paste commands between your PC and
the player.
If the files are not in .mp3, .wma or .txt formats, they will not be recognized by the Joybee 150 Digital Audio
Player as music or eBook files. and will not effect normal functions.
Using the Joybee 150 Digital Audio Player
25
Using the Joybee 150 Digital Audio Player
Software
Using the Lyrics Editing and Conversion Tool
The Joybee 150 Digital Audio Player Lyrics Editing and Conversion Tool allows you to
combine and convert the lyrics text files (.txt format) and song files (.mp3, .wav formats)
into .mpr files for the lyrics sync function of the player.
To open the Lyrics Editing and Conversion Tool, Click the Start button on Windows
Taskbar and select Programs, BenQ Joybee 150 MP3 Player, Lyrics Editing and Conversion
Tool.
The Main Screen
The table below is an introduction to the function of each button on the main screen:
Button Function
Create a new file
Open an existing file
Button Function
Wrap text (when editing lyrics, place
mouse cursor on the beginning of each
line and click this button to force
starting a new line)
Play (Click this buton to play the
music file)
Save file
Pause (Click this button to pause)
Cut
Stop (Click this button to stop)
Copy
Paste
26
Using the Joybee 150 Digital Audio Player Software
Fast forward (Click this button to step
1 second forward)
Fast rewind (Click this button to step 1
second behind)
Convert to LYR file
Synchronize (Click this button to
insert a synchronization point)
Open the song file for the lyrics
Remove the last inserted sync point
Step 1: Synchronize the lyrics with the song
Your computer must have a sound card and an earphone or speaker for this operation.
1. Click the
button to open a lyrics text file (in .txt format). You can also copy lyrics
from elsewhere and paste it onto the Lyrics Editing and Conversion Tool window directly.
2. Click the
button to open the song file for the lyrics.
3. The music file will play automatically after it is opened. Now you can start synchronizing
the lyrics with the song. When the song goes to the start of a sentence, place mouse cursor
on the beginning of that sentence and click the
button to mark a sync point. Perform
the same action for the rest of the song and the lyrics.
4. When finished, click the
file.
butto to convert and save the synchronized lyrics as a .lyr
If you want to simulate the synchronization result, you need to save current file as a .smi file. Click “Sync” on the
menu bar and select “Convert TLY into SMI”.
Step 2: Simulate the synchronization result (Optional)
Before simulating the synchronization result, make sure that you have Windows Media Player 7.0 or later versions in your computer. Otherwise, please download and install it from www.windowsmedia.com.
1. Click Sync on the menu bar and select Verify Sync. The following window will appear.
2. Click the Browse->Music button to browse for and select the music file and then the
Browse->SMI button to browse for and select the corresponding .smi file. Click the Play
button. The synchronization result will appear in a box at the lower right corner of the
window.
Using the Joybee 150 Digital Audio Player Software
27
Step 2: Combine and convert the synchronized lyrics file (.lyr file) and the music file into a
.mpr file and transfer it to the Joybee 150 Digial Audio Player
1.Click Convert on the menu bar and select MP3->MPR. The following window will appear
on the screen.
2. Click the Browse... button to browse for and select the MP3 music file.
3. Click the Browse... button to browse for and select the corresponding synchronized .lyr
lyrics file.
4. Click Covert. A message box will appear when conversion is done.
5. Copy the .mpr file to the Joybee 150 Digital Audio Player.
6. Select and play the .mpr file on the Joybee 150 Digital Audio Player, and you will see that
the lyrics are synchronized with the song on the display.
You must also enable the Lyrics Sync function. Please see "Lyrics Sync" on page 21.
You can also convert multiple song files and .lyr files at once. Follow the below steps:
1. Click Convert on the menu bar and select Batch MP3->MPR. The following window will
appear on the screen.
3. Click the Add button to browse for and select the MP3 song files. You can select multiple
files. When done, click the Open button.
28
Using the Joybee 150 Digital Audio Player Software
4. Click the Browse... button next to the Lyric Folder drop-down menu and select the
directory where the corresponding lyrics files are located. Click the LYR radio button on
the right.
5. Click the Browse... button next to the Output Folder drop-down menu and select the
directory where converted .mpr files will be located.
6. Click the Convert button to start converting selected files. You will be prompted by a
message box when the operation is finished.
During the batch conversion process, the Lyrics Editing and Conversion Tool will combine the song file that has
the same file name as that of the .lyr file and convert them into a .mpr file. If the names do not match, the software will go on to convert the next file. Therefore, please note that an MP3 song file must have the same name as
that of the .lyr file for conversion. Otherwise, mismatch or errors may occur.
Batch Converting .txt eBook Files
Pure text (.txt) files may be encoded with the following encoding formats: ANSI, Unicode
and UTF-8. However, the Joybee 150 Digital Audio Player supports only the ANSI and
Unicode ones. The .txt file conversion tool of the Lyrics Editing and Conversion Tool is
provided to convert your .txt eBook files into acceptable files using the supported encoding
formats. (Unicode encoded .txt files can not be displayed normally in Windows 98).
1. Click Convert on the menu bar and select Batch convert to txt. The following window will
appear on the screen.
2. Click the Add... button to browse for and select the .txt files. You can select multiple .txt
files at once.
3. Click the Browse... button next to the Output Folder drop-down menu and select the
directory where converted .txt files will be located.
4. Click the Convert button to start converting selected files. You will be prompted by a
message box when the operation is finished.
Using the Startup/Shutdown Screen Editing Tool
With the Startup/Shutdown Screen Editing Tool, you can customize the startup/shutdown
screen of the Joybee 150 Digital Audio Player.
Using the Joybee 150 Digital Audio Player Software
29
To open theStartup/Shutdown Screen Editing Tool, click the Start button on Windows
Taskbar and select Programs, BenQ Joybee 150 MP3 Player, Startup & Shutdown Screen
Editing Tool.
The Main Screen
The table below is an introduction to the function of each button on the main screen:
Button
Function
Open image files in .bmp, .jpg or .gif formats.
Save as .lgo startup/shutdown screen files.
Information about the software.
Adjust brightness (Move the slider to the left to decrease brightness, and to the
right to increase brightness.
Step 1: Convert .bmp, .jpg or .gif image files into .lgo startup/shutdown screen files
1. Click the
button to open a desired .bmp, .jpg or .gif image file.
2. After the file is opened, the image will appear on the left panel of the software main
screen, and a preview picture of the output .lgo file will appear on the right panel.
3. Click and drag the brightness adjustment slider
satisfactory level.
4. Click the
to adjust the brightness to a
button to convert and save the image as a .lgo startup/shutdown screen file.
Avoid using the Startup/Shutdown Screen Editing Tool to convert large images, such as files larger than 1MB.
Due to the size limit of the Joybee 150 Digital Audio Player display (128x64 pixels), when converting .bmp,
.jpg or .gif image files, if the dimension is larger than 128x64 pixels, it will be scaled down proportionally to a
smaller image with a height of 64 pixels. If the original image file is smaller than 128x64 pixels, it will be
converted to its original size. Therefore, to prevent possible scaling problems, it is recommended that you
change the size of the image file to fit the size limit using image editing software.
Step 2: Transfer the .lgo startup/shutdown screen file to the Joybee 150 Digital Audio Player and
perform setup
30
Using the Joybee 150 Digital Audio Player Software
Transfer the .lgo startup/shutdown screen file to the Joybee 150 Digital Audio Player and see
"Setting Up the Startup and Shutdown Screen" on page 25 to select the .lgo file as the startup
or shutdown screen.
Using the Joybee 150 Digital Audio Player Software
31
Using QMusic
QMusic is a software program that helps you to easily organize your music collection. You
can use it to play music CDs and MP3 files, convert CD music into .mp3 format, create
playlists for playing music, burn music CDs and compile your own music album.
When used with the Joybee 150 Digital Audio Player, you can easily convert CD music into
.mp3 format and transfer it to the player. You can also let QMusic update the music files in
the player automatically.
The following section will focus on the QMusic functions that are used with the Joybee 150
Digital Audio Player. For instructions on how to use other features, please refer to its online
help.
After QMusic is successfully installed, an icon will be created on your computer desktop.
Double-click the icon to open QMusic.
Or, you can also click the Start button on Windows Taskbar and select Programs, QMusic2,
QMusic2.
The Main Screen
Action Buttons
Display
System
Buttons
Search
Window
Left
panel
Right
Panel
Feature
Buttons
Playing Buttons
Parts
Action Buttons
Left Panel
32
Using QMusic
Status
Bar
Description
Execute certain actions in QMusic.
Displays all available media for QMusic.
Music Playing Buttons
Feature Buttons
You can use these buttons to play music.
The detailed information of playlist will appear here, including total
number of songs and total playback time.
When playing music, you can use these buttons to change play mode.
Right Qanel
Shows songs in the selected playlist/media on the left panel.
Status Bar
Search Window
System Buttons
Display
You search for a song by entering its name and pressing the magnifier
icon.
Used to control the QMusic window.
Shows the process currently being carried out by QMusic. For example,
when playing music, the title of the song, elapsed time and other
information will appear here.
Using QMusic
33
Adding songs to the Joybee 150 Digital Audio Player using QMusic
After QMusic is opened, connect the Joybee 150 Digital Audio Player to your computer
using the USB cable. The icon
will appear on the left panel of QMusic and all
directories in the player will appear below it.
Adding CD music to the Joybee 150 Digital Audio Player
1. Insert a music CD into the CD-ROM drive of your computer. A few seconds later, the
icon
will appear on QMusic left panel, and a list of songs on the CD will appear
on the right panel.
34
Using QMusic
2. Check the checkboxes next to the songs you want to transfer to the palyer. When finished,
click the
button. QMusic will convert selected songs into MP3 format.
3. When QMusic has done with the conversion process, it will place all converted files in a
New Album playlist on the left panel. Click on it and you will see a list of converted files
on the right panel.
4. Click to select the songs you want to transfer to the Joybee 150 Digital Audio Player on the
right panel. Selected files will be highlighted. If you want to select multiple songs, press
and hold the Ctrl key on the keyboard and click other songs. If you want to select all songs
Using QMusic
35
on the list at once, click the first song on the list, press and hold the Shift key on the
keyboard and then click to select the last song on the list. If you want to delete a song on
the list, click the song and press the Delete key on the keyboard.
5. Click and drag the selected songs on the right panel to the MP3 directory under the
icon.
Before dragging the selected songs to the Joybee 150 Digital Audio Player, make sure that there is enough memory space.
36
Using QMusic
Adding new songs to the Joybee 150 Digital Audio Player from your computer
1. Click the My Joybee playlist on the left panel.
2. Click the
button and then browse for and select the .mp3, .wav or .wma song files
you want to transfer to the Joybee 150 Digital Audio Player. Click Open and the selected
song files will be added to the My Joybee playlist.
Using QMusic
37
3. Click the
icon on the left panel.
4. Click the
button. The songs you just added will be transferred by QMusic to the
player. QMusic will ask you whether you want to delete the songs that are already in the
player. If you want to keep these songs, please back them up in your computer before
continuing.
Before dragging the selected songs to the Joybee 150 Digital Audio Player, make sure that there is enough memory space.
38
Using QMusic
Let QMusic automatically update the songs upon getting connected to the Joybee 150 Digital
Audio Player
1. Click the My Joybee playlist on the left panel.
2. Click the
button and then browse for and select the .mp3, .wav or .wma song files
you want to transfer to the Joybee 150 Digital Audio Player. Click Open and the selected
song files will be added to the My Joybee playlist.
Using QMusic
39
3. Click the
button.
4. Click the Joybee tab on the dialogue box that appears.
40
Using QMusic
5. On the Joybee tab, click to select Automatically launch QMusic when Joybee inserted and
Automatically transfer MP3 files to Joybee when inserted, then click
the
button.
6. Disconnect the Joybee 150 Digital Audio Player and then reconnect it to the computer.
QMusic will automatically update the songs in the player with the songs in the My Joybee
playlist.
From now on, you only have to place the new songs under the My Joybee playlist on the left
panel. Everytime you connect the Joybee 150 Digital Audio Player to your computer, the
update action will be carried out automatically.
Before dragging the selected songs to the Joybee 150 Digital Audio Player, make sure that there is enough
memory space.
Using QMusic
41
Notes, FAQ and Troubleshooting Tips
Notes
Do not put too many files under each directory or in the root directory to prevent the
system from slowing down. If a large number of files must be put in the player, organize
the files into different directories.
Do not store data in the player to its full memory capacity. Allow at least 0.5 MB for the
system to manage memory to prevent the system from slowing down or improper data
storage status.
When transferring files to the Joybee 150 Digital Audio Player, the message "Don't
Remove USB" with "OW" (writing) or "OR" (reading) will flash on the display. Do not
remove the USB cable when the transfer is in progress.
The Joybee 150 Digital Audio Player only plays the files in current directory in the
memory. If you need to play the files in other directories, switch to the corresponding
directory.
Restarting the player will reset the root directory as the current folder.
The maximum number of pages displayed for the lyrics of each song is 256. If the lyrics of
the song result in more than 256 pages, the player will not display the 257th pages and on.
Do not remove the USB cable when updating the firmware of the player. Otherwise, the
player may not be able to startup. Remove the USB cable only when you are informed by
the message on the display.
When playing VBR MP3, lyrics, time length repeat, and elapse time may be displayed
improperly.
There are 2 ways to display lyrics for music: (1)Play an MP3 or WMA file with a lyrics file
(.lyr) of the same file name; (2) Combine the MP3 file with lyrics file (.lyr) to create an
.mpr file with the lyrics editing and conversion tool software.
This player can play wma files with a bitrate higher than 32kbps.
Avoid storing over 200 song files in the root directory.
When formatting the player using the Windows Format command, do not format it using
the NTFS file system.
42
Notes, FAQ and Troubleshooting Tips
FAQ and Troubleshooting Tips
Why can’t I play certain songs in WMA format using my Joybee 150 Digital Audio Player?
Some WMA songs currently available from the Internet are copyright protected. This kind
of protection method prevents unauthorized person from playing protected song files.
These songs can only be played using a Window Media Player program that has been authorized. If you are already authorized to play these protected songs and want to make them
playable on your Joybee 150 Digital Audio Player, follow the steps below:
1. Open Windows Media Player and select Open in the File menu.
2. Select the songs you want to transfer to the Joybee 150 Digital Audio Player and click
Open.
3. Connect the Joybee 150 Digital Audio Player to your computer. A new Removable Disk
should appear in the My Computer window.
4. Select Copy in the Windows Media Player File menu, and then select Copy to portable
devices.
5. A file list will appear. Check to select the songs you want to copy to the Joybee 150 Digital
Audio Player and then click the Copy button located at the upper right corner of the
screen.
The music files will be copied and become playable using the Joybee 150 Digital Audio
Player.
How many minutes of MP3 music can be stored in the Joybee 150 Digital Audio Player?
It depends on the memory capacity of the player and the compression ratio used in
encoding the MP3 files. For MP3 files encoded by MPEG1 Layer3 with a bitrate of 128kbps
and sampling frequency of 44kHz (most commonly used), 1MB of memory can store about
1 minute of music. i.e. 128MB/256MB of memory stores about 128/256 minutes of music.
How long is the maximum recording time?
Recording time depends on the encoding method, bitrate, sampling frequency and memory
capacity of the player. If high sound quality is not needed for recording of meeting or
lecture, lower bitrate and sampling frequency such as MPEG1 Layer3, bitrate: 16kbps,
sampling frequency: 16kHz are recommended. To record with high sound quality, use
higher bitrate and sampling frequency such as MPEG1 Layer3, bitrate: 224kbps, sampling
frequency: 48kHz. The following table shows the recording time for different settings of
recording. Please see "Record Setup" on page 14 for how to configure them.
Encoding
method
MPEG2 Layer3
MPEG2 Layer3
MPEG2 Layer3
MPEG2 Layer3
MPEG2 Layer3
Bitrate
16kbps
128kbps
224kbps
32kbps
96kbps
Sampling
Frequency
16kHz
44.1kHz
48kHz
32kHz
22.05kHz
Qccupied
memory space
120kByte
960kByte
1640kByte
500kByte
720kByte
Recording time
per MB
9 minutes
1 minute
40 seonds
2 minutes
1.4 minutes
When should I recharge the battery?
When the battery indicator on the display shows that the battery is empty, or battery appears
to be weak (there is only one bar in the battery icon) or when the sound quality deteriorates,
recharge the battery as soon as possible.
Notes, FAQ and Troubleshooting Tips
43
Why do different songs have different sound volumes?
Because the parameter of the volume level when recording each song may not be the same,
the volume level of different songs are different.
The file size is smaller than the free memory available in my player, but I still cannot tranfer it to
my player
The Joybee 150 Digital Audio Player allocates memory in cluster of 16KB or 32KB. A file of 1
Byte also occupies one cluster, so a file of a size smaller than the free memory available might
not be transffered to the player.
Why is the memory capacity shown in the player smaller than that in the specifications chart?
The player needs some memory space to store fonts and other system data, therefore the
usable memory is smaller than its full capacity.
How can I get the updated firmware and fonts data?
You can go to BenQ website at http://www.BenQ.com to donwload these data when they are
available.
The Joybee 150 Digital Audio Player does not start up!
Check the following:
Make sure if you have accidentally disconnected the player from the computer when
updating firmware.
Physical damages in the flash memory may result in this problem.
The battery power is too low.
Solutions:
Press and hold the VOL- button while moving the power switch to the ON position and
keep this status for 5 seconds. Then, connect the player to the computer using the USB
cable, open the MP3 Update software and perform firmware upfate.
When the memory self-diagnosis procedure is carried out when you turn on the player,
the message "INT Not Formated” followed by "Format? Yes No" will appear on the display
when physical damages are found in the flash memory. If YES is selected, the system will
start formatting the flash memory. If No is selected, the player will be turned off
automatically and the problem will still persist.
Recharge the battery.
44
Notes, FAQ and Troubleshooting Tips