1
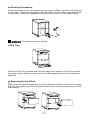
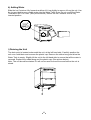
Ice Maker
Instruction Manual
Model: IM01A
1. Important Safety Instructions
Please read these instructions thoroughly before using this product and retain them for
future use.
WARNING: This appliance must be earthed.
-
-
This Ice Maker is intended for household use only.
If the power cord is damaged a replacement must be obtained from the manufacturer.
Hold the plug firmly when removing it; do not pull the power cord.
Do not place the appliance near an open flame, cooking or heating appliance, or hot
surface.
For indoor use only.
To avoid electric shock do not open the casing. There are no user serviceable parts
inside.
Switch off the power and remove the plug when cleaning the appliance and when the
appliance is not in use.
Do not operate the appliance if it has been damaged in any way.
This appliance is not intended for use by persons (including children) with reduced
physical, sensory or mental capabilities, or lack of experience and knowledge, unless
they have been given supervision or instruction concerning use of the appliance by a
person responsible for their safety.
Children should be supervised to ensure that they do not play with the appliance.
The appliance must not be transported at an inclined angle greater than 45°.
Do not turn the Ice Maker upside down; as this could cause the compressor or
refrigerating system to malfunction.
A clearance of 150mm should be provided around the appliance to allow air to circulate.
Thoroughly clean the Water Tank and Ice Container before and after use.
Change the water regularly to ensure the quality of the ice cubes.
NOTE: Only use still, potable water in the Ice Maker.
Do not fill the Water Tank above the ‘Full’ level mark.
If the power is switched off whilst the appliance is operating, please wait 3 minutes before
switching the power back on again.
Before storing the Ice Maker, drain out the water and dry out the Water Tank and Ice
Container.
The appliance contains flammable insulation foam and refrigeration gases, please
dispose of the appliance properly, inline with local recycling regulations.
NOTE: Please clean the inside of the ice maker thoroughly before use. (See Section 3)
NOTE: The first batches of ice cubes produced may not be full size. A batch of 10 full sized
ice cubes will be produced after approximately 25 minutes. Subsequent batches of ice
cubes will be produced every 7-10 minutes, depending on the ice size selected.
NOTE: Before using the Ice Maker for the first time, please stand it upright for approximately
2 hours to allow the cooling system to stabilise, following transportation.
-2-
2. Operation
a) Ice Making Cycle
The ice making cycle has 5 steps:
1. Pumping water from the water tank up to the water tray.
2. Operating the refrigeration system to create the ice cubes.
3. Emptying the excess water from the water tray.
4. Releasing the ice cubes into the ice container.
5. Returning the water tray to its upright position.
This cycle continues until the ice container is full of ice cubes or there is insufficient water in
the water tank.
b) Control Panel
‘START’ and ‘STOP’ buttons:
When the power is connected, the unit will go into standby mode. (One of the ice size
indicators will be flashing). When the ‘START’ button is pressed the selected ice size
indicator will remain on and the ice making cycle begins. When the ‘STOP’ button is pressed
the ice making cycle will stop. The water tray will empty the water back into the water tank
and any ice cubes will be released into the ice container, before the unit goes back into
standby mode.
‘ICE SIZE’ button:
Press this button to select the required size of ice cubes. (The default size is small) The ice
size indicator will cycle between small-medium-large and back to small, each time the button
is pressed.
Note: If the Ice Maker is operated in a cool ambient, it is recommended that ‘Small’ ice
cubes are selected.
Large Size Indicator (green): When this light is on, it indicates that the unit is making
large ice cubes and the cycle time will be the longest.
Medium Size Indicator (green): When this light is on, it indicates that the unit is
making medium size ice cubes.
Small Size Indicator (green): When this light is on, it indicates that the unit is making
small ice cubes and the cycle time will be the shortest.
-3-
Ice Full Indicator (red): When the Ice Container is full of ice cubes, the indicator will
turn red. The ice making cycle will stop after the next batch of ice cubes have been released
into the container. The unit will then go into standby mode. Remove the ice cubes before
pressing the 'STOP' and then 'START' buttons to restart the ice making cycle.
Low Water Indicator (red): The Ice Maker will automatically check the water level in
the Water Tank. If the water level is too low, the red light will come on and the ice making
cycle will stop. When water is added to the Water Tank, the ‘Low Water Indicator’ will go off
and the unit will automatically restart.
c) Moving the Unit
When unpacking or moving the Ice Maker, please note that the unit should not be tilted over
45°. Keep the appliance upright at all times. There are ‘handles’ at the rear edges of the
casing which should be used when moving the Ice Maker. (See picture C)
A
B
C
d) Locating the Unit
Position the Ice Maker on a sturdy flat surface so that there is a clearance of 150mm all
around. (See picture below)
≥ 150mm
≥ 150mm
-4-
e) Electrical Connection
Connect the supply cord to the socket at the rear of the Ice Maker. Insert the 3-pin plug into
a 13A socket. Ensure that the supply is 220-240V 50Hz. Switch off the supply and remove
the plug when cleaning the appliance or the appliance is not in use. (See picture below)
WARNING: This appliance must be earthed.
f) Drip Tray
Position the Drip Tray provided under the front edge of the appliance. This will then collect
any drops of water that may run down the front of the appliance when the Ice Container is
pulled out.
g) Removing the Ice Cubes
Slide the Ice Container forwards and use the Ice Scoop provided to remove the ice cubes.
Push the Ice Container back fully into position when the ice cubes have been removed. (See
picture below)
-5-
h) Adding Water
Slide the Ice Container fully forwards and then tilt it up slightly to remove it from the unit. Use
the jug provided to pour potable water into the Water Tank. Note: Do not overfill the Water
Tank above the ‘Full’ level. (See picture below). Return the Ice Container into its fully
inserted position.
FU L L
FULL
i) Draining the Unit
The drain point is located underneath the unit, at the left hand side. Carefully position the
unit over a sink/drain and unscrew the plastic cap. Remove the rubber bung and allow the
Water Tank to empty. Slightly tilt the unit to the left hand side to ensure that all the water is
removed. Replace the rubber bung and the plastic cap. (See picture below).
Note: The unit should be drained if it will not be used for some time and before the unit is
stored.
-6-
3. Cleaning and Maintenance
Note: Please clean the Ice Maker regularly.
- Before cleaning the unit, switch off the power and remove the plug. Remove any ice
cubes from the Ice Container and drain all the water from the Water Tank.
- Use a dilute mild detergent in water to clean the inside and outside of the Ice Maker with a
soft cloth. Rinse and dry thoroughly. Do not spray any liquids onto the appliance.
- Do not use any acidic or abrasive detergents.
- When cleaning the inside of the appliance, take care not to damage the sensing probes.
- If the Ice Maker will not be used for some time, please remove any ice cubes, drain the
water from the Water Tank and thoroughly clean and dry the inside of the appliance.
4. Technical Specification
Model
Climate Type
Ice Making Capacity
Ice Storage
Water Tank Capacity
Rated Voltage / Frequency
Rated Current
Input Power
Shock Protection Class
Refrigerant
Insulation Layer
Dimensions
Net Weight
IM01A
N
12kg/24h
700g
1.5L
220-240V / 50Hz
0.9A
140W
I
R134a/52g
EPS
332(h) x 260(w) x 335(d) mm
10kg
5. Environmental Note
This symbol on the product indicates that it must not be discarded as general
household waste. Instead it should be handed over to the applicable collection
point for the recycling of electrical and electronic equipment. Disposal must be
carried out in accordance with local environmental regulations for waste
disposal.
-7-
6. Trouble Shooting
Problem
The compressor
makes a strange noise
Possible Cause
The sensor is broken
Possible Solution
Turn off the Ice Maker.
Ensure the voltage is normal and
restart.
Remove the Ice Container. Wait
several minutes before replacing the
container and then restart the
machine.
Please clean the Ice Container and
restart the unit. If the Ice Full
Indicator fails to go off then the unit
will need to be replaced.
Please contact Customer Service
Ice Full Indicator is on
but there is no ice in
the Ice Container
Room temperature is
too low
The sensor is broken
Please contact Customer Service
Water conductivity is
low
Water conductivity is
low
Add a small amount of salt to the
water
Drain the unit and clean the Water
Tank; especially the screw heads at
the rear of the Tank, as these detect
the water level. Add water and
restart the appliance.
Please contact Customer Service
Check that the unit is properly
plugged in and the supply switched
on.
Please contact Customer Service
Too low voltage
Ice blocking trouble
Low Water Indicator is
on but Water Tank is
full of water
Whether there is no
water or just a little
water in the Water
Tank, but the Low
Water Indicator
remains off.
Ice Size Indicator is off
when the unit is
powered up.
The sensor is broken
Unit is not plugged in
properly
The fuse on the PCB
has blown.
7. Customer Service
If you encounter any problems with your Hostess Ice Maker, please contact the appropriate
Service Department. If the Ice Maker was bought in the UK, please contact:
Hostess Customer Service Department,
Crosslee plc,
Halifax,
West Yorkshire,
United Kingdom HX3 8DE
Telephone: 01422 203963
If the Ice Maker was bought outside the UK, please contact your retailer.
4213 194 09101
-8-