1
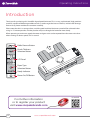
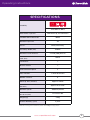
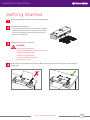
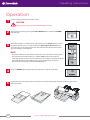
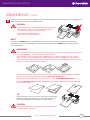
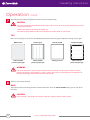
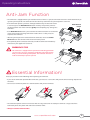
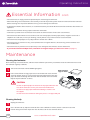
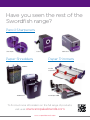
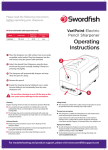
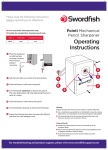
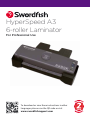
HyperSpeed A3
6-roller Laminator
For Professional Use
To download or view these instructions in other
languages please scan the QR code or visit
www.swordfishsupport.com
Operating Instructions
Introduction
Thank you for purchasing this Swordfish HyperSpeed laminator. This is a very sophisticated, high precision
machine, capable of delivering excellent results. In order to get the best use from it, and to avoid damage
from misuse, please read these instructions carefully.
Please note that this is a constant heat, variable speed machine. Maximum speed will be achieved when
using 2 x 75 micron pouches. Thicker pouches will pass through the laminator more slowly.
When operating at maximum speed, the motor and gear-train can be expected to make more noise than
when running at slower speeds. This is normal.
Roller Reverse Button
Pouch Thickness
Selection Button
LCD Panel
Paper Type
Selection Button
Ready Indicator
Power On/Off Button
For further information
or to register your product
visit www.snopakebrands.com
2
www.snopakebrands.com
SCAN ME
Operating Instructions
SPECIFICATIONS
Suitability
Small Office & Office
What makes it special?
Swordfish UK Product Code
Swift warm-up, fast lamination
40243
Maximum Paper Size
A3
Colour
Black/Silver-Grey
Feed Entry Width (mm)
320mm
Maximum Pouch Thickness
2 x 250 [500] Microns
Maximum Pouch Thickness
Total (mm)
1.0mm
Jam Release
✓
Reverse Control
✓
Cold Lamination Option
✗
✓ After 30 minutes
Auto Shut-Off
Number of Rollers
6
Warm-up Time (minutes)
Speed (time to laminate an
A4 sheet)
Maximum Speed*
Approx 1 minute
Approx 14 seconds*
2000mm/minute
Product Dimensions
H x W x D (mm)
127 x 525 x 364
Weight (kg)
5.4kg
Product Warranty (years)
2 years
*Based on using a 2 x 75micron pouch with 80gsm copy paper.
www.snopakebrands.com
3
Operating Instructions
Safety Precautions
Failure to comply with any of the following safety precations could result in serious injury, fire or electric shock.
This equipment is not intended for use by children. It is not a toy.
Unauthorised attempts at repair will invalidate the warranty.
Do not allow water, or damp media, to enter the laminator.
Do not cover the laminator, or place anything on it. Risk of fire!
Disconnect after use or when cleaning the laminator.
The laminator is hot and contains hazardous moving parts.
Do not operate the laminator on, or near, combustible objects.
Do not allow clothing or jewellery to enter the laminator. Risk of fire or electric shock!
Do not leave the laminator unattended during operation.
4
www.snopakebrands.com
Operating Instructions
Getting Started
1
Unpack your package. Dispose of the packaging responsibly.
2
Installation of the output tray:
• Insert the output tray into the slot at the back side of the
laminator. Gently push the tray upward until it is locked.
• To remove the output try, release the snap fit lock and
push the tray downward.
3
Decide where to locate the laminator.
CAUTION
Do not locate the laminator:
• Near any heat appliances such as heater or stove
• Directly exposed to sunlight
• In front of an air conditioner
• In a poor ventilated environment
• On a non-level surface
4
Allow enough clearance behind the laminator. Make sure that the lamination coming out of the laminator is
not blocked.
www.snopakebrands.com
5
Operating Instructions
Operation
1
Insert the electric plug into the power socket.
CAUTION
Do not leave the laminator unattended during lamination.
2
Turn on the laminator by pressing the Power On/Off button and the blue POWER
light will glow.
3
The default setting is 2 x 80 micron for copy paper. Press the Pouch button to select
the pouch thickness you are using and press the Paper Type Selection button to
select the item you are going to laminate. The laminator will adjust the lamination
speed according to your selection.
NOTE
• The pouch thickness on the LCD Panel represents one side thickness of the pouch.
• The maximum lamination thickness is 1.0mm (1000 micron) inclusive of the
lamination pouch and the item to be laminated. For example, if the thickness of the
lamination pouch is 0.1mm (100 micron) per side (total 0.2mm), the item to
be laminated should be less than 0.8mm (800 micron).
4
The green READY light will glow when the laminator is ready for lamination
5
Prepare the item to be laminated. Insert the item in the lamination pouch and push it right into the sealed
end of the pouch.
6
www.snopakebrands.com
Operating Instructions
Operation cont.
6
Insert the sealed end of the pouch straight into the laminator through the inlet. Once the pouch is engaged by the
rollers, it will be fed into the laminator automatically.
CAUTION
• Always feed the pouch into the laminator in the middle of the
inlet where the sensors are located. Feeding the pouch at
the side of the inlet may lead to malfunction.
• Do not laminate multiple pouches.
Always laminate one pouch at a time.
NOTE
The illuminated READY light may switch off during lamination. This is due to the temperature drop during
lamination. It is normal. It will not affect the lamination quality. Wait until the READY light glows again before
the next lamination.
IMPORTANT
Never attempt to laminate leaves, flowers or other organic material, wax crayon drawings, thermal paper,
instant photographs or any material that is not heat-resistant.
If you intend to laminate irregular shapes, multiple items in one pouch, soft materials such as tissue
paper or textiles, or any item that leaves a border of more than 3mm, you must use a carrier. Failure to
do so could cause serious damage to your laminator. Damage so caused will not be covered by warranty.
Carriers are available from your pouch supplier.
A carrier will absorb some of the heat, so you may need to adjust the settings accordingly. We suggest
that you start by selecting ”thick paper” using the Paper Type Selection button.
Note that the maximum thickness of carrier + pouch + contents MUST NOT EXCEED 1.0mm.
Press the Paper Type Selection button to Thick Paper and insert the folded end of the copy paper into
the laminator centrally.
TIP
If you don’t have a carrier, you can use a large piece of thick paper
folded in half along the short side to create a ’sleeve’ and place
your pouch in between the folded sides as shown below.
CAUTION
Do not attempt to make a carrier from two pieces of paper glued
or taped together - it will jam!
www.snopakebrands.com
7
Operating Instructions
Operation cont.
7
The laminated item will be transported out of the laminator automatically.
CAUTION
• Do not try to pull the pouch out by force. This may result in creases or curves in the laminated item and may
damage the laminator.
• Remove the laminated item from the output tray.
• The laminated item will be hot. Please handle with care. Cool it down on a flat surface.
TIPS
If the correct settings are not chosen, the following lamination results may appear. Adjust the setting and try again.
Whitish spots
Vertical spots
Clear & smooth
Horizontal ripples
Select a thicker
pouch or paper type
Select a thicker
pouch or paper type
Setting is correct
Select a thinner
pouch or paper type
WARNING
If you have laminated a large quantity of small pouches (eg. A4, A6, card size), please wait for 2 minutes
before you laminate a large pouch (ie. card size - A6, A5 - A4 or A4 - A3). The temperature on both sides of
the roller will be high and may affect the lamination quality.
8
After use, turn off the laminator.
NOTE
The laminator will shut down by itself if it is idle for 30 minutes. Press the Power On/Off button again to start up the
laminator.
CAUTION
If the laminator is not going to be used for a long time, unplug it from the power socket.
8
www.snopakebrands.com
Operating Instructions
Anti-Jam Function
• The laminator is equipped with a jam detection device. If there is a jam, the laminator will reverse itself automatically to
eject the jammed pouch. The laminator will shut down by itself when the jammed pouch is removed.
• If the lamination pouch is jammed / misaligned before the jam detection device
is activated, press the Roller Reverse button manually and pull the jammed /
misaligned pouch out of the laminator gently. Forceful pulling may damage the
laminator.
Roller Reverse
button
• If the Roller Reverse button is pressed when the laminated item has reached the
exit, the laminated item will go towards the outlet. This is a safety measure
to protect the laminator.
• After the jammed pouch is removed from the laminator, release the Roller
Reverse button and continue with a fresh lamination pouch.
• If the jammed pouch cannot be removed, turn off the laminator immediately
and contact your supplier for assistance.
EMERGENCY STOP
This laminator is equipped with a patented overloading protection
system. In the case of an emergency, hold both sides of the pouch
firmly to stall the feeding of the pouch. The laminator will reverse
itself automatically to eject the pouch.
Essential Information!
Please pay attention to the following when operating the laminator.
• If you cut the lamination pouch before lamination, you must use a carrier. This will prevent adhesive being deposited on
the rollers.
• Do not use 2 lamination pouches as shown below. It will jam the laminator.
• The lamination pouch comes in two sheets with one edge sealed. Do not attempt to laminate a single side of the
lamination pouch. The pouch will stick to the laminator roller.
• Always insert the sealed end first.
www.snopakebrands.com
9
Operating Instructions
Essential Information cont.
• Do not laminate an empty pouch. The pouch will jam and damage the laminator.
• When laminating several documents consecutively, wait until the previous pouch has been removed from the laminator
before inserting the new pouch. Otherwise it may jam and damage the laminator.
• To prolong the lifetime of the machine, it is recommended that you switch off the machine for 30 minutes after 4 hours of
operation.
• Do not use the laminator for any purpose other than lamination.
• Lamination is permanent and cannot be reversed. Do not laminate items of value such as bank notes.
• Do not laminate items which are heat sensitive such as thermal paper, facsimile paper, tickets, magnetic cards such as
telephone or credit cards, wax crayon drawings, instant photos or any other non-heat-resistant material.
• Do not laminate sharp objects or any object which is thicker than 1.0mm.
• Do not laminate any item that is curly, creased, folded or has irregular thickness. The item may jam the laminator and
cause malfunction.
• Do not laminate any item that is wet. Liquid may cause damage to the laminator, electric shock or fire.
• If you need to laminate multiple items, small items or irregular shapes, you must use a carrier (see page 7).
Maintenance
Cleaning the laminator
After laminating several documents, adhesive material from the pouch may accumulate inside the laminator. Please clean
the laminator regularly as follows:
1
Turn on the laminator until the READY light glows.
2
Fold a sheet of fresh A3 copy paper once in the middle and insert the roller
cleaning support sheet (or a piece of A4 card) to the folded end of the copy
paper. Insert them through the laminator with the folded end inserted first.
Repeat the procedure for 3-5 times.
Roller Cleaning
Support Sheet
CAUTION
Do not use printed paper or the toner on the paper will melt in the
heat of the laminator and may cause laminator malfunction.
Do not insert copy paper without first folding it around a card
for support.
Do not reverse the lamination during this process - the paper will jam!
Cleaning the body
1
Unplug the laminator.
2
Use a soft towel to dry wipe the laminator. If the dirt is difficult to remove, moisten a towel in water with
neutral detergent and then wipe clean the dirt. Please do not use chemical solvents.
10
www.snopakebrands.com
Operating Instructions
Troubleshooting
The POWER light does not glow when the laminator is turned on.
Please make sure the plug is properly plugged into the power socket.
The pouch cannot be laminated.
Please check the thickness of the lamination pouch. The total thickness cannot exceed
1.0mm.
The pouch cannot be laminated thoroughly, white spots appear on the pouch.
The speed of the laminator is too fast. Select a setting for thicker pouch or paper type.
The pouch becomes creased and wavy.
The speed of the laminator is too slow. Select a setting for thinner pouch or paper type.
The sides of the pouch are wavy.
Did you laminate a large number of small pouches? Wait for 2 minutes and laminate again.
The pouch is jammed inside the laminator.
Press the Roller Reverse button and pull out the pouch gently. If the jammed pouch cannot
be removed, turn off the laminator immediately and contact your retailer for assistance.
The laminator shuts down after about 30 mins operation.
This is normal. To restart, toggle the on/off button.
Should problems persist, please contact your supplier for assistance.
www.snopakebrands.com
11
Have you seen the rest of the
Swordfish range?
Pencil Sharpeners
The Triple
Pointi
Paper Shredders
VariPoint
Paper Trimmers
800XC
A3/A4
SuperSlim
1200XXCD
A3 Ellipse-500
To find out more information on the full range of products,
visit us at www.snopakebrands.com
www.snopakebrands.com