1
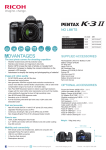
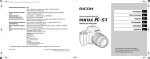
PENTAX O-FC1
User Guide [Operation]
This guide explains how to make use of remote control functions with
our cameras that are compatible with this memory card.
• For details on how to insert the memory card into a camera and establish a wireless LAN connection
with a communication device, refer to the “User Guide [Setup]” included with this memory card.
• The screen illustrations in this guide are examples. The displayed screens may vary depending on the
device.
1
2
3
4
5
6
7
8
Menu Screen
Select a function from the menu
screen that appears in the
browser.
9
10
11
12
13
14
15
16
17
18
Remote Capture
t Memo
• When the communication device is held in the landscape
orientation, only 12, 13, 17, and 18 are displayed.
In the [Remote Capture] screen, the camera’s Live View image
and buttons pertaining to shooting are displayed.
1
9
2
10
u Caution
• If a connection between the communication device and the
memory card via wireless LAN is not established, the menu
screen or other screens do not appear. Even if a wireless LAN
connection is already established, the Live View image in the
[Remote Capture] screen is not displayed correctly when a
browser that is not compatible with this memory card is used.
Before starting remote control operation, refer to the "User
Guide [Setup]" for information on compatible browsers, and
make sure that a wireless LAN connection is successfully
established.
11
3
Displays the menu screen.
Displays the [Image View] screen.
Drive Mode
Exposure Mode
Focus Method
Switches Live View on and off.
Instant Review window
Shutter speed/Aperture/EV Compensation/Sensitivity
* Options underlined in blue can be changed.
Displays the [Settings] screen.
Refreshes the screen.
Magnifies the image displayed.
AF frame
Live View image
Memory card information
Camera’s battery level
Resets the exposure value.
Operation switching slider (AF/Capture)
Shutter release button
12
13
4
14
5
15
6
16
7
17
8
18
2
5 Check the Live View
Shooting Images
1 Set the capture functions on the camera.
2 Connect the memory card to the communication
image on the
communication device.
device via wireless LAN.
For information on how to establish a connection, refer to
the “User Guide [Setup]”.
3 Start the browser on the communication device
and display the menu screen.
4 Tap [Remote Capture].
The camera monitor turns off
after displaying the message
[Remote Capture mode
activated].
The [Remote Capture]
screen is displayed on the
communication device.
Tap S to magnify the
display of the image to 8x,
centering around the AF
frame.
Tap S again to return to the
original magnification.
3
Tap M to return the settings
to their default values.
6 Change the shutter
speed, aperture value,
exposure
compensation value
and sensitivity as
necessary.
7 When the camera is in AF mode, tap the
Tap the options underlined in
blue and select a value from
the list.
focusing point in the Live View image.
Autofocusing is performed at the tapped point.
When the operation switching slider is set to A (Capture),
an image is captured after autofocusing is performed at the
point tapped in the Live View image.
8 Tap the shutter release
button.
The thumbnail image is
displayed in the Instant
Review window.
Tap the Instant Review
window to display the latest
10 images and their shooting
information.
4
u Caution
• Remote Capture cannot be used when the camera is used in
the following conditions.
• When a drive mode other than Single Frame Shooting is
set
• During Movie mode
• While adjusting a composition (Composition Adjustment)
• During the USB/HDMI connection
5
List Display
Image View
Displays the images saved on the memory card on the
communication device.
1
5
1 Tap [Image View] in the
2
6
3
7
menu screen.
4
Or, tap B in the [Remote
Capture] screen.
The [Image View] screen
appears.
8
9
1
2
3
4
5
Folder Display
6
7
8
9
Switches between List Display and Folder Display.
Tap a folder name to view a list of the images stored in
the folder.
Displays the menu screen.
Displays the [Remote Capture] screen.
Folder name
Changes the number of thumbnails to display in a row.
2, 3 or 4 thumbnails can be displayed in a row.
Displays the [Settings] screen.
Refreshes the screen.
Number of files
Thumbnail
u Caution
• Do not operate the camera or capture images with the
camera while viewing images using the Image View feature.
This may cause images not to be saved properly.
6
Checking the Image Information
Saving an Image
Tap the thumbnail to display the
image.
Tap 1 to return to the [Image
View] screen.
Touch and hold an image to save
the image to the communication
device.
u Caution
t Memo
• The location where the image is saved differs depending on
the communication device.
• Only JPEG files saved on this memory card can be displayed
as thumbnails. All other files are displayed as icons and these
images cannot be viewed using the Image View feature.
7
Information
Settings
1 In the menu screen, tap
Tap [Information].
[Settings].
Communication Info and Version
Info can be checked.
The [Settings] screen
appears.
Tap 1 to return to the
previous screen.
The following settings can
be made.
8
t Memo
Communication Settings
• For security reasons, it is recommended that the memory
card be used after changing the SSID and Network Key.
• The changed SSID and Network Key can be reset to the
default settings using the [Wireless Memory Card] setting of
the camera.
The default settings are as follows.
• SSID
FLUCARD_for_PENTAX
• Network Key
12345678
Tap [Communication Settings].
SSID, Network Key (security
code), and Channel Setting can
be changed.
SSID can be specified using 1 to
32 characters, Network Key with
0 or 8 to 63 characters.
Characters that can be used are
single-byte alphanumeric
characters and “_” (underscore).
If you change a setting, tap 2.
When the message [Enable the
settings?] appears, tap [OK].
Then, turn the camera off and on
again, and then establish a
wireless LAN connection again.
9
Camera Settings
Language
Tap [Camera Settings].
Tap [Language].
Select the image quality for Live
View.
Select either Japanese or
English.
10
5 Tap [Settings].
Using with an Unsupported Camera
The [Settings] screen
appears.
A camera incompatible with this memory card does not have
functions for turning the wireless LAN function on or off, or for
resetting the communication settings. Therefore, this memory
card cannot be controlled from the camera side.
For use with a non-compatible camera, two types of images to
control the wireless LAN function need to be created.
Creating Control Images
Create the wireless LAN control images on the memory card.
Be sure to create control images before using the function of the
memory card.
1 When captured images are saved on the
6 Tap [Reload the control
memory card, copy them to a computer or the
like.
image] and then tap
[OK].
2 Insert the memory card into the camera and
execute [Format] from the camera’s [Set-up]
menu.
3 Connect the memory card to the communication
device via wireless LAN.
When using this memory card with a non-compatible
camera, select [PENTAX_Flucard_WiFi] (default setting)
from the list of access points.
4 Start the browser on the communication device
and display the menu screen.
11
7 Turn the camera off and on again, and then
Turning the Wireless LAN Function Off
establish a wireless LAN connection again.
As the default setting, this memory card’s wireless LAN function
is set to on. To turn the function off, perform the following
operations.
The control images shown below are created on the
memory card.
Image
Function
1 Start the browser on the communication device
Turns the wireless LAN function
on.
and display the menu screen.
2 Tap [Settings].
The [Settings] screen appears.
3 Tap [Communication Settings].
Resets the communication
settings.
The [Communication Settings] screen appears.
4 Tap [Auto Startup] of
[Auto Wi-Fi Startup]
and select [off].
This option is displayed only
when this memory card is
used on a non-compatible
camera.
t Memo
• After the control images are created, captured images can be
saved in the normal way. If you accidentally delete either one
or both of the control images, do from step 1 to 7 again.
12
5 Tap 2 and then [OK].
Turning the Wireless LAN Function On
The setting is changed.
If the wireless LAN function is set to off in the [Communication
Settings] screen, the setting cannot be changed on the
communication device. To change the setting, perform the
following procedure on the camera side.
1 Insert the memory card into the camera.
2 With the camera in
playback mode,
display the image for
wireless LAN control.
6 Turn the camera off and on again.
3 Press B to display the playback mode palette.
4 Select Y (Protect) and specify either [Protect]
This memory card’s wireless LAN function is turned off.
or [Unprotect].
The wireless LAN function is set to on when the protection
setting is changed.
5 Press F to exit the playback mode palette.
This wireless LAN function is turned on.
Wait about 30 seconds before establishing a wireless LAN
connection.
13
t Memo
Resetting the Communication Settings
• If the camera is turned off and
on again when [Auto Wi-Fi
Startup] is set to [off], the
wireless LAN function is turned
off again. To always keep it set
to on, change [Auto Wi-Fi
Startup] to [on].
When the [SSID] and [Network Key] settings of [Communication
Settings] are changed, the changed settings can be returned to
their default settings using the control image.
1 Insert the memory card into the camera.
2 With the camera in
playback mode,
display the image to
reset the
communication
settings.
3 Press B to display the playback mode palette.
4 Select Y (Protect) and specify either [Protect]
or [Unprotect].
The settings are reset when the protection setting is
changed.
5 Press F to exit the playback mode palette.
6 Turn the camera off and on again.
The [SSID] and [Network Key] settings are returned to their
default settings.
t Memo
• For security reasons, it is recommended that the memory
card be used after changing the SSID and Network Key.
• When using this memory card on a non-compatible camera,
the default settings are as follows.
• SSID
PENTAX_Flucard_WiFi
• Network Key
12345678
14
Trademarks
• Trek® and FluCard® are trademarks or registered
trademarks of Trek Group of Companies in Singapore
and/or other countries.
• SDHC Logo is a trademark of SD-3C, LLC.
• All other trademarks are the property of their respective
owners.
15