1
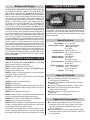
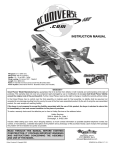
™
INSTRUCTION MANUAL
™
WARRANTY
Flyzone guarantees this kit to be free from defects in both place of purchase.
material and workmanship at the date of purchase. This warranty
does not cover any component parts damaged by use or To make a warranty claim send the defective part or item to
modification. In no case shall Flyzone’s liability exceed the Hobby Services at the address below:
original cost of the purchased kit. Further, Flyzone reserves
Hobby Services
the right to change or modify this warranty without notice.
3002 N. Apollo Dr. Suite 1
Champaign IL 61822 USA
In that Flyzone has no control over the final assembly or material
used for final assembly, no liability shall be assumed nor
accepted for any damage resulting from the use by the user of Include a letter stating your name, return shipping address, as
the final user-assembled product. By the act of using the much contact information as possible (daytime telephone
number, fax number, e-mail address), a detailed description of
user-assembled product, the user accepts all resulting liability.
the problem and a photocopy of the purchase receipt. Upon
If the buyer is not prepared to accept the liability associated receipt of the package the problem will be evaluated as quickly
with the use of this product, the buyer is advised to return as possible.
this kit immediately in new and unused condition to the
READ THROUGH THIS MANUAL BEFORE STARTING CONSTRUCTION. IT CONTAINS IMPORTANT
INSTRUCTIONS AND WARNINGS CONCERNING THE ASSEMBLY AND USE OF THIS MODEL.
Entire Contents © 2013 Hobbico,® Inc. All rights reserved.
FLZA3340/42
TABLE OF CONTENTS
CENTER OF GRAVITY . . . . . . . . . . . . . . . . . . . . . . . . . . 10
ARM THE MOTOR. . . . . . . . . . . . . . . . . . . . . . . . . . . . . . 10
CHOOSE A FLYING SITE . . . . . . . . . . . . . . . . . . . . . . . . 10
RANGE CHECK. . . . . . . . . . . . . . . . . . . . . . . . . . . . . . . . 10
HAND LAUNCHING . . . . . . . . . . . . . . . . . . . . . . . . . . . . 11
FLIGHT . . . . . . . . . . . . . . . . . . . . . . . . . . . . . . . . . . . . . . 11
REPAIRS . . . . . . . . . . . . . . . . . . . . . . . . . . . . . . . . . . . . . 11
REPLACEMENT PARTS. . . . . . . . . . . . . . . . . . . . . . . . . 11
PRECAUTIONS . . . . . . . . . . . . . . . . . . . . . . . . . . . . . . . . . 3
ADDITIONAL ITEMS REQUIRED. . . . . . . . . . . . . . . . . . . 3
LITHIUM BATTERY HANDLING & USAGE . . . . . . . . . . . 4
CHARGE THE BATTERY . . . . . . . . . . . . . . . . . . . . . . . . . 4
TTX404 TRANSMITTER . . . . . . . . . . . . . . . . . . . . . . . . . . 5
FINAL SETUP . . . . . . . . . . . . . . . . . . . . . . . . . . . . . . . . . . 7
POWER THE TTX404 AND CENTER THE TRIMS . . . . . 8
CHECK THE CONTROL SURFACE DIRECTIONS . . . . . 8
CENTER THE CONTROL SURFACES. . . . . . . . . . . . . . 10
INCLUDED ITEMS
Included with RTF (FLZA3340)
Transmitter, battery and charger not
included with Tx-R Prime (FLZA3342)
Check the parts against those shown. If any parts are damaged or missing, please call Hobby Services at: (217) 398-8970.
FCC AND ETSI
FCC REQUIREMENT
This device complies with part 15 of the FCC rules. Operation is subject to the following two conditions.
(1) This device may not cause harmful interference.
(2) This device must accept any interference received, including interference that may cause undesired operation.
NOTE: THE MANUFACTURER IS NOT RESPONSIBLE FOR ANY RADIO OR TV INTERFERENCE CAUSED BY UNAUTHORIZED MODIFICATIONS TO
THIS EQUIPMENT. SUCH MODIFICATIONS COULD VOID THE USER’S AUTHORITY TO OPERATE THE EQUIPMENT.
CE COMPLIANCE INFORMATION FOR THE EUROPEAN UNION
Instructions for Disposal of Waste Equipment by Private Users in the European Union: This symbol on the product or its packaging
indicates this product must not be disposed of with other household waste. Instead, it is the user’s responsibility to dispose of their waste
equipment by handing it over to a designated collection point for the recycling of waste electrical and electronic equipment. The separate
collection and recycling of your waste equipment at the time of disposal will help to conserve natural resources and ensure that it is recycled
in a manner that protects human health and the environment. For more information about where you can drop off your waste equipment for
recycling, please contact your local city office, your household waste disposal service or location where you purchased the product.
Declaration of Conformity:
Product: Tactic TTX404 2.4GHz 4-Channel Tx Rx
Item number: TACJ2404, Equipment class: 1
Tactic TTX404 transmitter and Tactic TR624 receiver: The objects of the declaration
described here are in conformity with the requirements of the specifications listed
below, following the provisions of the European 2006/95/EC Low Voltage Directive:
EN 60950-1:2006 Safety
The objects of the declaration described here are in conformity with the requirements
of the specifications listed below, following the provisions of the European R&TTE
directive 1995/5/EC:
ETSI EN 300 328 V1.7.1 Technical requirements for radio equipment
ETSI EN 301 489-1 V1.8.1, 301 489-17 V1.3.2 General EMC
requirements for radio equipment
2
Tactic™
c/o Hobbico, Inc.
2904 Research Road
Champaign, IL USA 61826
The associated regulatory agencies of the following
countries recognize the noted certifications to this
product as authorized for sale and use.
UK
DE
DK
BG
SE
FI
EE
LV
LT
PL
CZ
SK
HU
RO
SI
AT
IT
ES
PT
IE
NL
LU
MT
CY
GR
It is critically important to use only 2S 7.4V or
3S 11.1V LiPo batteries within the recommended
capacity range that do not include a PCM (Protection
Circuit Module) charging circuit inside the battery.
PRECAUTIONS
Your Eraze should not be considered a toy, but rather a
sophisticated, working model that functions very much like a
full-size airplane. Because of its performance capabilities, the
Eraze, if not assembled and operated correctly, could possibly
cause injury to yourself or spectators and damage to property.
Most PCM circuits restrict the delivery of power to the
ESC and motor and may cut all power to the receiver and
thus, result in complete loss of control over the model.
1. Operate the plane according to the instructions. DO NOT
alter or modify the model. If you make any modifications,
you void your warranty.
LITHIUM POLYMER BATTERY RECYCLING
ATTENTION: The product you have purchased
is powered by a rechargeable battery. At the end
of the battery’s useful life, under various state
and local laws, it may be illegal to dispose of this
battery into the municipal waste system. Check
with your local solid waste officials for details in your area
about recycling options or proper disposal.
2. Test the operation of the model before each flight to
ensure that all equipment is operating properly and that
the model remains structurally sound.
3. Fly only on calmer days (with wind speeds no more than
10 mph) and in large open areas free of trees, people,
buildings, or any other obstacles.
WARNING: This product contains a chemical known to
the State of California to cause cancer.
4. If you are not an experienced pilot or have not flown this
type of model before, we recommend that you get the
assistance of an experienced pilot in your R/C club for
your first flights. If you’re not a member of a club, your
ADDITIONAL ITEMS REQUIRED
local hobby shop has information about clubs in your area
whose membership includes experienced pilots. You can
Radio Control System
also contact the National Academy of Model Aeronautics
(AMA) which has over 2,500 chartered clubs across the The Eraze Tx-R Prime (transmitter ready) comes with the
country. Instructor training programs and insured newcomer servos and a Tactic™ TR624 receiver installed, so all that is
training are available through any of these clubs. Contact required is a 3+ channel transmitter with elevon mixing. The
the AMA at the following address or toll-free phone number: Tactic TTX404 2.4GHz spread spectrum 4-channel radio
control system (TACJ2404) is included with the RTF (ready
to fly) version of the Eraze, so this same radio system is ideal
Academy of Model Aeronautics
for your Tx-R version, too.
5151 East Memorial Drive
Ph. (800) 435-9262
Muncie, IN 47302-9252
Fx. (765) 741-0057
❍ Tactic TTX404 2.4GHz 4-channel system (TACJ2404)
www.modelaircraft.org
❍ (4) AA batteries will be required to operate the
recommended transmitter (FUGP7300).
If you already own a transmitter that you plan to use with the
Eraze, first make sure it is in the compatibility list at www.
Tx-Ready.com/anylink-chart.html. If so, you can purchase
the AnyLink™ 2.4GHz Universal Radio Adapter to allow your
transmitter to communicate with the pre-installed Tactic receiver.
TRANSMITTER CAUTIONS
● Do not use rechargeable (NiCd) batteries.
● Do not mix old and new batteries.
● Do not mix alkaline, standard (carbon-zinc) or
rechargeable (NiCd) batteries.
❍ Tactic AnyLink 2.4GHz Universal Radio Adapter
(TACJ2000) which includes the AnyLink Cable
Futaba® Square (TACM0001) and the AnyLink Cable
JR/Spektrum/Graupner (TACM0002)
BATTERY CHARGING PRECAUTIONS
❍ Tactic AnyLink SLT™ 2.4GHz Adapter Cable Futaba
Hitec® Round (TACM0003)
❏ 1. Always remove the battery from your Eraze before
charging.
❏ 2. Allow the battery to cool after flight before recharging.
❍ Tactic AnyLink SLT 2.4GHz Adapter Cable Hitec
Aurora (TACM0004)
❏ 3. Do not leave a charging battery unattended! Unplug
the battery if it gets warm, even if the charge LED has not
gone out.
❍ Tactic AnyLink SLT 2.4GHz Cable Spektrum®
DX4e/5e/7s/8 (TACM0005)
❍ Tactic AnyLink SLT Cable Fut 12Z/14MZ/18MZ/4YF
2.4GHz (TACM0007)
WARNING: Misuse or malfunction may overheat the battery
and charger, resulting in personal injury or damage to
surroundings.
❍ Tactic AnyLink SLT 2.4GHz Cable Spektrum®
DX4e/5e/7s/8 Deans® Micro (TACM0008)
3
Battery and Charger
CHARGE THE BATTERY
The Eraze comes complete with a motor battery and charger.
The Tx-R version requires a 600 mAh 7.4V LiPo battery and
LiPo Charger. The Eraze was designed for the Electrifly®
600 mAh 7.4V LiPo battery (GPMP0820). Other LiPo batteries
similar in size with the same voltage and capacity may also
work, but they may not fit properly in the battery compartment
or have the same type of battery connector. In addition to a
battery, a LiPo battery charger is also required and there
are several that will work (depending on your budget and
requirements). A safe, economical charger is the ElectriFly
2S (2-cell/7.4V) LiPo Balancing Charger (GPMM3321). The
charger includes adapters to charge from a 110V wall outlet or
a 12V DC outlet from a car. The charger will take approximately The ElectriFly® LiPo Battery Charger is great for simple balance
1-1/2 hours to fully charge the battery. Some pilots prefer to charging of 2-cell lithium-polymer batteries for small electric
have several batteries and charge them faster so they can models. Use it only to charge batteries within a capacity range
fly more. For charging up to four batteries faster at the same
of 150 to 750mAh.
time, the Great Planes PolyCharge4™ DC-powered LiPo
charger (GPMM3015) is recommended. But unlike the Smart
Charger, the PolyCharge4 does not have an internal LiPo cell
Specifications
balancer which is a critical component in making sure your
LiPo batteries charge efficiently and evenly. So, for each LiPo
Input voltage: 11.7 V –15V DC
battery you wish to charge simultaneously, one Great Planes
Battery
types,
# cells: 2 lithium-polymer cells
Equinox™ LiPo Cell Balancer (GPMM3160) will also be required.
connected in Series
Finally, the PolyCharge4 does not have AC capability, so if
(7.4V LiPo)
wall charging is a priority, a separate AC 12-Volt power source
Charge current: 450 mA maximum
must also be purchased separately. A suitable power supply
Charge method: CC-CV (current drop-off
for the PolyCharge4 is the Great Planes 12V 12A DC power
termination)
supply (GPMP0901).
Battery capacity: 150 –750 mAh
Status indicator: Two LEDs;
LITHIUM BATTERY HANDLING & USAGE
one green, one red
Input connectors: polarized DC power jack
ONLY use a LiPo approved charger. NEVER use a NiCd/NiMH
for DC input
peak charger to charge a LiPo battery.
Output connectors: one 2S balance plug
NEVER charge in excess of 4.20V per cell.
Case size: 2.18” x 1.13” x 3.26”
ONLY charge through the “charge” lead. NEVER charge
[55 x 28 x 82 mm]
through the “discharge” lead.
Weight: 2.1 oz. [59 g]
NEVER charge at currents greater than 1C unless the battery
is rated for a higher charge rate.
Special Features
ALWAYS set the charger’s output volts to match the battery
volts.
● A very economical, portable and simple way to
balance charge LiPo batteries
● Specifically designed for 2-cell 7.4V lithium-polymer
batteries only
● “Constant current/constant voltage” charge method
● Automatically starts charge upon connection of
battery to the balance plug
● 450 mA maximum charge current requires no
adjustment
● Twin LEDs indicate charging status
ALWAYS charge in a fireproof location.
NEVER trickle charge.
NEVER allow the battery temperature to exceed 150°F (65° C).
NEVER disassemble or modify the pack wiring in any way or
puncture the cells.
NEVER discharge below 2.5V per cell.
NEVER place the battery or charger on combustible materials
or leave it unattended during charge or discharge.
ALWAYS KEEP OUT OF THE REACH OF CHILDREN.
Important Precautions
NEVER charge the battery in the plane.
● Charge only lithium-polymer (LiPo) rechargeable
batteries that are 2S (2 cells in series) 7.4V nominal
voltage, from 150 mAh to 750 mAh, which have a
balance connector.
● Do not attempt to use this charger with NiCd, NiMH
or different types of Lithium-Ion batteries as they are
not compatible!
ALWAYS remove the battery from the plane after a crash. Set
it aside in a safe location for at least 20 minutes. If the battery
is damaged in the crash it could catch fire.
If the battery starts to swell, quickly move the battery to a safe
location, preferably outside. Place it in a bucket, covering the
battery with sand. Never use water to try and put out a LiPo fire.
4
● Do not leave the charger unattended while charging.
Disconnect the battery and remove input power from
charger immediately if either becomes hot! However,
it is normal for the charger to get warm.
● Disconnect the battery from the charger immediately
and remove to a fireproof location if the battery
begins to swell or smoke!
● Only use the included car adapter or approved AC
adapter to power the charger.
● Do not use charger with car running.
● Do not allow water, moisture or foreign objects into
the charger.
● Do not block the air intake holes, which could cause
the charger to overheat.
● Do not place the charger or any battery on a
flammable surface or near a combustible material
while in use.
● Do not charge on a carpet, cluttered workbench, paper,
plastic, vinyl, leather, wood, or inside an R/C model.
● Never charge inside a full-sized vehicle.
● Always disconnect charger from input power when
not in use.
● Do not attempt to charge a battery if it is swollen
or hot.
● Keep out of reach of children.
LED scheme – Use this table to determine charge action:
RED LED
GREEN LED
OFF
OFF
Solid ON
Solid ON
Flashing
Solid ON
Flashing
Solid ON
OFF
Flashing
ACTION
No battery is connected
Conditioning battery
Battery charging
Charge complete
ERROR
Possible sources of battery error may include a highly unbalanced
pack, charger timed out, or one cell in the pack which is low
voltage. In the case of a battery error, please remove the battery
pack from the charger and inspect it carefully for swelling or any
other damage, such as broken wires.
Optional 11.1V Battery
The Eraze can also be flown with a 3-cell 11.1V 600mAh LiPo
battery (GPMP0821). The added power is recommended only
for those who are already familiar with the flight characteristics
of Eraze using the included 2-cell battery. The roll rate becomes
impressively fast at the increased speed and the orientation
of the Eraze could become difficult to discern for unprepared
pilots. If you purchase the optional 11.1V battery, you will also
need a charger capable of balance charging a 3-cell LiPo. An
economical choice would be the Great Planes AC/DC 3S
LiPo Balancing Smart Charger (GPMM3318). A much more
comprehensive charger which can function for most or all of
your charging needs is Great Planes ElectriFly Triton EQ AC/
DC Charger (GPMM3155).
Charging Batteries
IMPORTANT!! ALWAYS charge a LiPo battery in a
location that is fireproof. NEVER leave the battery
unattended while being charged! If the battery feels
warm during charge, remove the battery at once and
disconnect the charger from the power source.
TTX404 TRANSMITTER
For more information on the Tactic Radio System included
with the Eraze visit tacticrc.com
Heat-resistant LiPo charging bags (GPMP0751) provide
additional safety when charging and are available
through your hobby supplier.
Use only approved power input accessories – the
included car adapter and AC adapter (also available
separately GPMM3310).
To charge a battery:
1. Connect input power to
the charger. The GREEN
LED will be lit, indicating
standby mode. The RED
LED will be OFF.
To install the batteries, slide the battery door down. Insert the
cells as shown in the diagram, making sure to note proper
polarity for each cell. Close the battery door.
2. Connect the battery to
be charged to the balance
plug. The RED LED will
also be lit, and remain RED
during charging. Both LEDs should be lit solid while charging.
Power Switch, LED,
and Low Battery Alarm
3. When the battery is fully charged, the GREEN LED will turn
OFF. Remove the battery from the charger at this time.
The red power LED should light when the power switch is moved
upwards to the “ON” position. The Tx should have adequate
power for flight when the LED is on constantly. Anytime the
LED begins to flash, accompanied by the sounding of an
audible tone, the Tx battery voltage has dropped too low and
operation of the model should NOT be attempted!
4. Charging time depends on level of discharge and capacity
of the battery. To estimate how long it should take to charge an
empty battery, divide the capacity of the battery in mAh by the
charge rate in milliamps:
600mAh battery/ 450 mA ~ 80 minutes
5
the Tx’s battery compartment noting proper polarity. Make
sure the transmitter’s power switch is in the OFF position.
Connect a compatible charge lead to the jack and follow the
instructions included with the charger for charging of NiCd or
NiMH batteries that are rated at 4.8V.
WARNING! Never operate an R/C model
with weak Tx batteries! Reduced operational
range and/or possible loss of control of the
aircraft could result. Replace weak alkaline
batteries, or re-charge NiCd or NiMH batteries before
attempting a flight!
An inexpensive DC field charger that is compatible with the
recommended charge leads is the Hobbico® Quick Field DC
Charger MKII (HCAP0290). A more advanced AC/DC
recommendation is the Hobbico Accu-Cycle Elite Battery
Cycler (HCAP0280).
If during a flight the Tx LED starts to flash, accompanied
by the sounding of audible tones, it’s a warning that the
Tx batteries have become weak and the aircraft should be
landed as soon as possible!
WARNING!! It’s not recommended to charge
batteries at greater than 1 amp through this
charge jack. Fast charging of NiCd and
NiMH batteries should ONLY be done with
chargers that are specifically designed to include the
peak-detection function which can automatically stop
charge when full charge is detected. Misuse, improper
charging, or over-charging of rechargeable cells can
result in damage to the cells that could include cell
rupture, explosion, or fire!!
Adjustable Sticks
Trainer Function
The TTX404 Tx includes a built-in wireless trainer function
– no trainer cable required! This trainer system connects a
The length of both gimbal sticks can be adjusted as desired. teacher’s Tactic Tx to a student’s Tactic Tx by wireless
Loosen the set screw inside the center of the stick with a connection. Tactic’s wireless trainer function is not compatible
2mm hex wrench. Rotate the stick end counter-clockwise to with trainer systems in any other brand radios.
lengthen the stick, or clockwise to shorten the stick. Once
IMPORTANT! Before attempting to fly the
the desired stick length is found, tighten the set screw with
airplane,
it’s very important to make sure all
the hex wrench.
reversing switches and trim lever adjustments
on the student’s Tx match the settings on the
Charge Jack
teacher’s Tx! Otherwise, the airplane could
suddenly veer off in an unwanted manner when the teacher’s
WARNING!! Do NOT attempt to recharge alkaline
trainer switch is pressed. Proper matching of the student
batteries! The charge jack should ONLY be
and teacher’s Tx settings should ensure that no unexpected
used if rechargeable cells are used in the
movements occur when the trainer switch is pressed. This is
transmitter.
especially true of the throttle control!
The TTX404 includes a built-in charge jack for convenient
1. The Tx that was used to setup the controls on the
recharging of NiCd or NiMH batteries, and is compatible
aircraft must be used by the TEACHER.
with charge leads designed for Futaba® brand transmitters.
2. The student must use a separate Tactic Tx with
(HCAP0101) This jack is NOT compatible with charge
wireless trainer function.
®
®
®
®
leads for Hitec , Airtronics , JR or Spektrum radios. The
3. Place the teacher and student’s transmitters within 1
polarities for compatible charge plugs are as shown in the
meter of each other, and make sure the throttle stick
picture below.
for each Tx is set to idle.
4. Turn ON the power switch for the Tx being held by the
student.
5. Pull and hold the trainer switch on the teacher’s Tx,
and then turn ON the teacher’s Tx power switch.
6. The LED on the teacher’s Tx will flash 3 times to
indicate it has become bound with the student’s Tx.
7. The teacher can then release his trainer switch.
8. Once both transmitters are bound together, power
can be applied to the receiver to prepare for flight.
To use the charge jack with optional rechargeable batteries,
When the training session has ended, with the model on the
ground and all power removed from the model, place both
transmitters within 1 meter of each other and simply turn the
first remove the sticker that covers the charge jack on the
side of the Tx – making sure not to allow any object to be
inserted inside the jack itself. Next, insert the cells inside
6
power switch for both transmitters to the OFF position. This
will terminate the wireless link between both transmitters. If
additional training will be performed again, return to step 1
above to re-establish the wireless link between the teacher
and student’s transmitters.
FINAL SETUP
Bind the Receiver to the Tx
For proper operation it’s necessary to “bind” the Tx and Rx
together electronically. This ensures sole communication
between the two, and prevents other transmitters from being
able to control the receiver.
1. Turn on the Tx.
2. Apply power to the Rx.
3. If the Rx LED flashes once and then stays on, the
Rx is already bound to the Tx and you can skip to
the next section. Otherwise, insert a small diameter
screwdriver through the hole marked “BIND” and
press the pushbutton until the Rx LED glows red and
then turns off after about one second.
4. Release the “BIND” button.
5. If the binding is successful, the Rx LED will flash once
and then remain ON.
6. Test for proper Tx /Rx functionality in the next section.
If the radio doesn’t appear to have become properly
bound, repeat steps 1– 6 above.
Failsafe Function
The included TR624 receiver has a failsafe feature which
engages in the event that the radio signal from the transmitter
somehow becomes interrupted. This safety feature causes the
servos to automatically move either to a certain position, or
hold their last position so to prevent the model from moving in
an erratic manner. Channels 1, 2, and 4 will enter a “hold” mode,
whereby the servos will lock in their last recognized position.
The canopy hatch is held securely to the plane with strong
Channel 3 will move to a pre-set position. The factory default magnets. To avoid damaging the foam material when removing
failsafe position for channel 3 is to move the throttle to 0%. the canopy hatch, reach your finger up through the cooling
Motor/prop movement should stop if the receiver loses signal hole on the underside of the fuse and push it off.
from the transmitter. The throttle servo’s failsafe position can
be manually re-set to any other position if desired, as follows:
IMPORTANT NOTE: Before manually resetting the
failsafe, make sure the servo reversing switches are in the
correct position for the application.
1. Apply power to the Tx and Rx.
2. If using an ESC, do NOT arm the ESC. Do NOT attempt
to adjust the throttle’s failsafe position if the ESC is
armed. (Disconnect one of the three motor wires to
disable the motor.)
3. Move the Tx throttle stick to the desired position for
the throttle control to move if the Rx goes to failsafe
(otherwise this process may arm the motor).
4. Press and hold the “Bind” button on the receiver, and the
Rx’s LED should blink twice. Release the Bind button,
and the receiver’s LED should turn on (stop flashing).
The Tx and Rx should now be bound, with the throttle The fin easily connects to the plane with magnets. Align the
failsafe in the new position as set above.
fin into the slot and it will click into place.
7
POWER THE TTX404 AND
CENTER THE TRIMS
Illuminated red light indicates the
TTX404 is powered and transmitting.
Keep the left stick
(throttle control) in the
minimum throttle
position during setup.
Center the rudder, aileron,
and elevator trims.
Power switch “ON”.
Install the prop saver adapter onto the motor shaft aligning
the screws with the flat spots on the motor shaft. Be sure you
have the smallest diameter end of the prop saver towards the
front. Tighten the screws against the motor shaft.
TRIM ADJUSTMENT
Full extent............. Centered ........... Full extent
Constant «beep» .....Single «beep» ..... Constant «beep»
CHECK THE CONTROL
SURFACE DIRECTIONS
Cut a piece from the hook side of the included hook and loop
material and stick it to the battery compartment as shown.
Press the propeller onto the prop saver adapter. Hook a prop
saver o-ring onto one of the screw heads and pull the o-ring
over the prop hub onto the opposite screw head.
Cut a piece from the loop side of the hook and loop material
and stick it to the bottom of the battery.
8
Moving the right stick to the left will cause the left elevon to
move up and the right elevon to move down.
Fit the battery in place in the battery compartment. Turn on
the transmitter with the throttle all the way down to the idle
position. Connect the battery to the ESC.
If the elevons do not move together when the right stick is
moved up or down, the elevon mixing function is not turned
on in your transmitter. If you are using the TTX404 transmitter,
disconnect the battery from the ESC and turn off the transmitter.
Hold the left stick down and to the left and the right stick down
and to the right. While holding the sticks in this position, turn
on the transmitter. The transmitter will make one, two, or three
consecutive beeps indicating the mode it is in. 1 beep- NORMAL
MODE, 2 beeps- V-TAIL MODE, 3 beeps- ELEVON MODE.
Each time the power is cycled on with the sticks in this position
the transmitter will change mode. Repeat this process until it
beeps three times for elevon mode.
Attach the canopy hatch being sure that the battery leads and
servo leads are not interfering with the hatch.
ELEVATOR AILERON
These are the control surface throws
as they are set up from the factory:
Up
Down
3/8"
[9.5mm]
3/8"
[9.5mm]
Up
Down
3/8"
[9.5mm]
3/8"
[9.5mm]
If using a transmitter with the Tactic AnyLink™, set up as above.
Moving the right stick down will cause the elevons to move up.
9
need to be added to the tail of the plane. If the plane tips back
then it is tail-heavy and weight will need to be added to the nose
for it to properly balance. Stick-on lead weight can be used to
balance the plane (GPMQ4485). If you have added weight, be
sure to re-check the balance point of the plane before flying.
CENTER THE CONTROL SURFACES
Use the trim buttons to center the positions of the
control surfaces.
Later, you may wish to experiment by shifting the C.G. up
to 3/16" [5mm] forward or 3/8" [9.5mm] back to change the
flying characteristics. Moving the C.G. forward may improve
the smoothness and stability, but the model may be less
responsive during launch, aerobatics, and will require a longer
glide during landing. Moving the C.G. aft makes the model
more maneuverable, but could also cause it to become too
difficult to control. In any case, start at the recommended
balance point and do not at any time balance the model
outside the specified range.
ARM THE MOTOR
The Eraze requires that an arming routine be completed before
the motor will operate. With the transmitter on and the throttle
stick in the idle position, connect the flight battery to the ESC.
Move the throttle all the way up and listen for the beep. Move the
throttle back to idle and you will hear two beeps confirming the
motor is now armed. Moving the throttle up will now cause the
motor to operate! Keep items and fingers clear of the propeller.
CHOOSE A FLYING SITE
CENTER OF GRAVITY
The Eraze is a fast flying model and an adequate space free
of trees and buildings is required. A park or open field that is
at minimum the size of two football fields side-to-side with no
obstructions or your local AMA sanctioned flying field would
be ideal. The Eraze can handle winds as much as 10 mph.
However, we recommend your first flew flights be done in
calm conditions so you can safely trim the model and become
accustomed to its flying characteristics.
RANGE CHECK
As a precaution, an operational ground range test should be
performed before the first flight each time you go out. Performing
a range test is a good way to detect problems that could cause
loss of control such as low batteries, defective or damaged
radio components or radio interference. This usually requires
an assistant and should be done at the actual flying site you
will be using. First turn on the transmitter, then install the
fully-charged battery into the fuselage. Connect the battery
and install the hatch. Remember, use care not to “bump”
the throttle stick. Otherwise, the propeller may turn and
The recommended balance point is 2-5/8" [67mm] from the possibly cause damage or injury. To range check the Tactic
forward edge of the battery compartment. Do not apply any sort TTX404 radio control system, switch on the transmitter and
of tape to the decaled areas of the plane. Peeling off the tape connect the motor battery to the ESC. Set the model on the
will most likely lift the decals. Instead, we recommend marking ground and have an assistant hold the model. Walk 100' [90m]
the recommended balance point with very small marks using a from the model and while pointing the transmitter at the plane,
felt-tip pen. With the battery installed in the battery compartment operate the controls ensuring that the plane’s surfaces operate
and the canopy hatch in place, use a Great Planes C.G. Machine according to the transmitter inputs. Operate the motor at
or use your fingers to lift the Eraze upside down at the marks different rpm. Have your assistant alert you if the controls quit
that you made. With an ElectriFly 7.4V 600mAh LiPo the plane responding or move suddenly or erratically. If you are using a
should be close to balancing at the recommended balance point. different radio control system, follow the instructions that came
If the plane tips forward then it is nose-heavy and weight will with your radio control system to perform a ground range check.
10
without power) and your model may suffer damage from an
uncontrolled landing. We strongly encourage you to use a flight
timer set for 9 minutes (safe flying time with a fully charged
battery) and allow yourself enough time to make your landing
approach before the timer goes off.
HAND LAUNCH
It is a good idea to have a helper hand launch the Eraze for
the first few flights until you are comfortable with its flying
characteristics.
REPAIRS
Repairs to your Eraze can be made quickly and easily using
regular CA glue (not foam-safe CA). Apply a small amount
of
glue into the joint that is being repaired. Excess glue will
Hold the airplane by the finger grips just in front of the servos.
squeeze
out of the joint and onto the surface of the plane so
Point the plane directly into the wind and at a slight upward
use
the
glue
sparingly. Hold the joint together and apply a
angle of 15° to 20° with the wings level with the horizon. Apply
light
mist
of
CA
accelerator to the glue line.
full throttle and toss the plane into the wind, taking care to
launch it straight without any rotation. The Eraze does not
REPLACEMENT PARTS
require an aggressive launch to achieve flying speed. A hand
launch similar to the effort applied when throwing a dart is all
that is needed. Immediately following the plane’s launch, apply Replacement parts are available only as listed. Replacement
a little up elevon to gain altitude and be prepared to make any parts are not available from Product Support, but can be
corrections with the elevons. Once you are at a comfortable purchased from hobby shops or mail order/Internet order
altitude, throttle back to a comfortable speed, make your first firms. If you need assistance locating a dealer to purchase
parts from, contact:
turn and begin to trim the model for straight and level flight.
Product Support
FLIGHT
The Eraze is an energetic plane and the controls are very
responsive. Be prepared for this during your first few flights by
maintaining altitude and get a feel for the roll rate and the way in
which the Eraze handles. Throttle back at altitude to 3/4 throttle
during your first flight to get the model trimmed out. When you
are familiar with the Eraze, you will discover it can perform
loops, rolls, inverted flight and a variety of aerobatics that do not
require rudder. Expect flight times of approximately 10 minutes
(with throttle management) when using the recommended
battery. Allow yourself excess time to prepare for your landing
approach. When it’s time to land, make your final pass with the
wind, slow the model and make a wide banking turn into the
wind approaching your landing spot. Maintain approximately
1/4 throttle and allow the plane to descend, being sure to keep
the plane at a level attitude. When the plane is about one foot
off the deck, apply some up elevator to flare the model and cut
the throttle. If the motor begins to noticeably lose power, the
battery is near depleted and soon will no longer be adequately
able to power the motor. The Eraze can still be controlled after
this point. As soon as you detect power being reduced, turn
into the wind as soon as possible and land the plane. Failing
to do so may result in you landing "dead stick" (completely
Phone: 217-398-0007 Fax: 217-398-7721
E-mail: [email protected]
REPLACEMENT PARTS LIST
Order No.
FLZA6375
FLZA6376
FLZA6377
FLZA6378
FLZA6379
FLZA6380
FLZA6381
FLZA6382
FLZA6383
FLZA6384
FLZA6385
GPMM3310
GPMM3321
GPMM3322
GPMP0820
Description
Airframe Wing & Hatch
Vertical Fin
Hatch/Canopy
Servo 9G
Pushrod Set w/Horns
Brushless ESC 12A
Brushless Motor 22mm
Motor Mount
Propeller (2)
Pushrod Covers (2)
Prop Saver Bands (3)
12V 1A AC Power Adapter
2S Micro LiPo AC/DC Charger
2S Micro LiPo DC Charger w/Car Adapter
LiPo 2S 7.4V 600 mAh 25C
This product is suitable only for people of 14 years and older.
11
™