1
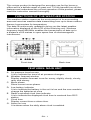
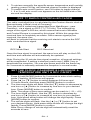
SWS 165 INSTRUCTION MANUAL SLIM TOUCH WEATHER STATION WITH 868MHZ REMOTE SENSOR This unique product is designed for everyday use for the home or office and is a definite asset of great use. To fully benefit from all the features and understand the correct operation of this product, please read this instruction manual thoroughly. FUNCTIONS OF THE WEATHER STATION This weather station measures the environment of its surrounding area and receives weather data transmitting from up to three outdoor thermo-hygrometers for temperature. The data is continuously updated to bring you the latest weather information displayed on the LCD of the receiving unit. Wireless frequency band 868 MHz enables the transmission of data up to a distance of 65 metres in open space free of electromagnetic interference. Front view Back view FEATURES: MAIN UNIT A. Air pressure trend arrows It is to Indicate the trend of air pressure changes. B. Weather forecast window Display weather forecast icons for sunny, slightly cloudy, cloudy, rainy and stormy. C. Moon phase Show current moon phase. D. Low battery indicator It is to indicate the battery in the unit is low and the user needs to change the batteries at once E. Radio controlled clock time indicator It is to indicate the displayed clock time is received from RCC station. F. Clock time Display current time or alarm time. G. Alarm on icon It is shown when the daily alarm clock is enabled. EN - 1 H. Remote sensor indicator It is to indicate which channel of remote sensor is being used. It can display up to 3 different remote sensors which are in different locations and within 65 meters (210 feet) distance away from the main unit. I. Auto scroll indicator The arrow icon is shown to indicate the auto scroll of 3 different remote channels. J. Outdoor maximum icon It is to indicate the maximum outdoor temperature/humidity that is being displayed. K. Outdoor minimum icon It is to indicate the minimum outdoor temperature/humidity that is being displayed. L. Indoor temperature icon It is to indicate the indoor temperature/humidity is being displayed. M. Indoor maximum icon It is to indicate the maximum indoor temperature/humidity that is being displayed. N. Indoor minimum icon It is to indicated the minimum outdoor temperature/humidity that is being displayed. DESCRIPTION OF BUTTONS The weather station has 6 touch buttons for the main functions controlled via the display. 1. [SNOOZE/LIGHT] Press once to activate the LCD backlight for 5 seconds or snooze function. Press once to work up the touch keys if they are not appeared on the screen. 2. [ ] Press once to increase the value in CLOCK, CALENDAR or ALARM setting mode. In alarm mode, press this key to enable/disable the alarm 1 or 2. 3. [ ] Press once to decrease the value in CLOCK, CALENDAR or ALARM setting mode. In alarm mode, press this key to enable/disable the alarm 1 or 2. 4. [ MODE ] Toggle amongst display for Clock-Sec (HR-MIN-Sec), Clock-day (HR-MIN-Weekday), Calendar (Date-Month-Weekday), Alarm 1, Alarm 2 and repeat… Press & hold 2 seconds to access setting mode of clock and alarm. EN - 2 5. [ CH ] Select among channel 1, 2, 3 or to enter auto scroll mode. Press and hold for 2 seconds to activate or deactivate the sensor searching mode. In RF register mode ( reception of the DCF signal for clock control), press and hold for 2s to exit this register mode. 6. [ MEM ] Press once to view the Max/Min reading of the indoor & outdoor temperature/humidity. After 5 seconds, will go back to current temperature/humidity. When the max/min value is displayed, press and hold for 2 seconds to clear the memorized Max/Min readings of the indoor & outdoor temperature/humidity. If RCC is not receiving, press and hold for 3 seconds to activate RCC. If RCC is receiving, press this key to deactivate RCC. Note: If there is no key pressed for 20 seconds, touch keys will disappear on the screen unless press once the “Snooze” button. GETTING STARTED This Weather Station was designed for easy set up. For best operation, the following steps are required to be done in the proper sequence. 1. Insert batteries for main unit before doing so for the sensor units. 2. Receiving unit cannot be programmed manually until the wirelss remote sensor unit registration procedure has been completed. The waves icon ))) flashes at the CH channel indicator and it is necessary to wait for the icon to be permanently displayed. 3. Position the remote unit and main unit within effective transmission range, which, in usual circumstance, is up to 65 meters. Important note: Every building obstacle results in the reduction of the radio signal range from the wireless unit. Therefore, it is possible that the range may only be several meters. Weather (fog, rain, snow) has an effect on transmission quality. Although the remote unit is weather resistant, it should be placed away from direct sunlight, rain or snow. Ideally, choose an installation location for the unit on the north side of the house at the ideal measurement height of 1.25 m above the ground away from asphalt and concrete surfaces. Never put the unit on a metal structure as this will reduce the transmission range. BATTERY INSTALLATION FOR MAIN UNIT 1. Remove the battery door. 2. Insert 2 pieces of AAA size 1.5V alkaline battery as indicate by the polarity. 3. Close the battery door. Note: Replace the batteries when the low battery indicator appears on the top-right corner of the LCD. EN - 3 BATTERY INSTALLATION FOR REMOTE SENSOR UNIT 1. Remove the battery cover by grabbing its bottom edge (near the two recess location) from bottom of sensor unit. 2. Insert 2 pieces of AA size batteries according to the “+” and “-” polarity marks shown in the battery compartment and then close the battery door with the clip on. (press down the snap on both sides slightly). Front view Back view WIRELESS REMOTE SENSOR REGISTRATION PROCEDURE 1. Insert 2 pieces of AAA batteries first to the main unit. The outdoor temperature display shows - - . – while the wave icon will keep blinking for 2 minutes indicate the main unit is in sensor searching mode. 2. In a second step, insert the 2 pieces of AA batteries into the sensor unit. The LED on the front panel will start flashing at a rate of one time per around 2 seconds indicates channel-1 is being used. 3. While the LED is flashing on remote sensor, press once the [CH] key will change the sensor channel setting to 2. Keep toggle on [CH] key can change channel setting up to 3. The LED is blinking at a frequency to indicate the channel setting. i.e. continuous blinks 2 times indicate channel 2 is selected. Note: If user does not press any key for 10 seconds, it will exit the channel setting mode and transmit the RF signal. The main unit will register the temperature reading. REMOTE CHANNEL AUTO-SCROLLING This device is equipped with an auto-scroll function. While the autoscroll function is set, the unit will automatically cycle to display the temperature and humidity of each remote sensor for 6 seconds. EN - 4 1. To retrieve manually the specific sensor temperature and humidity reading, press CH key until desired channel number is displayed 2. To enable auto-scroll function, use CH button to toggle channel 1, 2 or 3 until auto scroll icon appears on the left hand side of the second line display. DCF 77 RADIO CONTROLLED CLOCK The radio-controlled time is calculated by the Cesium Atomic clock of Braunschweig (official clock of Germany). Then the time is coded and transmitted from Mainflingen - near Frankfurt - via a signal on DCF-77 (77.5 kHz). The transmitting range of the signal is 500 km, which means that most of Western and Central Europe is covered by this signal. Within this range the received time is completely accurate. Once sensor signal(s) are received, the wave icon will flash to indicate that the receiving unit starts to receive the DCF radio controlled time signal. RCC Mode Start RCC Received Once the time signal is received, the wave icon will stay on the LCD, and time and calendar will automatically be updated. Note: During the 10-minute time signal reception, all manual settings will be suspended. If setting is desired, press once [ MEM ] key to deactivate the reception. You can also press and hold the same key for 3 seconds to manually activate the reception in normal mode. SET THE CLOCK, CALENDAR & LANGUAGE & TEMPERATURE UNIT & RCC ON/OFF 1. Press & hold [MODE] button for 2 seconds to enter clock setting mode. Flashing 12/24 hours will appear. 2. Press [ ] or [ ] button to switch between 24 hours and 12 hours format, and then press [MODE] button to confirm. 4. The time zone digits will flash. Use the [ ] button to decrease by one hour or [ ] button to increase by one hour to your desired hour. Press [MODE] button to confirm. Note: The range of time zone setting can be reach to ( -12 ~ +12) 5. The hour digits will flash. Use the [ ] button to decrease by one hour or [ ] button to increase by one hour to your desired hour. Hold press either button will change the digit rapidly. Press [MODE] button to confirm. 6. The minute digits will flash. Use the [ ] or [ ] button to set your desired minute. Hold press either button will change the digit rapidly. Press [MODE] button to confirm. Note: Every change of minute digit will automatically reset the seconds to zero. EN - 5 7. 8. 9. 10. 11. 12. The year digit will flash and Yr icon appears. Press [ ] or [ ] button to set your desired year. Press [MODE] button to confirm. Note: Year range is from 2000 to 2099. D and M icons will flash. Press [ ] or [ ] to select D M (Date Month) or M D (Month Date) format. Press [MODE] button to confirm. Month digits will flash. Press [ ] or [ ] button to set your desired month. Press [MODE] button to confirm. Do the same to set Date. Note: The moon phase and the weekday will be automatically calculated and displayed according to the date set as above. E digit will flash. Press [ ] or [ ] button to switch 5 languages display of weekday (English/German/French/Spanish/Italian. See table 1). Press [MODE] button to confirm and exit setting mode. Temperature units will flash, Press [ ] or [ ] button to switch between Celsius and Fahrenheit. Press [MODE] button to confirm your desired temperature unit. ON icon will flash, Press [ ] or [ ] button to switch between ON and OFF. Press [MODE] button to confirm your desired. If it is set to OFF, then the RCC function will be closed. Note: If there is no key pressed during setting mode for 10 seconds, it will automatically keep the setting and exit to normal display. TO SET DAILY ALARM 1. In clock time display mode, press [MODE] button to select alarm 1 or 2, then hold and press [MODE] again for 2 seconds to access alarm setting. 2. The hour digits will flash, use [ ] button to decrease by one hour or [ ] button to increase by one hour to your desired hour. Hold press either button will change the digit rapidly. Press [MODE] button to confirm. EN - 6 3. The minute digits will flash. Use [ ] button to decrease by one minute or [ ] to increase by one minute to your desired minute. Hold press either button will change the digit rapidly. Press [MODE] button to confirm. The unit will show the alarm time for 10 seconds and exit to clock time display automatically. The alarm bell icon will be turned on in clock time display to indicate that the daily alarm is enabled. Note: If there is no key pressed in the setting mode for 10 seconds, it will automatically save the set value and exit to normal display. Waning Gibbous Full Moon Waning Crescent Last Quarter Waxing Crescent New Moon Waxing Gibbous First Quarter MOON PHASE Our weather station is equipped with 8 moon phases display (i.e. from new moon to waning crescent) on the screen. WEATHER FORECAST Our weather station is capable of detecting local barometric pressure changes, and based on the data collected, predicts the weather forecast for the next 12 to 24 hours. Note: 1. The accuracy of a general pressure-based weather forecast is about 70 to 75%, and therefore, we cannot be held responsible for any inconveniences so caused by an inaccurate one. 2. The weather forecast is meant for the next 12 to 24 hours. It may not necessarily reflect the current situation. 3. The ‘Sunny’ forecast covering night hours indicates clear weather. EN - 7 SPECIFICATIONS Main Unit Displayed IN temperature range Proposed operating range Temperature resolution Remote Temperature measurement Displayed OUT temperature range Temperature resolution : -10°C to +60.0°C : 0°C to +50.0°C : 0.1°C : -20.0°C to +60.0°C : 0.1°C Indoor/Remote relative humidity measurement Displayed Relative Humidty range : 20%RH to 99%RH Measured temperature range : -10°C to +50.0°C Remote Unit Proposed operating range Temperature resolution Displayed Relative Humidty range Measured temperature range Temperature Accuracy Humidity Accuracy RF Transmission Frequency Open Field RF Transmission Range Temperature transmission cycle time Power – Main Unit – Sensor Dimensions of Main Unit Weight Dimensions of Sensor Weight : -10.0°C to +50.0°C : 0.1°C : 20%RH to 99%RH : -10°C to +50.0°C : +1°C(+2°C) : +5%RV(+8%RV) : 868 MHz : 65 meters in open space : 120 seconds : Battery 2 x 1,5V Type AAA (Not Included) : Battery 2 x1,5 Type AAA (Not Included) : 145 x 23 x 103 mm : 190 g : 54 x 25 x 105 mm : 52 g Note: Accuracy depend of range measurement for temperature and humidity. Temperature and humidity accuracy for main unit: 0°C to 40°C : +/-1°C 40°C to 50°C : +/- 2°C 40% to 80% RH : +/-5% RH Other range : +/-8°C Temperature and humidity accuracy for sensor: 0°C to 40°C : +/-1°C -10°C to 0°C and 40°C to 50°C : +/-2°C <40% to 80%< : +/-5%RH 30% to 40% ≤ ≥ 80% : +/-8%RH EN - 8 INSTRUCTIONS AND INFORMATION REGARDING THE DISPOSAL OF USED PACKAGING MATERIALS Dispose of packaging material at a public waste disposal site. DISPOSAL OF USED ELECTRICAL AND ELECTRONIC APPLIANCES The meaning of the symbol on the product, its accessory or packaging indicates that this product shall not be treated as household waste. Please, dispose of this product at your applicable collection point for the recycling of electrical & electronic equipment waste. Alternatively in some states of the European Union or other European states you may return your products to your local retailer when buying an equivalent new product. The correct disposal of this product will help save valuable natural resources and help in preventing the potential negative impact on the environment and human health, which could be caused as a result of improper liquidation of waste. Please ask your local authorities or the nearest waste collection centre for further details. The improper disposal of this type of waste may fall subject to national regulations for fines. For business entities in the European Union If you wish to dispose of an electrical or electronic device, request the necessary information from your seller or supplier. Disposal in other countries outside the European Union If you wish to dispose of this product, request the necessary information about the correct disposal method from local government departments or from your seller. Fast ČR, a.s. declares that the SWS 165 conforms to the basic requirements and other relevant provisions of the directive 1999/5/ES. The device can be operated in the EU without restriction. The declaration of conformity is a part of the user‘s manual or can be found at the website www.sencor.eu. Changes to the text, design and technical specifications may occur without prior notice and we reserve the right to make these changes. Copyright © 2014, Fast ČR, a.s. Revision 09/2014 EN - 9 EN Warranty conditions Warranty card is not a part of the device packaging. This product is warranted for the period of 24 months from the date of purchase to the end-user. Warranty is limited to the following conditions. Warranty is referred only to the customer goods using for common domestic use. The claim for service can be applied either at dealer’s shop where the product was bought, or at below mentioned authorized service shops. The end-user is obligated to set up a claim immediately when the defects appeared but only till the end of warranty period. The end user is obligated to cooperate to certify the claiming defects. Only completed and clean (according to hygienic standards) product will be accepted. In case of eligible warranty claim the warranty period will be prolonged by the period from the date of claim application till the date of taking over the product by end-user, or the date the end-user is obligated to take it over. To obtain the service under this warranty, end-user is obligated to certify his claim with duly completed following documents: receipt, certificate of warranty, certificate of installation. This warranty is void especially if apply as follows: Defects which were put on sale. Wear-out or damage caused by common use. The product was damaged by unprofessional or wrong installation, used in contrary to the applicable instruction manual, used in contrary to legal enactment and common process of use or used for another purpose which has been designed for. The product was damaged by uncared-for or insufficient maintenance. The product was damaged by dirt, accident of force majeure (natural disaster, fire, and flood). Defects on functionality caused by low duality of signal, electromagnetic field interference etc. The product was mechanically damaged (e.g. broken button, fall). Damage caused by use of unsuitable media, fillings, expendable supplies (batteries) or by unsuitable working conditions (e.g. high temperatures, high humidity, quakes). Repair, modification or other failure action to the product by unauthorized person. End-user did not prove enough his right to claim (time and place of purchase). Data on presented documents differs from data on products. Cases when the claiming product cannot be indentified according to the presented documents (e.g. the serial number or the warranty seal has been damaged). Authorized service centers Visit www.sencor.eu for detailed information about authorized service centers. EN - 10