1
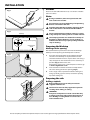
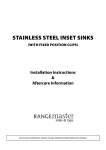
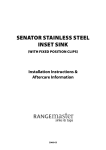
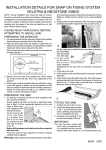
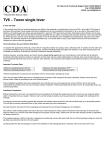
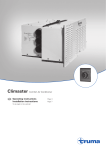
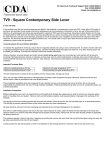
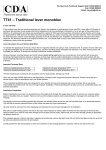
COMPOSITE INSET SINKS WITH FIXED POSITION CLIPS Installation Instructions & Aftercare Information Instructions for Cubix, Cubix Gemini & Lunar INSTALLATION Installer Fig.1 Please leave this leaflet with the user, as it contains valuable after care advice. Notes During installation, take care to protect the sink nn from scuffs and scratches. Avoid straining and overtightening of all plumbing nn fixtures connected to the sink. Carefully check that the moulding and edges of the nn sink are dead level so that water will flow off the drainer. Fig.2 We recommend that the worktop opening is sealed nn using waterproof sealant, paint or a similar material. Worktop Cutting line for opening The clamping brackets are suitable for worktops of nn between 28–40 mm thickness. If your worktop is a different size then it may require packing under the clips or rebating. 10 mm Final position of sink Preparing the Worktop Marking out the opening We recommend that you fit the inset sink to the worktop before permanently fixing the worktop to the cabinet. Fig.3 1. 2. 3. Fig.4 Place the sink upside down on the worktop. Position the sink on the worktop as required. Make sure the cabinet framework will clear all parts of the sink. Using a soft, sharp pencil draw around the sink as accurately as possible (Fig.1). Remove the sink. Alternatively, you can use a sink template. For details go to www.rangemaster.co.uk. Draw another line 10 mm inside the sink top outline – this is the cutting line for the opening (Fig.2). Drill as large a hole as possible inside the cutting line. Using a padsaw, jigsaw or similar, cut out the opening up to the cutting line. Preparing the sink Drilling a taphole Before drilling please read safety instructions nn supplied with hole saw. The front face must be fully supported to prevent nn cracking when drilling or cutting. WARNING! nn Composite sink products include a silica filler. Any machining operation will produce fine particles of dust. Drilling or cutting MUST be carried out in a well-ventilated area. Due to our policy of continual improvement, we reserve the right to change specifications without prior notice. If a taphole is required, but has not been supplied in the sink, proceed as follows: 1. 2. 3. Fig.5 Decide whether the bowl is to be left or right handed when the sink is fitted. You will require a 35 mm hole saw (supplied with selected products). On the reverse side of the sink you will find a location point for tap cut-out (Fig.3). Using the 35 mm hole saw, carefully cut out the tap hole. Fitting the clips There are two methods of fitting the clips: • • Screw down fixing or, Pin fixing Fig.6 Screw down fixing 1. Using the screws supplied, fit the mounting clips to the 2. sink (Fig.4). Hinge the clips away from the sink edge. Pin fixing 1. Position the clips over the pins molded in the sink. Pull Tap on clip base with a flat screwdriver and twist the clip towards the edge of the sink (Fig.5) until it snaps into place. 2. If a clip is tight then, using a flat screwdriver, tap on the base until it snaps into place (Fig.6). 3. Hinge the clips away from the sink edge. At this stage, test fit the sink in the worktop opening. You may need to enlarge the opening around the clips. Fig.7 Fit the tap and waste fittngs to the sink using the instructions supplied with them. Fitting the seal or sealant There are 2 methods of sealing your sink to the worktop: • • Fig.8 Foam seal or, Silicon sealant Foam seal Peel off the backing strip and stick the seal to the recess in the sink (Fig.7). Make sure that a neat butt joint is achieved where the ends of the seal meet. ArtNo.512-0001 - Gemini applying sealant Silicon sealant Apply silicone sealant (not supplied) to the underside of the sink rim (Fig.8). Fitting the sink 1. 2. Turn the sink upside down and lay the worktop over the sink. Swing each clip into place (Fig.9) – this is the most effective method, although if the worktop has been fitted to the cabinet the sink can be placed in the opening and fixed in position from underneath. Centre the sink. Tighten the fixing screws. DO NOT tighten fully at first attempt. nn Remove any surplus sealing material or wipe away any excess sealant. Worktop 1 Fig.9 Sink 2 3 AFTER CARE Day-to-day care Chemical Resistance Routine cleaning of your composite sink is easy if the following simple procedure is followed: The composite sinks are resistant to just about any chemical found in the home, but be careful, as your waste system may not be resistant. After use wipe the bowl and drainer with a soft damp soapy cloth and rinse with clean water. In hard water areas, an application of proprietary cream cleaner will avoid any buildup of a dull film of waterborne deposits. Although Velstra and Neostone are extremely durable materials and will withstand a great deal of hard use, they can be scratched by hard or sharp objects. If the surfaces are to be kept in a blemish free condition reasonable care should be taken when handling such items. Cleaning For everyday cleaning a damp cloth with ordinary washing up liquid will suffice. Heavier staining can be removed with a proprietary cream cleaner on a damp cloth. Really stubborn stains should be treated to an overnight soaking in diluted bleach. The wastes supplied as standard with the sink, are made from a tough plastic material but these are not resistant to some solvents, especially nail varnish remover, acetone and nitro thinners. Further Advice DO NOT use the drainer as a chopping board. A hardwood chopping board or polyethylene food board is available as an optional extra. Avoid plastic washing up bowls – they pick up fine particles of grit which transforms them into very efficient grinding surfaces causing wear on your sink. We recommend a rubber mat in this case. DO NOT use abrasive powders or steel scouring pads as they may affect the surface gloss. DO NOT attempt to remove limescale by scraping it off – an application of citric acid (lemon juice) should, with the help of a stiff brush, remove any deposits. Silver streaks on the surface of the sink are caused by aluminium utensils and are not scratches – they can be easily removed with a cream cleaner. Heat Resistance Composite sinks are highly resistant to extremes of temperature and will withstand hot pans up to 230 °C. Avoid pans containing very hot oil above this temperature. Meadow Lane, Long Eaton, Nottingham, NG10 2GD, England Tel: +44 (0) 115 946 4000 Fax: +44 (0) 115 973 6602 E-mail: [email protected] w w w. ra ng em a ster. co. uk 13 EN 13310 : 2003 Synthetic / Composite Kitchen sink made of: Cleanability: Pass Load resistance: NPD / N/A Durability: Pass 3963-03 20 Year Guarantee We guarantee to replace any composite sink that breaks due to material or manufacturing defects within 20 years from the date of purchase. The guarantee does not cover normal wear and tear occurring through use of the product. For the guarantee to apply the owner must follow the use, care and cleaning instructions provided. Accessories and waste fittings are not included in this guarantee.