1
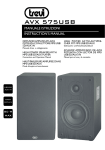
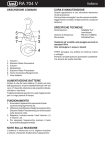
AVX 585 KB
MANUALE ISTRUZIONI
INSTRUCTION'S MANUAL
DIFFUSORI AMPLIFICATI CON
KARAOKE E BLUETOOTH®
AKTIVLAUTSPRECHER MIT
KARAOKE UND BLUETOOTH®
AMPLIFIED SPEAKERS WITH
KARAOKE AND BLUETOOTH®
ALTAVOZ AMPLIFICADO CON
KARAOKE E BLUETOOTH®
Manuale d'uso e collegamento
Connection and Operation Manual
HAUT-PARLERURS AMPLIFIEE DANS
KARAOKE ET BLUETOOTH®
Mode d'emploi et branchement
BLUETOOTH
CONNECTION
KARAOKE
BASS
REFLEX
80W
MAX
Gebrauchs- und Anschlusshandbuch
Manual para el uso y la conexión
AVX 585 kb
COMANDI / CONTROLS
1
2
3
4
8
9
5
10
11
6
12
7
13
2
AVX 585 kb
CONNESSIONE A DISPOSITIVI ESTERNI / CONNECTIONS TO EXTERNAL DEVICES
DVD/Mpeg4 Player
TV/Monitor
*All'uscita audio RCA
Cavo RCA/RCA non incluso
*To RCA audio output
RCA/RCA cable not included
**Alla presa cuffia o Line-out del dispositivo
**To headphones socket or Line-out of device
Personal Computer/
Notebook
*
**
**
Telefoni cellulari/
Smartphone
MP3 Player
**
**
DESCRIZIONE COMANDI
1. Indicatore led di accoppiamento Bluetooth
2. Controllo volume generale
3. Controllo toni alti
4. Controllo toni bassi
5. Commutatore LINE-IN/Bluetooth
6. Interruttore di accensione ON/OFF
7. Cavo di alimetazione AC 220-240V~50/60Hz
8. Controllo effetto echo microfono
9. Controllo volume microfono
10. Uscita per collegamento altoparlante satellite (presa gialla)
11. Ingresso LINE-IN1 RCA(prese rossa e bianca)
12. Ingresso LINE-IN2 jack Ø3,5mm
13. Ingresso microfono Ø6,3mm
2. In alternativa si può collegare un jack di un cavo audio all'ingresso
LINE-IN2 posto sul retro dell'altoparlante amplificato (12) e
l'altro jack del cavo audio alla presa cuffia o all’uscita line-out di
una sorgente audio.
NOTA: nel caso di ingressi LINE-IN1 e LINE-IN2 entrambi connessi, verrà
riprodotta la sorgente connessa all'ingresso LINE-IN2.
NOTA: si consiglia di non impostare un volume troppo alto della sorgente
audio per non saturare l’ingresso dei diffusori.
3. Portare il commutatore LINE-IN/Bluetooth (5) sulla posizione 1.
4. Accendere l'apparecchio.
UTILIZZO DELA SORGENTE BLUETOOTH
1. Posizionare il dispositivo Bluetooth da accoppiare vicino agli
speaker.
2. Portare il commutatore LINE-IN/Bluetooth (5) sulla posizione 0.
3. Accendere l'apparecchio.Verrà emesso un suono di ricerca dispositivi e l'indicatore led (1) comincerà a lampeggiare velocemente.
4. Ricercare lo speaker nominato "AVX 585 KB" o “GLD-811” e
inserire il codice di sicurezza (PIN) 0000 se richiesto.
5. Ad accoppiamento avvenuto verrà emesso un suono e l'indicatore
led (1) lampeggerà più lentamente.
Note: l’altoparlante Bluetooth andrà in modalità di riposo automaticamente
dopo 30 minuti di inutilizzo.
COLLEGAMENTO DEGLI ALTOPARLANTI
1. Collegare l'altoparlante satellite nella relativa uscita posta sul
retro dell'altoparlante amplificato (10).
ACCENSIONE E REGOLAZIONI
1. Portare l’interruttore di accensione ON/OFF (6) sulla posizione
1 per accendere l’apparecchio.
2. Regolare il volume generale tramite il relativo controllo (2).
3. Regolare i toni alti e bassi tramite i relativi controlli (3 e 4).
4. Portare l’interruttore di accensione ON/OFF (6) sulla posizione
0 per spegnere l’apparecchio.
CARATTERISTICHE TECNICHE
UTILIZZO DELL'INGRESSO MICROFONO
Potenza massima totale:.............................. 80W
Dimensioni unità:.......................................... 145x250x190mm
Alimentazione:............................................... AC 220-240V~50/60Hz
1. Inserire il jack Ø6,3mm di un microfono nel relativo ingresso (13).
2. Regolare il volume del microfono tramite il relativo controllo (9).
3. Regolare l'effetto echo del microfono tramite il relativo controllo (8).
UTILIZZO DELL'INGRESSO LINE IN
1. Collegare i connettori RCA di un cavo audio all'ingresso LINE-IN1 posto sul retro dell'altoparlante amplificato (11) e il
jack del cavo audio alla presa cuffia o all’uscita line-out di una
sorgente audio (TV/Monitor,Tablet, telefoni cellulari, lettori MP3,
lettori DVD/Mepg4, schede audio per computer, ecc...).
3
ENGLISH
AVX 585 kb
FRANÇAIS
DESCRIPTION OF CONTROLS
DESCRIPTION DES CONTRÔLES
CONNECTING SPEAKERS
RACCORDEMENT DES ENCEINTES
POWER AND ADJUSTMENTS
MISE SOUS TENSION ET RÉGLAGE
USING THE MICROPHONE
EN UTILISANT LE MICROPHONE
INPUT LINE IN USE
UTILISATION DE LINE IN
USE OF THE BLUETOOTH
UTILISATION DE BLUETOOTH
1. Pairing Bluetooth led indicator
2. General volume control
3. Treble control
4. Bass control
5. LINE-IN/Bluetooth switch
6. ON/OFF switch
7. Power supply cable AC 220-240V~50/60Hz
8. Control of echo effect of microphone
9. Microphone volume control
10. Satellite speaker connection output (yellow jack)
11. LINE-IN1 RCA input (red and white plugs)
12. LINE-IN2 jack Ø3,5mm input
13. Microphone input Ø6, 3mm
1. Pairage Bluetooth temoin led
2. Contrôle du volume général
3. Contrôle des treble
4. Contrôle des basses
5. Commutateur de LINE-IN/Bluetooth
6. Interrupteur ON/OFF
7. Câble d'alimentation AC 220-240V~50/60Hz
8. Contrôle de l'effet d'echo du microphone
9. Commande de volume de microphone
10. Sortie de connexion des haut-parleurs satellites (prise jack jaune)
11. Entrée LINE-IN1 RCA (fiches rouge et blanche)
12. Entrée LINE-IN2 jack Ø3,5mm
13. Entrée microphone Ø6, 3mm
1. Connect the satellite speaker in its output at the back of the
amplified speaker (10).
1. Branchez l'enceinte satellite dans son sortie à l'arrière de l'enceinte
amplifiée (10).
1. Turn the ON/OFF power switch (6) to position 1 to switch on
the device.
2. Adjust the overall volume through its control (2).
3. Adjust the volume using the corresponding control (6).
4. Adjust the treble and bass tones through their controls (3 and 4).
5. Turn the ON/OFF power switch (6) to position 0 to switch off
the device.
1. Tournez l'interrupteur d'alimentation ON/OFF (6) en position
1 pour allumer l'appareil.
2. Régler le volume général grâce à son contrôle (2).
3. Réglez le volume à l'aide de la commande correspondant(6) .
4. Régler les sons aigus et graves par le biais de leurs contrôles (3 et 4).
5. Tournez l'interrupteur d'alimentation ON/OFF (6) à la position
0 pour éteindre l'appareil.
1. Insert a plug Ø6,3mm of a microphone in its input (13).
2. Adjust the microphone volume through its control (9).
3. Adjust the echo effect of the microphone through its control (8).
1. Mettez une cheville Ø6,3mm d'un microphone dans son entrée (13).
2. Ajuster le volume du microphone à travers son contrôle (9).
3. Ajuster l'effet d'echo du microphone à travers son contrôle (8).
1. Connect the RCA connectors of an audio cable to the LINE- IN1
input (11) of amplified speaker and the jack plug to the headphone
jack or line-out output of an audio source (TV/Monitor, Tablet,
smartphone, MP3 players, DVD/Mepg4 players, computers, etc...).
2. Alternatively, you can connect a jack of an audio cable to the
LINE-IN2 (12) input of the amplified speaker and the other jack
of the audio cable to the headphone jack or the line-out output
of an audio source.
NOTE: in the case of LINE-IN1 and LINE-IN2 both related, will play the
source connected to the input LINE-IN2.
NOTE: we recommend that you do not set the volume of the audio source
is too high in order not to saturate the speaker input.
3. Set the switch LINE-IN/Bluetooth (5) to position 1.
4. Switch on the device.
1. Branchez les connecteurs RCA du câble audio à la prise LINE IN
(11) de haut-parleur amplifié et la prise jack en la prise casque
ou une sortie line-out d'une source audio (TV/moniteur, tablette,
smartphones,lecteurs MP3,lecteurs DVD/Mepg4 ,ordinateurs,etc...).
2. Vous pouvez également connecter une prise d'un câble audio
à l'entrée de LINE-IN2 (12) du haut-parleur amplifié et l'autre
prise du câble audio à la prise pour écouteurs ou la sortie de la
sortie d'une source audio.
REMARQUE: dans le cas de LINE-IN1 et LINE-IN2 les deux associés,
jouera la source connectée à l'entrée LINE-IN2.
REMARQUE: nous vous recommandons de ne pas définir le volume de
l'audio source est trop élevé pour ne pas saturer l'entrée de l'enceinte.
3. Mettez le LINE-IN/Bluetooth (5) sur la position 1.
4. Allumez l'appareil.
1. Place the Bluetooth device to pair near the speakers.
2. Set the switch LINE-IN/Bluetooth (5) to position 0.
3. Switch on the device.You will hear a sound of devices research
and the led indicator (1) will begin to flash rapidly.
4. Locate the speaker named "AVX 585 KB" or "GLD-811" and
enter the security code (PIN) 0000 if required.
5. After pairing you will hear a sound and the led indicator (1)
flashes more slowly.
NOTE: the Bluetooth speaker will go into sleep mode automatically after
30 minutes of inactivity.
1. Placez le périphérique Bluetooth pour jumeler à proximité des
enceintes.
2. Mettez le LINE-IN/Bluetooth (5) sur la position 0.
3. Allumez l'appareil. Vous entendrez un bruit de la recherche
de périphériques et l'indicateur led (1) commence à clignoter
rapidement.
4. Localiser l'orateur nommé « AVX 585 KB » ou « GLD-811 » et
entrez le code de sécurité (PIN) 0000 si nécessaire.
5. Après l'Association, vous entendrez un bruit et l'indicateur led
(1) clignote plus lentement.
REMARQUE: le haut-parleur Bluetooth se met en veille automatiquement
au bout de 30 minutes d'inactivité.
TECHNICAL CHARACTERISTICS
Total max power:......................................... 80W
Speakers Dimensions:.................................. 145x250x190mm
Power Supply:................................................ AC 220-240V~50/60Hz
CARACTÉRISTIQUES TECHNIQUES
Puissance max total:..................................... 80W
Dimensions Haut-parleurs:........................ 145x250x190mm
Bloc d'alimentation:...................................... AC 220-240V~50/60Hz
4
DEUTSCH
AVX 585 kb
ESPAÑOL
BESCHREIBUNG DER STEUERELEMENTE
DESCRIPCIÓN DE LOS CONTROLES
ANSCHLUSS LAUTSPRECHER
CONEXIÓN DE LOS ALTAVOCES
1. Den Satelliten-Lautsprecher in ihrem Ausgabe auf der Rückseite
der verstärkten Lautsprecher (10) verbinden.
1. Conecte el parlante satélite en su salida en la parte trasera del
altavoz amplificado (10).
ENERGIE UND EINSTELLUNGEN
ENCENDIDO Y AJUSTES
MIT HILFE DES MIKROFONS
USANDO EL MICRÓFONO
1. Pairing Bluetooth led Indikator
2. Allgemeine Lautstärkeregler
3. Treble-Regler
4. Bass-Regler
5. LINE-IN/Bluetooth-Schalter
6. Schalter ON/OFF
7. Stromversorgungskabel AC 220-240V~50/60Hz
8. Kontrolle der Effekt "Echo" des Mikrofons
9. Mikrofon-Lautstärkeregelung
10. Satelliten-Lautsprecherausgang (gelbe Buchse)
11. LINE-IN1 RCA Eingang (roten und weißen Steckern)
12. LINE-IN2 jack Ø3,5mm Eingang
13. Mikrofon-Eingang Ø6, 3mm
1. Indicador led de emparejamiento Bluetooth
2. Control de volumen general
3. Control de agudos
4. Control de graves
5. Interruptor de LINE-IN/Bluetooth
6. Interruptor ON/OFF
7. Cable de alimentación AC 220-240V~50/60Hz
8. Control del efecto de eco del micrófono
9. Control de volumen de micrófono
10. Salida de conexión del altavoz satélite (jurel)
11. Entrada LINE-IN1 RCA (conectores rojos y blancos)
12. Entrada LINE-IN2 jack Ø3,5mm
13. Entrada de micrófono Ø6, 3mm
1. Ponga el interruptor de alimentación ON/OFF (6) en la posición
1 para encender el dispositivo.
2. Ajustar el volumen general a través de su control (2).
3. Ajuste el volumen con el control correspondiente ( 6 ).
4. Ajustar los tonos agudos y graves a través de sus controles (3 y 4).
5. Ponga el interruptor de alimentación ON/OFF (6) a la posición
0 para apagar el dispositivo.
1. Schalten Sie den Netzschalter ON/OFF (6) um 1 um das Gerät
einzuschalten zu positionieren.
2. Die allgemeine Lautstärke durch seine Kontrolle (2).
3. Stellen Sie die Lautstärke mit dem entsprechenden Steuer(6).
4. Passen Sie die Höhen und Bass-Töne durch ihre Steuerelemente (3 und 4).
5. Schalten Sie den Netzschalter ON/OFF (6) um 0 bis das Gerät
ausschalten zu positionieren.
1. Introduzca un tapón Ø6,3mm de un micrófono en su entrada (13).
2. Ajustar el volumen del micrófono a través de su control (9).
3. Ajustar el efecto de eco del micrófono a través de su control (8).
1. Legen Sie einen Stecker Ø6, 3mm eines Mikrofons in ihrem
Eingabe (13).
2. Durch seine Kontrolle (9) die Mikrofon-Lautstärke.
3. Passen Sie den Effekt "Echo" des Mikrofons durch seine Kontrolle (8).
ENTRADA DE LÍNEA EN USO
1. Conecte los conectores RCA del cable de audio a las tomas LINE
IN (11) de altavoz amplificado y el conector jack para auriculares
o salida de línea de salida de una fuente de audio (TV/monitor,
Tablet, smartphone, reproductores MP3, reproductores DVD/Mepg4, ordenadores, etc ...).
2. Alternativamente, usted puede conectar a un enchufe de un cable
de audio a la entrada de LINE-IN2 (12) del altavoz amplificado y
el otro conector del cable de audio a los auriculares o la salida
de línea de salida de una fuente de audio.
NOTA: en el caso de LINE-IN2 relacionadas y LINE-IN1, tocará la fuente
conectada a la entrada LINE-IN2.
NOTA: le recomendamos que no se define el volumen del audio fuente es
demasiado alto para no saturar la entrada del altavoz.
3. Ponga el selector LINE-IN/Bluetooth (5) hasta la posición 1.
4. Encienda el aparato.
INPUT LINE IN USE
1. Verbinden Sie die Cinch-Stecker des Audiokabels mit den
LINE IN (11) Aktivlautsprecher und dem Klinkenstecker in die
Kopfhörerbuchse oder Line-Out- Ausgang einer Audio- Quelle
(TV/Monitor,Tablet ,Smartphone ,MP3-Player,DVD/Mepg4-Player,
Computer, etc ...).
2. Alternativ können Sie eine Buchse ein Audiokabel an den Eingang
LINE-IN2 (12) den verstärkten Lautsprecher und die anderen
das Audiokabel an den Kopfhöreranschluss-Buchse oder die
Line-Out-Ausgabe einer audio-Quelle anschließen.
HINWEIS: bei LINE-IN1 und LINE-IN2 sowohl mit Bezug, wird die Quelle
angeschlossen an den Eingang LINE-IN2 spielen.
HINWEIS: Wir empfehlen, dass Sie nicht die Lautstärke des Tons setzen
Quelle ist zu hoch, um nicht den Lautsprecher-Eingang zu sättigen.
3. Stellen Sie den Schalter LINE-IN/Bluetooth (5) auf position 1.
4. Schalten Sie das Gerät.
USO DE BLUETOOTH
1. Coloque el dispositivo Bluetooth para emparejar cerca de los
altavoces.
2. Ponga el selector LINE-IN/Bluetooth (5) hasta la posición 0.
3. Encienda el aparato. Usted escuchará un sonido de la investigación
de los dispositivos y el indicador led (1) comenzará a parpadear
rápidamente.
4. Localizar el orador llamado "AVX 585 KB" o "GLD-811" e
introduzca el código de seguridad (PIN) 0000 si es necesario.
5. Después de un acoplamiento escuchará un sonido y el indicador
led (1) parpadea más lentamente.
NOTA: el altavoz Bluetooth entrará en modo de reposo automáticamente
después de 30 minutos de inactividad.
VERWENDUNG VON BLUETOOTH
1. Stellen Sie das Bluetooth-Gerät in der Nähe der Lautsprecher
koppeln.
2. Stellen Sie den Schalter LINE-IN/Bluetooth (5) auf position 0.
3. Schalten Sie das Gerät ein. Sie hören einen Ton der GeräteForschung und die led-Anzeige (1) wird zu schnell zu blinken
beginnen.
4. Suchen Sie den Lautsprecher mit dem Namen "AVX 585 KB"
oder "GLD-811" und geben Sie den Sicherheitscode (PIN) 0000
bei Bedarf.
5. Nach der Paarung werden Sie einenTon hören und die led-Anzeige
(1) blinkt langsam.
HINWEIS: der Bluetooth-Lautsprecher wird automatisch nach 30 Minuten
Inaktivität in den Ruhezustand gehen.
CARACTERÍSTICAS TÉCNICAS
Potencia max total:...................................... 80W
Dimensiones del altavoz:............................ 145x250x190mm
Fuente de alimentación:.............................. AC 220-240V~50/60Hz
TECHNISCHE MERKMALE
Gesamtleistung:............................................. 80W
Lautsprechergröße:...................................... 145x250x190mm
Netzteil:.......................................................... AC 220-240V~50/60Hz
5
AVX 585 kb
Hinweise zur ordnungsgemäßen Entsorgung
des Produkts.
Das auf dem Gerät angebrachte Symbol weist darauf hin,
dass das Altgerät “getrennt zu sammeln” ist und das Produkt
daher nicht zusammen mit dem Gemeindeabfall entsorgt
werden darf.
Der Benutzer muss das Produkt zu den entsprechenden, von
der Gemeindeverwaltung eingerichteten“Wertstoffsammelstellen” bringen oder dem Händler beim Kauf eines neuen
Produkts übergeben.
Die getrennte Müllsammlung und anschließendeAufbereitung,
Wiederverwertung und Entsorgung fördern die Herstellung von Geräten unter Verwendung wiederverwerteter
Materialien und vermindern die negativen Auswirkungen
auf die Umwelt und Gesundheit in Folge einer falschen
Müllverwaltung.
Die widerrechtliche Entsorgung des Produkts führt zur
Auferlegung von Verwaltungsstrafen.
Avvertenze per il corretto smaltimento del
prodotto.
Il simbolo riportato sull’apparecchiatura indica che il rifiuto deve essere oggetto di “raccolta separata” pertanto il
prodotto non deve essere smaltito insieme ai rifiuti urbani.
L’utente dovrà consegnare il prodotto presso gli appositi
“centri di raccolta differenziata” predisposti dalle amministrazioni comunali, oppure consegnarlo al rivenditore contro
acquisto di un nuovo prodotto.
La raccolta differenziata del rifiuto e le successive operazioni
di trattamento, recupero e smaltimento favoriscono la produzione di apparecchiature con materiali riciclati e limitano
gli effetti negativi sull’ambiente e sulla salute causati da una
gestione impropria del rifiuto.
Lo smaltimento abusivo del prodotto comporta l’applicazione
di sanzioni amministrative.
Precautions for correct disposal of the
product.
The symbol shown on the equipment indicates that waste
must be disposed of in “separate collection” and so the
product must not be disposed of together with urban waste.
The user must take the product to special “separate waste
collection centres” provided by local government, or deliver
it to the retailer against the purchase of a new product.
Separate collection of waste and subsequent treatment,
recycling and disposal operations promotes the production
of equipment with recycled materials and limits negative effects on the environment and on health caused by improper
handling of waste.
Illegal disposal of the product leads to the enforcement of
administrative penalties.
Advertencias para la correcta eliminación del
producto.
El símbolo que aparece en el aparato indica que el residuo
debe ser objeto de “recogida selectiva” por tanto el producto
no se debe eliminar junto con residuos urbanos.
El usuario deberá entregar el producto a los“centros de recogida selectiva” creados por las administraciones municipales
o bien al distribuidor cuando adquiera un nuevo producto.
La recogida selectiva del residuo y las sucesivas operaciones
de tratamiento, recuperación y eliminación favorecen la fabricación de aparatos con materiales reciclados y limitan los
efectos negativos en el medio ambiente y la salud causados
por una gestión incorrecta del residuo.
La eliminación abusiva del producto da lugar a la aplicación
de sanciones administrativas.
Recommandations pour l’élimination
correcte du produit.
Le symbole figurant sur l’appareil indique que le produit fait
l’objet d’une “ collecte séparée “. C’est pourquoi, le produit
ne doit pas être éliminé avec les déchets urbains.
L’utilisateur doit remettre le produit auprès de “ décharges
spécialisées de collecte séparée “ prévues par les autorités
locales, ou bien le rendre au revendeur quand il achètera
un nouvel appareil équivalent.
La collecte séparée du produit et les opérations successives de
traitement, recyclage et élimination favorisent la production
d’appareils composés par des matériaux recyclés ainsi que
permettent d’éviter des effets négatifs sur l’environnement
et sur la santé des personnes suite à une gestion impropre
du déchet.
Toute élimination abusive du produit entraîne l’application
de sanctions administratives.
6
AVX 585 kb
GARANZIA
1. L’apparecchio è garantito per 24 mesi dalla data di fabbricazione indicata sull’etichetta applicata sul prodotto.
2. La garanzia si applica solo ad apparecchi, non manomessi,
riparati da centri assistenza TREVI, essa comprende la
riparazione dei componenti per difetti di fabbricazione
con l’esclusione di etichette, manopole e parti asportabili.
3. TREVI non risponde di danni diretti o indiretti a cose
o/e persone causati dall’uso o sospensione d’uso dell’apparecchio.
GARANTIEBESTIMMUNGEN
1. Das Gerät hat eine Garantie von 24 Monaten ab dem
Herstellungsdatum. Das Herstellungsdatum ist auf der
am Produkt angebrachten Etikette angegeben.
2. Die Garantie gilt nur für Geräte, an denen nicht selbst
ausgeführte Reparaturen erfolgt sind, sondern die von
TREVI-Kundendienststellen durchgeführt wurden. Die
Garantie umfaßt die Reparatur von Bauteilen, wenn
diese auf Herstellungsfehler zurückzuführen sind. Die
Garantie gilt hingegen nicht für Etiketten, Drucktasten,
Knöpfe und entfernbare Teile.
3. TREVI haftet nicht für direkte oder indirekte Sach- und/
oder Personenschäden, die vom Gebrauch des Gerätes
verursacht worden sind.
WARRANTY
1. This unit is guaranteed for a period of 24 months from
the date of production printed on the product itself or
on label on product.
2. The warranty is valid only if the unit has not been
tampered with. The warranty is valid only at authorized
TREVI assistance centres, that will repair manufacturing
defects, excluded replacement of labels and removable
parts.
3. TREVI is not liable for damage to people or things caused
by the use of this unit or by the interruption in the use
of this unit.
GARANTIA
1. El aparato tiene una garantía de 24 meses a partir de
la fecha de fabricación indicada en la tarjeta sobre el
producto.
2. La garantía está aplicada solamente a los productos no
desarreglados y reparados por los centros de asistencia
TREVI. Además, la garantía incluye la reparación de los
componentes a causa de defectos de fabricación, con la
exclusión de etiquetas, botones y partes removibles.
3. TREVI no es responsable por daños directos o indirectos
a cosas y/o personas causados por el uso o suspensión
del uso del aparato.
GARANTIE
1. L’appareil est garanti pendant une période de 24 mois de
la date de fabrication indiquée sur l’étiquette se trouvant
sur le produit.
2. La garantie n’est appliquée que sur les appareils non
altérés, ayant été réparés chez un Service Après-Vente
TREVI. Elle comprend la réparation des composantes à la
suite de défauts de fabrication, à l’exclusion d’étiquettes,
boutons de réglage et parties amovibles.
3. TREVI ne répond pas des dommages directs ou indirects
aux choses et/ou aux personnes entraînés pendant l’usage
ou la suspension d’usage de l’appareil.
7
ATTENZIONE
WARNING!
RISCHIO DI SCOSSEELETTRICHE!
NON ESPORRE A PIOGGIA E
UMIDITÀ
DANGER OF ELECTRIC SHOCK!
DO NOT EXPOSE TO
RAIN OR HUMIDITY
ATTENZIONE: NON APRITE L'APPARECCHIO. ALL'INTERNO NON VI
SONO COMANDI MANIPOLABILI DALL'UTENTE NE PARTI DI RICAMBIO.
PER TUTTE LE OPERAZIONI DI SERVIZIO RIVOLGERSI AD UN CENTRO
DI ASSISTENZA AUTORIZZATO TREVI
WARNING: DO NOT OPEN THE SET. NEITHER CONTROLS OR SPARE
PARTS TO BE USED BY THE USER ARE TO BE FOUND INSIDE IT. APPLY TO
AUTHORISED TREVI CENTERS FOR SERVICE OPERATIONS.
ATTENTION
ACHTUNG
RISQUE DE DECHARGES ELECTRIQUES
NE PAS EXPOSER A LA PLUIE ET A
L’HUMIDITE
GEFAHR ELEKTRISCHER SCHLÄGE
NICHT DER FEUCHTIGKEIT UND
DEM REGEN AUSSETZEN
ATTENTION: NE PAS OUVRIR L’APPAREIL, A L’INTERIEUR IL N’Y A PAS
DE COMMANDES A MANIPULER PAR L’UTILISATEUR OU DE PIECES
DE RECHANGE. POUR TOUTES LES OPERATIONS DE SERVICE IL FAUT
S’ADRESSER A UN SERVICE D’ASSISTANCE AUTORISE TREVI.
ACHTUNG: DAS GERÄT NICHT ÖFFNEN. IM INNERN BEFINDEN SICH
KEINE VOM BENUTZER SELBST INSTANDSETZBAREN TEILE UND AUCH
KEINE ERSATZTEILE. FÜR JEGLICHE SERVICEARBEITEN,WENDEN SIE SICH
BITTE AN EINE TREVI AUTORISIERTEN KUNDENDIENSTSTELLE.
ATENCION
ATENÇÃO
PELIGRO DE CHOQUES ELECTRICOS
NO EXPONER A LLUVIA Y HUMEDAD
PERIGO DE CHOQUES ELÉTRICOS
NÃO EXPOR A CHUVA E UMIDADE
ATENCION: NO ABRIR EL APARATO, EN SU INTERIOR NO HAY MANDOS
QUE PUEDAN SER MANIPULADOS POR EL USUARIO NI PARTES DE
REPUESTO. PARA TODAS LAS OPERACIONES DE SERVICIO DIRIGIRSE A
UN CENTRO DE ASISTENCIA AUTORIZADO TREVI.
PROSOCH
KINDUNOS HLEKTROPLHXIAS
MHN EKQETETE
SE BROCH KAI UGRASIA
PROSOCH. MHN ANOIGETE THN SUSKEUH. DEN UPARCOUN STO
ESWTERIKO THS ENTOLES POU NA MPOREI NA CEIRISTEI O KATANALWTHS OUTE ANTALLAKTIKA TMHMATA. GIA OPOIADHPOTE
EPISKEUH H¢ SUNTHRHSH APEUQUNQEITE SE ENA APO TA EXOUSIODOTHMENA KENTRA ANTIPROSWPEIAS TREVI.
ATENÇÃO: NÃO ABRIR O APARELHO. NO INTERIOR DO MESMO NÃO
EXISTEM COMANDOS OU PEÇAS DE SUBSTITUIÇÃO QUE POSSAM SER
MANIPULADOS PELO USUÁRIO. EM CASO DE EVENTUAL OPERAÇÃO DE
SERVIÇO,DIRIGIR-SEA UM CENTRO DEASSISTÊNCIAAUTORIZADOTREVI
UK PLUG ONLY
WIRES CONNECTIONS TO A UK THREEPIN PLUG
The wires in this mains lead are coloured in accordance with the following
wiring codes:
Blue: Neutral
Brown: Live
The wires in this mains lead must be connected to the terminals in the plug
as follows:
Blue wire: N or Black
Brown wire: L or Red
Neither wire is to be connected
to the earth (E or W) terminal of
three-pin plug.
Should the fuse fail in the plug
remove the plug form the wall
socket and replace the fuse with a 3
Amp.ASTA approved BS 1362 fuse.
Trevi S.p.A.
Strada Consolare Rimini-San Marino, 62 47924 Rimini (RN) Italia
Tel. 0541/756420 Fax 0541/756430
www.trevi.it email: [email protected]
Made in
CHINA