1
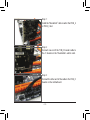
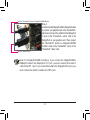
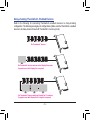
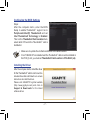
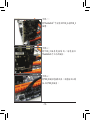
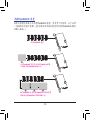
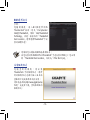
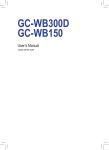
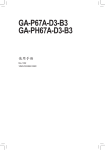
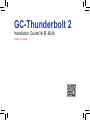
GC-Thunderbolt 2 Installation Guide/安裝指南 12WE6-TH2-10AR Product Specification Chip Intel® DSL5520 Thunderbolt™ 2 Controller Connectors 2 x Thunderbolt™ 2 ports (TBT 1/TBT 2), supporting up to 20 Gbps bandwidth and a maximum display resolution of 4096x2160@24Hz or 3840x2160@60Hz * A ctual resolutions supported are dependent on the graphics card being used. * Support an HDMI monitor via a DisplayPort to HDMI dongle (purchased separately). 2 x DisplayPort 1.2 In ports (DisplayPort IN 1/DisplayPort IN 2) 1 x 5-pin J1 header, connecting to the motherboard THB_C header by the included THB_C header cable Interface PCIe 2.0 interface Data Transfer Rate 20 Gbps Bi-directional per port Supported Support for Windows 8.1 (64-bit)/Windows 7 (64-bit) Operating Systems Compatible Compatible with the GIGABYTE X99 series motherboards only Motherboards -2- Installing the GIGABYTE GC-Thunderbolt 2 Add-in Card GC-Thunderbolt 2 Add-in Card Thunderbolt™ 2 Port 2 (TBT 2) Thunderbolt™ 2 Port 1 (TBT 1) J1 Header DisplayPort In Port 2 (DisplayPort IN 2) DisplayPort In Port 1 (DisplayPort IN 1) PCIe x4 Interface DisplayPort Cable x 2 Mini-DisplayPort Cable x 1 -3- THB_C Header Cable x 1 Step 1: Install the Thunderbolt™ add-in card in the PCIE_2 or PCIE_3 slot. Step 2: Connect one end of the THB_C header cable to the J1 header on the Thunderbolt™ add-in card. Step 3: Connect the other end of the cable to the THB_C header on the motherboard. -4- To the Thunderbolt™ Device or DisplayPort/HDMI Monitor To the Graphics Card Step 4: Use the included DisplayPort/Mini-DisplayPort cable to connect your graphics card to the Thunderbolt™ add-in card. Connect the cable from the DisplayPort In port on the Thunderbolt™ add-in card to the DisplayPort on your graphics card. Then connect the Thunderbolt™ device’s or DisplayPort/HDMI monitor’s cable to the Thunderbolt™ 2 port on the Thunderbolt™ add-in card. Note: For DisplayPort/HDMI monitor(s), if you connect the DisplayPort/MiniDisplayPort cable to the DisplayPort IN 1 port, you must connect the monitor’s cable to the TBT 1 port. If you connect the cable to the DisplayPort IN 2 port, you must connect the monitor’s cable to the TBT 2 port. -5- Daisy-chaining Thunderbolt™ Enabled Devices Refer to the following for connecting Thunderbolt™-enabled devices in a daisy-chaining configuration. The following are single-port configurations. (Make sure the Thunderbolt™-enabled devices to be daisy-chained have both Thunderbolt™ in and out ports.) Six Thunderbolt™ devices Six Thunderbolt™ devices and one native DisplayPort monitor (A graphics card with DisplayPort is required) Six Thunderbolt™ devices and three DisplayPort 1.2 monitors (A graphics card with DisplayPort 1.2 support is required) -6- Configuring the BIOS Settings Steps: After the computer starts, enter the BIOS Setup to enable Thunderbolt™ support. Go to Peripherals\Intel(R) Thunderbolt and set Intel Thunderbolt Technology to Enabled. Then on the Thunderbolt Card Location item, select which PCIe slot the Thunderbolt™ card is installed in. •• Make sure to update the motherboard BIOS to the latest version. •• If an i7-5820K CPU is installed and the Thunderbolt™ add-in card is installed in the PCIE_3 slot, you must set Thunderbolt Card Location to PCIe Slot 3 (x4). Installing the Driver After the computer starts, install the driver for the Thunderbolt™ add-in card. Insert the included driver disk and follow the on-screen instructions to install the driver. Please visit GIGABYTE’s global website (http://www.gigabyte.com) and click on Support & Downloads for the latest software driver. -7- 產品規格 晶片 Intel® DSL5520 Thunderbolt™ 2 控制器 插座 2個Thunderbolt™ 2插座(TBT 1/TBT 2),最高可支援20 Gbps傳輸 速度,螢幕可支援至最高4096x2160@24Hz及3840x2160@60Hz 的解析度 * 實際所支援的解析度會依您所使用的顯示卡而有不同。 * 可經由DisplayPort轉HDMI轉接器(需自行選購)支援HDMI 螢幕。 2個DisplayPort 1.2 In插座(DisplayPort IN 1/DisplayPort IN 2) 1個5-pin J1插座,可經由附件的THB_C插座連接線與主 機板的THB_C插座連接 介面 資料傳輸速度 PCIe 2.0 介面 每埠可支援至最高20 Gbps雙向傳輸速度 支援作業系統 支援Windows 8.1(64-bit)/Windows 7 (64-bit) 可相容主機板 僅相容於技嘉X99系列主機板 -8- 安裝技嘉GC-Thunderbolt 2卡 GC-Thunderbolt 2卡 Thunderbolt™ 2插座2 (TBT 2) Thunderbolt™ 2插座1 (TBT 1) J1插座 DisplayPort In插座2 (DisplayPort IN 2) DisplayPort In插座1 (DisplayPort IN 1) PCIe x4 介面 DisplayPort連接線-2條 Mini-DisplayPort連接線-1條 -9- THB_C插座連接線-1條 步驟一: 將Thunderbolt ™卡安裝至PCIE_2或PCIE_3 插槽。 步驟二: 將THB_C插座連接線的一端連接至 Thunderbolt™卡上的J1插座。 步驟三: 將THB_C插座連接線的另一端連接至主機 板上的THB_C插座。 - 10 - 連接至Thunderbolt™裝置或DisplayPort/HDMI螢幕 步驟四: 請使用所附的DisplayPort/Mini-DisplayPort 連接線將您的顯示卡與Thunderbolt™卡做 連結。Thunderbolt ™卡上的DisplayPort In 插座需連結至顯示卡的DisplayPort,而 Thunderbolt ™卡上的Thunderbolt ™ 2插座則 需連結至Thunderbolt ™裝置或DisplayPort/ HDMI螢幕。 連接至顯示卡 注意:連接DisplayPort或HDMI螢幕時,如果您是將連接線連接至 DisplayPort IN 1插座, 您就必須將螢幕連接線接至TBT 1插座;若是 連接至DisplayPort IN 2,就必須將螢幕連接線接至TBT 2插座。 - 11 - 串接Thunderbolt™ 裝置 若要以菊鏈式串接方式串連Thunderbolt™裝置,請參考下列說明。以下為單 一連接埠的串接示意圖。(請先確認要串接的裝置皆具備Thunderbolt ™輸出 及輸入插座。) 6台Thunderbolt™裝置 6台Thunderbolt™裝置及1台原生DisplayPort螢幕 (需搭配支援DisplayPort的顯示卡) 6台Thunderbolt™裝置及3台DisplayPort 1.2規格螢幕 (需搭配支援DisplayPort 1.2規格的顯示卡) - 12 - BIOS選項設定 步驟: 電腦開機後,進入BIOS選單開啟 Thunderbolt ™ 技術。請至「Peripherals\ Intel(R) Thunderbolt」 開啟「Intel Thunderbolt Technology」 功能,接著再到「Thunderbolt Card Location」選項選擇Thunderbolt™卡安 裝的插槽位置。 • 請確認您主機板的BIOS為最新版本。 • 若您安裝的i7-5820K CPU且Thunderbolt™卡是安裝於PCIE_3,您必須 將「Thunderbolt Card Location」設定為「PCIe Slot 3 (x4)」。 安裝驅動程式 電腦重新開機後,請安裝 Thunderbolt ™卡的驅動程式。將所 附的驅動程式光碟片插入並且依 螢幕指示完成驅動程式的安裝。 請至技嘉網站(http://www.gigabyte.tw) 點選「支援與下載」查詢最新版的 驅動程式。 - 13 - FCC Notice (U.S.A. Only) This equipment has been tested and found to comply with the limits for a Class B digital device, pursuant to Part 15 of the FCC Rules. These limits are designed to provide reasonable protection against harmful interference in a residential installation. This equipment generates, uses, and can radiate radio frequency energy and, if not installed and used in accordance with the instructions, may cause harmful interference to radio communications. However, there is no guarantee that interference will not occur in a particular installation. If this equipment does cause harmful interference to radio or television reception, which can be determined by turning the equipment off and on, the user is encouraged to try to correct the interference by one or more of the following measures: Reorient or relocate the receiving antenna. Increase the separation between the equipment and receiver. Connect the equipment into an outlet on a circuit different from that to which the receiver is connected. Consult a dealer or experienced TV/radio technician for help. Canada, Industry Canada (IC) Notices / Canada, avis d'Industry Canada (IC) This Class B digital apparatus complies with Canadian ICES-003 and RSS-210. Operation is subject to the following two conditions: (1) this device may not cause interference, and (2) this device must accept any interference, including interference that may cause undesired operation of the device. Cet appareil numérique de classe B est conforme aux normes canadiennes ICES-003 et RSS-210. Son fonctionnement est soumis aux deux conditions suivantes : (1) cet appareil ne doit pas causer d'interférence et (2) cet appareil doit accepter toute interférence, notamment les interférences qui peuvent affecter son fonctionnement. - 14 - PCIe add in card GC-Thunderbolt 2 PCIe add-in card GC-Thunderbolt 2 Nov. 14, 2014 Nov. 14, 2014