1
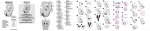
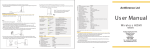
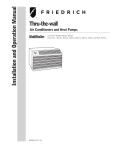
Swing N’ Bounce WARNING IMPORTANT! KEEP FOR FUTURE REFERENCE Read carefully ©2010 Graco PD130020A 01/10 1 Attaching Tray Parts 2X 4 5 6 7 2X SOOTHING VIBRATION REAR REAR 2X 2X Styles vary FRONT FRONT Features on certain models Attaching Bouncer Legs 8 Styles vary 9 10 Vibration Assembly and Seat Wire 3 2 1 11 12 13 2X 2 3 Attaching Seat Pad Attaching Front Legs 15 14 21 20 22 2X 23 16 Front Tube Attaching Rear Legs 19 25 2X 26 27 FRONT 1 FRONT 1 FRONT 2 FRONT 2 FRONT 2 FRONT 2 FRONT 1 Attaching Tubes to Legs 28 4 FRONT 1 Rear Tube 30 29 Rear 4 REAR 2X 18 REAR 17 24 5 Rear 3 Hanger Tubes 31 To Secure Child 32 40 41 42 43 44 45 46 47 Assembling Toy Bar 33 34 3X Attaching Carrier 36 Adjust Recline (3 positions) 39 38 Installing Batteries 48 49 + - 6 - + 37 7 + 35 For Storage Button Functions 51 50 52 53 56 57 63 64 1 6 2 1 3 5 6 4 2 3 5 4 55 54 Vibration 65 66 Head Support 59 58 OR OU O Mix ‘N Move 60 62 61 8 9 10 11 GB WARNING CARE AND MAINTENANCE Failure to follow these warnings and the assembly instructions could result in serious injury or death. WARNING: Be aware of the risk of open fire and other sources of strong heat, such as electic bar fires, gas fires, etc. in the vicinity of the product. WARNING: Always check the suspension system before use. Failure to follow this could result in falling down. This product requires adult assembly. Follow assembly instructions carefully. If you experience any difficulties, please contact the Customer Service Department. PLEASE SAVE OWNER’SMANUAL FOR FUTURE USE. Transformer or batteries: Product is not to be connected to more than the recommended number of power supplies. To prevent serious injury or death from child falling or being strangled in straps: WARNING: Always use restraint system. WARNING: Never leave child unattended. WARNING: Stop using product when child attempts to climb out or reaches 19,84 pounds (9 kg). WARNING: It is dangerous to use this reclined cradle on an elevated surface e.g table. Recommended type batteries—alkaline disposables, size D(LR20-1.5V). NEVER mix battery types. Change batteries when product ceases to operate satisfactorily. FROM TIME TO TIME CHECK YOUR PRODUCT for loose screws, worn parts, torn material or stitching. Replace or repair the parts as needed. Use only Graco replacement parts. REMOVABLE CLOTH SEAT COVER may be machine washed in cold water on delicate cycle and drip-dried. NO BLEACH. The crossed out wheelie bin symbol indicates the product is to be recycled. TO CLEAN FRAME, use only household soap and warm water. NO BLEACH or detergent. Electronic toys (on certain models): Do not open. No serviceable parts inside. Remove and immediately discard plastic tab from slot in toy. Excessive exposure to sun or heat could cause fading or warping of parts. FOR SAFE BATTERY USE Keep the batteries out of children’s reach. PROBLEM SOLVING Product won’t operate: 1. No batteries in swing. Only the recomended batteries or equivalent are to be used, volts and size. WARNING: Always use on a flat, level floor. 2. Batteries dead. Batteries are inserted with the correct polarity. WARNING: This reclined cradle is not intended for prolonged periods of sleep. This reclined cradle does not replace a cot or bed.Should your child need to sleep, then place the child in a suitable cot or bed. 3. Speed setting too low. Remove exhausted batteries from the product. 4. Batteries in backwards — check “+” and “-”. 5. C orrosion on battery terminals. Rotate bateries in place against terminals, or clean with sandpaper or steel wool if corrosion is severe. DO NOT short-circuit supply terminals. WARNING: Do not use the reclined cradle once your child can sit unaided. Rechargeable batteries are to be removed from the toy before being charged. WARNING: Do not use the product without the seat cushion. Rechargeable batteries are only to be charged under adult supervision. 7. Baby grabbing swing legs. (Discontinue use.) To be used from birth to 9 kg. Do not use for a child that weighs less than 5.5 pounds (2.5 kg), or a child premature or weakened – Use in most reclined position until child can sit up unassisted. Any battery may leak battery acid if mixed with a different battery type, if inserted incorrectly (put in backwards) or if all batteries are not replaced or recharged at the same time. Do not mix old and new batteries. Do not mix alkaline, standard (carbon-zinc) or rechargeable (nickel-cadmium) batteries. 9. P rotective device activated. (Turn off motor, wait 3 minutes, then restart swing.) Any battery may leak battery acid or explode if disposed of in fire or an attempt is made to charge a battery not intended to be recharged. Never recharge a cell of one type in a recharger made for a cell of another type. 2. Blanket hanging down, causing increased wind resistance. Discard leaky batteries immediately. Leaky batteries can cause skin burns or other personal injury. When discarding batteries, be sure to dispose of them in the proper manner, according to your state and local regulations. 6. Soft carpet (swings higher on hard floors). STRANGULATION HAZARD: WARNING: Do not leave or place the product close to another product which could present a danger of suffocation or strangulation, e.g. strings, blind/ curtain cords etc. Strings can cause strangulation. DO NOT place items with a string around your child’s neck, such as hood strings or pacifier cords. DO NOT suspend strings over the product or attach strings to toys. DISCONTINUE USING YOUR PRODUCT should it become damaged or broken. 6. Baby leaning too far forward. 8. Seat not pushed high enough for a good start. Seat doesn’t swing very high: 1. Control setting too low. 3. Batteries too weak. 4. Baby leaning too far forward. 5. Baby too heavy or too active. (Discontinue use.) Always remove batteries if the product is not going to be used for a month or more. Batteries left in the unit may leak and cause damage. WARNING: Do not use the product if any parts are broken, torn or missing and use only spare parts approved by the manufacturer. 12 13 GB Instructions Vibration Assembly and Seat Wire Attaching Front Tube to Legs Starting Product See images 28 See image WARNING: avoid serious injury from falling or sliding out. Always use harness. After fastening buckles, adjust belts to get a snug fit around your child. 1 - 3 Attaching Tray Rear Tube 4 Squeeze recline handle on seat and lower 29 See image seat before attaching tray. 30 CHECK that all tubes are securely attached. 5 Line up tray on edge of seat and insert peg CHECK that the parts of the frame are assembled in the positions shown. into hole and close tray. 6 See image Hanger Tubes 7 See image See images Attaching Bouncer Legs See images 8 - 14 - - 32 13 Assembling Toy Bar Attaching Seat Pad See images 31 See images 16 33 - 34 Attaching Carrier Attaching Rear Legs See images 17 See image 18 - 19 Insert rear legs into holes in housings as shown. 35 - See images Attaching Front Legs 37 - 39 To Secure Child 20 See image See images 21 The double buttons must fit into the channels inside 40 - 44 the battery housing. Button MUST snap through hole. 22 Swing the leg outward until the single button snaps its notch. CHECK that the leg is properly attached by twisting it in the housing. 45 Use slide adjuster at shoulder and waist for further 23 Repeat step 13 with other housing and leg. 47 The harness straps must go into the slot that is adjustment. Repeat on other side. 46 When changing harness strap slots, MAKE SURE harness straps are going through same slots in seat pad. Button MUST snap through hole. even with or slightly above the shoulders. Avoid twisting straps. 24 Swing the leg outward until the single button snaps Installing Batteries its notch. CHECK that the leg is properly attached by twisting it in the housing. 48 With baby out of swing, open the battery 25 - TO TURN PRODUCT ON:Press On /Off button or press any speed from 1 to 6. When pressing On/Off button, it automatically starts with the last speed setting that was selected before the product was turned off. When using the timer with the product on, if the button is pushed once, the red speed light will flash once and timer is set for 10 minutes. Pushing the timer button a second time will increase the run time to 20 minutes and the red speed light will flash twice. Observe the swinging motion for a minute. It takes time for the product to adjust to a setting. Change setting if needed. A small, quiet baby will swing higher on each setting than a larger, more active baby. Your seat may be stopped at any time the motor is running without damaging the motor. Push product to restart. Pushing a third time will increase the time to 30 minutes and the red speed light will flash three times. When using the timer with the Music/Nature sounds on, the timer will set to 10, 20 or 30 minutes as described for the swing, but there will be no flashing light. If your product motor stops operating by itself, a protective device may have been activated. Turn off motor, wait three minutes, then restart swing. TO TURN PRODUCT OFF: Press On /Off button. Button Functions 50 Head Support 51 SPEED – Press On /Off button or press any speed from 1 to 6. When pressing On/Off button, it automatically starts with the last speed setting that was selected before the swing was turned off. See images 27 - 59 Never use this head support on any other product. OFF. Press button to stop swing motion. Mix ‘N Move 53 MUSIC - Push “Music” button to turn on music. Push button again to advance to next track. There are 10 songs. See images 54 MUSIC/NATURE OFF - Press button to turn OFF. 60 - 62 - 64 For Storage 55 VOLUME— Press the plus (+) to raise the volume See images and the minus (-) to lower the volume. There are 5 volume settings. 63 63 Push buttons to fold. 56 NATURE SOUNDS— Push “Nature” button to Vibration turn on nature sound selection. Each press will change to the next nature sound. After the 5th sound is selected, it will return to the first track. See images 49 CHECK that the batteries are put in correctly. Your swing will not run if the batteries are put in backwards. 14 58 59 Only use this head support on this swing. 52 ON/OFF POWER - Press to turn ON and turn compartment lid by inserting a screwdriver into the coin slot. Insert three “D”-LR20 (1.5V) cell batteries. Front Tube See images the swing and/or Music/Nature sounds. If the timer button is not pushed, the swing and/or music/ nature sound will continue to play until the power on/off button is pushed or the music/nature off button is pushed. 36 Adjust Recline (3 positions) Button MUST snap through hole. 57 TIMER— Push “Timer” button to set the timer for 15 65 - 66 UK Graco consumer Services Newell Rubbermaid Graco Children’s Products Halifax Avenue Fradley Park Lichfield WS13 8SS United Kingdom 44844 412 1212 Graco Continental Europe Newell Rubbermaid Luxembourg SARL 1 rue Edmond Reuter L-5326 CONTERN Luxembourg www.gracobaby.eu www.graco.co.uk 16