1
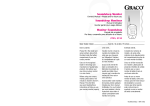
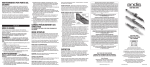
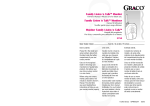
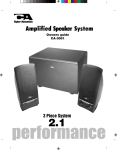
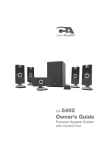
CA-3602
Owner’s Guide
Powered Speaker System
with Control Pod
Thank you!
Merci!
¡Gracias!
Getting Started
Pour commencer
Inicio
Connect to line-out source (green)
Connecter à la prise de sortie ligne (vert)
Conectar a la toma de salida (verde)
Connect to audio out source
Connecter à la prise de sortie audio
Conectar a la fuente de audio
To Speaker
Aux cable not included
Câble auxiliaire non fourni
No se incluye cable auxiliar
Or connect to headphone jack
Ou connecter à la prise casque
O conectar a la toma de auriculares
1
WARNING:
The lightning flash with arrowhead
symbol, within an equilateral triangle, is
intended to alert the user to presence of
uninsulated “dangerous voltage” within
the product’s enclosure that may be of
sufficient magnitude to constitute a risk
of electric shock to persons.
To reduce the risk of fire or electric shock, do
not expose this appliance to rain or moisture.
CAUTION:
Use of controls or adjustments or performance
of procedures other than those specified may
result in hazardous radiation exposure.
The exclamation point within an
equilateral triangle is intended to alert the
user to the presence of important
operating and maintenance (servicing)
instructions in the literature
accompanying the appliance.
CAUTION - TO REDUCE THE RISK OF
ELECTRIC SHOCK, DO NOT REMOVE COVER
(OR BACK). NO USER-SERVICING TO
QUALIFIED SERVICE PERSONNEL.
IMPORTANT SAFETY INSTRUCTIONS
CAUTION:
TO PREVENT ELECTRIC SHOCK, MATCH
WIDE BLADE OF PLUG TO WIDE SLOT,
FULLY INSERT.
ATTENTION:
POUR ÉVITER LES CHOC ÉLECTRIQUES,
INTRODUIRE LA LAME LA PLUS LARGE
DE LA FICHE DANS LA BORNE
CORRESPONDANTE DE LA PRISES ET
POUSSER JUSQU’AU FOND.
1. Read Instructions - All the safety and operating instruction should be
read before the product is operated.
2. Retain Instructions - The safety and operating instruction should be
retained for future reference.
3. Heed Warnings - All warning on the product and in the operating
instructions should be adhered to.
4. Follow instructions - All operating and use instructions should be
followed.
5. Cleaning - Unplug this product from the wall outlet before cleaning.
Do not use liquid cleaners or aerosol cleaners. Use a dry cloth for
cleaning.
6. Attachments - Do not use attachments not recommended by the
product manufacturer as they may cause hazards.
7. Water and Moisture - Do not use this product near water - for example,
near a bath tub, wash bowl, kitchen sink, or laundry tub; in a wet
basement, or near a swimming pool, and the like.
8. Accessories - Do not place this product on an unstable cart, stand tripod, bracket, or table. The product
may fall, causing serious injury to a child or adult, and serious damage to the product. Use only with a cart,
stand, tripod, bracket, or table recommended by the manufacturer, or sold with the product. Any mounting
of the product should follow the manufacturer? instructions, and should use a mounting accessory
recommended by the manufacturer.
9. A product and cart combination should be moved with care. Quick stops, excessive force, and uneven
surfaces may cause the appliance and cart combination to overturn.
10. Ventilation - Slots and openings in the cabinet are provided for ventilation and to ensure reliable operation of the product and to
protect it from overheating, and these openings must not be blocked or covered. The openings should never be blocked by placing
the product on a bed, sofa, rug, or other similar surface. This product should not be placed in a built-in installation such as a
bookcase or rack unless proper ventilation is provided or the manufacturer’s instruction have been adhered to.
11. Power Sources - This product should be operated only from the type of power source indicated on the marking label. If you are not
sure of the type of power supply to your home, consult your product dealer or local power company. For products intended to
operate from battery power, or other sources, refer to the operating instruction.
12. Grounding or Polarization - This product may be equipped with a polarized alternating-current line plug (a plug having one blade
wider than the other). This plug will fit into the power outlet only one way. This is a safety feature. If you are unable to insert the plug
fully into the outlet, try reversing the plug. If the plug should still fail to fit, contact your electrician to replace your obsolete outlet. Do
not defeat the safety purpose of the polarizes plug.
2
13. Power-Cord Protection - Power supply cords should be routed so that they are not likely to be walked on or pinched by items placed
upon or against them, paying particular attention to cords at plugs, convenience receptacles, and point where they exit from the
product.
14. Protective Attachment Plug - The product is equipped with an attachment plug having overload protection. This is a safety feature.
See Instruction Manual for replacement or resetting of protective device. If replacement of the plug is required, be sure the service
technician has used a replacement plug specified by the manufacturer that has the same overload protection as the original plug.
15. Lightning - For added protection for this product during a lightning storm, or when it is left unattended and unused for long periods of
time, unplug it from the wall outlet and disconnect the antenna or cable system. This will prevent damage to the product due to
lightning and power-line surges.
16. Power Lines - An outside antenna system should not be located in the vicinity of overhead power lines or other electric light or power
circuits, or where it can fall into such power lines or circuits. When installing an outside antenna system, extreme care should be
taken to keep from touching such power lines or circuits as contact with them might be fatal.
17. Overloading - Do not overload wall outlets, extension cords, or integral convenience receptacles as this can result in a risk of fire or
electric shock.
18. Object and Liquid Entry - Never push objects of any kind into this product through openings as they may touch dangerous voltage
points or short-out parts that could result in a fire or electric shock. Never spill liquid of any kind on the product.
19. Servicing - Do not attempt to service this product yourself as opening or removing covers may expose you to dangerous voltage or
other hazards. Refer all servicing to qualified service personnel.
20. Damage Requiring Service - Unplug this product from the wall outlet and refer servicing to qualified service personnel under the
following conditions:
a)
b)
c)
d)
e)
f)
When the power-supply cord or plug is damaged,
If liquid has been spilled, or objects have fallen into the product,
If the product has been exposed to rain or water,
If the product does not operate normally by following the operating instructions. Adjust only those controls that are covered by the
operating instructions as an improper adjustment of other controls may result in damage and will often require extensive work by a
qualified technician to restore the product to its normal operation.
If the product has been dropped or damaged in any way, and
When the product exhibits a distinct change in performance - this indicates a need for service.
21. Replacement Parts - When replacement parts are required, be sure the service technician has used replacement parts specified by
the manufacturer or have the same characteristics as the original part. Unauthorized substitutions may result in fire, electric shock, or
other hazards.
22. Safety Check - Upon completion of any service or repairs to this product, ask the service technician to perform safety checks to
determine that the product is in proper operating condition.
23. Wall or Ceiling Mounting - The product should be mounted to a wall or ceiling only as recommended by the manufacturer.
24. Heat - The product should be situated away from heat sources such as radiators, heat registers, stoves, or other products (including
amplifiers) that produce heat.
3
Welcome.
CA-3602
A Three-Piece Powered Speaker System
Introduction
This speaker system is designed to deliver superior audio performance to computers, smartphones, iPod®,
MP3 players, DVD players, and other portable audio devices. The system offers high efficient, long excursion
drivers combined with a low distortion, high powered amplifier that provides deep bass with clarity and
a greater dynamic audio range.
Box Contents
• 2 x satellite speakers
• Subwoofer
• Control pod
• Owner’s guide with connection diagram
Caution
• Do not plug the power supply in until all connections are made.
• Use only the AC power cable supplied with these speakers.
• Keep speakers away from sources of extreme heat, such as stereo amplifiers, space heaters, stoves, and
heat vents.
• Use a dry cloth for cleaning. Do not wipe any part of the system with cleaning solvents, such as furniture wax,
bleach, benzene, acetone, or ammonia.
Speaker Preparation
• Subwoofer—place on the floor near a wall or corner, for optimum performance. Adjust distance from the
corner or wall to affect quality of bass performance as desired. Direct open port toward wall to increase
bass punch.
• Satellite Speakers—For best stereo separation, place on opposite sides of the listening device, computer,
or TV screen (as far apart as possible is usually best). For example, if you are listening to the speakers using
a laptop on a desk, place the left satellite speaker on the far left corner of the desk, and the right satellite
speaker on the far right corner of the desk.
4
Speaker Connection
You can connect these speakers to a variety of devices, such as laptop, computer, smartphone, iPod, MP3
player, CD player, DVD player, and other audio devices. Please read the following instructions along with the
diagrams provided to identify which diagram most closely matches your connection source.
Desktop computer
• Take the cable with the green plug and plug it into the green output/source jack in the back or front of the computer
(also referred to as the sound/audio out jack).
• Connect the gray plug to the “To Speaker” jack on the back of the subwoofer.
• Take the red plug and plug it into the red DIN jack on the back of the subwoofer.
• Take the AC power cord and plug it into a wall socket or power strip.
Smartphone, iPod, MP3 player, DVD Player, or CD player
• Take the cable with the green plug and plug it into the green output/source jack of the audio device.
• Connect the gray plug to the “To Speaker” jack on the back of the subwoofer.
• Take the red plug and plug it into the red DIN jack on the back of the subwoofer.
• Take the AC power cord and plug it into a wall socket or power strip.
Gaming system
• In order to connect these speakers to a game console, you will need a console gaming adapter, also
known as a “Y adapter”, which has dual-RCA outputs and is sold separately.
• Turn off the power to your gaming system.
• Take the red and white dual-RCA connections on the Y adapter, and plug them into the matching red and
white RCA jacks on your gaming system.
• Take the green stereo jack at the other end of the Y adapter, and plug that into the control pod cable with
the green plug.
• Connect the gray plug to the “To Speaker” jack on the back of the subwoofer.
• Take the red plug and plug it into the red DIN jack on the back of the subwoofer.
Connect to line-out source (green)
Connect to audio out source
To Speaker
Connect to
headphone jack
Aux cable not included
Y
R
W
R
W
Connect to video
game output
5
RCA “Y” adapter cable
(not included)
Controls and Features
• Power—the on/off button is on the side of the control pod. Slide to turn the speaker on or off.
• Master Volume Control—this volume is on the top of the control pod and is indicated by the words “MAX”
and “MIN.” Rotate clockwise to turn the volume up, and counter-clockwise to turn the volume down.
• Bass Volume Control – the bass volume is located on the side of the control pod. Turn knob to the right to
increase bass, turn knob to the left to decrease.
• Headphone Output Jack—connect your headphones to this jack and they will mute the speaker system
automatically. The master volume can then be used to turn the volume up or down to your headphones.
• Auxiliary Input Connection—the auxiliary input jack allows the connection of a second audio source. For
example, if your speakers are connected to your computer, you would still be able to plug in an iPod or
smartphone using the 3.5mm input jack on the side of the control pod. The connected iPod or smartphone
would override your computer’s audio source connection while it’s plugged in.
Multi-function Control Pod
Master volume control
Bass volume control
Auxiliary input jack
Power on / off
Headphone output jack
6
Troubleshooting
Symptom:
Speaker system will not power on.
Solution:
• Power button is not turned on. Slide the power button back and forth and check for the blue LED indicator
light to come on.
• Verify the AC power cord is plugged into the wall outlet.
• Check if the wall outlet or power strip you are using is actually getting power, i.e. not a switched outlet.
Symptom:
Speaker does not produce sound.
Solution:
• Verify the speaker is getting power. Check above steps.
• Make sure the volume is turned up to audible listening level.
• Verify that all cables are plugged into the correct jacks.
• Many times users believe that the speakers are not working, when in fact they are having trouble with the
sound source. The most common problem when connecting to a computer is that the connections are
incorrect. Make sure you are connected to the audio output jack from your computer. Many times, this jack
will be green. Also, make sure your media device or CD/DVD device is playing and the software volume
settings are turned up and not muted.
• If you still have problems, disconnect the speaker source cable from your computer and connect to a
smartphone, iPod, or anything else with a 3.5mm headphone output. If your speakers work on this other
source, you know they are functioning as normal and the issue likely lies with your computer or the connections.
Symptom:
Sound is distorted.
Solution:
• Turn the volume down by 25% or 50%. If this does not work, also check the audio software volume level
and decrease it if necessary.
• Adjust the computer’s master volume control by balancing the volume until it’s at 50%, then adjust the
volume levels on the speakers.
• Adjust the bass volume control to test for maximum and minimum output. You may also need to move the
subwoofer either closer or farther away from a wall or corner to affect the sound performance.
If you have questions or need assistance with your speakers, we’re here to help.
Call 360-883-0333 during the hours of 8 am to 5 pm (United States PST) or send email to
[email protected]
iPod, iPhone, iPad, and iPad mini are a trademarks of Apple, Inc.
7
Merci !
CA-3602
Système d'enceintes 3 enceintes à alimentation intégrée
Introduction
Ce système d'enceintes haute efficacité et à long déplacement est conçu pour apporter une haute performance
audio aux ordinateurs, smartphones, iPod®, lecteurs MP3 et DVD et autres dispositif audio portables.
Box Contents
• 2 enceintes satellites
• 1 subwoofer
• Boîtier de commande
• Guide de l'utilisateur avec schéma de branchement
Attention
• Ne pas brancher l'appareil sur la prise secteur avant d'avoir effectué toutes les connexions.
• Utilisez uniquement l'adaptateur AC fourni avec ces enceintes.
• Tenez les enceintes à l'écart de toute source de chaleur extrême telle qu'amplificateur stéréo, chauffage,
poêle ou bouches d'air.
• Nettoyez l'appareil à l'ide d'un chiffon sec. N'essuyez aucune partie de ce système avec un solvant tel que cire
à meubles, javel, benzène, acétone ou ammoniac.
Placement des enceintes
• Subwoofer : pour une performance optimale, placez le subwoofer par terre près d'un mur ou dans un angle.
Réglez la distance depuis le mur ou l'angle pour obtenir le meilleur rendement des basses. Orientez l'évent vers
le mur pour augmenter la percussion des basses.
• Enceintes satellites—pour un effet stéréo optimal, placez les enceintes de part et d'autre de la source audio,
ordinateur ou écran TV (de préférence à une distance maximum l'une de l'autre). Par exemple, si vous utilisez
les enceintes avec un ordinateur portable placé sur un bureau, placez l'enceinte de gauche dans l'angle gauche
le plus éloigné et l'enceinte droite dans l'angle droit le plus éloigné.
8
Connexion des enceintes
Vous pouvez connecter ces enceintes à divers dispositifs tels qu'ordinateurs portables, ordinateurs de bureau,
smartphones, iPods, lecteurs MP3, CD et DVD et autres dispositifs audio. Veuillez consulter les instructions
suivantes et les schémas pour trouver le schéma qui ressemble le plus à votre installation.
Ordinateur de bureau
• Branchez le câble avec la fiche verte sur la prise de sortie/source verte situé sur la façade ou à l'arrière du boîtier
(appelé également la prise de sortie son/audio).
• Branchez la fiche grise sur la prise marquée "To Speaker" située à l'arrière du subwoofer.
• Branchez la prise rouge sur la prise DIN située à l'arrière du subwoofer.
• Branchez le cordon d'alimentation AC sur une prise murale ou sur un bloc multiprise.
Smartphone, iPod, lecteur MP3/CD/DVD
• Branchez le câble avec la fiche verte sur la prise de sortie/source verte du dispositif audio.
• Branchez la fiche grise sur la prise marquée "To Speaker" située à l'arrière du subwoofer.
• Branchez la prise rouge sur la prise DIN située à l'arrière du subwoofer.
• Branchez le cordon d'alimentation AC sur une prise murale ou sur un bloc multiprise.
Console de jeux
• Pour connecter ces enceintes à une console de jeux, vous aurez besoin d'un câble adaptateur pour console
(câble en ""Y"") avec deux fiche RCA (vendu séparément).
• Mettez votre console de jeux hors tension.
• Branchez les deux fiches RCA, rouge et blanc, du câble adaptateur en ""Y"" sur les deux prises RCA
correspondantes sur la console de jeux.
• Branchez la fiche stéréo verte à l'autre extrémité du câble en ""Y"" sur la prise verte.
• Branchez la fiche grise sur la prise marquée "To Speaker" située à l'arrière du subwoofer.
• Branchez la prise rouge sur la prise DIN située à l'arrière du subwoofer.
Connecter à la prise de sortie ligne (vert)
Connecter à la prise de sortie audio
To Speaker
Connecter à
la prise casque
Câble auxiliaire non fourni
Y
R
W
R
W
Connecter à la prise
de sortie de la console
de jeux.
9
Câble adaptateur RCA
en "Y" (non fourni)
Commandes et fonctionnalités
• Alimentation : l'interrupteur marche/arrêt est situé sur le côté du boîtier de commande. Faites glisser
l'interrupteur pour allumer ou éteindre les enceintes.
• Bouton de volume principal : le bouton de volume, indiqué par les mots "MAX" et "MIN", est situé sur le
dessus du boîtier de commande. Tournez la commande dans le sens des aiguilles d'une montre pour
augmenter le volume et dans le sens contraire pour le diminuer.
• Bouton des basses : le bouton des basses est situé sur le côté du boîtier de commande. Tournez la
commande vers la droite pour augmenter les basses et vers la gauche pour les diminuer.
• Prise casque : branchez votre casque sur cette prise ; le son les enceintes sera coupé automatiquement. Le
bouton principal de volume peut être utilisé ensuite pour régler le son du casque.
• Prise d'entrée auxiliaire : permet la connexion d'une deuxième source audio. Par exemple, si les enceintes
sont connectées à votre ordinateur, vous pouvez aussi brancher un iPod ou smartphone sur la prise 3,5 mm
située sur le côté du boîtier de commande. Le son de l'iPod ou du smartphone prendra alors la priorité sur le
son sortant de l'ordinateur tant que la source reste branchée.
Boîtier de commande multifonctions
Commande principale
du volume
Commande du
volume des graves
Prise d'entrée auxiliaire
Marche/arrêt
Casque
10
Dépistage des pannes
Symptôme
Le système d'enceintes ne s'allume pas.
Solution :
• L'interrupteur marche/arrêt est en position arrêt. Appuyez sur l'interrupteur et vérifiez le bon allumage du
voyant LED bleu.
• Vérifiez le branchement de l'adaptateur AC sur la prise secteur.
• Vérifiez que la prise secteur ou le bloc prise est alimenté (prise non*commandée par un interrupteur).
Symptôme :
L'enceinte ne produit aucun son
Solution :
• Vérifiez l'alimentation de l'enceinte en suivant les étapes ci-avant.
• Assurez-vous que la commande du volume est réglé à un niveau d'écoute.
• Vérifiez que tous les câbles sont correctement branchés.
• Fréquemment, les problèmes liés au son proviennent non des enceintes mais de la source audio. Le problème
le plus fréquent est dû à un mauvais branchement des câbles. Vérifiez que les enceintes sont bien branchées
sur la prise sortie audio de votre ordinateur. Normalement, cette prise est identifiée par sa couleur verte.
Vérifiez également que votre lecteur média ou CD/DVD est en mode lecture et que les commandes logicielles
du volume sont réglées pour une écoute normale et non en sourdine.
• Si les problèmes persistent, débranchez le câble de votre ordinateur, puis branchez à sa place un smartphone,
iPod ou autre appareil doté d'une prise casque de 3,5mm. Si les enceintes fonctionnent avec cette source
audio, vous savez que le problème provient de votre ordinateur ou des connexions.
Symptôme :
Le son est déformé
Solution :
• Réduisez le niveau du volume de 25 ou 50%. Si le problème n'est toujours pas résolu, vérifiez également le
niveau du volume logiciel et réduisez celui*ci si nécessaire.
• Réglez la commande principal du volume de l'ordinateur à 50% de son maximum, puis ajustez ensuite le
volume des enceintes.
Si vous avez des questions ou avez besoin d'assistance, nous sommes à votre écoute. Appelez-nous au
360-883-0333 entre 08:00 et 17:00 (fuseau horaire PST) ou contactez-nous par e-mail à [email protected]
iPod, iPhone, iPad et iPad Mini sont des marques commerciales d'Apple Inc.
11
¡Gracias!
CA-3602
Un sistema de Altavoz de tres piezas
Introducción.
Este sistema de altavoces de dos piezas está diseñado para proprocionar un nivel de audio superior en los
ordenadores, smartphones, iPod , reproductores MP3, reproductores DVD y otros aparatos de audio portátiles.
Contenido de la Caja
• 2 altavoces satélite
• Subwoofer
• Estación de controles
• Gua del usuario con diagrama de conexión
Precaución
• No conecte el enchufe hasta haber realizado todas las conexiones.
• Utilice solamente el adaptador CA suministrado con estos altavoces.
• Mantenga los altavoces lejos de fuentes de calor extremo, tales como amplificadores estéreo, calefactores,
hornos y entradas de aire caliente
• Utilice un paño seco para la limpieza. No frote con detergentes tales como cera para muebles, lejía, benceno,
acetona o amoníaco ninguna de las partes del sistema.
Preparación de los Altavoces
• Subwoofer - colóquelos en el suelo cerca de una pared o una esquina, para un mejor rendimiento. Ajuste la
distancia desde la esquina o la pared para afectar la calidad del sonido bass tal como desee. Abra directamente
el puerto hacia la pared para aumentar el efecto del sonido.
• Altavoces satélite—para una mejor separación del estéreo, colóquelos en los extremos opuestos del aparato
de audio, ordenador o pantalla de TV (lo mejor es colocarlos tan lejos como sea posible). Por ejemplo, si está
escuchando a través de los altavoces usando un laptop encima de un escritorio, coloque el altavoz izquierdo
en extremo izquierdo más alejado de la mesa y el derecho en el extremo derecho más alejado de la mesa.
12
Conexión de los Altavoces:
Puede contactar estos altavoces a una variedad de aparatos, tales como laptops, ordenadores, smartphones,
iPod, reproductores MP3, reproductores de CD, reproductores de DVD, y otros aparatos audio. Por favor, lea las
instrucciones siguientes junto con los diagramas que se proporcionan, para identificar qué diagrama se parece
más a su fuente de alimentación.
Ordenador de mesa:
• Coja el cable con el enchufe verde y conéctelo en la toma de salida verde en la parte trasera o delantera del ordenador
(también conocido como la toma de salida audio).
• Conecte el enchufe gris a la toma "Al Altavoz" de detrás del subwoofer
• Coja el enchufe rojo y conéctelo en la toma roja DIN de la parte trasera del subwoofer.
• Tome el cable de corriente y conéctelo al tomacorriente de pared o a un tomacorriente múltiple.
Smartphone, iPod, reproductor MP3, reproductor DVD, o reproductor CD
• Coja el cable con el enchufe verde y conéctelo en la toma de salida del aparato de audio.
• Conecte el enchufe gris a la toma "Al Altavoz" de detrás del subwoofer
• Coja el enchufe rojo y conéctelo en la toma roja DIN de la parte trasera del subwoofer.
• Tome el cable de corriente y conéctelo al tomacorriente de pared o a un tomacorriente múltiple.
Sistema de juegos
• Para poder conectar estos altavoces a la consola de juego, necesitará un adaptador de juegos con consola,
también conocido como ""adaptador Y"", que tiene tomas de salida duales RCA y se vende por separado.
• Apague el sistema de juego
• Coja las conexiones duales-RCA roja y blanca del adaptador Y enchúfelas en las tomas de salida RCA roja y
blanca de sus sistema de juego.
• Coja la toma verde de estéreo en el otro extremo del adaptador ""Y"" y enchúfelo en el cable con enchufe
verde.
• Conecte el enchufe gris a la toma "Al Altavoz" de detrás del subwoofer
• Coja el enchufe rojo y conéctelo en la toma roja DIN de la parte trasera del subwoofer.
Conectar a la toma de salida (verde)
Conectar a la fuente de audio
To Speaker
Conectar a la toma
de auriculares
No se incluye cable auxiliar
Y
R
W
R
W
Conectar a la toma
de salida de videojuegos
13
Cable adaptador RCA
"Y" (no incluido)
Controles y funciones:
• Energía - el botón on/off está en la parte lateral de los controles. Deslícelo para encender o apagar el altavoz.
• Control de Volumen Principal - este volumen está encima de los controles y se indica con las palabras
"MAX" y "MIN". Gírelo en el sentido de las agujas del reloj para aumentar el volumen y en sentido contrario
para disminuirlo.
• Control de Volumen de los graves - dicho volumen está ubicado en la parte lateral de los controles. Gire el
control a la derecha para aumentar los bajos y a la izquierda para disminuirlos.
• Toma de salida de los auriculares - Conecte sus auriculares a esta toma y silenciarán el sistema del altavoz
automáticamente. El volumen principal puede usarse para aumentar o disminuir el volumen de sus auriculares.
• Conexión de entrada auxiliar - la toma de entrada auxiliar le permite la conexión de una segunda fuente de
audio. Por ejemplo, si sus altavoces están conectados a su ordenador, podrá conectar un iPod o un
smartphone utilizando la toma de entrada de 3.5mm de la parte lateral de los controles. El iPod o smartphone
conectados anularan la conexión de audio de su ordenador mientras estén enchufados.
Estación de control multi-función
Control de Volumen principal
Control de Volumen para los
graves
Toma de entrada auxiliar
Energía on/off
Toma de salida de los
auriculares
14
Problemas
Síntomas:
El sistema de altavoz no se conecta.
Solución:
• El control de energía no está conectado. Presiónelo y compruebe si el indicador LED azul se enciende.
• Verifique que el adaptador de energía CA está conectado en la toma de salida de la pared.
• Compruebe si la toma de salida de la pared o la regleta que utiliza está recibiendo energía, i.e. no una toma de
salida conectada
Symptom:
Speaker does not produce sound.
Solución:
• Verifique que llega energía al altavoz. Compruebe los pasos anteriores.
• Asegúrese que el volumen está conectado a un nivel de escucha audible
• Verifique que todos los cables están conectados en las tomas correctas.
• Muchas veces, los usuarios creen que los altavoces no están funcionado, cuando de hecho están teniendo
problemas con la fuente de sonido. El problema más común cuando se conecta a un ordenador es que las
conexiones son incorrectas. Asegúrese que ha conectado la toma de salida audio desde su ordenador.
Muchas veces, esta toma será de color verde. Asimismo, asegúrese de que su aparato o CD/DVD está
funcionando y que los ajustes de software de volumen están conectados y no puestos en silencio.
• Si aún así tiene problemas, desconecte el cable del altavoz de su ordenador y conéctelo a un smartphone,
iPod o cualquier otro aparato que tenga una toma de salida de auriculares de 3.5mm. Si sus altavoces
funcionan en ese otro aparato, sabrá que están funcionando correctamente y que probablemente el problema
esté en su ordenador o en las conexiones.
Síntoma:
El sonido está distorsionado
Solución:
• Disminuya el volumen un 25% o un 50%. Si eso no funciona, compruebe también el nivel del volumen del
software de audio y disminúyalo si es necesario.
• Ajuste el control de volumen del ordenador equilibrando el volumen hasta que esté a 50%, luego ajuste los
niveles de volumen de los altavoces.
Si tiene alguna duda o necesita asistencia con sus altavoces, estamos aquí para ayudarle. Llame al
360-883-0333 entre las 8am y las 5pm (Hora de E.E.U.U.) o envíe un email a: [email protected]
iPod, iPhone, iPad, and iPad mini son marcas registradas de Apple, Inc.
Amplified Speaker System