1
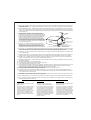
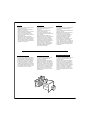
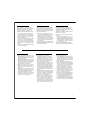
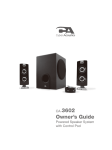
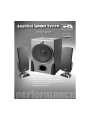
CA-3550 3-piece speaker system Power output: 68 watts Bass reflex wooden subwoofer cabinet Convenient desktop volume control, bass control and on/off control Headphone input jack WARNING: To reduce the risk of fire or electric shock, do not expose this appliance to rain or moisture. CAUTION: Use of controls or adjustments or performance of procedures other than those specified may result in hazardous radiation exposure. CAUTION - TO REDUCE THE RISK OF ELECTRIC SHOCK, DO NOT REMOVE COVER (OR BACK). NO USER-SERVICING TO QUALIFIED SERVICE PERSONNEL. The lightning flash with arrowhead symbol, within an equilateral triangle, is intended to alert the user to presence of uninsulated dangerous voltage within the products enclosure that may be of sufficient magnitude to constitute a risk of electric shock to persons. The exclamation point within an equilateral triangle is intended to alert the user to the presence of important operating and maintenance (servicing) instructions in the literature accompanying the appliance. IMPORTANT SAFETY INSTRUCTIONS CAUTION: TO PREVENT ELECTRIC SHOCK, MATCH WIDE BLADE OF PLUG TO WIDE SLOT, FULLY INSERT. ATTENTION: POUR ÉVITER LES CHOC ÉLECTRIQUES, INTRODUIRE LA LAME LA PLUS LARGE DE LA FICHE DANS LA BORNE CORRESPONDANTE DE LA PRISES ET POUSSER JUSQUAU FOND. 1. Read Instructions - All the safety and operating instruction should be read before the product is operated. 2. Retain Instructions - The safety and operating instruction should be retained for future reference. 3. Heed Warnings - All warning on the product and in the operating instructions should be adhered to. 4. Follow instructions - All operating and use instructions should be followed. 5. Cleaning - Unplug this product from the wall outlet before cleaning. Do not use liquid cleaners or aerosol cleaners. Use a damp cloth for cleaning. 6. Attachments - Do not use attachments not recommended by the product manufacturer as they may cause hazards. 7. Water and Moisture - Do not use this product near water - for example, near a bath tub, wash bowl, kitchen sink, or laundry tub; in a wet basement, or near a swimming pool, and the like. 8. Accessories - Do not place this product on an unstable cart, stand tripod, bracket, or table. The product may fall, causing serious injury to a child or adult, and serious damage to the product. Use only with a cart, stand, tripod, bracket, or table recommended by the manufacturer, or sold with the product. Any mounting of the product should follow the manufacturer? instructions, and should use a mounting accessory recommended by the manufacturer. 9. A product and cart combination should be moved with care. Quick stops, excessive force, and uneven surfaces may cause the appliance and cart combination to overturn. 10. Ventilation - Slots and openings in the cabinet are provided for ventilation and to ensure reliable operation of the product and to protect it from overheating, and these openings must not be blocked or covered. The openings should never be blocked by placing the product on a bed, sofa, rug, or other similar surface. This product should not be placed in a built-in installation such as a bookcase or rack unless proper ventilation is provided or the manufacturers instruction have been adhered to. 11. Power Sources - This product should be operated only from the type of power source indicated on the marking label. If you are not sure of the type of power supply to your home, consult your product dealer or local power company. For products intended to operate from battery power, or other sources, refer to the operating instruction. 12. Grounding or Polarization - This product may be equipped with a polarized alternating-current line plug (a plug having one blade wider than the other). This plug will fit into the power outlet only one way. This is a safety feature. If you are unable to insert the plug fully into the outlet, try reversing the plug. If the plug should still fail to fit, contact your electrician to replace your obsolete outlet. Do not defeat the safety purpose of the polarizes plug. Alternate Warnings - This product is equipped with a three-wire grounding-type plug, a plug having a third (grounding) pin. This plug will only fit into a grounding-type power outlet. This is a safety feature. If you are unable to insert the plug into the outlet, contact your electrician to replace your obsolete outlet. Do not defeat the safety purpose of the grounding-type plug. 1 13. Power-Cord Protection - Power supply cords should be routed so that they are not likely to be walked on or pinched by items placed upon or against them, paying particular attention to cords at plugs, convenience receptacles, and point where they exit from the product. 14. Protective Attachment Plug - The product is equipped with an attachment plug having overload protection. This is a safety feature. See Instruction Manual for replacement or resetting of protective device. If replacement of the plug is required, be sure the service technician has used a replacement plug specified by the manufacturer that has the same overload protection as the original plug. 15. Outdoor Antenna Grounding - If an outside antenna is connected to the receiver, be sure the antenna system is grounded so as to provide some protection against voltage surges and built-up static charges. Article 810 of the National Electrical Code, ANSI/NFPA 70, provides information with regard to proper grounding of the mast and supporting structure, grounding of the mast and supporting structure, grounding of the lead-in wire to an antenna-discharge unit, size of grounding conductors, location of antenna-discharge unit, connection to grounding electrodes, and requirements for the grounding electrode. 16. Lightning - For added protection for this product during a lightning storm, or when it is left unattended and unused for long periods of time, unplug it from the wall outlet and disconnect the antenna or cable system. This will prevent damage to the product due to lightning and power-line surges. ANTENNA LEAD IN WIRE GROUND CLAMP ANTENNA DISCHARGE UNIT (NEC SECTION 810-20) ELECTRIC SERVICE EQUIPMENT GROUND CONDUCTORS (NEC SECTION 810-21) GROUND CLAMPS NEC - NATIONAL ELECTRICAL CODE POWER SERVICE GROUNDING ELECTRODE SYSTEM (NEC ART 250, PART H) 17. Power Lines - An outside antenna system should not be located in the vicinity of overhead power lines or other electric light or power circuits, or where it can fall into such power lines or circuits. When installing an outside antenna system, extreme care should be taken to keep from touching such power lines or circuits as contact with them might be fatal. 18. Overloading - Do not overload wall outlets, extension cords, or integral convenience receptacles as this can result in a risk of fire or electric shock. 19. Object and Liquid Entry - Never push objects of any kind into this product through openings as they may touch dangerous voltage points or short-out parts that could result in a fire or electric shock. Never spill liquid of any kind on the product. 20. Servicing - Do not attempt to service this product yourself as opening or removing covers may expose you to dangerous voltage or other hazards. Refer all servicing to qualified service personnel. 21. Damage Requiring Service - Unplug this product from the wall outlet and refer servicing to qualified service personnel under the following conditions: a) b) c) d) When the power-supply cord or plug is damaged, If liquid has been spilled, or objects have fallen into the product, If the product has been exposed to rain or water, If the product does not operate normally by following the operating instructions. Adjust only those controls that are covered by the operating instructions as an improper adjustment of other controls may result in damage and will often require extensive work by a qualified technician to restore the product to its normal operation. e) If the product has been dropped or damaged in any way, and f) When the product exhibits a distinct change in performance - this indicates a need for service. 22. Replacement Parts - When replacement parts are required, be sure the service technician has used replacement parts specified by the manufacturer or have the same characteristics as the original part. Unauthorized substitutions may result in fire, electric shock, or other hazards. 23. Safety Check - Upon completion of any service or repairs to this product, ask the service technician to perform safety checks to determine that the product is in proper operating condition. 24. Wall or Ceiling Mounting - The product should be mounted to a wall or ceiling only as recommended by the manufacturer. 25. Heat - The product should be situated away from heat sources such as radiators, heat registers, stoves, or other products (including amplifiers) that produce heat. Introduction Introduction Introducción Welcome to the Cyber Acoustics CA-3550 speaker system. Bienvenue au système d'enceintes acoustiques Cyber Acoustics CA-3550. Bienvenido al sistema de altavoces Cyber Acoustics CA-3550. This 3-piece system is designed to deliver superior performance in devices such as computers, video game consoles, MP-3 players, DVD players, CD players and various other sources. High efficient, long excursion drivers combined with a low distortion, high power amplifier provide deep bass with clarify and greater dynamic range. La conception de ce système à 3 enceintes assure une performance de haute qualité pour une utilisation avec les ordinateurs, consoles de jeux, lecteurs MP3, DVD et CD et divers autres appareils. Des hautparleurs à hauts rendement et déplacement, associés à un amplificateur haute-puissance à faible distorsion, produisent des basses profondes avec une clarté et une dynamique accrues. Este sistema de 3 piezas se ha diseñado para ofrecerle una actuación superior en equipo como ordenadores, consolas de juegos de vídeo, equipo MP-3, DVD y CD y muchos otros. Con controladores de larga amplitud y gran eficiencia combinados con un amplificador de baja distorsión y alta potencia que le ofrece bajos profundos con límites claros y muy dinámicos. 2 Caution Do not plug the power supply in until all connections are made. Read the entire owners guide before making any connections. Keep your speakers away from extreme heat or humid and wet conditions. Use a dry cloth for cleaning. Do not expose any part of the system to cleaning liquids or solvents. The subwoofer is not magnetically shielded. It should not be placed near a computer hard drive, monitor, television, disks and game cartridges. 2 feet away from any device that may be affected by magnetics is a good rule. Preparing the speakers The subwoofer should be placed on the floor near a wall for optimum performance. Satellite speakers usually are placed on opposite ends of the listeners positions. As far apart as possible is usually best. An example would be to have the left satellite on the far left corner of a desktop and the right satellite on the far right corner of the desktop. On either side of a monitor or television is also very common. 3 Avertissement Ne branchez pas le cordon d'alimentation avant d'avoir effectué toutes les connexions. Lisez le manuel d'utilisation avant d'effectuer les connexions. Tenez vos enceintes à l'écart des températures extrêmes et à l'abri de l'eau ou de l'humidité. Nettoyez à l'aide d'un chiffon sec. N'exposez aucune partie du système aux produits d'entretien ou aux solvants. Le subwoofer n'est pas muni d'écran magnétique. Il ne doit pas être placé à proximité des disques durs d'ordinateur, écrans, téléviseurs, disquettes et cartouches de jeu. En règle générale, éloignez-le de 60 cm de tout appareil susceptible d'être affecté par le rayonnement magnétique. Installation des enceintes Le subwoofer doit être placé par terre, près d'un mur afin d'assurer une performance optimale. Les enceintes satellites sont souvent placées de chaque côté de l'utilisateur, éloignées au maximum l'une de l'autre. Par exemple, l'enceinte satellite gauche peut être placée sur le coin à l'extrême gauche du bureau et l'enceinte satellite droite sur le coin à l'extrême droite du bureau. Souvent, les enceintes sont placées de chaque côté d'un écran ou d'un téléviseur. Precaución No conecte a la fuente de corriente hasta que haya hecho todas las demás conexiones. Lea el manual del usuario antes de hacer cualquier conexión. Mantenga los altavoces lejos del calor o humedad excesivos y de la lluvia. Use un paño seco para limpiarlos. No exponga parte alguna del sistema a líquidos o disolventes de limpieza. El subwoofer no está protegido magnéticamente. No se coloque cerca del controlador duro del ordenador, monitor, televisión, discos y cartuchos de juegos. Una regla a seguir es mantenerlo cuando menos a medio metro de cualquier equipo que pudiese ser afectado por el magnetismo. Preparación de los altavoces El subwoofer deberá colocarse en el suelo cerca de la pared para obtener una actuación óptima. Generalmente, los altavoces satélite se colocan en los extremos opuestos a la posición del escucha. Generalmente es mejor ponerlos tan separados como se pueda. Un ejemplo sería tener el satélite izquierdo en la esquina izquierda de un escritorio y el derecho en la esquina derecha del escritorio. También es muy común en los dos lados de un monitor o televisión. Connecting the speakers Connexion des enceintes There are a variety of devices these speakers can connect to. Please read these step by step instructions first and then consult the diagrams. Identify which diagram most closely matches your source. Les enceintes peuvent être connectées à divers appareils. Veuillez lire auparavant ces instructions, puis consulter les schémas. Identifiez les schémas se rapprochant le plus de votre installation. The cable with the green plug goes to your audio source. This is normally the computer audio source or a headphone jack on a portable audio player. Please consult the diagram. There is a Y cable adapter which allows connection to a video console game or direct to a TV. Connect the green plug cable into the Y cable and then follow diagram shown on this products owners guide. Red plug to To Right Speaker DIN jack on back of subwoofer Fiche verte vers sortie source audio - Une branche de l'adaptateur en Y fourni se branche sur la console de jeux ou Branchez directement sur la prise de sortie audio de votre ordinateur, lecteur CD etc. (l'adaptateur en Y s'utilise pour le branchement sur la console de jeux et le téléviseur) Fiche rouge à la prise DIN Vers Enceinte Droite (To Right Speaker) située à l'arrière de l'enceinte subwoofer Controls and features 1.Power: The on/off button is on the right satellite speaker. Press in to turn on. The panel will illuminate when on. Press again to turn the system off. 2.Master volume control: This control is on the right satellite speaker and is indicated by the words master volume. Rotate anti-clockwise to turn volume up or clockwise to turn volume down. 3.Bass volume control: This control works similar to the master volume control. Rotate to increase or decrease bass as preferred. 4.Headphone: The right satellite speaker has a headphone input jack. Connect your favorite headphones to this jack and they will mute the speaker system automatically. The master volume control can then be used to turn up and down the volume to your headphones. Commandes et caractéristiques 1.Alimentation: Le commutateur marche/arrêt est situé sur l'enceinte satellite droite. Appuyez sur celui-ci pour mettre les enceintes sous tension. Le tableau de bord s'allume alors. Appuyez de nouveau sur le commutateur pour mettre le système hors-tension. 2.Commande générale du volume: Cette commande, située sur l'enceinte droite, est identifiée par l'inscription master volume. Tournez la commande dans le sens contraire des aiguilles d'une montre pour augmenter le volume et dans le sens des aiguilles d'une montre pour le diminuer. 3.Commande des graves: Cette commande s'utilise comme la commande générale du volume. Tournez la commande pour augmenter ou diminuer le niveau des graves, selon votre préférence. 4.Casque: L'enceinte satellite droite est munie d'une prise casque. Branchez votre casque préféré à la prise casque et le son des enceintes sera coupé automatiquement. Le niveau du volume du casque peut alors être ajusté à l'aide de la commande générale du volume. Conexión de los altavoces Estos altavoces pueden conectarse a un gran número de equipos. Sírvase leer cuidadosamente estas instrucciones antes de hacerlo y consulte los diagramas. Identifique el diagrama que se parece más a su fuente. El enchufe verde a la salida de la fuente de audio - Un extremo al adaptador Y que se engancha al video game player o conecta directamente al jack de salida de audio en su computadora, reproductor de CDs, etc. (el adaptador Y se usa en conexión con el video game y TV) El enchufe rojo al jack DIN To Right Speaker en la parte trasera del subwoofer Control y características 1. Encendido: El botón de encendido/apagado se encuentra en el altavoz satélite derecho. Presionar para encender. El panel se iluminará cuando esté encendido. Presionar de nuevo para apagar el sistema. 2. Control Maestro del Volumen: Este control se encuentra en el altavoz satélite derecho y está indicado por las palabras master volumen. Hacer girar en sentido contrario a las agujas del reloj para aumentar el volumen y en el sentido coincidente para disminuir el volumen. 3. Control del Volumen de los Graves: Este control funciona de manera similar al control maestro del volumen. Girar para aumentar o disminuir los graves. 4. Auriculares: El altavoz satélite derecho tiene un jack de entrada para altavoces. Conecte un par de auriculares en el jack y se bloqueará automáticamente el sistema de altavoces. El control maestro del volumen puede usarse para aumentar o disminuir el volumen en sus altavoces. 4 Headphone input jack Bass volume control Power on / off Master volume control Troubleshooting tips Speaker system will not power on Solution: AC power cord is not connected to the AC wall outlet Power is not turned on Speaker does not produce sound Solution: Verify the system is getting power (see above steps) Volume setting is too low. Turn up the master volume control to 1/4 to 1/2 level Check all cable connections Check to see if your music source is properly functioning (see more on this below) Checking your sound source: Many times users believe the speakers are not working, when in fact they are having trouble from the sound source. The most common problem when connecting to a computer sound card is the connections are incorrect. Make sure you are connected to the audio output jack from your computer sound card. Many times it has a green color to it. Also, make sure your CD/DVD device is playing and the volume settings are turned up and not muted. If you still have problems disconnect the speaker source cable from your computer and connect to a Walkman or personal CD player or anything else with a mini headphone jack. If your speaker work on this other source, you know the speakers are OK and the problem lies within your computer or the connections. If you have questions or need assistance with your speakers, please call or consult our web site. Telephone (UK) 0121 625 2850 (outside UK) 0044 121 625 2850 Web site: www.cyberacoustics.com 5 U.S.A. 360-823-4100 Détection des pannes Le système d'enceintes ne se met pas sous tension Solution: L'adaptateur AC n'est pas connecté au subwoofer et/ou à la prise murale AC Le commutateur marche/arrêt n'est pas sur la position Marche (On) Pas de son des enceintes Solution: Vérifiez l'alimentation (voir ci-dessus) Volume pas assez fort. Augmentez le volume au niveau ¼ ou ½ sur la commande Vérifiez les connexions des câbles Vérifiez le bon fonctionnement de votre source audio (voir ci-dessous) Vérification de la source audio: On croit souvent que les enceintes ne marchent pas alors que le problème provient de la source audio. Le problème le plus commun, lorsqu'il s'agit de a connexion sur une carte audio d'ordinateur, est une erreur de câblage. Vérifiez que le câble est bien connecté à la prise de sortie audio de la carte. Cette prise est souvent marquée en vert. Assurez-vous également que votre lecteur CD/DVD est en lecture et que la commande du volume est réglée à un niveau moyen et n'est pas en sourdine. Si le problème persiste, déconnectez le câble de votre ordinateur, puis connectez-le à un baladeur cassette ou CD ou tout autre appareil ayant une prise de sortie casque. Si les enceintes fonctionnent avec cet appareil, vous savez que le problème provient de l'ordinateur ou des connexions. Si vous avez des questions ou désirez de l'aide au sujet de vos enceintes, appelez-nous ou consultez notre site Web. Téléphone Site Web : (Royaume Uni) 0121 625 2850 www.cyberacoustics.com (Hors du Royaume Uni) 0044 121 625 2850 Sugerencias para resolver problemas El sistema de altavoces no se enciende La solución: El adaptador CA no está conectado al subwoofer y/o al enchufe de corriente directa en la pared No se ha encendido la corriente Los altavoces no suenan La solución: Verifique que el sistema está recibiendo corriente (siga los pasos dados abajo) La posición del volumen es muy baja. Suba el control maestro del volumen a un nivel de 1/4 o 1/2 Revise todas las conexiones de los cables Verifique que su fuente de música está funcionando correctamente (más información abajo) Para revisar su fuente de sonido: Muchas veces los usuarios piensan que los altavoces no funcionan, cuando de hecho están teniendo problemas con la fuente de sonido. El problema más común al conectarse a una tarjeta de sonido de ordenador es que las conexiones se han hecho mal. Asegúrese de que están conectadas al enchufe de salida de audio de la tarjeta de sonido del ordenador. Con frecuencia es de color verde. Además, asegúrese de que su equipo de CD/DVD está tocando y que el volumen se ha subido y no está silenciado. Si sigue teniendo problemas, desconecte el cable de la fuente del altavoz de su ordenador y conéctelo a un Walkman o CD personal o cualquier otro equipo que cuente con unamini conexión para auriculares. Si su altavoz funciona en la otra fuente, sabrá que lo altavoces no tienen problemas, y que el problema es con su ordenador o las conexiones. Si tiene preguntas o necesita asistencia con sus parlantes, por favor llame o consulte nuestro sitio web. Teléfono (Reino Unido) 0121 625 2850 Sitio web: www.cyberacoustics.com (Fuera del Reino Unido) 0044 121 625 2850 6 Amplified Speaker System Amplified Speaker System Owners guide CA-3550 Made in China To source Connecting to source (green) Connecting to source To video RCA stereo plug cable not included CA-3550