1
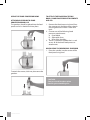
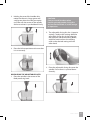
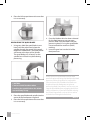
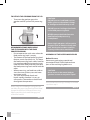
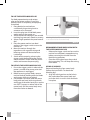
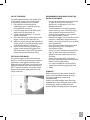
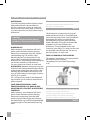
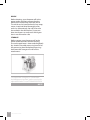
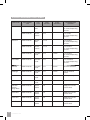
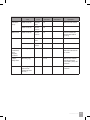
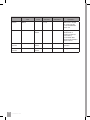
MINI FOOD PROCESSOR Instruction manual MINI FOOD PROCESSOR FP 4010 OPERATING YOUR CONTROL GRIP SB 4010 1 MINI FOOD PROCESSOR 2 OPERATING YOUR CONTROL GRIP SB 4010 CONTENTS 5 Catler recommends safety first 11 Know your Catler product 12 Assembly & operation of your Catler product 22 Care, cleaning & storage of your Catler product 25 Troubleshooting 26 Food preparation guide 30 Recipes CONTENTS 3 Congratulations on the purchase of your Catler product. 4 OPERATING YOUR CONTROL GRIP SB 4010 CONGRATULATIONS CATLER RECOMMENDS SAFETY FIRST We at Catler are very safety conscious. We design and manufacture consumer products with the safety of you, our valued customer foremost in mind. In addition we ask that you exercise a degree of care when using any electrical appliance and adhere to the following precautions: IMPORTANT SAFEGUARD FOR YOUR MINI FOOD PROCESSOR FP 4010 READ INSTRUCTIONS BEFORE USE Carefully read all instructions before operation and save for future reference. Remove and safely discard any packaging material and promotional labels before using the appliance for the first time. To eliminate a choking hazard for young children, remove and safely discard the protective cover fitted to the power plug of the appliance. Use this appliance ONLY for the purposes that it has been intended for and how it is described in this manual. This appliance has been designed exclusively for household use and constructed to process of normal amount of food in household. Do not place the appliance near the edge of a bench or table during operation. Use the appliance only on level surface, free of water. Ensure that the surface is clean, level, and free of water. Do not place the appliance on or near a hot gas burner, electric element or where it could touch a heated oven. Do not operate the appliance on a sink drain board. This appliance is not intended to be operated by means of an external timer or separate remote control system. Do not use sprays near the appliance. CATLER RECOMMENDS SAFETY FIRST 5 Before you connect the appliance into the power outlet make sure the voltage on the rating label corresponds to the voltage in your power outlet. Always make sure the appliance is completely and properly assembled before operating, mainly the blending leg. Follow the instructions in the manual. Ensure the appliance is turned off and the power is switched off at the power outlet before attempting to assemble or disassemble. Do not run the appliance unless it is correctly and properly assembled. Do not run an empty appliance. Incorrect using of the appliance can negatively influence its life. Handle the appliance and the accessories with care – remember the blades are very sharp and should be kept out of reach of children. 6 CATLER RECOMMENDS SAFETY FIRST Never use the appliance to process food on a hot stove or gas burner. Always remove the saucepan from the heat source and ensure the power cord and the appliance are also kept away from any heat source. Use the appliance as described in this manual. Use the whisk attachment only for the recipes which require the whisk attachment usage. Do not use the whisk attachment any other purposes than it is intended for. Do not process hot or boiling liquids in the chopper / mixing bowl. Allow liquids to cool before placing into the bowl. Insert only food for mixing into the chopper / mixing bowl. Allow the hot food to cool down to the temperature of 60°C at least. Do not operate the appliance continuously for more than 1 minute. After 1 minute, turn off the appliance and allow the motor to rest for 1 minute at least. When processing dry, thick or heavy mixtures, interrupt the process after 30 seconds. Stir the ingredients and allow the motor to rest for 1 minute at least. Recipes in the manual are considered as common food amount in household. If food becomes lodged around the processing blade, turn off the appliance by releasing the main switch and disconnect the power cord from the power outlet. Use a spatula, or plastic knife, to dislodge the food. In no cases use your fingers to dislodge the food. The blades are very sharp. Do not insert your hand into the mixing bowl if the appliance is in process. Do not remove the appliance from the mixing mixture during operation. Turn off the appliance at first, disconnect the power cord from the power outlet and wait until the blades stop turning. Then you can remove the appliance from the mixing mixture. Do not push food into the food chute with your fingers or other utensils. Always use the food pusher provided. Keep fingers, hands, knives and other utensils away from moving blade and discs. Do not place hands or fingers in the processing bowl of the food processor unless the motor, processing blade, dough blade or disc has come to a complete stopped. Ensure the appliance is switched off at the power outlet and the power cord is unplugged before removing the lid from the processing bowl. Do not leave the appliance unattended when in use. Do not use the appliance with wet hands. Always ensure the appliance has been turn off before attempting to move the appliance, when the appliance is not in use and before cleaning and storing. Then you can unplug the appliance from the power outlet. CATLER RECOMMENDS SAFETY FIRST 7 If you do not use the appliance for a long time or you attempt to leave it unattended, unplug the appliance from the power outlet. Do not disconnect the appliance from the power point by pulling the electric cable – it may damage the electric cable/power point. Disconnect the cable from the power point by gently pulling the plug of the electric cable. TO PROTECT AGAINST ELECTRIC SHOCK DO NOT IMMERSE THE MOTOR BODY, POWER CORD OR POWER PLUD IN WATER OR ANY OTHER LIQUID OR DO NOT ALLOW MOISTURE TO COME IN CONTACT WITH THESE PARTS. DO NOT WASH THE POWER BASE UNDER RUNNING WATER. This appliance can be used by children aged from 8 years and above and persons with reduced physical, sensory or mental capabilities or lack of experience and knowledge if they have been given supervision 8 CATLER RECOMMENDS SAFETY FIRST or instruction concerning use of the appliance in a safe way and understand the hazards involved. Use only supplied accessories or recommended accessories by a manufacturer. Otherwise it may result in fire, electric shock or injury to persons. Keep the appliance clean. Follow the cleaning instructions provided in Care and Cleaning chapter. IMPORTANT SAFEGUARD FOR ALL ELECTRICAL APPLIANCES This appliance is for household Do not use this appliance for other than its intended use. use only. Do not use in moving vehicles Unwind the cord fully before or boats. Do not use outdoors. use. The installation of a residual Do not let the cord hang over current device (safety switch) the edge of a table or counter, is recommended to provide touch hot surfaces or become additional safety protection knotted. when using electrical This appliance is not intended appliances. It is advisable that for use by persons (including a safety switch with a rated children) with reduces physical, residual operating current sensory or mental capabilities not exceeding 30mA be or lack of experience and installed in the electrical circuit knowledge, unless they have supplying the appliance. been given supervision or See your electrician for instruction concerning use professional advice. of the appliance by a person For the security reasons, responsible for their safety. we recommend to plug Children should be supervised the appliance directly to its to ensure that they do not play own circuit, separate from with this appliance. other appliances. It is not It is recommended to inspect recommended using hub the appliance regularly. Do or extension cord. not use the appliance if power supply cord, plug or appliance This symbol points out becomes damaged in any way. that the device has double Return the entire appliance to insulation between the the nearest authorised Catler dangerous mains voltage Service Centre for examination and the parts accessible and/or repair. to the user. In the case of Any maintenance other than servicing use only identical cleaning should be performed spare parts. at an authorised Catler Service Centre. CATLER RECOMMENDS SAFETY FIRST 9 WARNING: DO NOT OPERATE THE APPLIANCE ON AN INCLINED SURFACE. DO NOT MOVE THE APPLIANCE WHILE IT IS SWITCHED ON. WARNING: THE POWER PLUG WHEN PLUGGED MUST REMAIN ACCESSIBLE FOR EASY REMOVING. WARNING: THE BLADES AND DISCS ARE VERY SHARP. PAY YOUR OWN ATTENTION WHEN THEIR HANDLING. WARNING: ENSURE THE PROCESSING BLADES AND DISCS HAVE COMPLETED STOPPED, THE APPLIANCE IS SWITCHED OFF, POWER CORD IS UNPLUGGED FROM THE POWER OUTLET IF YOU NEED TO ASSEMBLE/DISASSEMBLE, YOU NEED TO STORE OR CLEAN THE APPLIANCE OR BEFORE ATTEMPTING OTHER MANIPULATION. WARNING: DO NOT IMMERSE IN WATER OR OTHER LIQUID. NOT DISHWASHER PROOF. WARNING: BLADES ARE SHARP! DO NOT PUT HANDS OR UTENSILS DOWN FEED CHUTE. DO NO OPEN THE COVER UNTILL THE BLADES HAVE COMPLETELY STOPPED. WARNING: ONLY FOR HOUSEHOLD USE. FULLY UNWIND THE POWER CORD BEFORE USING. KEEP THE MANUAL IN A SAFE PLACE. KEEP THE APPLIANCE AND ITS POWER CORD OUT OF REACH OF CHILDREN. SAFE THESE INSTRUCTIONS 10 CATLER RECOMMENDS SAFETY FIRST KNOW YOUR CATLER PRODUCT A B J I H G C D E K L F M A. B. C. D. E. F. G. H. I. O N Speed Control Dial Easy Grip Trigger Switch Motor Body Processing Gear Box Clear Lid 1.6L Chopping Bowl Feed Chute Whisk Stainless Steel Blending Leg J. K. L. M. N. O. P. P Detachable Mashing Gear Box Detachable Mashing Leg Quad Blade Variable Slicing Disc Reversible Shredding Disc Storage Base Spindle NOT SHOWN Quad Blade Cover KNOW YOUR CATLER PRODUCT 11 ASSEMBLY & OPERATION BEFORE FIRST USE Remove any packaging material and promotional labels. Remove the blending leg from the mixer motor body and wash it in warm soapy water (refer to assembly instructions in this booklet). Rinse and dry thoroughly. Ensure no water remains inside the blending leg to avoid water running into the motor body when reattached. Disassemble and wash the chopping blade, chopper bowl, chopper bowl lid, whisk, storage lid, and blending jug in warm soapy water, rinse and dry thoroughly. Ensure no water remains on the chopper bowl lid or whisk attachment to avoid water running into the motor body when reattached. The detachable blending leg, chopping bowl (without the gearbox), quad blade, variable masher, whisk can also be washed in the dishwasher. The whisk gear box, processor gear box, masher gear box and motor body are not dishwasher safe – see the care and cleaning section of this booklet for cleaning instructions of these parts. NOTE This stick mixer is a versatile appliance that can be attached to: • The stainless steel blending leg – for use as a stick mixer. • The food processor bowl with quad blade, variable slicing disc, reversible shredding disc - for use as a mini food processor. • The variable mashing leg – for use as mashing vegetables. • The whisk attachment – for use as a hand whisk. TO ATTACH THE BLENDING LEG Hold the blending leg with the blades down, and align the top end of the blending leg with the corresponding end of the motor body and push until the blending leg clicks and locks onto the motor body. Always ensure blending leg is dry, and no water left inside, before reattaching. USING AS A STICK MIXER Ensure the blending leg is assembled to the motor body as detailed above. 1. Place food to be processed into a sufficiently large mixing bowl or saucepan (do not use the food processor bowl as this may damage either the stick mixer or the bowl). The bowl should only be 1/2 full or less when blending liquids or when making a puree of fruit and/or vegetables. 2. Insert the plug into a 230/240V power outlet and turn the power on. 3. Turn the dial at the top of motor body, select a speed from 1 to 15. If selecting a higher speed, it is recommended that you start on a slow speed and then increase to high speed to avoid splattering and over-processing. NOTE 12 ASSEMBLY & OPERATION 4. Place the blending leg as deeply as possible into the bowl and press the trigger switch to turn the stick mixer on. The button must be held for the required duration of operation. 5. Work through the ingredients in the bowl with a gentle raising and lowering motion. 6. Switch off the motor by releasing the trigger switch. 7. Ensure the motor has completely stopped before lifting the blender out of the bowl. 8. When processing has finished, switch off at the power outlet and remove the power plug. TO DETACH THE BLENDING LEG Ensure the trigger switch is released, the power is turned off at power point and the appliance is unplugged. Hold the motor body with one hand, and using thumb and finger of the other hand, press on the two EJECT buttons on either side of the motor body. Pull the motor body away from the blending leg to detach. RECOMMENDATIONS WHEN USING AS A STICK MIXER • The stick mixer blends foods and liquids rapidly, therefore it is easy to over process. Remember when using the blending leg to stop the stick mixer and check food throughout the operation. • Use caution when blending hot food as it can splatter. • The stainless steel blending leg allows for hot food to be processed directly in the saucepan. This makes blending soups and sauces very easy. • For safety reasons remove saucepan away from the heat before processing. • Ensure the body of the appliance and power cord are kept away from any heat source. • When pureeing and blending, cut food into uniform sizes. This will ensure smooth and consistent results. • Warm all liquids to be added to soups and purees, this will ensure even blending. • Do not operate the appliance continuously for more than 1 minute. Allow the motor to rest for 1 minute between each use. If food becomes lodged around the processing blade or in the blade guard, follow the safety instructions below: 1. Release the trigger switch, the power off at the power outlet and unplug the cord. 2. Use a spatula to carefully dislodge the food. Do not use fingers as the blades are sharp. 3. After the food has been removed and blades are clear, plug the appliance back into the power supply, switch the power on and continue blending. ASSEMBLY & OPERATION 13 USING THE FOOD PROCESSOR BOWL ATTACHING GEARBOX TO FOOD PROCESSING BOWL LID The gearbox should be placed into the food processor lid. It should click into place. TO ATTACH THE FOOD PROCESSING BOWL, FOOD PROCESSOR ATTACHMENTS AND LID 1. Remove the food processing bowl from the storage unit and place onto a bench ensuring that the surface is clean and level. 2. Choose one of the following food processor attachments: a) Quad blade b) Adjustable slicer c) Reversible shredder 3. There is a common spindle that is used across all of the three food processor attachments. WHEN USING THE REVERSIBLE SHREDDER 1. Place the spindle, into the centre of the food processing bowl. To attach the motor, click into place onto the gearbox. CAUTION: Caution should be taken when handling the shredding disc. 14 ASSEMBLY & OPERATION 2. Holding the reversible shredder disc, notice that there is a large grater and small grater, place the side you require up. Place over the centre of the spindle and ensure that it is pushed down firmly. CAUTION: Caution should be taken when handling the adjustable slicing disc and ensure that blade is in the storage or 0 position. 2. The adjustable slicing disc has 18 precise settings. To adjust the settings hold the adjustable slicing disc by the edge (on the opposite side to the cutting blade) with one hand and turn the rotating collar to the desired setting with the other hand. 3. Place the lid into position and ensure that it is on correctly. 3. Place the adjustable slicing disc onto the spindle. Ensure that it is pushed down correctly. WHEN USING THE ADJUSTABLE SLICER 1. Place the spindle in the centre of the food processing bowl. ASSEMBLY & OPERATION 15 4. Place the lid into position and ensure that it is on correctly. WHEN USING THE QUAD BLADE 1. Using care, hold the quad blade in one hand, with the other hand, place the spindle through the centre of the quad blade from underneath. The quad should self-locate at the base of the spindle. The quad blade will sit loosely on the spindle but will lock into place during processing. CAUTION: Caution should be taken when handling the quad blade as the blades are extremely sharp. 2. Place the quad blade and spindle into the centre of the food processing bowl. 3. Place the lid into position and ensure that it is on correctly. 16 ASSEMBLY & OPERATION 4. Once the blade or disc has been selected for the food processor you can now process food. Place the food inside the processing bowl. If using the quad blade. Do not exceed the maximum (MAX) marking. 5. Insert the gear box into the lid of the food processor. Always place the quad blade into the food processor prior to placing the food into the food processor. When using the disc’s adjustable slicer and reversible shredder these both can be placed into the food processor prior to processing food. Some foods, such as nuts, can stop the quad blade from engaging the built in safety mechanism. If you have troubles closing the lid with ingredients such as this we advise to load these through the feed chute. NOTE TO USE THE FOOD PROCESSOR For food preparation tips and recipes refer to the recipe section of this booklet. 1. Insert the plug into a 230/240V power outlet and turn the power on. 2. Select a speed between 1–15 on the speed control dial. 3. Press the trigger switch to turn the appliance on and start the processing action. 5. When processing has finished switch off the motor by releasing the trigger switch, switch off at the power outlet and remove the power plug. 6. Detach the food processing bowl and lid (refer to instructions). Remove the lid from the food processor bowl. Carefully remove the food processing blades or quad blade and use a spatula to scrape off any attached food back into food processing bowl. TO DETACH THE FOOD PROCESSING BOWL AND LID Ensure the switch is released, power is turned off at power point and the appliance is unplugged. Hold the motor body with one hand and using thumb and finger of the other hand, press on the two EJECT buttons on either side of the motor body. Pull the motor body away from the chopper bowl lid to detach. 4. Feed the food through the feed chute of the food processor, using the food pusher to push it down. CAUTION: Only use the small pusher with the large pusher resting inside the feed chute. ASSEMBLY & OPERATION 17 TO DETACH THE GEARBOX FROM THE LID • To remove the gearbox grasp the gearbox and lift up from the processing lid. CAUTION: DO NOT process hard foods such as coffee, grains or chocolate in lumps, as damage to the blade may result. DO NOT process boiling or hot foods in the food processing bowl. NEVER remove the blade from the bowl before food processing is completed. RECOMMENDATIONS WHEN USING THE STICK MIXER WITH THE FOOD PROCESSING BOWL • Do not operate the stick mixer when the food processing bowl is empty. • The bottom of the food processing bowl features a anti-slip rubber rim. This keeps the food processing bowl stable, however it is recommended during processing to hold the motor body with one hand and the food processing bowl and lid with the other. • When processing, cut food into uniform sizes to ensure quicker, even and more consistent results. • The stick mixer blends foods and liquids rapidly, therefore it is easy to over process. Remember to check food throughout the operation. When using the shredding or slicing disc do not allow the processing bowl to fill with food beyond the MAX level indicated. Processing food beyond this level could damage parts of the bowl and lid NOTE 18 ASSEMBLY & OPERATION Processing hard spices will cause the chopper bowl to become cloudy over time. Hard spices are best suited to a spice grinder with a metal bowl. ASSEMBLY OF THE POTATO MASHER LEG Before first use Remove any packaging material and promotional labels. Wash blade and two parts of the mashing leg before use. CAUTION: Never immerse the motor body or gearbox in water or any other liquid. If the variable masher leg is already assembled start from step 3. NOTE 1. Holding the outer leg and insert the gearbox making sure ALIGN arrows are aligned. 3. Rotate gearbox while holding outer leg to lock into place until it clicks. 2. Hold both outer leg and gearbox firmly with one hand and insert inner leg until it clicks and locks into place. 4. Align the mashing leg with the motor body and push the two parts together until it clicks. 5. Place blade on underside of the mashing head. To lock the blade rotate in a anticlockwise direction. Blade will not attach if the leg is not attached to the motor body. ASSEMBLY & OPERATION 19 TO USE THE POTATO MASHER LEG For food preparation tips and recipes refer to the recipes section. Ensure the potato masher is completely and properly assembled. 1. Place food to be mashed into a sufficiently large mixing bowl or container or in saucepan. 2. Insert the plug into a 230/240V power outlet and turn the power on. 3. Select the desired setting on the variable mashing leg: textured, smooth or creamy. 4. Select a high speed on the speed control dial. 5. Place the potato masher into food and press the trigger switch to turn the masher on. 6. Move the masher through the ingredients with a gentle raising and lowering action until desired texture is achieved. 7. Switch off the motor by releasing the trigger switch before lifting the masher out of the bowl. Switch off at the power outlet and remove the power plug. TO DETACH THE POTATO MASHING LEG 1. Ensure the trigger switch is released, the power is turned off at power point and the appliance is unplugged. 2. Before removing motor body, remove masher blade by holding onto the blade and turning clockwise to unlock. 3. Once blade is removed, hold the motor body with one hand, and using thumb and finger of the other hand, press on the two EJECT buttons on either side of the motor body. Pull the motor body away from the masher to detach. 20 ASSEMBLY & OPERATION Mashing blade will not attach/detach if the leg is not attached to the motor body. NOTE RECOMMENDATIONS WHEN USING WITH THE POTATO MASHING LEG • Release the trigger switch and ensure the masher has completely stopped turning before removing the masher from the food during operation. • Place the mixing bowl on a damp cloth during mashing. This will keep the mixing bowl stable. USING AS A WHISK Remove blending leg from motor body (follow the instructions ‘To detach the blending leg’). 1. Align the whisk gear box to the hole in the underside of the motor body and push the whisk in until it clicks and locks into place. TO USE THE WHISK For food preparation tips and recipes refer to the recipes section. Ensure the whisk is completely and properly assembled. 1. Place food to be processed into a blending jug or a sufficiently large mixing bowl or container. 2. Insert the plug into a 230/240V power outlet and turn the power on. 3. Select a speed between 1–15 on the speed control dial. 4. Place the whisk into food and press the trigger switch to turn the whisk on. 5. Move the whisk through the ingredients with a gentle raising and lowering action until desired texture is achieved. 6. Switch off the motor by releasing the trigger switch before lifting the whisk out of the bowl. Switch off at the power outlet and remove the power plug. TO DETACH THE WHISK Ensure the trigger switch is released, the power is turned off at power point and the appliance is unplugged. Hold the motor body with one hand, and using thumb and finger of the other hand, press on the two EJECT buttons on either side of the motor body. Pull the motor body away from the whisk to detach. RECOMMENDATIONS WHEN USING THE WHISK ATTACHMENT • Do not allow the whisk to hit the bottom or sides of mixing bowl while the appliance is in operation, as this may damage the whisk. • To incorporate air into the ingredients when whisking, use a sufficiently deep, wide container and move the whisk through the ingredients with a gentle raising and lowering action. • Release the trigger switch and ensure the whisk has completely stopped turning before removing the whisk from the food during operation. • Place the mixing bowl on a damp cloth during whisking. This will keep the mixing bowl stable. • Always use fresh chilled cream and fresh eggs at room temperature to achieve greater and more stable volume when whisking. • Always ensure the whisk and mixing bowl are completely clean and free of fat before whisking egg whites. • It is recommended to use the highest speed when whisking egg whites and cream. STORAGE Before storage, turn the power off at the power outlet and then remove the plug. Ensure the appliance is clean and completely dry. Attach/assemble chopper bowl lid to the chopper bowl, place chopper bowl inside blending jug, attach storage lid to the bottom of the blending jug (non-slip base). ASSEMBLY & OPERATION 21 CARE, CLEANING & STORAGE MOTOR BODY To remove any food residue wipe the motor body and cord with a damp cloth only. Do not use abrasive cleaners or steel wool. Never immerse the motor body in water or any other liquid. Do not place motor body in dishwasher. CAUTION: Never immerse the motor body or gearbox in water or any other liquid. BLENDING LEG Before cleaning, turn the power off at the power outlet and then remove the plug. Remove the motor body from the stainless steel blending leg. The stainless steel blending leg can be hand washed in hot soapy water, rinsed and dried thoroughly after each use. Alternatively, the blending leg can also be washed in the dishwasher. Do not use abrasive cleaners or steel wool. QUICK WASH: Between each processing task, with the motor body attached and turned on at the power outlet, place the stainless steel blending leg and blade assembly only in to a jug of water and press the trigger switch to turn on for 5 seconds. This will remove any food on the blade and leg and allow you to continue onto the next processing task. FOOD PROCESSING BOWL, FOOD PROCESSING BOWL LID, QUAD BLADE, ADJUSTABLE SLICING DISC & REVERSIBLE SHREDDER Before cleaning, turn the power off at the power outlet and then remove the plug. Remove the motor body from the food processing bowl lid and gear box. Remove the food processing bowl lid and quad blade | processing discs from the food processing bowl. 22 CARE, CLEANING & STORAGE The lid is dishwasher safe remove the removable gear box from the lid prior to placing in the dishwasher. NOTE The food processing bowl, bowl lid, quad blade and processing discs should be hand washed in hot soapy water, rinsed and dried thoroughly after each use. Alternatively, the food processing bowl, bowl lid, quad blade, adjustable slicing disc and reversible shredder can also be washed in the dishwasher. The quad blade comes with a cover for your safety. This cover can be used on the blade in the dishwasher. Do not use abrasive cleaners or steel wool. CARE & CLEANING OF THE GEARBOX The gearbox should always be removed from the lid prior to any cleaning. The gearbox lifts out of the lid by pulling it up. The gear box is not dishwasher safe and should never be immersed in liquid at all. To clean the gearbox, remove from the lid and wipe down with a damp cloth only. Do not use abrasive cleansers or steel wool. NOTE POTATO MASHER LEG Before cleaning, turn the power off at the power outlet and then remove the plug. The masher leg can be hand washed in hot soapy water, rinsed and dried thoroughly after each use. 3. Unclip the gear box from motor body, turn the masher leg to align and remove the inner and outer legs from the gear box together. TO DISASSEMBLE THE POTATO MASHING LEG 1. Ensure the motor is unplugged. Before removing the masher leg, unlock the blade by rotating in a clockwise direction. Blade will not detach once the masher leg is released from motor body. 4. The inner and outer legs can now be separated. 2. Once the blade is removed hold the motor body with one hand, and using thumb and finger of the other hand, press on the two EJECT buttons on either side of the motor body. Pull the motor body away from the masher to detach. Both of the legs can now be washed in hot soapy water, rinsed and dried thoroughly. Alternatively, the masher can be washed in the dishwasher. CAUTION: Do not use abrasive cleaners or steel wool. Masher gear box is not dishwasher safe. NOTE CARE, CLEANING & STORAGE 23 WHISK Before cleaning, turn the power off at the power outlet and then remove the plug. Remove the motor body from the whisk. The whisk can be hand washed in hot soapy water, rinsed and dried thoroughly after each use. Alternatively, the whisk can also be washed in the dishwasher. Do not use abrasive cleaners or steel wool. Whisk gear box is not dishwasher safe. STORAGE Before storage, turn the power off at the power outlet and then remove the plug. Ensure the appliance is clean and completely dry. Attach/assemble processing bowl lid to the processing bowl and place processing bowl onto the storage unit with all the attachments. The adjustable slicing disc is stored under the food processing bowl, make sure that the adjustable blade is set to STORAGE POSITION. NOTE 24 CARE, CLEANING & STORAGE TROUBLESHOOTING PROBLEM SOLUTION Blades don’t turn when processing. • • May be too much food in bowl. Reduce quantity. Pieces of food, such as meat are too large. Reduce size. Unable to lock lid into place. • Spindle may be out of position. Remove lid, straighten spindle as vertical as possible and reposition lid. Food may be stuck underneath the quad blade preventing the lid from being locked into place. Food such as nuts can be loaded through the feed chute. • Gear box in lid jumps out of lid when processing. • Replace gear box and ensure that the control grip is held vertically and firmly. Masher leg won’t attach onto masher drive. • Ensure mashing leg and gear box arrow graphics are vertically aligned. Twist masher leg anticlockwise to lock for use. Blades won’t remove from potato masher. • Mashing leg must be assembled to gearbox and motor body to remove blade. Rotate blade clockwise to remove. Grating disc slows down when grating. • Grating has exceeded Max level. Empty bowl and continue to grate. Too much force is being used when grating. Reduce force when pushing. • Processing bowl does not sit flat onto storage base. • Ensure adjustable slicing disc is set to ‘Storage Position’. Motor sounds like it is not coping with processing load. • Speed may not be correct. Refer to processing guide for correct speeds. TROUBLESHOOTING 25 FOOD PREPARATION CHART FOOD TYPE ATTACHMENT TYPE DISK TYPE Food Processor Grater fine 9-13 - 1-2 carrots at a time, depending on size Food Processor Grater coarse 9-13 - 1-2 carrots at a time, depending on size Food Processor Grater fine 11-15 - 1-2 zucchini at a time, depending on size Food Processor Grater coarse 11-15 - 1-2 zucchini at a time, depending on size Food Processor Variable slicer 9-13 1-6mm 1-2 zucchini at a time, depending on size Cucumber Food Processor Variable slicer 9-13 2-5mm 1-2 cucumber at a time, depending on size Tomato Food Processor Variable slicer 9-11 4-6mm Use firm tomatoes Cabbage Food Processor Variable slicer 9-11 2-6mm Cut to size to fit shoot Leek Food Processor Variable slicer 9-13 2-6mm White part only Onion Food Processor Variable slicer 9-13 2-6mm Cut in half Chicken breast/ thigh fillets Food Processor Quad blade 15 Lean Beef Food Processor Quad blade 15 - 700g max cut into 2.5cm cubes Lean Pork Food Processor Quad blade 15 - 700g max cut into 2.5cm cubes Fish fillets Food Processor Quad blade 15 - 700g max cut into 2.5cm cubes Carrot Zucchini 26 FOOD PREPARATION CHART SPEED SETTING BLADE THICKNESS RECOMMENDED QUANTITY 700g max cut into 2.5cm cubes FOOD TYPE ATTACHMENT TYPE DISK TYPE Food Processor Greater fine 15 - Food Processor Grater coarse 15 - Mozzarella Food Processor Grater coarse 15 - Place in freezer for 20 minutes before grating Parmesan Food Processor Grater fine 15 - Must be well chilled Food Processor Quad blade 15 - Cut into 1cm cubes Milkshakes, smoothies, fruit frappes, cocktails Blending Leg - 11-15 - Use chilled milk. Blend for 30 seconds at a time. Soups, baby food Blending Leg - 11-15 - Blend until smooth, checking desired consistency every 30 seconds Ice Blending Leg (Do not use chopping bowl for ice) - 15 - Crush ice for 20-30 seconds Cheddar/ tasty SPEED SETTING BLADE THICKNESS RECOMMENDED QUANTITY Must be well chilled FOOD PREPARATION CHART 27 FOOD TYPE 28 ATTACHMENT TYPE DISK TYPE SPEED SETTING BLADE THICKNESS RECOMMENDED QUANTITY Cream Whisk - 11-15 - Whisk for 1 minute at a time, rest for 1 minute between each use Nuts Food Processor Quad blade 15 - 250g for 30 seconds at time until desired consistency is achieved. Wait 30 seconds between each interval. Bread crumbs Food Processor Quad blade 15 - 2-3 slices cut into quarters Biscuit crumbs Food Processor Quad blade 15 - 250g max FOOD PREPARATION CHART Recipes 29 RECIPES ROAST BEETROOT DIP Makes approx 2 cups SPINACH, PARMESAN AND CASHEW DIP Makes approximately 1 cup INGREDIENTS 4 medium (700g) beetroot 1 garlic bulb 2 teaspoons lemon juice 1 tablespoon horseradish 1 /4 cup (60ml) light olive oil Salt and freshly ground black pepper Turkish bread to serve INGREDIENTS 75g baby spinach leaves 1 clove garlic 75g Parmesan cheese, grated 1 /3 cup (50g) unsalted toasted cashews 1 /3 cup (80ml) olive oil 2 teaspoons lemon juice Salt and freshly ground black pepper Crackers, to serve METHOD 1. Preheat oven to 200°C. Wash beetroot well and pat dry. Cut top off garlic and place beetroot and garlic onto a baking tray and drizzle with oil. Bake for 30 minutes then remove garlic and turn beetroot over and cook beetroot for a further 15–20 minutes or until beetroot is tender. Set aside to cool completely. 2. Once beetroot is cool, peel off skin and cut into quarters. Squeeze garlic out of skin. 3. Assemble the food processing bowl using the quad blade. 4. Place beetroot and garlic and remaining ingredients into processing bowl. Place lid on bowl. 5. Attach the motor body; select speed 13–15 and process until mixture is almost smooth, scraping down the sides of processing bowl if necessary. Serve dip chilled with Turkish bread. 30 RECIPES METHOD 1. Assemble the food processing bowl using the quad blade 2. Add ingredients except salt and pepper into the processing bowl in the order listed. Place lid on bowl. 3. Attach the motor body; select speed 13–15 and process until all the ingredients are chopped as desired; scrap down side if necessary. Do not over process and it should be slightly chunky. Season to taste and serve with crackers. Dip will keep fresh for 1 day. TIP RED CURRY PASTE Red curry two ways This curry paste will make enough for the Thai sweet potato soup recipe on page 33 and the Red Chicken Curry on page 37 INGREDIENTS 1 teaspoon shrimp paste (belacan), optional 20 dried long red chillies, seeds removed 4 cm piece galangal, peeled, thinly sliced 2 lemongrass, white part only, roughly sliced 12–14 coriander roots, scraped 10 kaffir lime leaves, stems removed and sliced thinly 4 red shallots, halved 12 cloves garlic 2 teaspoons salt 3-4 tablespoons vegetable oil METHOD 1. Wrap shrimp paste in a piece of aluminium foil. Cook under a hot grill and cook for 1–2 minutes each side. 2. Place chillies in a heatproof bowl and cover with boiling water; soak for approximately 15 minutes or until softened. 3. Assemble the food processing bowl using the quad blade. 4. Combine shrimp paste, chillies and remaining red curry paste ingredients into the processor bowl; place lid on bowl. Attach the motor body; select speed 15 and process until all the ingredients become a paste. Scrape down sides if necessary. ROASTED MEDITERRANEAN SOUP Serves 4–6 INGREDIENTS 2 tablespoons olive oil 2 red onions, quartered 5 cloves garlic 1 large fennel, cut into thin wedges 3 zucchinis, roughly chopped 2 red capsicum, quartered and seeded 2 green capsicum, quartered and seeded 1–2 tablespoons olive oil Salt and freshly ground black pepper 1 litre chicken or vegetable stock 2 × 400g can chopped tomatoes 1 /3 cup shredded fresh basil leaves METHOD 1. Preheat oven to 200°C. Place onions, garlic, fennel, zucchini and capsicums into a large baking dish; drizzle with oil and season with salt and pepper. Bake in oven for about 30 minutes or until vegetables are tender. 2. Place vegetables into a saucepan with stock and chopped tomatoes. Bring mixture to the boil and cook for a 10 minutes. Allow mixture to cool slightly. 3. Place stick mixer into saucepan and blend until soup is smooth. Season to taste and stir through shredded basil. Paste can be stored in refrigerator with a little extra oil over the top for 1 week or frozen for 1 month. TIP RECIPES 31 GOATS CHEESE AND LEEK TART Serves 6–8 INGREDIENTS 2 leeks, white part only 80g butter 1 tablespoon olive oil 1 tablespoon chopped fresh thyme Sea salt and freshly ground black pepper 80g goats’ cheese 300ml cream 4 eggs Extra sprigs of thyme Pastry 250g plain flour 135g chilled butter, cubed 1 egg 2 teaspoons cold water METHOD 1. To make the pastry, assemble the food processor using the quad blade. 2. Place flour and butter into the processing bowl. Place lid on bowl. 3. Using speed 15; process ingredients until mixture resembles a fine crumble. Add egg and water and process until mixture forms just forms a ball. Do not over process. 4. Lightly knead dough by hand until smooth and shape into a disc. Cover with plastic wrap and refrigerate for 20 minutes. 5. Preheat oven to 180°C. Lightly grease a 25cm × 3cm loose base round flan tin. 6. Assemble the processor with the variable slicer set to setting 3–4. Slice leeks. 7. Heat butter and oil in a frying pan over a medium heat; add leeks and cook, stirring, until the leeks have softened. Add the chopped thyme and cook for a further minute. Season with salt and pepper and set aside. 32 RECIPES 8. Roll dough between two sheets of baking paper large enough to line tin; line flan tin with pastry. Using a fork press several holes around the middle of the pastry. Line pastry with baking paper and fill with baking beads or uncooked rice. Bake in oven for 15 minutes; remove beads and paper and bake for a further 5 minutes. 9. Spread leeks over the base of the pastry and sprinkle with goats’ cheese and top with extra sprigs of thyme. Whisk together cream, eggs, salt and pepper and pour over leeks. Bake in preheated oven for 30 minutes or until set. Allow to cool for 30 minutes before serving. POTATO GNOCCHI Serves 4–6 CREAMY MASHED POTATO Serves 4–6 INGREDIENTS 1 kg medium size Desiree, Dutch Cream or Nicola potatoes 1 egg, lightly beaten 3 /4 cup (110g) plain four, plus extra for dusting salt INGREDIENTS 1 kg medium size brushed potato such as Sebago 80g butter 200ml warm milk Salt, to taste METHOD 1. Peel potatoes and cut into 2.5cm pieces. Place potatoes into a large saucepan and cover with cold water. Cover and bring to the boil over a high heat. Once boiling remove lid and cook for about 20–25 minutes or until potatoes are tender and a skewer can be inserted easily. Drain potatoes well. 2. Place potatoes back into the dry saucepan and gently shake the potatoes in the saucepan over a low heat for 1–2 minutes to remove excess moisture. Remove from heat and allow to cool for 5 minutes. 3. Assemble the motor body with the potato masher attachment set to the finest setting; using speed 15 mash potatoes until smooth. Do not over process as this will cause the potatoes to go gluey. 4. Place potato onto a clean flat work surface and make a well in the centre. Pour egg into the centre and add flour and salt. Knead mixture gently together to form a soft dough. 5. Cut dough into 10 portions and roll into a long thin logs 2cm in diameter. Cut each log into 1.5 cm portions. 6. Bring a large pot of water to the boil; once boiling add salt. Gently drop 20–25 gnocchi into cooking water. Stir once; when gnocchi rises to the top, scoop out with a slotted spoon and place into a large bowl. Repeat with remaining gnocchi. METHOD 1. Peel potatoes and cut into 2.5cm pieces. Place potatoes into a large saucepan and cover with cold water. Cover and bring to the boil over a high heat. Once boiling remove lid and cook for about 20–25 minutes or until potatoes are tender and a skewer can be inserted easily. Drain potatoes well. 2. Place potatoes back into the dry saucepan and gently shake the potatoes in the saucepan over a low heat for 1–2 minutes to remove excess moisture. Remove from heat and allow to cool for 5 minutes. Transfer potatoes to a straight sided bowl or mash in saucepan. Add the butter and warm milk. 3. Assemble the motor body with the potato masher attachment set to the desired masher setting; using speed 15 mash potatoes until smooth. Do not over process as this will cause the potatoes to go gluey. Season to taste with salt and serve. Serve gnocchi with pesto. RECIPES 33 LEMON TARTS Makes 4 LEMON CAKE Serves 8 INGREDIENTS Sweet Shortcrust Pastry 3 /4 cup (110g) plain flour 2 tablespoons icing sugar mixture 65g butter 1 tablespoon iced water INGREDIENTS 185g butter, melted 3 /4 cup (165g) caster sugar 1 tablespoon finely grated lemon rind 3 eggs, lightly beaten 11/2 cups (225g) self raising flour 1 /2 cup (110g) caster sugar, extra 1 /4 cup (60ml) lemon juice Lemon Filling 2 lemons 2 eggs 1 egg yolk 1 /2 cup (110g) caster sugar 100ml cream METHOD 1. Assemble the processing bowl using the quad blade. Add flour, icing sugar and butter. Place lid on bowl. Select speed 15. Process until well combined; add water, 1 /2 tablespoon at a time and process until mixture just forms a ball. 2. Remove pastry from bowl onto a clean surface and shape into a flat disc. Cover pastry and refrigerate for 30 minutes. 3. Grease a 24cm round loose-based flan tin. Roll pastry, between two sheets of baking paper, large enough to line tin. Carefully lift pastry into tin and press into sides; trim edges. Cover and refrigerate for 30 minutes. 4. Preheat oven to 200°C. Place tin on oven tray; line pastry with baking paper then fill with baking beans. Bake for 10 minutes then remove beans and paper and cook in oven for a further 10 minutes or until pastry is lightly browned; remove from oven and reduce heat to 160°C. 5. Remove rind from lemons; reserve. Juice lemons. Combine rind, juice and remaining filling ingredients and whisk until well combined. 6. Carefully pour into pastry case and bake for about 35 minutes or until set. Cool completely before serving. 34 RECIPES METHOD 1. Preheat oven to 160°C. Grease and line base and sides of a loaf pan. 2. Assemble the processing bowl using the quad blade. Place all ingredients into the processing bowl. Using speed 15; process ingredients until combined. Scrape down sides if necessary. Spoon into prepared pan. 3. Bake in oven for 50–60 minutes or until cooked when tested with a wooden skewer. Turn onto a wire rack. 4. Combine sugar and lemon juice and quickly spoon over warm cake. INSTRUCTIONS AND INFORMATION REGARDING THE DISPOSAL OF USED PACKAGING MATERIALS Dispose of packaging material at a public waste disposal site. DISPOSAL OF USED ELECTRICAL AND ELECTRONIC APPLIANCES The meaning of the symbol on the product, its accessory or packaging indicates that this product shall not be treated as household waste. Please, dispose of this product at your applicable collection point for the recycling of electrical & electronic equipment waste. Alternatively in some states of the European Union or other European states you may return your products to your local retailer when buying an equivalent new product. The correct disposal of this product will help save valuable natural resources and help in preventing the potential negative impact on the environment and human health, which could be caused as a result of improper liquidation of waste. Please ask your local authorities or the nearest waste collection centre for further details. The improper disposal of this type of waste may fall subject to national regulations for fi nes. For business entities in the European Union If you wish to dispose of an electrical or electronic device, request the necessary information from your seller or supplier. Disposal in other countries outside the European Union If you wish to dispose of this product, request the necessary information about the correct disposal method from local government departments or from your seller. This product meets all the basic EU regulation requirements that relate to it. Changes to the text, design and technical specifications may occur without prior notice and we reserve the right to make these changes. 35 Due to continued product improvement, the products illustrated/photographed in this brochure may vary slightly from the actual product. W W W . C A T L E R . E U CUSTOMER SERVICE I N F O @ C A T L E R . E U