1
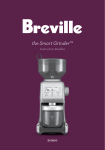
COFFEE GRINDER
Instructions
for use
CG
153124_CG_8010_EN_.indd 1
17.5.11 13:10
COFFEE GRINDER
153124_CG_8010_EN_.indd 2
17.5.11 13:10
CONTENTS
4
Congratulations
5
Catler recommends safety first
8
Know your Coffee Grinder CG 8010
10
Assembling your Coffee Grinder CG 8010
11
Operating your Coffee Grinder CG 8010
14
Hints & tips
16
Care and Cleaning
18
Troubleshooting
CONTENTS
153124_CG_8010_EN_.indd Odd1:3
3
17.5.11 13:10
Congratulations
on the purchase of your new Catler Coffee Grinder CG 8010.
4
CONGRATULATIONS
153124_CG_8010_EN_.indd Odd1:4
17.5.11 13:10
CATLER RECOMMENDS SAFETY FIRST
We at Catler are very safety conscious. We design and manufacture consumer products with the safety of you, our valued customer foremost in mind.
In addition we ask that you exercise a degree of care when using any electrical appliance and adhere to the following precautions:
IMPORTANT SAFEGUARDS FOR YOUR COFFEE GRINDER CG 8010
•
Carefully read all instructions before operation
and save for future reference.
•
Remove and safely discard any packaging
material and promotional labels before using
the appliance for the first time.
•
•
•
•
To eliminate a choking hazard for young
children, remove and safely discard the
protective cover fitted to the power plug of
this appliance.
This appliance has been designed specifically
for the purpose of grinding roasted coffee
beans only. Under no circumstances should
this product be used for other purposes than
it is intended.
This appliance is not designed to grind pre
ground coffee in bean hopper. Under no
circumstances should this product be used
that is sticky, or extremely hard, or make
pastes of any fruits, seeds or herbs i.e. curry
pastes, nut batters.
Do not insert any metal objects or similar
product into the bean hopper which could
damage or negatively influence the device
operation.
•
•
Do not place the appliance near the edge of
a bench or table during operation. Ensure
that the surface is level, clean and free of
water.
Do not place the appliance on or near a hot
gas burner, electric element or where it could
touch a heated oven.
•
Do not operate the appliance on a sink drain
board.
•
Before you connect the appliance into the
power outlet make sure the voltage on the
rating label corresponds to the voltage in
your power outlet.
•
Always ensure the appliance is properly
assembled before connecting to a power
outlet and operating. Follow the instructions
provided in this book.
•
Ensure the surface is level, clean and free of
water.
•
This appliance is not intended to be operated
by means of an external timer or separate
remote control system.
•
Before operation, ensure the bean hopper lid
is securely attached to the hoper.
•
The device should not be switched on until
the bean hopper and hopper lid are locked
into position in the grinding chamber.
•
Do not operate the device without locking
the bean hopper lid in position. Keep fingers,
hands, hair, clothing and utensils away from
the bean hopper during operation.
•
Do not move the appliance if turned on.
Do not manipulate with the appliance if
placed on the power base and turned on.
•
Do not put metal or similar items into the jug
as this may damage or affect the operation of
the unit.
•
Always ensure the START/CANCEL button has
been pressed to cancel before attempting
to move the appliance, when the appliance
is not in use and before cleaning and
storing. The appliance is turned off if button
illumination goes off. Now, you can unplug
the appliance from the power outlet.
CATLER RECOMMENDS SAFETY FIRST
153124_CG_8010_EN_.indd Odd1:5
5
17.5.11 13:10
•
If you do not use the appliance for a long
time or you attempt to leave unattended,
unplug the appliance from the power outlet.
•
Do not disconnect the appliance from the
power point by pulling the electric cable - it
may damage the electric cable/power point.
Disconnect the cable from the power point
by gently pulling the plug of the electric
cable.
•
Do not operate the device for longer than
2 minutes as this could cause overheating.
Allow the Catler Coffee Grinder to cool
down for 20 minutes after long operation.
•
Use only supplied accessories or recommended accessories by a manufacturer.
Otherwise it may result in fire, electric shock
or injury to persons.
•
Keep the appliance clean. Refer to Care and
Cleaning (page 16).
WARNING:
DO NOT WASH THE POWER BASE UNDER
RUNNING WATER.
WARNING:
TO PROTECT AGAINST ELECTRIC SHOCK,
DO NOT IMMERSE THE POWER BASE,
POWER CORD OR POWER PLUG IN
WATER OR ALLOW MOISTURE TO COME
IN CONTACT WITH THESE PARTS.
6
•
Do not remove the jug from the power base
during operation.
•
The appliance is not intended for use by
young children or infirm persons unless
they have been adequately supervised by
a responsible person to ensure they can use
the appliance safely.
CATLER RECOMMENDS SAFETY FIRST
153124_CG_8010_EN_.indd Odd1:6
17.5.11 13:10
IMPORTANT SAFEFUARDS FOR ALL ELECTRICAL APPLIANCES
•
This appliance is for household use only.
•
Unwind the power cord fully before use.
•
Do not let the cord hang over the edge of
a table or counter, touch hot surfaces or
become knotted.
•
This appliance is not intended for use by
persons (including children) with reduces
physical, sensory or mental capabilities or
lack of experience and knowledge, unless
they have been given supervision or
instruction concerning use of the appliance
by a person responsible for their safety.
•
Children should be supervised to ensure
that they do not play with this appliance.
•
It is recommended to inspect the appliance
regularly. Do not use the appliance if power
supply cord, plug or appliance becomes
damaged in any way. Return the entire
appliance to the nearest authorised Catler
Service Centre for examination and/or repair.
•
Any maintenance other than cleaning
should be performed at an authorised Catler
Service Centre.
•
Do not use this appliance for other than its
intended use. Do not use in moving vehicles
or boats. Do not use outdoors.
•
The installation of a residual current
device (safety switch) is recommended to
provide additional safety protection when
using electrical appliances. It is advisable
that a safety switch with a rated residual
operating current not exceeding 30mA be
installed in the electrical circuit supplying
the appliance. See your electrician for
professional advice.
WARNING:
DO NOT OPERATE THE APPLIANCE ON
AN INCLINED SURFACE. DO NOT MOVE
THE APPLIANCE WHILE IT IS SWITCHED
ON.
WARNING:
•
For the security reasons, we recommend to
plug the Catler Coffee Grinder directly to its
own circuit, separate from other appliances.
It is not recommended using hub or
extension cord.
ALWAYS ENSURE THE BEAN HOPPER IS
INSERTED FIRMLY AND LOCKED PROPERLY.
WARNING:
THE POWER PLUG WHEN PLUGGED
MUST REMAIN ACCESSIBLE FOR EASY
REMOVING.
SAVE THESE INSTRUCTIONS
HOUSEHOLD USE ONLY
CATLER RECOMMENDS SAFETY FIRST
153124_CG_8010_EN_.indd Odd1:7
7
17.5.11 13:10
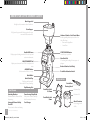
KNOW YOUR COFFEE GRINDER CG 8010
Bean Hopper Lid
Air tight seal to maximise bean freshness.
Bean Hopper
450g bean hopper with locking system for easy
removal and bean transfer.
Hardened Stainless Steel Conical Burrs
Reduce grinding heat to protect the oils in
the coffee bean.
- Removable Upper Burr
- Lower Burr
Backlit LCD Screen
Displays grind setting, number of shots/cups and
customised amount.
START/CANCEL Button
Starts & stops operation.
Grind Size Dial
25 custom grind settings from espresso to
plunger.
ADJUST AMOUNT Dial
Adjusts preset amount ‘Less’ or ‘More’ to suit personal
taste.
AMOUNT Button
Selects number of shots or cups.
Brushed Stainless Steel Body
Portafilter Activation Switch
Grind Outlet
Grind Catch Tray
Catches grind overspill.
Removable for easy cleaning.
Slip Reducing Feet
Not Shown
8
Grinding Chamber
Minimises static of beans before
dispensing.
Power Saving/Sleep Mode
Unit powers down to standby
after 5 minutes of non use.
Automatic Thermal Safety
Shut Off
Protects motor from overheating.
Cord Storage
Accessories
Conical Burr
Cleaning Brush
Portafilter Cradle
50-54mm
Container Cap
Container Lid
Portafilter Cradle
58mm
Grinds Container
For storing ground
coffee.
KNOW YOUR COFFEE GRINDER CG 8010
153124_CG_8010_EN_.indd Odd1:8
17.5.11 13:10
Operating
153124_CG_8010_EN_.indd Odd1:9
17.5.11 13:10
ASSEMBLING YOUR COFFEE GRINDER CG 8010
Before first use
Before first use, remove and safely discard all promotional labels and packing materials attached
to the device.
Wash hopper, cradles, grind container, container
lid and cleaning brush in warm soapy water and
dry thoroughly. Wipe exterior of grinder with
a soft damp cloth and dry thoroughly.
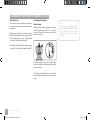
Assembling the grinder
Bean Hopper
Align tabs and place bean hopper into position.
Turn the bean hopper dial 90° to lock into
position. Fill with coffee beans and place lid on
top of bean hopper.
NOTE:
If Bean Hopper has not been locked into
position, ‘LOCK BEAN HOPPER’ message
will be displayed on the LCD screen
disabling the operation of the grinder
for safety.
Place grinder on flat level surface and plug power
cord into 230-240V outlet and switch Power ‘ON’.
The bean hopper can be removed by turning
knob anti clockwise and lifting upwards to pull
bean hopper out.
The locking system allows you to remove and
transfer hopper without having to remove the
beans.
10
ASSEMBLING YOUR COFFEE GRINDER CG 8010
153124_CG_8010_EN_.indd Odd1:10
17.5.11 13:10
OPERATING YOUR COFFEE GRINDER CG 8010
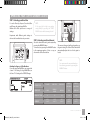
STEP 1: Selecting your Grind Size
For each coffee style, Espresso, Percolator, Filter
and Plunger, the grind size will differ.
Within each coffee style there is a range of
settings.
Experiment with different grind settings to
achieve the brew that best suits your taste.
NOTE:
If the grind dial is tight, run grinder
empty briefly by pressing the START/
CANCEL button whilst turning the dial.
STEP 2: Selecting your Grind Amount
Select the desired amount of grinds required by
pressing the AMOUNT button.
To increase, keep pressing the AMOUNT button
to the maximum number of shots or cups, as
shown in the Coffee Chart below.
The amount dispensed will vary depending on
the grind setting. The Catler Coffee Grinder will
automatically adjust the dose for the grind selected.
NOTE:
You can increase the amount already selected during operation by pressing the
AMOUNT button.
Grinding for Espresso Coffee Machines
If you are using Dual Wall Filters, we suggest the
coarser 11-20 setting. For Single Wall Filters, use
the finer 17-25 setting in the ESPRESSO range.
COFFEE TYPE
PLUNGER
DRIP FILTER
PERCOLATOR
ESPRESSO
(DUAL WALL)
ESPRESSO
(SINGLE WALL)
GRIND SIZE
COARSE
MEDIUM
COARSE
MEDIUM
FINE
EXTRA FINE
1-2
3-5
6-10
11-20
17-25
1 UP TO
12 SHOTS
1 UP TO
12 SHOTS
1 UP TO
12 SHOTS
1 UP TO
8 SHOTS
1 UP TO
8 SHOTS
GRIND SETTING
AMOUNT
OPERATING YOUR COFFEE GRINDER CG 8010
153124_CG_8010_EN_.indd Odd1:11
11
17.5.11 13:10
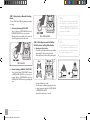
STEP 3: Using Auto or Manual Grinding
Mode
You can START and STOP the grinding operation
in 2 ways.
OR
1. Automatic Grinding (AUTO STOP)
• ‘Press & Release’ START/CANCEL button or
PORTAFILTER SWITCH once to activate.
• Grinding will automatically stop when the
selected grind amount is dispensed.
PORTAFILTER SWITCH
PRESS, HOLD & RELEASE
STEP 4: Grinding into your Portafilter,
Grind Container or Drip Filter Basket
1. Grinding into Portafilter
• Choose the cradle size that fits your portafilter
(either small 50-54mm or large 58mm).
• Slide cradle into position under grind outlet.
OR
NOTE:
You can grind direct into your portafilter
even if it does not fit into the cradles
supplied; without the cradle attached,
press the ‘PORTAFILTER SWITCH’ with
your finger or portafilter.
PORTAFILTER SWITCH
NOTE:
It is normal for the correct amount of
coffee to appear overfilled in your portafilter. Untamped coffee is three times
the volume of tamped coffee.
CRADLES
PRESS & RELEASE
50–54 mm
2. Manual Grinding (MANUAL START/STOP)
• ‘Press & Hold’ either START/CANCEL button
or PORTAFILTER SWITCH for as long as you
require. ‘Release’ START/CANCEL button or
PORTAFILTER SWITCH and the grinding will
stop.
PUSH
58 mm
•
•
•
12
Insert portafilter into cradle.
Use Automatic or Manual grinding function
to start operation using the START/CANCEL
or PORTAFILTER SWITCH.
Simply slide cradle out to remove.
OPERATING YOUR COFFEE GRINDER CG 8010
153124_CG_8010_EN_.indd Odd1:12
17.5.11 13:10
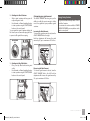
2. Grinding into Grind Container
• Slide in grind container with cap open directly under grind outlet.
• Use Automatic or Manual grinding function
to start operation using the START/CANCEL
button on the control panel.
You can grind into grind container without the
lid. However, we recommend keeping the lid on
to prevent coffee grinds from escaping.
OPEN CONTAINER
CAP
Customising your grind amount
The ADJUST AMOUNT function gives you the
ability to modify the preset amount to deliver
more or less grinds into your portafilter or grind
container.
Increasing the Grind Amount
To increase the grind amount selected, turn the
ADJUST AMOUNT dial to the right.
Each bar adjustment will increase the grind
amount by 5%, up to a maximum of 25% more.
Energy Saving Feature
The grinder will automatically switch off if not
used after 5 minutes.
To reactivate the machine whilst in POWER
SAVING/SLEEP MODE, press any button on the
grinder control panel.
INSERT UNDER
GRIND OUTLET
3. Grinding into Drip Filter Basket
• Place your drip filter basket under grind
outlet.
• Use Automatic or Manual grinding function
to start operation using the START/CANCEL
button on the control panel.
Decreasing the Grind Amount
To decrease grind amount selected, turn the
ADJUST AMOUNT dial to the left. Each bar
adjustment will decrease the grind amount by
5%, up to a minimum of 25% less.
OPERATING YOUR COFFEE GRINDER CG 8010
153124_CG_8010_EN_.indd Odd1:13
13
17.5.11 13:10
HINTS & TIPS
These hints and tips will help you to improve the results of grinding coffee and preparation of your favorite beverages.
•
Fresh grinds are the key to making coffee with
more flavour and body.
•
Store coffee beans in a dark, cool and dry place.
Vacuum seal if possible.
•
Do not store beans in the bean hopper for
a prolonged period.
•
Coffee flavour and strength is a personal
preference. Vary the type of coffee beans,
amount of coffee and fineness of grind to
achieve the flavour you prefer.
•
Buy in small batches to reduce the storage time
and store no more than one week’s supply at
any time.
•
When storing appliance, run grinder empty to
clear of ground beans left in chamber.
•
•
Once coffee is ground it quickly loses its flavour
and aroma. For the best results grind beans
immediately before brewing.
Run grinder for 2 seconds before each use for
maximum freshness.
•
Clean the bean hopper and conical burrs
regularly.
•
14
Use freshly roasted coffee beans, preferably
with a ‘roasted on’ date.
HINTS & TIPS
153124_CG_8010_EN_.indd Odd1:14
17.5.11 13:10
Care and Cleaning
PÉČE A ČIŠTĚNÍ
153124_CG_8010_EN_.indd Odd1:15
15
17.5.11 13:10
CARE AND CLEANING
1.
Make sure the device has been switched
off by pressing START/CANCEL button. The
device is switched off if push-dial backlight
has gone off. Unplug the power cord from
the power outlet before cleaning.
2.
Wash the grind container and lid, bean
hopper and lid in warm soapy water, rinse
and dry thoroughly.
3.
Wipe and polish exterior of appliance with
a soft damp cloth.
NOTE:
Do do not use alkaline or abrasive
cleaning agents, steel wool or scouring
pads, as these can damage the surface.
Storage
WARNING:
NEVER IMMERSE THE POWER BASE,
POWER CORD AND PLUG IN WATER OR
ANY OTHER LIGUID. DO NOT EXPOSE
THE DEVICE OR ANY ITS PART TO
MOISTURE.
1.
Ensure the appliance is switched off, cleaned
and dried before storing.
2.
Ensure all accessories are clean and dry.
3.
Wrap the power cord around the power cord
storage under the power base.
4.
Store the appliance upright position. Do not
place anything on top.
NOTE:
USE A SOFT CLOTH AND MILD DETERGENT
TO CLEAN THE APPLIANCE.
NOTE:
We recommend you do not clean any
grinder parts or accessories in the
dishwasher.
16
CARE AND CLEANING
153124_CG_8010_EN_.indd Odd1:16
17.5.11 13:10
Cleaning conical burrs
Regular cleaning helps the burrs achieve consistent grinding results which is especially important when grinding for espresso coffee.
1
Unlock hopper.
8
2
Remove beans.
9
Clean lower burr
Clean grind outlet
with cleaning brush. with brush.
3
Lock hopper.
10
4
Run grinder until
empty.
11
Push upper burr
Lock upper burr.
firmly into position.
5
6
7
Remove hopper.
Remove upper burr. Clean upper burr
with cleaning brush.
12
13
Align hopper into
position.
Lock hopper.
CARE AND CLEANING
153124_CG_8010_EN_.indd Odd1:17
17
17.5.11 13:10
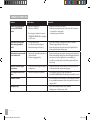
TROUBLESHOOTING
Problem
Possible Cause
What to Do
Grinder does not start after
pressing START/CANCEL
button.
•
•
Grinder not plugged in!
Grinder is overheated.
•
•
•
Bean hopper not attached correctly.
‘LOCK BEAN HOPPER’ will be displayed
on LCD screen.
•
Motor starts but no ground
coffee coming from grind
outlet.
•
•
•
Incorrect button press.
No coffee beans in bean hopper!
Grinder/bean hopper is blocked.
•
•
•
Press START/CANCEL or PORTAFILTER SWITCH to activate.
Fill bean hopper with fresh coffee beans.
Remove bean hopper. Inspect bean hopper & grind heads for
blockage. Replace parts and try again.
Motor starts but operates with
a loud ‘racket’ noise.
•
Grinder is blocked with foreign item or
chute is blocked.
Moisture clogging grinder.
•
•
•
Remove bean hopper, inspect burrs & remove any foreign body.
Clean burr heads and chute (refer to Care & Cleaning instructions).
Leave burrs to dry thoroughly before re-assembling. It is
possible to use a hair dryer to blow air into grinder inlet (lower
burr) to dry.
•
18
Plug power cord into power outlet.
Remove power plug from power outlet. Leave for 20 minutes to
cool down before using again.
Lock bean hopper into position.
Unable to lock bean hopper
into position.
•
Coffee beans obstructing bean hopper
locking device.
•
Remove bean hopper. Clear coffee beans from top of burrs. Relock bean hopper into position and try again.
Not enough/too much coffee
grind.
•
Grind amount requires adjustment.
•
•
Press AMOUNT button to change grind amount.
Use ADJUST AMOUNT dial to fine tune the amount ‘More or Less’.
Portafilter overfills.
•
It is normal for the correct amount of coffee to appear overfilled
in your portafilter. Untamped coffee is three times the volume of
tamped coffee.
Emergency stop?
•
•
Press START/CANCEL button to stop operation.
Unplug power cord from power outlet.
TROUBLESHOOTING
153124_CG_8010_EN_.indd Odd1:18
17.5.11 13:10
INSTRUCTIONS AND INFORMATION REGARDING THE DISPOSAL OF USED PACKAGING MATERIALS
Dispose of packaging material at a public waste disposal site.
DISPOSAL OF USED ELECTRICAL AND ELECTRONIC APPLIANCES
The meaning of the symbol on the product, its accessory or packaging indicates that this
product shall not be treated as household waste. Please, dispose of this product at your applicable collection point for the recycling
of electrical & electronic equipment waste. Alternatively in some states of the European Union or other European states you may
return your products to your local retailer when buying an equivalent new product. The correct disposal of this product will help save
valuable natural resources and help in preventing the potential negative impact on the environment and human health, which could be
caused as a result of improper liquidation of waste. Please ask your local authorities or the nearest waste collection centre for further
details. The improper disposal of this type of waste may fall subject to national regulations for fines.
For business entities in the European Union
If you wish to dispose of an electrical or electronic device, request the necessary information from your seller or supplier.
Disposal in other countries outside the European Union
If you wish to dispose of this product, request the necessary information about the correct disposal method from local government
departments or from your seller.
This product meets all the basic EU regulation requirements that relate to it.
Changes to the text, design and technical specifications may occur without prior notice and we reserve the right to make these changes.
153124_CG_8010_EN_.indd Odd1:19
17.5.11 13:10
COFFEE GRINDER
Due to continued product
improvement, the products
illustrated/photographed in
this brochure may vary slightly from the actual product.
W W W . C A T L E R . E U
CUSTOMER SERVICE
I N F O @ C A T L E R . E U
153124_CG_8010_EN_.indd Odd1:20
17.5.11 13:10