1
SENCOR
STT114BLUE
TURNTABLE
GRAMOFON
GRAMOFON
LEMEZJATSZO
GRAMOFON
ПРОИГРЫВАТЕЛЬ
PLOKSTELIU GROTUVAS
HA ar > COMPACT
USB MP3 y ONE
PLAYBACK TURNTABLE DIGITAL AUDIO
ENCODE
INSTRUCTION MANUAL
NAVOD K OBSLUZE
NAVOD NA OBSLUHU
HASZNALATI UTMUTATO
INSTRUKCJA OBSLUGI
РУКОВОДСТВО ПО ЭКСПЛУАТАЦИИ
VARTOTOJO VADOVAS
[EN] [CZ] [SK] [HU] [PL] [RU] [LT]
CONTENTS
Safety precautions
Device Description
Remote control
Installation of the device
Radio reception
Playing CD
Playback from USB
Playing records
LINE OUT
© Oo N о с во © N
EN-1
© Ww ©») © SS aa + N
—
o
1. SAFETY PRECAUTIONS
CAUTION: TO PREVENT FIRE OR ELECTIC SHOCK, DO NOT
DO NOT EXPOSE THE UNIT TO RAIN REMOVE THE DEVICE COVER (OR ITS BACK PART). THERE
OR MOISTURE TO PREVENT ARISK ARE NO SERVICEABLE PARTS THAT USER CAN REPAIR.
OF FIRE OR AN ELECTRIC SHOCK. REFER SERVICING TO QUALIFIED SERVICE PERSONNEL.
The lightning flash within an equilateral tnangle is intended to alert the user to the presence of uninsulated ,dangerous voltage”
within the unit's cabinet that may cause a risk of electric shock to persons.
The exclamation mark within an equilateral triangle is intended to alert the user to presence of important operating and maintenance
instructions in the instruction manual.
CAUTION: To operate the device correctly, read the instruction manual carefully and store in a safe place for future reference. If the device needs servicing or
maintenance, contact qualified personnel only.
CAUTION: In case of removing the cover, unplug the power cord from the power outlet at first.
1.
Read the instruction manual
Read all instruction manual carefully after unpacking the device. Follow all operating and other instructions in the manual.
. Power sources
This product should be operated only from the type of power source indicated on the making label. If you are not sure of the type of power supply to your
home, consult your product dealer or local power company. For products intended to operate from battery power or other sources, refer to the operating
instructions.
. Ventilation
Slots and openings in the cabinet are provided for ventilation. It protects it from overheating and ensures reliable operation of the product. Do not block or
cover these ventilation openings. The openings should never be blocked by placing the product on a bed, sofa, rug or other similar surface. This product
should not be placed In a built-In Installation such as a bookcase or rack unless proper ventilation is provided or manufacturer's Instructions have been
adhered to.
. High temperatures
Do nol place the device near the heating elements, stoves, fire place or other sources of heat (including amplifiers). Do not place any open flame
{e.g. buming candle) on the device.
. Water and moisture
Do not use this product near water for example near a bathtub, kitchen sink, in a wet basement, near a swimming pool and the like. Do not place any
objects (e.g. vases) filled with water on the device.
. Cleaning
Unplug this product from the wall outlet before cleaning. Do not use liquid cleaners or aerosol cleaners. Use a damp cloth for cleaning.
. Power cord protection
Power supply cords should be routed so that they are not likely to be walked on or pinched by items placed upon or against them, paying particular
attention to cords at plugs, konvenience receptacles, and the point where they exit from the product.
. Overloading
Do not overload wall outlets, extension cords, or integral convenience receptacles, as this can result in a risk of fire or electric shock.
. Lightning
For added protection for this product during a lightning storm, or when It is left unattended and unused for long periods of time, unplug it from the wall
outlet and disconnect the antenna or cable system. This will prevent from damage to the product due to lightning and power lines surges.
10. Object and liquid entry
Never push objects of any kind into this product through openings as they may touch dangerous voltage points or short-out parts that could result in a fire
or electric shock. Never spill liquid of any kind on the product.
EN-2
11. Plug-in
Do not use the types of connection that are not recommended by the manufacturer. Otherwise you risk a healthy or possession danger. The socket you
plug the power cord to or the AC adapter, must be easily accessible.
12. Accessories
Do nol place this product on an unstable cart, stand, tripod, bracket, or table. The producl may fall, causing serious injury to a child or adult and serious
damage to the product. Use only with a cart, stand, tripod, bracket, or table recommended by the manufacturer, or sold with the product. Any mounting of
the product should follow the manufacturer's instructions, and should use a mounting accessory recommended by the manufacturer. A product and cart
combination should be moved with care. Quick stop, excessive force, and uneven surface may cause the product and cart combination to overtum.
13. Loading
Do not step or place any heavy objects on the device. If such heavy object falls, it may cause an injury or damage the device.
14. Connection
If you connect the device to another device, turn off and unplug all devices. Before connecting always read carefully the connection guide and follow the
instructions.
15. Volume
Before turning on, always set the volume to minimum. In case of high volume you can damage your hearing or speakers.
16. Sound distortion
Do not leave the device to produce distorted sound for a long time. It can heat the speakers up and may cause a fire.
17. Earphones
Set reasonable volume level when using the earphones. The long-term listening at excessive volume can damage hearing.
18. Records
Do not use cracked, deformed or repaired records. They can break down or cause serious injury or damage the device.
19. Damage requiring service
Unplug this product form the wall outlet and refer servicing to qualified personnel under the following conditions:
a) when the power-supply cord or plug is damaged;
b) if liquid has been spilled or objects have fallen into the product;
c) if the product has been expose to rain or water;
а} if the product does not operate normally by following the operating instructions. Adjust only those controls that are covered by the operating
instructions as an improper adjustment of other controls may result in damage and will often require extensive work by qualified technician to restore
the product to its normal operation;
e) if the product has been dropped or damaged in any way;
f} when the product exhibits a distinct change in performance this indicates a need for service.
20. Servicing
Do not attempt to service this product yourself. As opening or removing the cover may expose you to dangerous voltage or other hazards. Refer all
servicing to qualified service personnel.
21. Replacement parts
When replacement parts are required, be sure the service technician has used replacement parts specified by the manufacturer or have the same
characteristics as the original part. Unauthorized substitutions may result in fire, electric shock, or other hazards.
22. Safety check
Upon completion of any service or repairs to this product, ask the service technician to perform safety checks to determine that the product is in proper
operaling condition.
EN-3
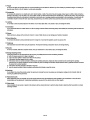
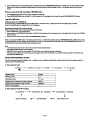
2. DEVICE DESCRIPTION
) Record player cover
) Tuning indicator
) Left amplifier
) LCD display
5) LED FM STEREO
6) Remote control sensor
7) CD tray
8) USB jack
9) VOLUME control
10) X-BASS button to enhance basses
11) RECORD button to start recording
12) REPEAT / INTRO / RANDOM button to select CD playback mode
13) Right amplifier
14) Tuning control TUNING
15) OPEN/CLOSE button to open and close the disk tray
16) SOURCE button to select media for playback (CD or USB)
17) BAND switch to select radio bandwidth
18) POWER OFF / FUNCTION switch to switch of the device/ to select the signal
source
19) Headphones jack (stereo jack with 3.5 mm diameter)
20) CD PLAY / PAUSE / STOP to start / pause / stop CD playback (»/11/H)
21) SKIP/SEARCH ppl button to skip to the beginning of the music track in
the CD recording forward or back (short pressure) / to find a desired location in
the recording (steady pressure). After skipping to the beginning of the required
song or after finding the desired location in the recording, the disk playback will
continue when you release the button.
22) FOLDER UP button to select folder with MP3 files recorded on CD / in the
memory of the connected USB drive
23) Turntable shaft adapter to play ELP records with large central opening
24) Switch to set speed of the turntable
25) Tone arm holder
26) AUTO-STOP switch to stop the record from continuing to turn after the play ends
27) LINE OUT jack for external processing of the audio output
28) Wire FM antenna
29) Power cord
EN-4
26
27
+ + + «e 0—# +000
996086809560
609668000090
o
29
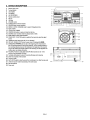
3. REMOTE CONTROL
Insert 2 AAA batteries (not included) in the battery compartment at the back of the remote control before using the remote
control.
FIND INFO
The functions of the remote control buttons are as follows:
REP/
INIRO/RAN PROGRAM
* FIND to find a file or a folder with MP3 files CC
* INFO to specify the speed of the data flow when converting songs from the record to MP3 format. Y GUIDED A
+ REC to start recording of the songs converted to MP3 format in the memory of the USB drive connected to the device - =
» REP/INTRO/RAN to select the desired mode for CD playback (repeat play/successive playback of the first 10 seconds of the MO =
songs from the disc/ random CD playback)
* PROGRAM to program the order of the playback of the songs from CD by the user
» PLAY/PAUSE to start/pause CD playback
+ SKIP/SEARCH button to skip to the beginning of the music track in the CD recording forward or back / to find a desired
location on the CD
* STOP 10 stop playback/cancel the user's programmed order of playback of the songs from CD
* FOLDER to select the desired folder with MP3 files
+ SOURCE to select the signal source (by repeated pressing)
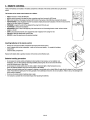
REMOTE CONTROL UNIT
Inserting batteries in the remote control
+ Remove the cover from the battery compartment at the back of the remote control.
* Insert 2 batteries AAA into the compartment — watch out for the correct polarity — it is marked in the battery
compartment.
* Close the battery compartment.
Replace both batteries after a significant reduction of the remote control effective reach.
Batteries handling precautions
* Do not expose the remote control and batteries to direct sunlight or heat sources, such as radiators, heat
exchangers, ovens or other appliances (including amplifiers) producing heat. Do not use or store the remote
control and batteries near an open flame.
* Do not expose the remote control sensor to direct sunlight or fluorescent light or other fluorescent sources.
These may affect the effective range of the remote control or its reliability.
* Remote control and batteries may not be exposed to dripping or running water and no objects filled with water should be placed on them, for example,
vases. Protect them from getting wet, from being sprayed or from spilled liquid of any kind. Do not use outdoors. Failure to do so, risks damage to the
remote control or batteries.
* Do not use the remote control or batteries close to water.
* |tis necessary to consider the environmental impact when liquidating the batteries.
EN-5
4. INSTALLATION OF THE DEVICE
Unpack the unit from the shipping carton and check it for damage. Store the material used for packaging the device out of reach of children until its
disposal. This material is fully recyclable — follow local regulations for its diposal.
+ Install the device as described in the preceding text of this manual.
+ The last step of the installation of the device is connecting it to the power outlet — after connecting the external components to the device and checking
the power grid voltage. You can find the voltage on e. g. the label on the meter — it must be the same as the voltage specified byt the manufacturer for the
device's power supply and indicated on its label.
* Leave some free space (a few cm) on all sides of the device — to ensure free air circulation around the device (it is necessary to dissipate heat produced
by the operation of the device).
* Insert the power cord plug of the device (29) into the power outlet.
* Setthe FUNCTION (18) switch to TUNER — the device is switched on, it is tuned to the last broadcasting radio station and the backlight of the tuner
switches on.
5. RADIO RECEPTION
Tuning
1. Set switch FUNCTION (18) to TUNER.
2. Using BAND switch (17) select a bandwidth (AM, FM or FM STEREO).
3. Using tuning control TUNING (14) tune the desired station.
4. Set the required volume using the VOLUME control (9).
Stereo/mono FM radio reception
1. For automatic FM stereo reception set the switch BAND (17) to FM STEREO. FM stereo receplion is indicated by the lighted LED FM STEREO (5).
2. In case of low-quality stereo signal (noise) set the switch BAND (17) to FM — in this switch setting you will receive all the FM stations mono, but in a better
quality.
Tips for radio reception
* The device uses a built-in ferrite antenna for the AM radio bandwidth. For optimal reception of the desired station, it is necessary to direct (tum) the whole
device.
The device uses a wire antenna for the FM radio bandwidth, permanently attached to the device. For best reception of a desired FM station, extend the
antenna and search for best position.
6. PLAYING CD
Inserting disc in the record player
1. Set the switch FUNCTION (18) to CD/USB.
2. Press OPEN/CLOSE (15) to open the disc fray (7).
3. Insert the disc in the disc tray with label facing up.
4, The evaluation of the disc will start and afterwards the display (7) will show data indicating the total number of tracks on the inserted disc and the total
playing time.
Start / pause / stop disc playback
1. Press PLAY/PAUSE/STOP button (20) to start playback — it will start with track No. 1. After playing the first track, all the following tracks will be
successively played, the playback stops with playing the last song.
In the course of playback, the display shows the number of the played song and the elapsed playing time.
2. To pause playback, press again PLAY/PAUSE/STOP (20) button — the display flashes information about the elapsed playing time. When you press PLAY/
PAUSE/STOP button again, the playback continues.
3. To stop playback, press and hold PLAY/PAUSE/STOP (20) button for more than 2 seconds.
Skipping to the beginning of songs / finding the desired location on the disc forward / backward
When playing audio CD:
To skip to the beginning of the song / finding the desired location on the disc use the SKIP/SEARCH b>M<< (21) button.
1. Press briefly the SKIP/SEARCH (P}>1) button during playback or pause, the player skips to the beginning of the following song and according to the
circumstances, either starts playback or stays in the pause mode. Press repeatedly this button to skip to the beginnings of following tracks.
2. Press briefly the SKIP/SEARCH (14) button during playback or pause, the player skips to the beginning of the currently played song and according to
the circumstances, either starts playback or stays in the pause mode. Press repeatedly this button to skip to the beginnings of previous songs.
EN-6
3. To find à desired location In the recording forward or backward, press and hold SKIP/SEARCH (>>) button, or 144). Once you find the desired location
(listening to the playback at somewhat increased speed and somewhat reduced volume), release the button — the playback continues from the found
location.
When you play CD-R with recordings of MP3/WMA files:
1. Press FOLDER UP (22) button to find the folder containing the desired file.
2. Press SKIPISEARCH (PD) button or (4) (21) to find the desired fils. To start playback of the found file, press PLAY/PAUSE/STOP (20) button.
Tags 1D3 of MP3 files
Displaying the title of the MP3AWMA filo
During the playback of the MP3/WMA files press the INFO button on the remote control — display shows the title of the played song (if it exists).
When you press INFO agaln the displayed title of the file disappears.
Searching for the desired fila or folder by the title
Switch the device to Stop mode and continue following these Instructions:
1. Press the FIND button on the remote control.
2. Press repeetedly the SKIPISEARCH (DI) button or (1) (21) and the display will show successively and in alphabetical order the titles of the MP3AVMA
files from the disc.
3. Select the file you want to pley and press the PLAY/PAUSE/STOP (20) button.
When you press again the FIND button on the remote control after step 1, and follow with repeated pressing of SKIP/SEARCH (PP) or (4< (21) the display
will show successively the titles of folders with MP3/WMA files from the disc. After selecting the desired folder, press the PLAY/PAUSE/STOP (20) button — all
the MP3/WMA files from the selected folder will be successively played.
Note:
a Ihe selected folder does not have a tie, None or Unknown will be displayed instead.
Only English alphabet characters can be displayed.
+ Only MP3 files made at data flow in the range of 32 to 256 kb/sec can be played by the player of this device.
Depending on the quality of the recording media and the program used to record the MP3 files, it is possible that the time needed to find MP3 filas may
vary significantly between discs.
REPEAT/INTRO/RANDOM (12) button
This button is designed to select the playback mode — pressing the button repeatediy during playback or before îts start will provide successive selection of
playback modes in the following order:
a) When playing CD audio:
(1)REPEAT 1 —# (2) REPEAT ALL TRACK—® (3) INTRO —® (4) RANDOM —® (5) OFF MODE
и
Playback mode Display
Replaying a song es)
Replaying all songs CIAL
Playing the first 10 seconds of recording of all songs INTRO
Playing a random selection of songs on the disc RANDOM
Switch to normal playback eee
b} When playing CD-R with MP3 recording:
(1) REPEAT 1 —® (2) REPEAT ALL TRACKS — (3) REPEAT 1 FOLDER
(6) OFF MODE <g— (5)RANDOM 1<— (4) INTRO PLAY
EN-7
Playback mode Display
Replaying file CD
Replaying all files CDALL
Replaying whole folder O) frowmeal
Playing first 10 seconds of every file in the selected folder INTRO
Playing random selection of files from the folder RANDOM
Switch to normal playback pe
Programmed playback
The player allows you to program up to 32 songs playing in order chosen by you.
Exit playback of the disc and follow these instructions:
1. Press the PROGRAM button on the remote control — the display shows PROG, a step in the programming (1 — 32) and the number of the song, which you
want to enter into the program.
. Press SKIPISEARCH (PD) or (1<<) (21) buttons to select a song which you want to insert in the program.
. Confirm selection by pressing PROG button.
. Repeat steps 2 and 3 to insert other songs in the program (max. 32).
. To play press the PLAY/PAUSE/STOP (20) button.
. To cancel the program, delete from the display the program by repeatedly pressing the PROGRAM info PROG button.
SO a a or
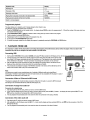
7. PLAYBACK FROM USB
It is necessary to switch off the player before connecting /disconnecting of the USB memory device to/from the player. Failure to observe this
instruction may risk loss or damage of the data recorded in the USB device.
Connecting USB
1. Set the switch FUNCTION (18) to position CD/USB and to play MP3 files recorded in USB display on the LCD (4) using the SOURCE (16) button USB.
2. Connect as shown to the USB jack on the left of the front panel of the player the USB memory device (USB
drive (,flash”), MP3 player, removable disk with USB connector, etc.). Pay attention to the correct connection
of the USB device to the player — incorrect connection may damage the connectors. Do not use force!
3. After the USB device will be connected, the player will evaluate the recording stored in the device and the
display will show information on the total number of recorded files and folders.
4. The procedures and playback functions of the MP3 files recorded in the memory of the USB device are the
same as the functions used to play CDs as described above.
Note:
USB devices are made by many manufacturers out of materials of different quality and using different
technologies. Therefore it might happen that some of those devices are not compatible with this player. In case of
problems with the USB device, use another one.
Conversion of files on CD/record to MP3 format
This player is equipped with circuits that allow conversion of files from CD audio or a record to MP3 format and
their saving to the connected USB device (USB disk, MP3 player, etc.).
Conversion of songs from audio CD
Conversion of a selected song
1. Start playing the CD with the song, which you want to convert to MP3 format.
2. Inthe course of playing the song, which you want to convert to MP3 format, press the REC (11) button — the display will show symbols USB*5=- and
(REG), and the conversion of the selected file to MP3 format will start.
3. The CD playback will automatically end in the same time when the conversion of the song is finished.
Conversion of the entire audio CD
1. Start playing the CD, which you want to convert to MP3 format.
2. After evaluation by the CD player, press the REC (11) - button and the display will show symbols US2*<=-- and (RES) and the conversion of the CD to
MP3 format will start.
3. The CD playback will automatically end in the same time when the conversion of the disc is finished.
EN-8
Conversion of programmed songs from audio CD
1. Program the playing of the songs, which you went to comvert lo the MP3 format.
2. Bian playing the programmed songs snd during play press and hold for 2 esconde the PLAYEPAUBERTOR (20) Entra. Tie priinys will switch bo Stop
mode.
3. Pros the REG {11) bution — the display will show symbols USB===- and GES) and he conversion of CD to the MP3 format will start.
4. CD playback wil end suricrradica wii ha completicn d' ha conversion df ha programmead songs.
Note:
The conversor ¿peed k the same as the playback speed.
The parameters of the comverslon to MP3 format: data flow speed 128 kbsac, 44,1 kHz sampling fequancy.
The Information labale (tage) [3 am not meorded,
Рашья carding by pressing he REC button, In cminue mcording, pros this bution agin.
The recording ls completed by recording tha entira song — If he recording vil and In fhe coures of playing, tha song will not be recorded.
Copying MP3 files from CD-R to USB device
When you Insert In the player Instead of sudie CO a disc with MP3 files, the files wil be copled from CD-R to USE device alter pressing the REC bution,
Conversion cf sangs from a record
1. But the seich FUNCTION (15) to PHONQ und ster] playing tha racand.
2. Presa the REC {11] bution — fhe display will ahow eymbola USB=<=-- and REO) and he convercion of fhe songa from record to MP3 format will start
3. The playing of tie record will end automatically wih complefon of the comverslon of the songs from the record to MP3 format.
Setting the data flow speed when converting the songs from a record to MP3 formal
The following selection of the dat flow speed Ln possible: 327 84 / 58.1 126.1 182 / 258 kieec.
1. Using the satich FUNCTION (18) show on the display PHONO.
2. Presa the INFO bution on the remote control — the display wil show default data flan speed {128 kb/eac.),
3. Proms BKIP/SEARCH (MM or (44) (21) to welect tha desired deta Kw apaed
4. Corfirm by pressing the INFObution
The division of songs during conversion of songs from a record to MPI format
To divide the MP3 1a, press TS on the emote comirel during the comverslon of songa from the record to MP3 format. The division of the cremtad Me (cnaation
of 2 nsw MP3 ln) will be confimmad by a shart daplay of PHONO.
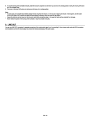
8. PLAYING RECORDS
Proparation
«LI the cover of the record player.
» Release the tone arm heidar a remove tha cover af the ions arm Insert — ses pictures.
al
tone am insert prod
+
needie assembiy -— E
Playing records
Set the eatich FUNCTION to PHORG — the device will be switched on to the use of the record player.
When plying EP record (oimrmeter 17 am) insect an adap on the Ут оао.
Places the record carefully on the turmiable.
Sel the selich for speed of the uring of the lumiable to the position marked on the record, which you want to play.
Rasa the one ami using the mieass [svar and mova it over the edge of he record (when you want ka play the entre record) or over the gap Inthe
recording on fhe record before the song that you wish to play — during the moving of the tona arm, the tumtable starts to um.
Gerry moving the tone arm lever, put he fone am down and piace the needle of the fone arm on the record.
Afr the record le played, the fumtable shoukl wip fuming sutcmelically (only when the wutich AUTO STOP cn the mer panel ks ast io ON). After the
record siope tuming, raie carstuily the fone am sing te lever for bone am release and mave ft io nexling (original) postion.
NE fp A
EN-8
8. To stop the tuming of the tumtable manually, raise the tone am using the tone arm lever up and move it to resting position. During the moving of the tone
arm, the tumtable stops.
9. Put cover on the insert of the tone arm and secure the tone arm in resting position.
Note:
* In some cases, the lurntable stops before playing the last song from the record, or in the course of playing the record. If thal happens, set the switch
AUTO STOP (26) to OFF position and after the record playing is finished, return the switch to ON position.
Secure the tone arm and put cover on the tone arm insert when moving the player — this way, both parts will be protected from damage.
* Never restrict the speed of the turning of the turntable or stop the tumtable manually.
9. LINE OUT
You can use LINE OUT connectors for separate processing of the output audio signal (e. g. for recording it). Use a stereo audio cable with RCA connectors
(not included) to connect the record player to a device for external processing of the audio output.
EN-10
INSTRUCTIONS FOR THE CORRECT DISPOSAL OF THE PRODUCT
Instructions and information regarding the disposal of used packaging materials
Dispose of packaging material at a public waste disposal site.
Disposal of used electrical and electronic appliances
The meaning of the symbol on the product, its accessory or packaging indicates that this product shall not be treated as household waste.
Please, dispose of this product at your applicable collection point for the recycling of electrical & electronic equipment waste. Alternatively in
some states of the European Union or other European states you may retum your products to your local retailer when buying an equivalent new
product.
ME The correct disposal of this product will help save valuable natural resources and help in preventing the potential negative impact on the
environment and human health, which could be caused as a result of improper liquidation of waste. Please ask your local authorities or the
nearest waste collection centre for further details. The improper disposal of this type of waste may fall subject to national regulations for fines.
For business entities in the European Union
If you wish to dispose of an electrical or electronic device, request the necessary information from your seller or supplier.
Disposal in other countries outside the European Union
If you wish to dispose of this product, request the necessary information about the correct disposal method from local government departments
or from your seller.
C € This appliance complies with EU rules and regulations regarding electromagnetic and electrical safety.
Changes to the text, design and technical specifications may occur without prior notice and we reserve the right to make these changes.
Copyright © 2012, Fast CR, a.s. Revision 04/2012
EN-11