Transcript
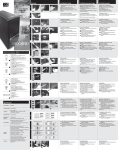
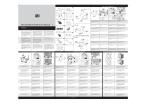
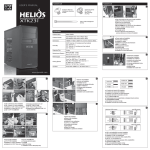
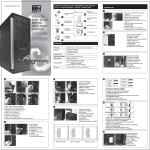
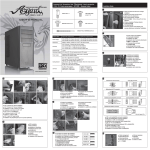
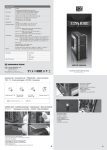
Cable Description ࢣ࣮ࣈࣝᵝ Kabelbeschreibung ቢՄఢॾဦ Descripción del Cable Cable Description Kablo Tanımı SPECIFICATION C XTK-TB-0400A XTK-TB-0500A / XTK-TB-0600A ɜ Connect the 6/6+2 pin PCI-Express connector to your graphic card if needed. ɜ ᵝ⾲ SPEZIFIKATION ESPECIFICACIÓN ఢॾܑ Spécifications SPESİFİKASYON Schließen Sie den 6/6+2-poligen PCI-ExpressStecker an die Grafikkarte an. ɜ ᚲせ僑ᛂ傾僌傎6/6+2 儸兗 / PCE-Express 儗儱儓儣僸儔免 XTK-TB-0400A 儹儇儧儓儏兠儭僑᥋⥆傽僤傿傏 ɜ Conecte el conector PCI-Express de 6/6+2 contactos ɜ тѣᅮࢋĂ707,3!qjo!QDJ.FyqsfttତᐝాତҌଋ۞ᘱဦΙĄ ɜ Connectez le connecteur PCIe 6/6+2 broches à en su tarjeta gráfica si es necesario. XTK-TB-0400A XTK-TB-0500A XTK-TB-0600A votre carte graphique si nécessaire. 20+4pin x1 12V 4+4pin (8pin) x1 x1 x1 x1 POWER FORCE ɜ Gerekliyse grafik kartınıza 6/6+2 pim PCI-Express konektörü takın. x1 x2 ɜ x2 x2 x0 x2 x0 x2 +5V +12V1 -12V +5VSB 20A 20A 30A 0.4A 2.5A 360W 4.8W 12.5W 130W 384W 400W XTK-TB-0500A Schließen Sie den 4-poligen Leistungssteckverbinder an Peripheriegeräte wie DVD- Brenner oder AC Input ɜ 4 儸兗㟁※儗儱儓儣僸䢢DVD䢢児儗兠儤傎儳兠儭儭免儈儺僐像僔࿘㎶儫儴儈儝僑᥋⥆傽僤傿傏 ɜ Conecte el conector de alimentación de 4 contactos en los dispositivos periféricos como ɜ 5!qjoତᐝాତҌᙝన౯ĂּтEWE፵ᐂ፟ăർჄ፟ඈĄ ɜ DVD-Yazıcı, sabit disk, ve vs. gibi çevresel aygıtlara 4 pim güç konektörünü takın. 2 115-230VAC DC Output Max Output Current +3.3V +5V +12V1 -12V +5VSB 20A 20A 37A 0.4A 2.5A 444W 4.8W 12.5W 130W Max Combined Wattage 3 x2 484W x6 x6 17.3W 500W Total Output SATA 17.3W Festplatten an. 1 Molex 4pin Max Output Current +3.3V Connect the 4 pin power connector to peripheral devices such as DVD-Burner, hard drive, and etc. grabadora de DVD, disco duro, etc. PCI-E 6pin DC Output Total Output ɜ x0 115-230VAC Max Combined Wattage D PCI-E 6+2pin AC Input x6 XTK-TB-0600A AC Input ɜ If you have S-ATA disk drives, connect the Serial ATA connectors provided. ɜ Wenn S-ATA-Festplatten vorhanden sind, sind auch Serial-ATA-Anschlüsse vorhanden. ɜ S-ATA䢢儳兠儭儫儇儝儓儭免儈儺傲储僱ሙྜ傎儛兎儆兏䢢ATA䢢儗儱儓儣僨傺⏝僑僐僲僤傿傏 ɜ Si hay unidades de disco duro S-ATA, también hay conectores Serial ATA disponiblessind auch 115-230VAC DC Output Max Output Current +3.3V +5V +12V1 -12V +5VSB 20A 20A 45A 0.4A 2.5A 540W 4.8W 12.5W Serial-ATA-Anschlüsse vorhanden. E-mail: [email protected] 2014© XIGMATEK Co., Ltd. All rights reserved. All trademarks are the property of their respective owners. 12cm COOLING FAN Made in China www.xigmatek.com http://www.xigmatek.com A ACCESORY KITS ᛳ੨І ZUBEHÖR Kits d’accessoire ࣃࢵࢣ࣮ࢪෆᐜ ɜ 4 mounting screws 4 Schrauben 4 僊僔ྲྀ僰傷儱儜 4 tornillos de montaje ɜ 5࣎ؠᓲක ɜ Quatre vis de montage 4 montaj vidası ɜ ɜ ɜ ɜ ɜ ɜ ɜ Power Supply Netzteil 㟁※⨨ Fuente de alimentación 3 ɜ ɜ User manual Benutzerhandbuch 兊兠儚兠儞兂儯光儆兏 Cable ties Manual del usuario ɜ ᄲځ३ ɜ Manuel de l’utilisateur Kullanım Kılavuzu ɜ Unité d’alimentation Güç Kaynağı ɜ 1 ɜ BDᏮˢቢ ɜ ɜ Cordon d’alimentation d’entrée AC AC Giriş güç kablosu ɜ ቢؠՁቢ ɜ Attaches de câble Kablo bağlantısı ɜ 2 INSTALLATION Installation ɜ 4 AC Input power cord AC-Eingangsstromkabel AC ධຊ㟁※儗兠儭 Cable de entrada de alimentación AC ɜ ɜ 3 INSTALLATION ɜ ɜ ɜ 5 ɜ ࣥࢫࢺ࣮ࣝᡭ㡰 INSTALACIÓN ɜ After installing the power supply unit into the chassis, connect the 20 + 4-pin main power cable to the 20 pin or 24 pin motherboard socket. ɜ Installieren Sie das Netzteil im Chassis, und schließen Sie den 20+4-poligen Hauptsteck- ɜ 㟁※⨨僸儛兇兠儛僑儈兗儝儬兠兏傽僅ᚋ傎20+4 儸兗㟁※儕兠儺兏僸兂儚兠兀兠儭僔䢢 20 儸兗僤僅僕䢢 24 儸兗儡儕儧 儬僑᥋⥆傽僤傿傏 ɜ Tras instalar la fuente de alimentación en el chasis, conecte el cable de alimentación principal de 20+4 contactos en el zócalo de 20 contactos o 24 contactos de la placa base. ɜ ֻᑕጡщ྅Ҍ፟ഥ̰̝ޢĂ31,5.qjoቢాତҌ፟۞ڕ31!qjoٕ35!qjo೧͋Ą ɜ Après avoir installé le bloc d’alimentation dans le châssis, connectez le câble d’alimentation 20+4 broches à l’interface 20 broches ou 24 broches de la carte mère. ɜ ɜ ɜ FEHLERBEHEBUNG 584W 17.3W 600W Total Output ࢺࣛࣈࣝࢩ࣮ࣗࢸࣥࢢ SOLUCIÓN DE PROBLEMAS Ⴗᙱଵྋ ɜ Trennen Sie, um einen Stromschlag zu vermeiden, das Netzkabel vom vorhandenen Netzteil vom Stromnetz. Das No Rules Power -Netzteil verfügt über einen automatischen Spannungswähler, der automatisch auf 100 – 240 V schaltet. Connect the 4/4+4 pin +12V auxiliary power ɜ Schließen Sie den 4/4+4-poligen +12v-Hilfssteckverbinder an das Motherboard an. ɜ Para evitar descarga eléctrica, desconecte el cable de alimentación de su fuente de alimentación actual. La fuente de alimentación No Rules Power Supply tiene un selector de voltaje automático que cambiará automáticamente a 100V-240V PSU. 4/4+4 儸兗䢭12v ⿵ຓ㟁※儗儱儓儣僸兂儚兠兀兠儭 僑᥋⥆傽僤傿傏 ɜ Conecte el conector de alimentación auxiliar ɜ ɜ Elektrik çarpmasını önlemek için, lütfen mevcut güç kaynağı ünitesinden güç kablosunu çıkarınız. No Rules Power Güç Kaynağının 100V-240V PSU’ya otomatik olarak değişecek olan otomatik voltaj selektörü vardır. ɜ 505,5!qjo,23wᛳቢాତҌ፟ڕĄ Connectez le connecteur d’alimentation 12V 4+4 broches à l’interface 4 broches ou 8 broches de la carte mère. Pour éviter des électrocutions, veuillez déconnecter le cordon d’alimentation de votre bloc d’alimentation existant. La série NRP de bloc d’alimentation est équipée d’un PFC actif pour l’entrée universelle 100-240VCA, et l’utilisateur n’a pas besoin de changer la sélection de la tension d’entrée. ɜ Anakarta 4/4+4 pim +12V harici güç konektörünü takın. 1 2 If there is no DC output and the fan or fans remain motionless, check: •Is the AC inlet plug firmly plugged into the PSU inlet socket? •Is the wall socket, extension power cord, power strip or surge protector in use, fully functional and wall power switch turned ‘ON’? •Is the Main Board socket (20+4 pin) plug fully and firmly inserted? Condition 2 ࣇࣥࡀᅇ㌿ࡍࡿࡀࠊࡍࡄṆࡲࡗ࡚ࡋࡲ࠺ࠋ᧯స୰ࢩࢫࢸ࣒ ࡀࣇ࣮ࣜࢬࡍࡿࠋ☜ㄆ㡯: • ࿘㎶ࢥࢿࢡࢱࡣࠊࣁ࣮ࢻࢻࣛࣈࡸ CD-ROM ࡞ࡢᶵჾࡋࡗ ࡾ᥋⥆ࡉࢀ࡚࠸ࡲࡍ? • ࣉࣛࢢࡀ࠺ࡗࡾᾘ࠼࡚࠸ࡓࡾࠊ㏫ࡢ⨨࡛ᕪࡋ㎸ࡲࢀ࡚࠸ࡿሙྜࡣ AC 㟁※ࢆྲྀࡾእࡋࠊᗘၥ㢟ࡢ࠶ࡿࢥࢿࢡࢱ᥋⥆ࡋ࡚ࡳ࡚ࡃࡔࡉ ࠸ࠋAC 㟁※ࢆࡶ࠺୍ᗘᕪࡋ㎸ࡴ๓ࠊ30 ⛊㛫࠾ᚅࡕࡃࡔࡉ࠸ࠋ If the fan or fans began rotating but stopped and the system failed to proceed any further, check: •Are the peripheral connectors firmly plugged into accessory devices, such as the main hard drive, CD ROM, etc? •If a plug has been inadvertently connected in an off-set or reversed position, unplug the AC power source, reconnect the offending connectors and then wait 20 seconds before plugging in the AC power. ὀ㸸ࡶࡋୖグࡢ᪉ἲ࠾ࡾ᧯సࡋ࡚ࡶࠊ㟁※ࡀ౫↛ṇᖖືసࡋ ࡞࠸ሙྜࠊࡲࡎXigmatek ࡢබᘧࢧࢺwww.xigmatek.com ࢡࢭࢫࡋ࡚࠸ࡓࡔࡁࡲࡋ࡚ࠊFAQ ࢆࡈ☜ㄆࡋ࡚࠸ࡓࡔࡁࡲࡍࡼ ࠺࠾㢪࠸࠸ࡓࡋࡲࡍࠋࡑࢀ࡛ࡶၥ㢟ࡀゎỴࡉࢀ࡞࠸ሙྜࡣ㈍ ᗑᵝࡈ┦ㄯࡃࡔࡉ࠸ࠋ Note: If the power supply is still unable to power up after f o l l o w i n g a b o v e i n s t r u c t i o n , p l e a s e v i s i t FA Q p a g e o f XIGMATEK official website(www.xigmatek.com), to find out the solution of similar problem. If there is no any solution, please send the unit back to your dealer or retailer for after service. Zustand 1 Pas de sortie CC. Le ventilateur ne bouge pas. Veuillez vérifier: •Est-ce que la prise d’entrée CA est solidement connectée à l’interface d’entrée du bloc d’alimentation? •Est-ce que la prise de courant murale, la rallonge électrique, la bande d’alimentation ou le disjoncteur utilisé sont bien fonctionnel et mis sur “MARCHE”? •Est-ce que l’interface 20+4 broches de la carte mère et la prise 12V 4+4 broches sont solidement connectées à fond? connector to the motherboard. ឤ㟁僸㜵傶僅僧傎᪤Ꮡ僔㟁※⨨傱僯㟁※儗兠儭僸ྲྀ僰እ傽僌債僆傻傪傏No Rules Power 㟁※⨨僑僕⮬ື㟁ᅽ㑅ᢥᶵ⬟傲ᦚ㍕傻僲僌傪僱僅僧傎 100V-240V PSU䢢僸⮬ືⓗ僑ኚ᭦傿僱傹僎傲働傳僤傿傏 de 4/4+4 contactos +12v en la placa base. ࠎᔖҺᛈĂኛனѣֻᑕጡ۞ቢଂ೧ळ˯٥˭ĄOp! Svmft!Qpxfsֻᑕጡ౯ҋજᑅᏴፄ྅ཉĂΞҋજតՀࠎ 211W.351W!QTVĄ! Condition 1 Condition 1 B To prevent electrical shocks, please disconnect the power cord from your existing power supply unit. No Rules Power Power Supply has automatic voltage selector which will automatically change to 100V-240V PSU. ≧ἣ䢢1 Kasanın içine güç kaynağı ünitesini kurun ve daha sonra anakart 20 pim veya 24 pim sokete 20+4-pim ana güç kablosunu takın. щ྅Վូ KURULUM ɜ ɜ Eğer burada S-ATA sabit disk sürücüleri mevcutsa, burada ayrıca Seri ATA konektörleri mevcuttur. ≧ἣ䢢2 ɜ ɜ 130W Max Combined Wattage DVD, disque dur, etc ɜ DC䢢ฟຊ傲僐傪傏儹儅兗傲ື傱僐傪傏☜ㄆ㡯䢼 • AC䢢ධຊ儻免儔僕傽僉傱僰僎䢢PSU䢢儡儕儧儬ᕪ㎸ཱྀ僑ᕪ傽㎸僤僲僌傪僤傿傱䣁䢢 • ቨ僔儗兗償兗儬傎ᘏ㛗儗兠儭傎儕兠儺兏儣儧儻傎儙兠儜ಖㆤ僐像僕ṇᖖ僑ᶵ⬟ 傽僌傰僰傎ቨ僔㟁※僕䢢䯔儎兗䯕䢢僔≧ែ僑储僰僤傿傱䣁䢢 • 充儈兗兀兠儭儡儕儧儬䢢䢪20+4儸兗䢫䢢儻免儔僕僑ᕪ傽㎸僤僲僌傪僤傿傱䣁 verbinder an den 20- oder 24-poligen Sockel auf dem Motherboard an. Cable ties Kabelklammern 儕兠儺兏␃僧ල Cable kits bag Fijadores de cables ɜ 2 ֻᑕጡ ɜ ɜ Connectez les connecteurs SATA et Molex 4 broches à des périphériques comme un graveur de Dépannage PROBLEMLERİN GİDERİLMESİ AKSESUAR KİTLERİ ɜ ɜ тڍѣT.BUBർჄ፟ĂώயݡϺѣTfsjbm!BUBତᐝΞֹֻϡĄ ɜ TROUBLESHOOTING KITS DE ACCESORIOS 1 ɜ ɜ Keine DC-Ausgabe. Der oder die Lüfter bewegen sich nicht. Prüfen Sie: •Ist der AC-Eingangsstecker richtig an den Netzteilanschluss angeschlossen •Funktionieren die Netzsteckdose, das Verlängerungskabel, die Steckerleiste oder der Spannungsschutz richtig, und ist das Gerät eingeschaltet (‘ON’)? •Ist der Motherboard-Stecker (20+4-polig) richtig angeschlossen? Zustand 2 Condition 6 2 Le ventilateur commence à tourner puis s’arrête. Le système s’interrompt sans reprendre. Veuillez vérifier: •Est-ce que les connecteurs de périphérique sont solidement connectés aux appareils, tels que le disque dur primaire, CD-ROM, etc. •Si une prise a été connectée par inadvertance dans une mauvaise position ou une position inverse, débranchez le cordon d’alimentation, reconnectez les connecteurs fournis puis patientez 30 secondes avant de rebrancher le cordon d’alimentation et réessayer. Remarque: Si l'alimentation ne peut toujours pas être mise sous tension malgré les instructions ci-dessus, visitez la page FAQ du site web officiel de XIGMATEK (www.xigmatek.com) pour consulter la solution d’un problème similaire. Il n’y a aucune solution, veuillez contacter votre vendeur ou distributeur pour le service après-vente. 5 Der oder die Lüfter haben sich gedreht, aber laufen jetzt nicht mehr. Das System ist hängen geblieben. Prüfen Sie: •Sind die Peripherieanschlüsse richtig an die Geräte wie Festplatte, CD-ROM-Laufwerk usw. angeschlossen? •Wenn ein Stecker falsch herum eingesteckt wurde, trennen Sie das Gerät vom Stromnetz. Drehen Sie den entsprechenden Stecker um, und warten Sie 30 Sekunden, bis Sie das Gerät wieder an das Stromnetz anschließen und einschalten. Achtung: Sollte das Power Supply nach den oben genannten Instruktionen immer noch nicht starten, besuchen Sie bitte das offizielle FAQ der der Xigmatek Webseite (www.xigmatek. com), um eventuell ein solches Problem zu ergründen. Sollte sich dennoch keine Lösung anbieten, dann senden Sie bitte Ihre PSU zurück an den „Händler“ oder den „Retailer“ bei dem Sie es erworben haben um den Austausch zu ermöglichen. Estado 1 Sin salida DC. El ventilador o ventiladores no se mueve(n). Comprobar: •¿Está el enchufe de entrada AC bien conectado en el zócalo de entrada de la PSU? •¿Está la toma de corriente de la pared, cable de extensión, regleta de alimentación o protector de subida de tensión en la posición ‘ON’? •¿Está el enchufe del zócalo de la placa base (20+4 contactos) bien insertado hasta el fondo? Estado 2 El ventilador o ventiladores han comenzado a girar y luego se han detenido. El sistema se detiene sin responder. Compruebe: •¿Están los conectores de los periféricos bien enchufados en sus dispositivos como disco duro principal, CD ROM, etc.? •Si se ha conectado un enchufe sin querer en una posición invertida o al revés, desenchufe la fuente de alimentación AC, vuelva a conectar los conectores mal colocados y luego espere 30 segundos antes de volver a conectar la fuente de alimentación AC para probar. Nota: Si la fuente de alimentación sigue sin poder arrancar después de seguir estas instrucciones, visite por favor la página oficial de XIGMATEK, www.xigmatek.com, para encontrar la solución ofrecida a un problema similar. Si no encuentra ninguna solución, por favor, devuelva la unidad a su distribuidor o a la tienda donde la haya adquirido para poder atenderle mejor. ڶې2 ED ᏮĄࢲै՟ѣજүĄᑭߤĈ BD ೧ᐝߏӎ̏ቁ၁೧ˢ QTV ೧͋ĉ ᒒጨ೧ळăܜؼቢăቢֹٕϡ̚۞ࡎܲگ᜕྅ཉߏӎΑਕϒ ૱ᒒጨฟᙯߏӎ̏གྷฟୁĉ! ߏӎ̏གྷԆͷቁ၁೧ˢ፟ڕ೧͋ )31,5!qjo*ĉ ڶې3 ࢲैѣฟؕᖼજҭ˫ઃͤ˞Ąր༊፟ͷ՟ѣЇңજүĄᑭߤĈ ᙝన౯ତᐝߏӎ̏ቁ၁೧ˢІ྅ཉĂּтࢋർჄ፟ăDE! SPNඈĉ! т̙ڍຕ೧ᐝ೧ˢ˧۞೧ٕ͋࠹ͅҜཉĂኛ٥ੵBDĂ ࢦາాତѣયᗟ۞ତᐝĂޢඈ࣏41ࡋĂГࢦາ೧ˢቢ֭Гྏ ˘ѨĄ! ොĈтֶڍ˯͞ڱፆү̝ޢĂֻᑕጡ̪ୁڱજĂኛА ౄణYJHNBUFL͞ءშ৭۞GBRವՐ࠹Ҭયᗟ۞ྋඍĄࡶ̪ڱྋՙ યᗟĂኛώயݡਖ਼аགྷዚથٕથତצڇޢચĄ 6