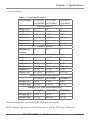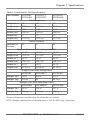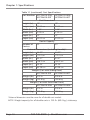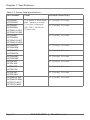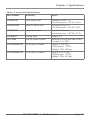
1
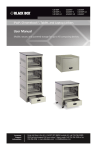
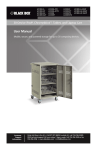
UCCDS20T UCCDS40H UCCDM36TUCCDL27H UCCDM-10-40T UCCDS20H UCCDM18T UCCDM36HUCCDL36T UCCDM-10-40H UCCDS30TUCCDM18HUCCDL18T UCCDL36H UCCDM-12-48T UCCDS30H UCCDM27T UCCDL18H UCCDM-10-30T UCCDM-12-48H UCCDS40TUCCDM27HUCCDL27T UCCDM-10-30HUCCDS-12-48T UCCDS-12-48H iPad®, Chromebook®, Tablet, and Laptop Cart, Double Frame Mobile, secure, and powered storage for up to 18, 20, 27, 30, 36, 40, or 48 computing devices. The perfect storage solution for tablets, notebooks, and laptops. Customer Support Information Order toll-free in the U.S.: Call 877-877-BBOX (outside U.S. call 724-746-5500) FREE technical support 24 hours a day, 7 days a week: Call 724-746-5500 or fax 724-746-0746 • www.blackbox.com • [email protected] FCC and IC RFI Statements/NOM Statement FEDERAL COMMUNICATIONS COMMISSION AND INDUSTRY CANADA RADIO FREQUENCY INTERFERENCE STATEMENTS This equipment generates, uses, and can radiate radio-frequency energy, and if not installed and used properly, that is, in strict accordance with the manufacturer’s instructions, may cause interference to radio communication. It has been tested and found to comply with the limits for a Class A computing device in accordance with the specifications in Subpart B of Part 15 of FCC rules, which are designed to provide reasonable protection against such interference when the equipment is operated in a commercial environment. Operation of this equipment in a residential area is likely to cause interference, in which case the user at his own expense will be required to take whatever measures may be necessary to correct the interference. Changes or modifications not expressly approved by the party responsible for compliance could void the user’s authority to operate the equipment. This digital apparatus does not exceed the Class A limits for radio noise emission from digital apparatus set out in the Radio Interference Regulation of Industry Canada. Le présent appareil numérique n’émet pas de bruits radioélectriques dépassant les limites applicables aux appareils numériques de la classe A prescrites dans le Règlement sur le brouillage radioélectrique publié par Industrie Canada. Normas Oficiales Mexicanas (NOM) Electrical Safety Statement INSTRUCCIONES DE SEGURIDAD 1. Todas las instrucciones de seguridad y operación deberán ser leídas antes de que el aparato eléctrico sea operado. 2. Las instrucciones de seguridad y operación deberán ser guardadas para referencia futura. 3. Todas las advertencias en el aparato eléctrico y en sus instrucciones de operación deben ser respetadas. Page 2 724-746-5500 | blackbox.com UCCDM20T NOM Statement 4. Todas las instrucciones de operación y uso deben ser seguidas. 5. El aparato eléctrico no deberá ser usado cerca del agua—por ejemplo, cerca de la tina de baño, lavabo, sótano mojado o cerca de una alberca, etc. 6. El aparato eléctrico debe ser usado únicamente con carritos o pedestales que sean recomendados por el fabricante. 7. El aparato eléctrico debe ser montado a la pared o al techo sólo como sea recomendado por el fabricante. 8. Servicio—El usuario no debe intentar dar servicio al equipo eléctrico más allá lo descrito en las instrucciones de operación. Todo otro servicio deberá ser referido a personal de servicio calificado. 9. El aparato eléctrico debe ser situado de tal manera que su posición no interfiera su uso. La colocación del aparato eléctrico sobre una cama, sofá, alfombra o superficie similar puede bloquea la ventilación, no se debe colocar en libreros o gabinetes que impidan el flujo de aire por los orificios de ventilación. 10. El equipo eléctrico deber ser situado fuera del alcance de fuentes de calor como radiadores, registros de calor, estufas u otros aparatos (incluyendo amplificadores) que producen calor. 11. El aparato eléctrico deberá ser connectado a una fuente de poder sólo del tipo descrito en el instructivo de operación, o como se indique en el aparato. 12. Precaución debe ser tomada de tal manera que la tierra fisica y la polarización del equipo no sea eliminada. 13. Los cables de la fuente de poder deben ser guiados de tal manera que no sean pisados ni pellizcados por objetos colocados sobre o contra ellos, poniendo particular atención a los contactos y receptáculos donde salen del aparato. 14. El equipo eléctrico debe ser limpiado únicamente de acuerdo a las recomendaciones del fabricante. 15. En caso de existir, una antena externa deberá ser localizada lejos de las lineas de energia. UCCDM20-T 724-746-5500 | blackbox.com Page 3 NOM Statement 16. El cable de corriente deberá ser desconectado del cuando el equipo no sea usado por un largo periodo de tiempo. 17. Cuidado debe ser tomado de tal manera que objectos liquidos no sean derramados sobre la cubierta u orificios de ventilación. 18. Servicio por personal calificado deberá ser provisto cuando: A: El cable de poder o el contacto ha sido dañado; u B: Objectos han caído o líquido ha sido derramado dentro del aparato; o C: El aparato ha sido expuesto a la lluvia; o D: El aparato parece no operar normalmente o muestra un cambio en su desempeño; o E: El aparato ha sido tirado o su cubierta ha sido dañada. Page 4 724-746-5500 | blackbox.com UCCDM20T Trademarks Used In This Manual Trademarks Used In This Manual Black Box and the Double Diamond logo are registered trademarks of BB Technologies, Inc. Any other trademarks mentioned in this manual are acknowledged to be the property of the trademark owners. UCCDM20-T 724-746-5500 | blackbox.com Page 5 Table of Contents Table of Contents 1. Specifications ....................................................................................................... 7 2. Overview............................................................................................................ 14 2.1 Introduction........................................................................................ 14 2.2 What‘s Included ................................................................................. 14 2.3 Hardware Description......................................................................... 15 3. Electrical Precautions.......................................................................................... 16 3.1 Other Precautions .............................................................................. 16 4. Configuration and Setup ................................................................................... 17 4.1 Installing the Handle .......................................................................... 17 4.2 Routing the Cable .............................................................................. 18 4.3 Fastening the Power Bricks and Routing the Cable.............................. 19 5. Using Your Cart.................................................................................................. 21 5.1 Charging Your Computers ................................................................. 21 5.2 Moving Your Cart .............................................................................. 21 5.3 Timer Instructions............................................................................... 23 Page 6 724-746-5500 | blackbox.com UCCDM20T Chapter 1: Specifications 1. Specifications Table 1-1. Cart Specifications Part Number UCCDS20T, UCCDS30T, UCCDS20H UCCDS30H UCCDS40T, UCCDS40H Slot Dimensions Height (in.) 13" 13" 13" Height (cm) 33.02 cm 33.02 cm 33.02 cm Width (in.) 1.36" 1.3.6" 1.36" Width (cm) 3.45 cm 3.45 cm 3.45 cm Depth (in.) 10" 10" 10" Depth (cm) 25.4 25.4 cm 25.4 cm Device Capacity Number of Devices 20 30 40 External Dimensions (Including Handle)* Height (in.) 44.27" 44.27" 44.27" Height (cm) 112.4 cm 112.4 cm 112.4 cm Width (in.) 54.41" 54.41" 54.41" Width (cm) 138.2 cm 138.2 cm 138.2 cm Depth (in.) 25.35" 25.25" 25.35" Depth (cm) 64.38 cm 64.38 cm 64.38 cm Weight (Cart with Sliding Door) UCCDS20T UCCDS30T UCCDS40T Weight (lb.) 164 lb. 176 lb. 188 lb. Weight (kg) 74.4 kg 79.8 kg 85.3 kg Weight (Cart with Solid Steel Door) UCCDS20H UCCDS30H UCCDS40H Weight (lb.) 179 lb. 191 lb. 203 lb. Weight (kg) 81.2 kg 86.6 kg 92.1 kg *External dimensions are the same for all double cart models. NOTE: Weight capacity for all double carts is 150 lb. (68.2 kg), stationary. UCCDM20-T 724-746-5500 | blackbox.com Page 7 Chapter 1: Specifications Table 1-1 (continued). Cart Specifications Part Number UCCDM18T, UCCDM18H UCCDM27T, UCCDM27H UCCDM36T, UCCDM36H Slot Dimensions Height (in.) 13" 13" 13" Height (cm) 33.02 cm 33.02 cm 33.02 cm Width (in.) 1.53" 1.53" 1.53" Width (cm) 3.89 cm 3.89 cm 3.89 cm Depth (in.) 15" 15" 15" Depth (cm) 38.1 cm 38.1 cm 38.1 cm Number of Devices 18 Device Capacity 27 36 External Dimensions (Including Handle)* Height (in.) 44.27" 44.27" 44.27" Height (cm) 112.4 cm 112.4 cm 112.4 cm Width (in.) 54.41" 54.41" 54.41" Width (cm) 138.2 cm 138.2 cm 138.2 cm Depth (in.) 25.35" 25.35" 25.35" Depth (cm) 64.38 cm 64.38 cm 64.38 cm Weight (Cart with Sliding Door) UCCDM18T UCCDM27T UCCDM36T Weight (lb.) 170 lb. 185 lb. 200 lb. Weight (kg) 77.1 kg 83.9 kg 90.7 kg Weight (Cart with Solid Steel Door) UCCDM18H UCCDM27H UCCDM36H Weight (lb.) 185 lb. 200 lb. 215 lb. Weight (kg) 83.9 kg 90.7 kg 97.5 kg *External dimensions are the same for all double cart models. NOTE: Weight capacity for all double carts is 150 lb. (68.2 kg), stationary. Page 8 724-746-5500 | blackbox.com UCCDM20T Chapter 1: Specifications Table 1-1 (continued). Cart Specifications Part Number UCCDL18T, UCCDL18H UCCDL27T, UCCDL27H UCCDL36T, UCCDL36H Slot Dimensions Height (in.) 13" 13" 13" Height (cm) 33.02 cm 33.02 cm 33.02 cm Width (in.) 1.53" 1.53" 1.53" Width (cm) 3.89 cm 3.89 cm 3.89 cm Depth (in.) 17" 17" 17" Depth (cm) 43.18 cm 43.18 cm 43.18 cm Number of Devices 18 Device Capacity 27 36 External Dimensions (Including Handle)* Height (in.) 44.27" 44.27" 44.27" Height (cm) 112.4 cm 112.4 cm 112.4 cm Width (in.) 54.41" 54.41" 54.41" Width (cm) 138.2 cm 138.2 cm 138.2 cm Depth (in.) 25.35" 25.35" 25.35" Depth (cm) 64.38 cm 64.38 cm 64.38 cm Weight (Cart with Sliding Door) UCCDL18T UCCDM27T UCCDL36T Weight (lb.) 176 lb. 194 lb. 212 lb. Weight (kg) 79.8 kg 88 96.2 kg Weight (Cart with Solid Steel Door) UCCDL18H UCCDM27H UCCDL36H Weight (lb.) 191 lb. 209 lb. 227 lb. Weight (kg) 86.6 kg 94.8 kg 103 kg *External dimensions are the same for all double cart models. NOTE: Weight capacity for all double carts is 150 lb. (68.2 kg), stationary. . UCCDM20-T 724-746-5500 | blackbox.com Page 9 Chapter 1: Specifications Table 1-1 (continued). Cart Specifications Part Number UCCDM-10-30H, UCCDM-10-30T UCCDM-10-40H, UCCDM-10-40T Slot Dimensions Height (in.) 13" 13" Height (cm) 33.02 cm 33.02 cm Width (in.) 1.36" 1.36" Width (cm) 3.45 cm 3.45 cm Depth (in.) 13" 13" Depth (cm) 33.02 cm 33.02 cm Number of Devices 30 Device Capacity 40 External Dimensions (Including Handle)* Height (in.) 44.27" 44.27" Height (cm) 112.4 cm 112.4 cm Width (in.) 54.41" 54.41" Width (cm) 138.2 cm 138.2 cm Depth (in.) 25.35" 25.35" Depth (cm) 64.38 cm 64.38 cm Weight (Cart with Sliding Door) UCCDM-10-30T UCCDM-10-40T Weight (lb.) 273 lb. 305.6 lb. Weight (kg) 123.8 kg 138.6 kg Weight (Cart with Solid Steel Door) UCCDM-10-30H UCCDM-10-40H Weight (lb.) 273 lb. 305.6 lb. Weight (kg) 123.8 kg 138.6 kg *External dimensions are the same for all double cart models. NOTE: Weight capacity for all double carts is 150 lb. (68.2 kg), stationary. Page 10 724-746-5500 | blackbox.com UCCDM20T Chapter 1: Specifications Table 1-1 (continued). Cart Specifications Part Number UCCDM-12-48T, UCCDM-12-48H UCCDS-12-48T, UCCDS-12-48H Slot Dimensions Height (in.) 13" 13" Height (cm) 33.02 cm 33.02 cm Width (in.) 1.12" 1.12" Width (cm) 2.84 cm 2.84 cm Depth (in.) 15" 10" Depth (cm) 38.1 cm 25.4 cm Number of Devices 48 Device Capacity 48 External Dimensions (Including Handle)* Height (in.) 44.27" 44.27" Height (cm) 112.4 cm 112.4 cm Width (in.) 54.41" 54.41" Width (cm) 138.2 cm 138.2 cm Depth (in.) 25.35" 25.35" Depth (cm) 64.38 cm 64.38 cm Weight (Cart with Sliding Door) UCCDM-12-48T UCCDS-12-48T Weight (lb.) 309.6 lb. 295.6 lb. Weight (kg) 140.4 kg 134.1 kg Weight (Cart with Solid Steel Door) UCCDM-12-48H UCCDS-12-48H Weight (lb.) 309.6 lb. 295.6 lb. Weight (kg) 140.4 kg 134.1 kg *External dimensions are the same for all double cart models. NOTE: Weight capacity for all double carts is 150 lb. (68.2 kg), stationary. UCCDM20-T 724-746-5500 | blackbox.com Page 11 Chapter 1: Specifications Table 1-2. Power Strip Specifications Part Number Timer Included Power Strips (1) 4-outlet, 4-bank timer with ”always-on outlet,” 15-minute increments, UCCDS30T, 100–125 V, 50–60 Hz, UCCDS30H, UCCDM-10-30T, 15 amp max. UCCDM-10-30H (2) 12-outlet, 15 A max. UCCDS40T, UCCDS40H, UCCDM-10-40T, UCCDM-10-40H (4) 12-outlet, 15 A max. UCCDM18T, UCCDM18H (2) 12-outlet, 15 A max. UCCDM27T, UCCDM27H (3) 12-outlet, 15 A max. UCCDM36T, UCCDM36H (3) 12-outlet, 15 A max. UCCDL18T, UCCDL18H (2) 12-outlet, 15 A max. UCCDL27T, UCCDL27H (3) 12-outlet, 15 A max. UCCDL36T, UCCDL36H (3) 12-outlet, 15 A max. UCCDM-12-48T, UCCDM-12-48H, UCCDS-12-48T, UCCDS-12-48H (4) 12-outlet, 15 A max. UCCDS20T, UCCDS20H Page 12 (3) 12-outlet, 15 A max. 724-746-5500 | blackbox.com UCCDM20T Chapter 1: Specifications Table 1-3. Accessories Specifications Part Number Accessory Specs UCCSHELFS Small device shelf Number of Slots: 10; Slot Dimensions: 1.32"W x 10"D UCCSHELFM Medium device shelf Number of Slots: 9; Slot Dimensions: 1.52"W x 15"D UCCSHELFL Large device shelf Number of Slots: 9; Slot Dimensions: 1.52"W x 17"D UCCSHELF Storage shelf Height: 2U UCC-PPM Pop-up power module Recesses into top laminate of cart, 2-outlet, 110–125 V UCCDRAWER-2U 2U Accessory Drawer Height: 3.5"H (2U); Cable Access: 1.75"D; Weight: 15 lb. (6.8 kg) UCCDRAWER-3U 3U Accessory Drawer Height: 5.25"H (3U); Cable Access: 1.75"D; Weight: 18 lb. (8.2 kg) UCCDM20-T 724-746-5500 | blackbox.com Page 13 Chapter 2: Overview 2. Overview 2.1 Introduction The iPad®, Chromebook®, Tablet, and Laptop Cart is designed to store, charge, and transport tablets, e-readers, laptops, netbooks, and other similar devices. Units are available with capacities for 18, 20, 27, 30, 36, or 40 separate storage slots. Each unit plugs into a typical 120-volt 15-amp outlet. Carts are available with Sliding or solid-steel doors. Please read these operating instructions carefully. They contain important advice concerning the use and safety of your cart. This iPad, Chromebook, Tablet, and Laptop Cart must only be used for its intended purpose in accordance with these operating instructions. 2.2 What‘s Included • iPad, Chromebook, Tablet, and Laptop Cart with 18-, 20-, 27-, 30-, 36-, or 40-device capacity; assembled • (4) casters (installed), including: (2) locking swivel casters and (2) non-locking fixed casters • (1) 4-outlet timer (4-bank) (installed) • Power Strips (installed): See the power strips specifications in Table 1-2 on the previous page. • Cart handle with mounting hardware (to be installed by user) • (1) user‘s manual • (2) sets of keys Page 14 724-746-5500 | blackbox.com UCCDM20T Chapter 2: Overview 2.3 Hardware Description Cable Grommet or Pop-Up Power Module Laminate Top Ventilation Handle and Power Cord Wrap Removable Rear Door Sliding Door Cable Access Non-Locking Casters Locking SwivelCasters Figure 2-1. Front and back of cart with Sliding door. Ventilation Cable Grommet or Pop-Up Power Module Laminate Top Handle and Power Cord Wrap Removable Rear Door Solid Steel Door Non-Locking Casters Cable Access Locking SwivelCasters Figure 2-2. Front and back of cart with solid steel door. UCCDM20-T 724-746-5500 | blackbox.com Page 15 Chapter 3: Electrical Precautions 3. Electrical Precautions • The power switch must be in the “OFF” position before plugging the iPad, Chromebook, Tablet, and Laptop Cart into a wall receptacle. • The Cart must ONLY be connected to a 120-volt AC 15- or 20-amp power supply. • The Cart must only be used by adults or with adult supervision. • Always store the power cord around the cord wraps when transporting the Cart. • Never pull the Cart by the power cord. • Do not plug the Cart in if the switch, receptacle(s), or power cord has been damaged. All electrical components on this product must be repaired by a qualified electrician. • Do not use an extension cord in conjunction with the Cart. • Do not use liquids in or around the Cart environment. • Inadequate repair can create significant hazards to users and is not covered by warranty. • For your safety, we recommend that a qualified electrician test the circuit you will be plugging the Cart into. The circuit should be checked for ground integrity and appropriate branch circuit protection. • The Cart ground prong must be present for safe operation. If the plug is damaged or if the ground prong has been removed, it should be replaced by a qualified electrician. • The use of the Cart, including plugging or unplugging laptops, plugging or unplugging the Cart, operating the control switch, and engaging or releasing the directional and locked casters, must be done with adult supervision. 3.1 Other Precautions • The Cart can be very heavy when fully loaded with laptops and should be moved about by persons physically able to do so. • The Cart should only be used for the storage and transport of tablets, laptops, and other similar devices. • Misuse, incorrect operation, or inadequate repair of the Cart will void the warranty. Page 16 724-746-5500 | blackbox.com UCCDM20T Chapter 4: Configuration and Setup 4. Configuration and Setup Remove and discard all packaging materials and then lock the lockable casters. Open and inspect the Cart to verify all doors, locks, and casters are working properly. Do not plug the Cart into a wall outlet until all configurations and setup are complete. 4.1 Installing the Handle The handle/cord wrap installs on the side of the cart with the locking swivel casters. NOTE: The casters swivel on one side of the Cart and are fixed on the other. Consider maneuverability options before installing the handle. Step 1: Locate the side of the cart with the locking swivel casters. Step 2. Place the handle so that the holes in the brackets are aligned with the threaded holes in the side panels. Phillips-head screws Handle Phillips-head screws Figure 4-1. Handle assembly. Step 3. Using a Phillips-head screwdriver, tighten four of the Phillips-head screws into the threaded holes. UCCDM20-T 724-746-5500 | blackbox.com Page 17 Chapter 4: Configuration and Setup 4.2 Routing the Cable (UCCDS20T, UCCDS20H, UCCDS30T, UCCDS30H, UCCDS40T, UCCDS40H) 1. A t the back of the cart, loosen the two screws on the cable manager, pull up on the top section of the cable manager, and place the device side of the charging cable into one of the slots. (See Figure 4-2.) Cable manager Loosen screws on cable manager and pull up Route cable to the front of the cart Power Strip Wrap excess cable around cable wrap Charger Figure 4-2. Small shelf routing instructions. 2. Replace the top section of the cable manager and tighten the screws. 3. R oute the device side of the charging cable to the front of the cart and repeat step 1 for the front cable manager. 4. Wrap any excess cable around the cable wrap on the back of the shelf. 5. Plug the charger power plug into the power strip located below the shelf. Page 18 724-746-5500 | blackbox.com UCCDM20T Chapter 4: Configuration and Setup Loosen screws on cable manager and pull up Cable manager Route cable to the front of the cart Figure 4-3. Routing the cable. 4.3 Fastening the Power Bricks and Routing the Cable (UCCDM18T, UCCDM18H, UCCDM27T, UCCDM27H, UCCDM36T, UCCDM36H, UCCDL18T, UCCDL18H, UCCDL27T, UCCDL27H, UCCDL36T, UCCDL36H) 1. A ttach the wrapped cord and power brick to the back of the shelf using the hook and loop strap. Keep some extra cable unwrapped to plug into the power strip. (See Figure 4-4.) 2. L oosen the two screws on the cable manager, pull up on the top section of the cable manager, and place the device side of the charging cable into one of the slots. 3. Replace the top section of the cable manager and tighten the screws. 4. R oute the device side of the charging cable to the front of the cart and repeat step 2 for the front cable manager (see Figure 4-3). 5. Plug the charger power plug into the power strip located below the shelf. UCCDM20-T 724-746-5500 | blackbox.com Page 19 Chapter 4: Configuration and Setup Route cable to the front of the cart Loosen screws on cable manager and pull up Cable manager Power brick and cord Power strip Figure 4-4. Fastening the power brick and routing the cable.. Page 20 724-746-5500 | blackbox.com UCCDM20T Chapter 5: Using Your iPad, Chromebook, Tablet, and Laptop Cart 5. Using Your iPad, Chromebook, Tablet, and Laptop Cart 5.1 Charging Your Computers • After the devices have been loaded into the Cart, plug the power cord of the Cart into a suitable receptacle. • Locate the internal power switches on the timer and power strips of the Cart and push the switches to the ON position. 5.2 Moving Your iPad, Chromebook, Tablet, and Laptop Cart • Turn the timer power switch to the off position. • Remove the Cart plug from the wall receptacle and wrap the cord around the cord wrap or handle. • Close and secure Sliding or solid-steel doors. • Your Cart comes equipped with two fixed casters and two locking swivel casters. Unlock the casters before moving the Cart to a new location. • When you reach your desired destination, lock the casters to prevent the cart from moving and plug the Cart into a wall receptacle. UCCDM20-T 724-746-5500 | blackbox.com Page 21 Chapter 5: Using Your iPad, Chromebook, Tablet, and Laptop Cart Timer Power cord To wall outlet Cable access ports Figure 5-1. Plug the cart into the wall. Page 22 724-746-5500 | blackbox.com UCCDM20T Chapter 5: Using Your iPad, Chromebook, Tablet, and Laptop Cart 5.3 Timer Instructions Before using your timer: • For your safety, we recommend that a qualified electrician test the circuit you will plug the cart into. The circuit should be checked for ground integrity and appropriate branch circuit protection. • The cart’s ground prong must be present for safe operation. If the plug is damaged or if the ground prong has been removed, it should be replaced by a qualified electrician. • Using the cart, including plugging it in or unplugging it, plugging in or unplugging the laptop(s) or other electrical equipment, or operating the control switch must be done with adult supervision. The timer comes preset from the factory to alternate power between the power strips at 15-minute intervals. All power strips cannot charge simultaneously. By plugging the cart power cord into an approved outlet and flipping the red switches located on the timer and power strips, the cart will begin charging. To end power, turn the red switch on the timer off and unplug the cart from the wall outlet. UCCDM20-T 724-746-5500 | blackbox.com Page 23 Black Box Tech Support: FREE! Live. 24/7. Tech support the way it should be. Great tech support is just 60 seconds away at 724-746-5500 or blackbox.com. About Black Box Black Box Network Services is your source for an extensive range of networking and infrastructure products. You’ll find everything from cabinets and racks and power and surge protection products to media converters and Ethernet switches all supported by free, live 24/7 Tech support available in 60 seconds or less. © Copyright 2015. Black Box Corporation. All rights reserved. UCCDM20T, version 2 724-746-5500 | blackbox.com Resources Appendix: Resources Do you have technical questions about this product or similar technology? Check out the Resources listed below or contact our FREE Technical Support at 724-746-5500 or [email protected]. White Papers: To dowload a white paper, click on the corresponding link listed below: Whitepapers Cabinets and Racks Digital Signage and Multimedia (Continued) Retrofitting with passive water cooling at the rack level. Extending the Life of Your Data Center Deliver real-time communications—including emergency messaging—to students, teachers, and staff. Digital Signage for K–12 Selecting cooling systems for IT equipment cabinets is not always as simple as it might seem. Six Things to Know When Cooling IT Equipment Cabinets Cables Everything you need to ask when planning and evaluating digital signage. The Roadmap to Digital Signage Success Falling victim to these common mistakes can cost you both time and money. Seven Pitfalls to Avoid When Planning Digital Signage Industrial What’s in the ANSI/TIA 1179 standard. ANSI/TIA 1179 Healthcare Infrastructure Standard Connect industrial equipment to your network by using USB. Bridging the Gap: USB Converters Buyer beware: If the price seems too good to be true, it is. Counterfeit cable: The dangers, risks, and how to spot it. Learn about system configuration, cabling selection, transient protection, software, and device selection. The Elements of an RS-422 and RS-485 System Using CAT 6A in 10-GBe networks. CAT 6A F/UTP vs. UTP: What You Need to Know When is fiber the ideal choice for your network? Fiber Optic Technology When is fiber the ideal choice for your network? Fiber Optic Technology Understanding Power Needs for Industrial Control Devices Industrial Power Solutions Key cabling infrastructure standards. Structured Cabling Organizations and Standards Run wireless even in extreme environments. Industrial Wireless Carts and Storage Interface and Protocol Converters 12 Questions to Ask When Choosing a Tablet and Laptop Cart E-Learning Device Storage Communications Solutions Connect industrial equipment to your network by using USB. Bridging the Gap: USB Converters Learn about system configuration, cabling selection, transient protection, software, and device selection. The Elements of an RS-422 and RS-485 System 10 Tips for Securing a Strong ROI. Voicemail to Unified Communications Compliance Solutions Go beyond the five-meter USB distance limitation with USB extenders! Read How to extend USB and break the five-meter barrier. Extending the Benefits of USB The key to protecting data in motion. KVM Group Encryption An overview of extension and switching technologies in high-performance KVM environments. HD Video and Peripheral Matrix Switching and Extension Digital Signage and Multimedia Deliver the right message at the right time. A Beginner’s Guide to Digital Signage 7 Questions You to Need to Ask when Choosing a Signage System. Deliver real-time communications, including emergency messaging, to students, faculty, and staff. Choosing the Right Digital Signage System Best practices for creating high-value, compelling content that delivers extraordinary results. Digital Signage Content 101 Get secure local KVM console access and secure remote IP server access. Security with the ServSwitch Wizard IP Use this transparent and reliable switching technology to avoid the limitations of traditional emulations. USB True Emulation for KVM Switches Why your school or university needs digital signage and how to implement it. Digital Signage in Education Page 2 724-746-5500 | blackbox.com Resources Whitepapers Networking Testers and Tools Eliminate the need to buy and install expensive network equipment by using wireless Ethernet extension. 5 Questions You Need to Ask When Choosing Wireless Ethernet Extenders See how industrial-strength Ethernet has come of age. Ethernet in Harsh Environments Integrate fiber optic cabling to add speed, distance, and cost savings. Media Converters Add low-voltage devices and network equipment in industrial environments without running power. Power over Ethernet in Industrial Applications Is your network ready? Tablets in Education Common network mistakes that cost money, cause downtime, and create frustration. Top 10 Network Mistakes Take these ten steps to ensure wireless success: Ten Commandments of Wireless Communications white paper. Wireless Communications Run wireless even in extreme environments. Industrial Wireless Learn about the top three growth drivers for fiber networks: greater bandwidth needs, increased storage demands, and the transition to higher network speeds. Improve the Quality of Fiber Installations with Extended Fiber Certification Meet the need for implementation speed without sacrificing accuracy. Proven Techniques and Best Practices for Managing Infrastructure Changes Move your private networks in premises and campus environments towards high-speed applications. Testing Today’s High-Speed Multimode Fiber Infrastructure Use easy-to-install, standardized, plug-and-play technology. Troubleshooting Your Industrial Network Be sure to complete this step when installing a new local area network segment. Validate LAN Installations for Optimal Service Delivery Wireless Wireless Networking: wireless standards, architecture, security and more white paper. A basic overview of standards, installation, and security. Wireless Networking Network Security Ten Commandments of Wireless Communications white paper. Take these ten steps to ensure wireless success. Wireless Communications Run wireless even in extreme environments. Industrial Wireless The key to protecting data in motion. Group Encryption Is your network ready? Tablets in Education Physical Security See why it’s just as important as software-based security. Physical Network Security A basic overview of standards, installation, and security. Wireless Networking Power Understand the power needs for industrial control devices. Industrial Power Solutions Understanding the risks to your network and how to choose the right solution. Power Protection Add low-voltage devices and network equipment in industrial environments without running power. Power over Ethernet in Industrial Applications 724-746-5500 | blackbox.com Page 3