1
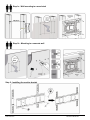
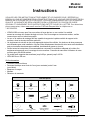
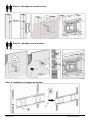
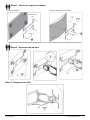
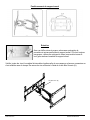
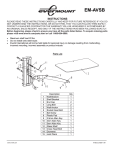
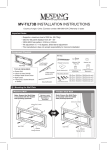
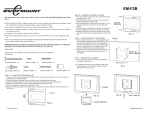
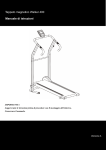
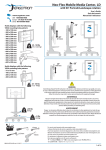
Model:
EM-SA1000
Instructions
PLEASE READ THESE INSTRUCTIONS CAREFULLY AND KEEP FOR FUTURE REFERENCE! IF
YOU DO NOT UNDERSTAND THE INSTRUCTIONS, OR DO NOT FEEL THAT YOU CAN
FOLLOW THEM SAFELY, CONTACT A QUALIFIED CONTRACTOR. THE WARRANTY WILL BE
HONOURED IF ACCOMPANIED BY AN ORIGINAL SALES RECEIPT, AND ONLY IF THE
INSTRUCTIONS HAVE BEEN FOLLOWED EXACTLY. To acquire missing parts please visit
www.everik.com/en-CA/Parts-Request.html or call 1-866-604-6966.
• The EM-SA1000 is designed to mount a flat panel onto a vertical wall. Hardware for
mounting to a wood stud is included. For mounting to any other surface, it is recommended you
contact a qualified contractor.
• The wall or mounting surface must be capable of supporting the combined weight of the mount
and the flat panel, otherwise the structure must be reinforced.
• Safety gear and proper tools must be used. A minimum of two people are required for this
installation. Failure to use safety gear and/or attempting this installation alone can result in
property damage, serious injury, or death.
• Follow all instructions and recommendations regarding adequate ventilation and suitable locations
for mounting your flat panel. Consult the owner’s manual of your flat panel for more information.
• This product will hold flat panels up to 65” and weighing up to 100 lbs.
• VESA 600mm x 400mm
Tools Required
• Phillips head screwdriver
• Electric drill with 6mm bit (for studs) or 8mm bit (for concrete)
• Marking Pen or Pencil
• Hammer
• Stud finder
• Level
Parts List
A
B
C
D
E
Countersunk Screw
M5x8mm
x6
Cross Recess Head Screw
M5x8mm
x4
M5x35mm
x4
M6x35mm
x4
M6x45mm
x4
F
G
H
I
J
M8x35mm
x4
M8x45mm
x4
6mm Allen Key
x1
ø12.7xø6x12.7
Plastic Spacer
x4
ø19xø8.2x19.6
Plastic Spacer
x4
Wood Screw M8x65mm
x6
Concrete Anchor
x6
K
Square Washer
x4
www.everik.com
Cable Tie
x2
ø16xø8.2x2.0
Metal Washer
x6
SA1000.JO.042013.IM
Step 1a - Wall mounting to a wood stud
M8x65mm
(6x)
Step 1b - Mounting to a concrete wall
M8x65mm
(6x)
Step 2 - Installing the monitor bracket
A
(6x)
www.everik.com
SA1000.JO.042013.IM
Step 3 - Attaching the monitor bracket to the flat panel
Flat back TVs
Bump out or recessed back TVs
I or J
(4x)
C, D, E, F, or G
(4x)
C, D, E, F, or G
(4x)
Note: You will have to hand test mounting screws and spacers to determine the correct combination for your flat panel.
Step 4 - Mounting the flat panel
B
(2x)
B
(2x)
Step 5 - Wire management
www.everik.com
SA1000.JO.042013.IM
Positioning the wall mount
Maintenance
With a clean soft cloth, gently remove dust and other particles
from the wall mount. If still not clean, please use a vitreous
cleaner (non-nitrogen, non-alcoholic based) to remove dirt from
the wall mount.
Inspect all screws and hardware at regular intervals to ensure that no connections have become loose
over time. Re-tighten joints as needed using the provided Allen Key (H).
6mm Allen Key (H)
www.everik.com
SA1000.JO.042013.IM
Modèle:
EM-SA1000
Instructions
VEUILLEZ LIRE CES INSTRUCTIONS ATTENTIVEMENT ET LES GARDER POUR Y RÉFÉRER AU
BESOIN. SI VOUS NE COMPRENEZ PAS LES INSTRUCTIONS OU SI VOUS NE CROYEZ PAS ÊTRE EN
MESURE DE LES SUIVRE EN TOUTE SÉCURITÉ, VEUILLEZ COMMUNIQUER AVEC UN TECHNICIEN
QUALIFIÉ. LA GARANTIE NE SERA HONORÉE QU'EN LA PRÉSENCE DU COUPON DE CAISSE
ORIGINAL ET UNIQUEMENT SI LES INSTRUCTIONS ONT ÉTÉ SUIVIES À LA LETTRE. Pour obtenir des
pièces manquantes, visitez www.everik.com/en-CA/Parts-Request.html ou téléphonez au
1 866 604-6966.
• L'EM-SA1000 est conçu pour fixer un moniteur à écran plat sur un mur vertical. Le matériel
•
•
•
•
•
servant au montage sur montant de bois est inclus. Pour le montage sur toute autre surface, veuillez
communiquer avec un technicien qualifié.
Le mur ou la surface de montage doit être capable de supporter le poids combiné du support et du
moniteur, sinon la structure doit être renforcée.
Un équipement de sécurité et des outils appropriés doivent être utilisés. Un minimum de deux personnes
est nécessaire pour cette installation. Ne pas utiliser d'équipement de sécurité et/ou tenter cette installation
seul peut entraîner des dommages matériels, des blessures graves ou la mort.
Suivez toutes les instructions et recommandations concernant la ventilation adéquate et le choix d'un
emplacement approprié pour le montage de votre moniteur. Consultez le manuel de l'utilisateur de votre
moniteur pour plus d'informations.
Ce produit peut supporter des moniteurs jusqu'à 65 po, pesant jusqu'à 100 lb.
VESA 600 mm x 400 mm
Outils nécessaires
• Tournevis à tête cruciforme
• Perceuse électrique avec foret de 6 mm (pour montants) ou de 8 mm
(pour béton)
• Marqueur ou crayon
• Marteau
• Détecteur de montants
Liste des pièces
A
B
C
D
E
Vis à tête fraisée plate
M5x8 mm
x6
Vis à tête fraisée cruciforme
M5x8 mm
x4
M5x35 mm
x4
M6x35 mm
x4
M6x45 mm
x4
F
G
H
I
J
M8x35 mm
x4
M8x45 mm
x4
Clé Allen 6 mm
x1
Cale en plastique
ø12.7xø6x12.7
x4
Cale en plastique
ø19xø8.2x19.6
x4
Vis à bois M8x65 mm
x6
Ancrage pour béton
x6
K
Rondelle à plan carré
x4
www.everik.com
Attache pour câbles
x2
Rondelle métallique
Ø16xØ8.2x2.0 x6
x6
SA1000.JO.042013.IM
Étape 1a - Montage sur montant de bois
Rondelle métallique
Ø16*Ø8,2*2,0
(6x)
M8x65 mm
(6x)
Étape 1b - Montage sur mur de béton
Rondelle métallique Ø16*Ø8,2*2,0
(6x)
M8x65 mm
(6x)
Étape 2 - Installation du support de moniteur
A
(6x)
www.everik.com
SA1000.JO.042013.IM
Étape 3 - Fixation du support au moniteur
TV avec dos plat
TV avec dos incurvé ou concave
Rondelle à plan carré
I or J
(4x)
C, D, E, F, or G
(4x)
Rondelle à
plan carré
C, D, E, F, or G
(4x)
Remarque : Vous devez d'abord tester les vis de montage et les cales à la main pour déterminer la bonne combinaison pour votre moniteur.
Étape 4 - Ajustement du moniteur
B
(2x)
B
(2x)
Étape 5 - Rangement du câble
Câble
www.everik.com
Attache pour
câble
(2x)
SA1000.JO.042013.IM
Positionnement du support mural
Entretien
Avec un chiffon doux et propre, retirez avec précaution la
poussière et autres particules du support mural. S'il n'est toujours
pas propre, utilisez un nettoyant à vitres (non-azoté et sans alcool) pour enlever la saleté du support mural.
Vérifier toutes les vis et le matériel à intervalles réguliers afin de vous assurer qu'aucune connexion ne
s'est relâchée avec le temps. Re-serrez les vis au besoin à l'aide de la clé Allen fournie (H).
Clé Allen 6 mm (H)
www.everik.com
SA1000.JO.042013.IM