1
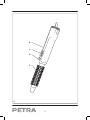
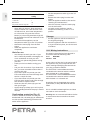
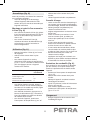
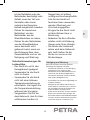
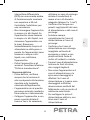
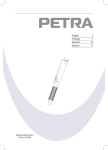
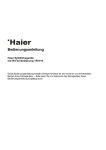
II I 0 English Français Deutsch Italiano 520001 Petra Air Curl AC 200 3 8 13 18 4 2 II I 0 1 3 A 2 You have purchased a Petra product. Our aim is to provide quality products with a tasteful design and at an affordable price. We hope that you will enjoy this product for many years. Safety instructions General safety • Read the manual carefully before use. Keep the manual for future reference. • Only use the appliance and the accessories for their intended purposes. Do not use the appliance and the accessories for other purposes than described in the manual. • Do not use the appliance if any part or any accessory is damaged or defective. If a part or an accessory is damaged or defective, it must be replaced by the manufacturer or an authorised repair agent. • The appliance can be used by children from 8 years and above and by persons with a physical, sensory, mental or motorial disability, or lack of experience and knowledge if they are supervised or instructed on how to use the 3 EN appliance in a safe way and understand the hazards involved. Children shall not play with the appliance. Cleaning and maintenance shall not be made by children unless they are older than 8 years and supervised. Keep the appliance and the mains cable out of the reach of children younger than 8 years. • Do not use the appliance near bathtubs, showers, basins or other vessels containing water. • If you use the appliance in a bathroom, remove the mains plug from the wall socket after use. The presence of water can cause personal injury or damage to the appliance even when the appliance has been switched off. • For additional protection, install a residual current device (RCD) with a rated residual operating current that does not exceed 30 mA in the electrical circuit of the bathroom. Contact your installer for advice. Congratulations! EN • Do not immerse the appliance in water or other liquids. If the appliance is immersed in water or other liquids, do not remove the appliance with your hands. Immediately remove the mains plug from the wall socket. If the appliance is immersed in water or other liquids, do not use the appliance again. • Clean the appliance and the accessories. Refer to the section "Cleaning and maintenance". • Always fully unwind the mains cable and the extension cable. • Make sure that the mains cable does not hang over the edge of a worktop and cannot be caught accidentally or tripped over. • Keep the mains cable away from heat, oil and sharp edges. • Do not use the appliance if the mains cable or the mains plug is damaged or defective. If the mains cable or the mains plug is damaged or defective, it must be replaced by the manufacturer or an authorised repair agent. • Do not pull the mains cable to disconnect the mains plug from the mains. • Disconnect the mains plug from the mains when the appliance is not in use, before assembly or disassembly and before cleaning and maintenance. Electrical safety • Before use, always check that the mains voltage is the same as the voltage on the rating plate of the appliance. • The appliance is not intended to be operated by means of an external timer or separate remote-control system. • Connect the appliance to an earthed wall socket. If necessary, use an earthed extension cable of a suitable diameter (at least 3 x 1 mm2). • Make sure that water cannot enter the contact plugs of the mains cable and the extension cable. Safety instructions for hair curlers • The appliance is suitable for domestic use only. 4 • Clean the outside of the appliance with a soft, damp cloth. Thoroughly dry the outside of the appliance with a clean, dry cloth. • Remove the hairs from the curling attachment using a soft brush. Clean the curling attachment under running water. Thoroughly dry the curling attachment with a clean, dry cloth. Description (fig. A) Your 520001 Petra hair curler has been designed for curling and waving your hair. The appliance is equipped with two curling attachments (16 mm / 20 mm). The appliance is suitable for indoor use only. The appliance is suitable for domestic use only. 1. Temperature switch 2. Roll-out button 3. Curling attachment 4. Handgrip Assembly (fig. A) Before you proceed, we need you to pay attention to the following notes: - Before assembly or disassembly, switch off the appliance, remove the mains plug from the wall socket and wait until the appliance has cooled down. Mounting and removing the curling attachment (fig. A) • To mount the curling attachment (3), slide the accessory over the front of the appliance until the roll-out button (2) clicks into place. • To remove the curling attachment (3), keep the roll-out button (2) pressed and pull off the accessory with a slight twist. Cleaning and maintenance Before you proceed, we need you to pay attention to the following notes: - Before cleaning or maintenance, switch off the appliance, remove the mains plug from the wall socket and wait until the appliance has cooled down. - Do not immerse the appliance in water or any other liquids. Use (fig. A) • Mount the curling attachment (3) over the front of the appliance. • Insert the mains plug into the wall socket. • To switch on the appliance, set the temperature switch (1) to the "I" or "II" position. Refer to the table below for the correct settings. The appliance starts heating. • Regularly check the appliance for possible damage. 5 EN • Do not use the appliance outdoors. • Do not use the appliance with a higher temperature setting than required. Reduce the level of the temperature setting during the process. • Before use, make sure that your hair is fully dry. Hair is most fragile and prone to breakage when it is wet. If you use the appliance on damp hair, the cuticle will be opened and the cortex will be damaged. • Do not bring the appliance in contact with artificial hair. • Do not cover the air outlets with clothes, hair or hands. • The brush of the curling attachment becomes very hot during use. Only hold the brush at the front by the brush cap. EN • Set the temperature switch (1) to the "O" position. • Remove the mains plug from the wall socket. • Clean the appliance. Refer to the section "Cleaning and maintenance". • After five minutes, insert the mains plug into the wall socket. • To switch on the appliance, set the temperature switch (1) to the "I" or "II" position. Hair textureRecommended setting Bleached, fragile, damaged or fine hair Normal hair Very coarse, thick or curly hair I I/II II • After rolling in the hair, allow the heat to work on the hair for a few seconds. If the air feels too hot, set a lower temperature. To roll out the curls, press the roll-out button (2). The curling attachment (3) will be disengaged and can be rolled out of the formed curl. • To switch off the appliance, set the temperature switch (1) to the "O" position. • Remove the mains plug from the wall socket. • Allow the appliance to cool down completely. Storage • Put the appliance and the accessories in the original packaging. • Store the appliance with the accessories in a dry and frost-free place, out of the reach of children. U.K. Wiring instructions Hints for use The wires in the mains lead are coloured in accordance with the following code: BLUE NEUTRAL BROWN LIVE • Use shampoo to wash your hair. If your hair is chemically treated or damaged, use a hair conditioner to wash your hair. • Dry your hair (almost fully) before curling your hair. • Comb your hair out before curling your hair. • Curl your hair in sections. If you have thick hair, you must use smaller sections than if you have thin hair. • If you want spiral curls, divide your hair into small sections and move through each section a couple of times. • If you want loose curls, divide your hair into flat, larger sections and move through each section a couple of times. • Shake out the curls, then style your hair with your fingers. • Apply hairspray to keep your curls in place. Use a humidity-resistant hairspray in humid climates. As the colours of the wire in the mains lead of this appliance may not correspond with the colour markings identifying the terminals on your plug, proceed as follows: The wire which is coloured BLUE must be connected to the terminal which is marked with the letter N or coloured black. The wire which is coloured BROWN must be connected to the terminal which is marked with the letter L or coloured red. Should the fuse in the BS1363 plug require replacement, a 3Amp BS1362 fuse must be fitted. This is a double-insulated appliance and does not need an earth connection. Overheating protection (fig. A) Warning! On no account should either the live or neutral wires be connected to the earth terminal. If the air outlets are covered or if they are blocked with hair, the emerging air will become too hot and the overheating protection will switch off the appliance. 6 EN Disclaimer Subject to change; specifications can be changed without further notice. 7 l'expérience nécessaires en cas de surveillance ou d'instructions sur l'usage de cet appareil en toute sécurité et de compréhension des risques impliqués. Les enfants ne doivent pas jouer avec l'appareil. Le nettoyage et la maintenance ne doivent pas être confiés à des enfants sauf s'ils ont 8 ans ou plus et sont sous surveillance. Maintenez l'appareil et le cordon d'alimentation hors de portée des enfants de moins de 8 ans. • N'utilisez pas l'appareil à proximité d'une baignoire, d'une douche, d'un lavabo ou d'autres récipients contenant de l'eau. • Si vous utilisez l'appareil dans une salle de bains, débranchez la fiche secteur de la prise murale après usage. La présence d'eau est un facteur de risque de blessure ou de dégâts pour l'appareil, même s'il est éteint. • Pour maximiser la protection, installez dans le circuit électrique de la salle de bains un dispositif de courant Félicitations! FR Vous avez acheté un produit Petra. Nous souhaitons vous proposer des produits de qualité associant un design raffiné et des prix accessibles. Nous espérons que vous profiterez longtemps de ce produit. Instructions de sécurité Sécurité générale • Lisez avec soin le manuel avant utilisation. Conservez le manuel pour référence future. • Utilisez l'appareil et ses accessoires uniquement pour leurs fins prévues. N'utilisez pas l'appareil et ses accessoires pour tout autre objet que celui exposé dans le manuel. • N'utilisez pas l'appareil si une pièce ou un accessoire quelconque est endommagé ou défectueux. Si une pièce ou un accessoire quelconque est endommagé ou défectueux, il doit être remplacé par le fabricant ou par un réparateur agréé. • Cet appareil peut être utilisé par des enfants 8 ans ou plus et des personnes présentant un handicap physique, sensoriel, mental ou moteur voire ne disposant pas des connaissances et de 8 • Connectez l'appareil à une prise murale mise à la terre. Si nécessaire, vous pouvez utiliser une rallonge d'un diamètre adapté (au moins 3 x 1 mm2). • Assurez-vous que l'eau ne peut pas s'infiltrer dans les contacts de prise du cordon d'alimentation et de la rallonge. • Déroulez toujours complètement le cordon d'alimentation et la rallonge. • Assurez-vous que le cordon d'alimentation ne pend pas sur le bord d'un plan de travail et ne peut pas être happé ou faire trébucher quelqu'un accidentellement. • Maintenez le cordon d'alimentation à l'écart de la chaleur, de l'huile et des bords tranchants. • N'utilisez pas l'appareil si le cordon d'alimentation ou la fiche secteur est endommagé ou défectueux. Si le cordon d'alimentation ou la fiche secteur est endommagé ou défectueux, il doit être remplacé par le fabricant ou par un réparateur agréé. Sécurité électrique • Avant toute utilisation, vérifiez que la tension du secteur correspond à celle indiquée sur la plaque signalétique de l'appareil. • L'appareil n'est pas conçu pour être utilisé avec une minuterie externe ou un système de télécommande séparé. 9 FR résiduel (RCD) présentant une intensité de service résiduelle nominale inférieure ou égale à 30 mA. Contactez votre installateur si vous souhaitez être conseillé. • Ne plongez pas l'appareil dans l'eau ou autres liquides. Si l'appareil est plongé dans l'eau ou d'autres liquides, ne retirez pas l'appareil avec vos mains. Débranchez immédiatement la fiche secteur de la prise murale. Si l'appareil est plongé dans l'eau ou autre liquide, ne l'utilisez pas à nouveau. • Nettoyez l'appareil et les accessoires. Consultez la section "Nettoyage et entretien". FR • Ne tirez pas sur le cordon d'alimentation pour débrancher la fiche secteur du secteur. • Débranchez la fiche secteur du secteur lorsque l'appareil n'est pas utilisé, avant le montage ou le démontage de même qu'avant le nettoyage ou l'entretien. • Ne couvrez pas les sorties d'air avec les vêtements, les cheveux ou les mains. • La brosse de l'accessoire à friser peut devenir très chaude à l'usage. Tenez la brosse uniquement par l'avant de son cache. Nettoyage et entretien Instructions de sécurité pour fers à friser • L'appareil est réservé à un usage domestique. • N'utilisez pas l'appareil à l'extérieur. • N'utilisez pas l'appareil avec un réglage de température supérieur à celui requis. Réduisez le niveau du réglage de température pendant le processus. • Avant l'utilisation, assurezvous que vos cheveux sont complètement secs. Les cheveux sont plus fragiles et susceptibles de se casser lorsqu'ils sont mouillés. Si vous utilisez l'appareil sur des cheveux mouillés, la cuticule va s'ouvrir et le cortex être endommagé. • Ne mettez pas l'appareil en contact avec des cheveux artificiels. Avant de procéder, vous devez faire attention aux remarques suivantes : - Avant le nettoyage ou l'entretien, arrêtez l'appareil, débranchez la fiche secteur de la prise murale et attendez que l'appareil refroidisse. - Ne plongez pas l'appareil dans l'eau ou autres liquides. • Contrôlez régulièrement les éventuels dommages sur l'appareil. • Nettoyez l'extérieur de l'appareil avec un chiffon doux et humide. Séchez soigneusement l'extérieur de l'appareil avec un chiffon propre et sec. • Retirez les cheveux de l'accessoire à friser avec une brosse douce. Nettoyez l'accessoire à friser sous l'eau courante. Séchez soigneusement l'accessoire à friser avec un chiffon propre et sec. Description (fig. A) Votre fer à friser 520001 Petra a été conçu pour friser et onduler vos cheveux. L'appareil comporte deux accessoires à friser (16 mm / 20 mm). L'appareil est réservé à un usage à l'intérieur. L'appareil est réservé à un usage domestique. 1. Interrupteur de température 2. Bouton déroulement 3. Accessoire à friser 4. Poignée 10 Assemblage (fig. A) • Débranchez la fiche secteur de la prise murale. • Laissez l'appareil refroidir complètement. Avant de procéder, vous devez faire attention aux remarques suivantes : - Avant le montage ou le démontage, arrêtez l'appareil, débranchez la fiche secteur de la prise murale et attendez que l'appareil refroidisse. • Lavez vos cheveux avec du shampooing. Si vos cheveux ont été traités chimiquement ou endommagés, lavez-les avec du démêlant. • Séchez (presque complètement) vos cheveux avant de les friser. • Peignez soigneusement vos cheveux avant de les friser. • Frisez vos cheveux par sections. Si vous avez les cheveux épais, procédez par sections plus petites que si vos cheveux sont fins. • Si vous voulez des boucles en spirale, divisez votre chevelure en petites sections et frisez chacune une ou deux fois. • Si vous voulez des boucles libres, divisez votre chevelure en sections plates et plus grandes et frisez chacune une ou deux fois. • Secouez les boucles puis coiffez vos cheveux avec les doigts. • Appliquez une laque pour maintenir vos boucles en place. Utilisez une laque résistante à l'humidité si le climat est humide. Montage et retrait d'un accessoire à friser (fig. A) • Pour monter l'accessoire à friser (3), glissezle sur l'avant de l'appareil jusqu'à ce que le bouton de déroulement (2) s'enclenche avec un clic. • Pour retirer l'accessoire à friser (3), maintenez le bouton de déroulement (2) enfoncé tout en tirant l'accessoire en tournant légèrement. Utilisation (fig. A) • Montez l'accessoire à friser (3) sur l'avant de l'appareil. • Insérez la fiche secteur dans la prise murale. • Pour mettre l'appareil en marche, positionnez l'interrupteur de température (1) sur "I" ou "II". Consultez la table suivante pour les réglages corrects. L'appareil commence à chauffer. Protection de surchauffe (fig. A) Si les sorties d'air sont couvertes ou bloquées par des cheveux, l'air expulsé devient trop chaud et la protection de surchauffe arrête l'appareil. • Positionnez l'interrupteur de température (1) sur "O". • Débranchez la fiche secteur de la prise murale. • Nettoyez l'appareil. Consultez la section "Nettoyage et entretien". • Après cinq minutes, insérez la fiche secteur dans la prise murale. • Pour mettre l'appareil en marche, positionnez l'interrupteur de température (1) sur "I" ou "II". Texture des cheveuxRéglage recommandé Cheveux décolorés, fragiles, endommagés ou fins Cheveux normaux Cheveux très drus, épais ou bouclés I I/II II • Une fois les cheveux enroulés, laissez la chaleur s'exercer sur les cheveux quelques secondes. Si l'air semble trop chaud, réglez une température inférieure. Pour dérouler les boucles, appuyez sur le bouton de déroulement (2). L'accessoire à friser (3) se libère et et peut être déroulé de la boucle alors formée. • Pour éteindre l'appareil, positionnez l'interrupteur de température (1) sur "O". Rangement • Rangez l'appareil et les accessoires dans l'emballage d'origine. 11 FR Conseils d'usage • Rangez l'appareil avec les accessoires dans un endroit sec, hors de portée des enfants et à l'abri du gel. Clause de non responsabilité FR Sous réserve de modifications ; les spécifications peuvent être modifiées sans préavis. 12 oder einem Mangel an Erfahrung und Kenntnissen verwendet werden, sofern diese Personen beaufsichtigt oder über den sicheren Gebrauch des Geräts Sicherheitsanweisungen unterrichtet wurden und die damit verbundenen Allgemeine Sicherheit Gefahren verstanden haben. • Lesen Sie das Handbuch vor Kinder dürfen mit dem Gerät dem Gebrauch genau durch. nicht spielen. Die Reinigung Bewahren Sie das Handbuch und Wartung darf nur dann zur künftigen Bezugnahme auf. von Kindern durchgeführt • Verwenden Sie das Gerät werden, wenn sie älter als und sein Zubehör nur für den 8 Jahre sind und beaufsichtigt Zweck, für den es konstruiert werden. Halten Sie das Gerät wurde. Verwenden Sie das und das Netzkabel aus der Gerät und sein Zubehör nicht Reichweite von Kindern, die für Zwecke, die nicht in jünger als 8 Jahre sind. diesem Handbuch beschrieben • Verwenden Sie das Gerät nicht sind. in der Nähe von Badewannen, • Verwenden Sie das Gerät nicht, Duschen, Bassins oder wenn ein Teil oder Zubehör anderen Wasserbehältern. beschädigt oder defekt ist. • Falls Sie das Gerät in einem Ist ein Teil oder Zubehör Badezimmer verwenden, beschädigt oder defekt, muss ziehen Sie nach dem es vom Hersteller oder einem Gebrauch den Netzstecker autorisierten Reparatur aus der Wandsteckdose. betrieb ausgetauscht werden. Wasser birgt die Gefahr von • Das Gerät kann von Kindern Personenverletzungen oder ab 8 Jahren und von Personen Schäden am Gerät, selbst wenn mit einer körperlichen, das Gerät ausgeschaltet wurde. sensorischen, geistigen oder motorischen Behinderung Herzlichen Glückwunsch! 13 DE Sie haben ein Petra Produkt erworben. Unser Ziel ist es, Qualitätsprodukte mit einem geschmackvollen Design zu einem erschwinglichen Preis anzubieten. Wir hoffen, dass Sie viele Jahre Gefallen an diesem Produkt finden. DE • Lassen Sie als zusätzliche Schutzmaßnahme einen Fehlerstromschutzschalter (FI-Schutzschalter) im Stromkreis des Badezimmers installieren, der einen NennFehlerstrom von 30 mA nicht überschreitet. Fragen Sie hierzu Ihren Installateur. • Tauchen Sie das Gerät niemals in Wasser oder andere Flüssigkeiten ein. Falls das Gerät in Wasser oder andere Flüssigkeiten eingetaucht wurde, nehmen Sie es nicht mit Ihren Händen heraus. Ziehen Sie sofort den Netzstecker aus der Wandsteckdose. Falls das Gerät in Wasser oder andere Flüssigkeiten eingetaucht wird, darf es nicht mehr verwendet werden. • Reinigen Sie das Gerät und das Zubehör. Siehe Abschnitt "Reinigung und Wartung". • Das Gerät ist nicht dafür ausgelegt, von einer externen Zeitschaltuhr oder einem Fernsteuersystem betrieben zu werden. • Schließen Sie das Gerät an eine geerdete Wandsteckdose an. Verwenden Sie nötigenfalls ein geerdetes Verlängerungskabel mit einem geeigneten Durchmesser (mindestens 3 x 1 mm2). • Stellen Sie sicher, dass kein Wasser in die Steckkontakte des Netzkabels und in das Verlängerungskabel eindringen kann. • Wickeln Sie das Netzkabel und das Verlängerungskabel stets vollständig ab. • Vergewissern Sie sich, dass das Netzkabel nicht an der Kante einer Arbeitsplatte hängen bleibt und nicht versehentlich daran gezogen oder darüber gestolpert wird. • Halten Sie das Netzkabel von Hitzequellen, Öl und scharfen Kanten fern. • Verwenden Sie das Gerät nicht, wenn das Netzkabel oder der Netzstecker beschädigt oder defekt ist. Elektrische Sicherheit • Vergewissern Sie sich vor dem Gebrauch stets, dass die Netzspannung mit der Spannung auf dem Typenschild des Geräts übereinstimmt. 14 Nasses Haar ist äußerst anfällig und bruchempfindlich. Falls Sie das Gerät auf feuchtem Haar verwenden, werden Oberhaut und Hirnrinde angegriffen. • Bringen Sie das Gerät nicht mit künstlichem Haar in Berührung. • Bedecken Sie die Luftauslas sstellen nicht mit Kleidung, Haaren oder Ihren Händen. • Die Bürste des Lockenauf satzes wird beim Gebrauch sehr heiß. Halten Sie die Bürste nur vorne an der Bürstenkappe. Sicherheitsanweisungen für Lockenstäbe • Das Gerät ist nur für den Hausgebrauch geeignet. • Verwenden Sie das Gerät nicht im Freien. • Verwenden Sie das Gerät nicht mit einer höheren Temperatureinstellung als erforderlich. Verringern Sie die Temperatureinstellung während des Vorgangs. • Vergewissern Sie sich vor dem Gebrauch, dass Ihr Haar vollkommen trocken ist. Reinigung und Wartung Bevor Sie fortfahren, beachten Sie bitte unbedingt die folgenden Hinweise: - Schalten Sie das Gerät vor der Reinigung und Wartung aus, ziehen Sie den Netzstecker aus der Wandsteckdose und warten Sie, bis das Gerät abgekühlt ist. - Tauchen Sie das Gerät niemals in Wasser oder andere Flüssigkeiten ein. • Kontrollieren Sie das Gerät regelmäßig auf mögliche Schäden. • Reinigen Sie das Äußere des Geräts mit einem weichen, feuchten Tuch. Trocknen Sie das Äußere des Geräts gründlich mit einem sauberen, trockenen Tuch. • Entfernen Sie die Haare mit einer weichen Bürste vom Lockenaufsatz. Reinigen Sie den Lockenaufsatz unter fließendem Wasser. Trocknen Sie den Lockenaufsatz gründlich mit einem sauberen, trockenen Tuch. 15 DE Ist das Netzkabel oder der Netzstecker beschädigt oder defekt, muss das Teil vom Hersteller oder einem autorisierten Reparatur betrieb ausgetauscht werden. • Ziehen Sie niemals am Netzkabel, um den Netzstecker aus der Wandsteckdose zu ziehen. • Ziehen Sie den Netzstecker aus der Wandsteckdose, wenn das Gerät nicht gebraucht wird, sowie vor der Zerlegung bzw. dem Zusammenbau und vor der Reinigung und Wartung. Beschreibung (Abb. A) HaarbeschaffenheitEmpfohlene Einstellung DE Ihr 520001 Petra Lockenstab wurde zum Locken und Wellen Ihrer Haare entwickelt. Das Gerät ist mit zwei Lockenaufsätzen (16 mm / 20 mm) ausgestattet. Das Gerät ist nur für den Gebrauch in geschlossenen Räumen geeignet. Das Gerät ist nur für den Hausgebrauch geeignet. 1. Temperaturschalter 2. Ausrolltaste 3. Lockenaufsatz 4. Handgriff Gebleichtes, sprödes, beschädigtes oder feines Haar Normales Haar Sehr grobes, dickes oder lockiges Haar I I/II II • Lassen Sie die Hitze nach dem Aufrollen der Haare einige Sekunden auf die Haare einwirken. Fühlt sich das Haar zu heiß an, stellen Sie eine niedrigere Temperatur ein. Um die Locken auszurollen, drücken Sie auf die Ausrolltaste (2). Der Lockenaufsatz (3) wird gelöst und kann aus der geformten Locke ausgerollt werden. • Um das Gerät auszuschalten, stellen Sie den Temperaturschalter (1) auf Position "O". • Ziehen Sie den Netzstecker aus der Wandsteckdose. • Lassen Sie das Gerät vollständig abkühlen. Zusammenbau (Abb. A) Bevor Sie fortfahren, beachten Sie bitte unbedingt die folgenden Hinweise: - Schalten Sie das Gerät vor dem Zusammenbau bzw. der Zerlegung aus, ziehen Sie den Netzstecker aus der Wandsteckdose und warten Sie, bis das Gerät abgekühlt ist. Hinweise für den Gebrauch • Waschen Sie Ihre Haare mit Haarshampoo. Falls Ihr Haar chemisch behandelt oder beschädigt ist, verwenden Sie beim Waschen eine Haarspülung. • Trocknen Sie Ihr Haar (fast vollständig) vor dem Einrollen. • Kämmen Sie Ihr Haar vor dem Einrollen von Locken aus. • Rollen Sie Ihr Haar in Abschnitten ein. Falls Sie dickes Haar haben, müssen Sie kleinere Abschnitte verwenden als bei dünnem Haar. • Wenn Sie Spirallocken wünschen, teilen Sie Ihr Haar in kleine Abschnitte auf und bewegen Sie sich mehrmals durch jeden Abschnitt. • Wenn Sie lose Locken wünschen, teilen Sie Ihr Haar in flache, größere Abschnitte auf und bewegen Sie sich mehrmals durch jeden Abschnitt. • Schütteln Sie die Locken aus und gestalten Sie Ihr Haar anschließend mit den Fingern. • Wenden Sie Haarspray an, um Ihre Locken in ihrer Lage zu halten. Verwenden Sie bei feuchtem Klima ein feuchtigkeitsbeständiges Haarspray. Anbringen und Entfernen des Lockenaufsatzes (Abb. A) • Um den Lockenaufsatz (3) anzubringen, schieben Sie den Aufsatz vorne auf das Gerät, bis die Ausrolltaste (2) einrastet. • Um den Lockenaufsatz (3) zu entfernen, halten Sie die Ausrolltaste (2) gedrückt und ziehen Sie den Aufsatz mit einer leichten Drehung ab. Gebrauch (Abb. A) • Bringen Sie den Lockenaufsatz (3) vorne am Gerät an. • Stecken Sie den Netzstecker in die Wandsteckdose. • Um das Gerät einzuschalten, stellen Sie den Temperaturschalter (1) auf Position "I" oder "II". Die richtigen Einstellungen können Sie der Tabelle unten entnehmen. Das Gerät beginnt mit dem Aufheizvorgang. 16 Überhitzungsschutz (Abb. A) DE Werden die Luftauslassstellen abgedeckt oder mit Haaren blockiert, wird die austretende Luft zu heiß und der Überhitzungsschutz schaltet das Gerät ab. • Stellen Sie den Temperaturschalter (1) auf Position "O". • Ziehen Sie den Netzstecker aus der Wandsteckdose. • Reinigen Sie das Gerät. Siehe Abschnitt "Reinigung und Wartung". • Stecken Sie den Netzstecker nach fünf Minuten in die Wandsteckdose. • Um das Gerät einzuschalten, stellen Sie den Temperaturschalter (1) auf Position "I" oder "II". Aufbewahrung • Verstauen Sie das Gerät und das Zubehör in der Originalverpackung. • Bewahren Sie das Gerät samt Zubehör an einem trockenen, frostfreien und für Kinder unerreichbaren Ort auf. Haftungsausschluss Änderungen vorbehalten; die Daten können ohne Vorankündigung geändert werden. 17 pratica ed esperienza sotto la supervisione di un adulto o dopo aver ricevuto adeguate istruzioni sull'uso in sicurezza dell'apparecchio e aver compreso i possibili rischi. I bambini non devono giocare con l'apparecchio. I bambini non devono eseguire interventi di manutenzione e pulizia almeno che non abbiano più di 8 anni e non siano controllati. Tenere l'apparecchio e il cavo di alimentazione fuori dalla portata di bambini di età inferiore agli 8 anni. • Non usare l'apparecchio in prossimità di vasche da bagno, docce, bacinelle o altri recipienti contenenti acqua. • Se utilizzate l'apparecchio in una stanza da bagno, dopo l'uso rimuovete la spina per rete di alimentazione dalla presa a parete. La presenza d'acqua può creare il rischio di lesioni personali o danni all'apparecchio anche quando l'apparecchio è spento. • Come ulteriore protezione, installate nell'impianto elettrico della stanza da bagno un Congratulazioni! Avete acquistato un prodotto Petra. Il nostro scopo è quello di fornire prodotti di qualità con un design gradevole, ad un prezzo interessante. Ci auguriamo che possiate usufruire di questo prodotto per molti anni a venire. Istruzioni per la sicurezza IT Sicurezza generale • Leggere attentamente il manuale prima dell'uso. Conservare il manuale per future consultazioni. • Utilizzare l'apparecchio e gli accessori esclusivamente per gli scopi previsti. Non utilizzare l'apparecchio e gli accessori per scopi diversi da quelli descritti nel manuale. • Non usare l'apparecchio se presenta parti o accessori danneggiati o difettosi. Se una parte e/o un accessorio sono danneggiati o difettosi, devono essere sostituiti dal fabbricante o da un centro di assistenza autorizzato. • L'apparecchio può essere utilizzato da bambini di almeno 8 anni e da persone con ridotte capacità fisiche, sensoriali, mentali o motorie oppure senza la necessaria 18 19 IT utilizzare un cavo di prolunga dotato di conduttore di messa a terra di diametro adeguato (almeno 3 x 1 mm2). • Verificare che l'acqua non penetri negli spinotti del cavo di alimentazione e del cavo di prolunga. • Srotolare sempre completamente il cavo di alimentazione e il cavo di prolunga. • Verificare che il cavo di alimentazione non rimanga impigliato nel bordo di sporgenze o ripiani e non possa costituire fonte di rischio di incidenti o cadute. • Tenere il cavo di alimentazione lontano da fonti di calore, olio e spigoli taglienti. • Non usare l'apparecchio se il Sicurezza elettrica cavo di alimentazione o la • Prima dell'uso, verificare spina sono danneggiati o sempre che la tensione di difettosi. Se il cavo di rete corrisponda alla tensione alimentazione o la spina sono riportata sulla targhetta danneggiati o difettosi, nominale dell'apparecchio. devono essere sostituiti dal • L'apparecchio non è previsto fabbricante o da un centro di per essere azionato mediante assistenza autorizzato. timer esterno o telecomando. • Per scollegare la spina di • Collegare l'apparecchio a una alimentazione elettrica, non presa a parete dotata di tirare mai il cavo di messa a terra. Se necessario, alimentazione. interruttore differenziale (RCD) con una corrente residua di funzionamento nominale non superiore a 30 mA. Contattate l'installatore per una consulenza. • Non immergere l'apparecchio in acqua o in altri liquidi. Se l'apparecchio viene immerso in acqua o in altri liquidi, non rimuovere l'apparecchio con le mani. Rimuovere immediatamente la spina di alimentazione dalla presa a parete. Se l'apparecchio viene immerso in acqua o altri liquidi, non riutilizzare l'apparecchio. • Pulire l'apparecchio e gli accessori. Consultare la sezione "Pulizia e manutenzione". • Se l'apparecchio non viene utilizzato, prima di eseguire operazioni di montaggio o smontaggio e prima di effettuare interventi di pulizia e manutenzione, scollegare sempre la spina dalla rete di alimentazione elettrica. • Non coprire le uscite dell'aria con abiti, capelli o con le mani. • La spazzola per arricciare diventa molto calda durante l'uso. Sostenere la spazzola sulla parte anteriore esclusivamente utilizzando l'apposito supporto. IT Istruzioni di sicurezza per arricciacapelli • L'apparecchio è adatto esclusivamente per uso domestico. • Non usare l'apparecchio in ambienti esterni. • Non usate l'apparecchio con una regolazione della temperatura più alta del necessario. Durante l'utilizzo, diminuite il livello di regolazione della temperatura. • Prima dell'uso, accertatevi di avere i capelli completamente asciutti. Se sono bagnati, i capelli sono particolarmente fragili e tendono a rompersi. Se usate l'apparecchio sui capelli umidi, la cuticola si aprirà e la corteccia verrà danneggiata. • Non portare l'apparecchio a contatto con capelli artificiali. Pulizia e manutenzione Prima di procedere, è necessario porre attenzione alle seguenti note: - Prima di qualsiasi operazione di pulizia o manutenzione, spegnere l'apparecchio, scollegare la spina di alimentazione dalla presa elettrica a parete e attendere che l'apparecchio si raffreddi. - Non immergere l'apparecchio in acqua o in altri liquidi. • Controllare l'apparecchio a intervalli regolari, verificando che non sia danneggiato. • Pulire l'esterno dell'apparecchio con un panno morbido inumidito. Asciugare a fondo l'esterno dell'apparecchio con un panno pulito e asciutto. • Rimuovere i capelli dalla spazzola per arricciare utilizzando una spazzola morbida. Pulire la spazzola per arricciare sotto l'acqua corrente. Asciugare a fondo la spazzola per arricciare con un panno pulito e asciutto. Descrizione (fig. A) L'arricciacapelli 520001 Petra è progettato per rendere ricci e ondulati i capelli. L'apparecchio è dotato di due spazzole per arricciare (16 mm / 20 mm). L'apparecchio è adatto esclusivamente per l'uso al coperto. L'apparecchio è adatto esclusivamente per uso domestico. 1. Interruttore della temperatura 2. Pulsante di estrazione 3. Spazzola per arricciare 4. Impugnatura 20 Montaggio (fig. A) • Disinserire la spina di alimentazione dalla presa a parete. • Far raffreddare completamente l'apparecchio. Prima di procedere, è necessario porre attenzione alle seguenti note: - Prima del montaggio o dello smontaggio, spegnere l'apparecchio, scollegare la spina di alimentazione dalla presa elettrica a parete e attendere che l'apparecchio si raffreddi. • Usate uno shampoo per lavare i capelli. Se avete i capelli tinti o danneggiati, usate un balsamo per lavarli. • Asciugate i capelli (quasi completamente) prima di arricciarli. • Pettinate i capelli prima di arricciarli. • Arricciate i capelli in sezioni. Se avete i capelli folti, procedete per sezioni più piccole di quanto non fareste se aveste i capelli fini. • Se desiderate dei riccioli a spirale, dividete i capelli in piccole sezioni e passate ciascuna sezione un paio di volte. • Se desiderate dei riccioli sciolti, dividete i capelli in sezioni più ampie e piatte, e passate ciascuna sezione un paio di volte. • Scrollate i riccioli, quindi acconciate i capelli con le dita. • Applicate un po' di lacca per fissare in posizione i riccioli. Se il clima è umido, usate una lacca specifica resistente all'umidità. Montaggio e rimozione della spazzola per arricciare (fig. A) • Per montare la spazzola per arricciare (3), far scorrere l'accessorio sulla parte anteriore dell'apparecchio finché il pulsante di estrazione (2) non scatta in posizione. • Per togliere la spazzola per arricciare (3), tenere premuto il pulsante di estrazione (2) ed estrarre l'accessorio con un leggero movimento rotatorio. Uso (fig. A) • Montare la spazzola per arricciare (3) sulla parte anteriore dell'apparecchio. • Collegare la spina di alimentazione alla presa a parete. • Per accendere l'apparecchio, portare l'interruttore della temperatura (1) sulla posizione "I" o "II". Consultate la tabella sotto per conoscere le regolazioni corrette. L'apparecchio inizia a riscaldarsi. Protezione da surriscaldamento (fig. A) Se le bocchette dell'aria sono coperte o se sono bloccate dai capelli, l'aria in uscita diventa troppo calda e la protezione da surriscaldamento spenge l'apparecchio. • Impostare l'interruttore della temperatura (1) sulla posizione "O". • Disinserire la spina di alimentazione dalla presa a parete. • Pulire l'apparecchio. Consultare la sezione "Pulizia e manutenzione". • Dopo cinque minuti, inserire la spina di alimentazione nella presa a parete. • Per accendere l'apparecchio, portare l'interruttore della temperatura (1) sulla posizione "I" o "II". Struttura dei capelliImpostazione raccomandata Capelli decolorati, fragili, danneggiati o sottili Capelli normali Capelli molto grossi, spessi o arricciati I I/II II • Dopo aver arrotolato i capelli, consentire al calore di agire sui capelli per alcuni secondi. Se l'aria in uscita è troppo calda, impostare una temperatura inferiore. Per liberare i ricci, premere il pulsante di estrazione (2). La spazzola per arricciare (3) viene scollegata e può essere estratta dal ricciolo. • Per spegnere l'apparecchio, portare l'interruttore della temperatura (1) sulla posizione "O". Stoccaggio • Collocare l'apparecchio e gli accessori nell'imballaggio originale. • Riporre l'apparecchio con i relativi accessori in un luogo asciutto, al riparo dal gelo e fuori dalla portata dei bambini. 21 IT Suggerimenti per l'uso lausola di esclusione C della responsabilità Soggetto a modifica; le specifiche possono subire variazioni senza preavviso. IT 22 23 PETRA Deutschland GmbH Eberhardstraße 73312 Geislingen/Steige Deutschland www.petra-electric.de © Petra 2013 05/13/V1