1
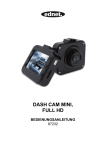
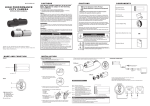
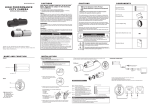
DASH CAM MINI,
FULL HD
MANUAL
87232
In order to make better use of all the function of the car DVR, please read
the manual carefully before using.
Caution
1. Please insert the memory card to the Car DVR and format it. Please insert the card
according to the correct direction to avoid damaging the TF card or Car DVR.
2. It is suggested to regularly backup the recorded files from the card every week.
3. Please charge the Car DVR for the first time use.
4. Please note that this Car DVR is not waterproof.
5. Please do not use it in dusty environment to avoid damaging the Lens
6. Please do not use it in the high-intensity of magnetic field environment.
1.0 STRUCTURE
1: Stand slot
2:USB interface
6: Status LED 7: Power LED
11: LCD
12: DOWN key
3: RESET key
8: POWER key
13: REC key
2.0 FEATURES
1. Supporting 1080P, 720P & 480P
2. Built-in microphone & speaker
3. Support max capacity of 32GB MicroSD card
4. Cycling recording
5. Motion detecting function
6. SOS & G-SENSOR for data protection.
4: TF card slot
9: MODE key
14: UP key
5: Speaker
10: Menu key
15: Lens
3.0 OPERATION GUIDE
3.1. Power on/off
The Car DVR can be turned on by either pressing the POWER key or simply connected it
with the car charger to automatically power it on. After power on, the Car DVR will enter the
video mode automatically and start recording if the MicroSD card is already inserted. The
Status LED would start to flash in green color indicating recording. After switching off the
car’s engine (or unplug the car charger from the car DVR), the Car DVR will record for
another 5 seconds and then turn off automatically.
Remark:
If there is no SD card inserted, the LCD screen would display "No card" after turn on.
3.2. Shutdown
To turn off the camera, please do a long press on the POWER key.
Remark: when battery power is insufficient, the screen will show “low battery”,
and then the Car DVR will turn off and save the video files automatically.
3.3 Battery charging
There are two charging methods:
1)Charging by USB cable.
2 ) Charging by car charger
Remark: The red POWER LED will be on during charging, and the red LED light will be off
when it is fully charged.
3.4 Install and Remove a memory card
Insert the MicroSD card into the MicroSD card slot.
To remove the card, simply push the memory card inside first then it will be ejected out.
Please note that the SD card itself is directional. So please insert it in the correct way.
3.5 Video
Press the POWER key to start and enter into the video mode directly. While the green
Status LED flashes, you can press the REC key to stop the recording and save the video
file. Then this Car DVR is now under “Standby mode”.
Under Standby mode, you can press the “REC” key to start recording again.
Under Standby mode, you can press the “POWER” key once to enable or disable the audio
recording to have only video recorded.
Under Standby mode, you can also press the "UP" key to disable the LCD screen display to
save power. You can press “UP” key again to turn on the LCD display.
3.6 Photo
Under Standby mode, press the “MODE” button once to enter the Snapshot mode. Then
press the REC button to take pictures. You can hear the clicking sound indicating photo
taken.
3.7.Playback and Delete files.
Under Standby, short press the “MODE” button twice, it will enter into “PLAYBACK” Mode.
Press UP or DOWN to select the files you want to preview. Then press REC button to play
or stop. If you want to delete the files, please press MENU to select DELETE and press
REC key to enter into the option of “delete all” or “delete current one”.
Press REC button to confirm and return. Press MENU key to go back to PLAYBACK
MODE.
3.8 SOS function
Short press the “MENU” button while recording, the video file will be forced to save.
Please note if the MENU button is pressed during the first 10 seconds of the video segment,
then this current and the previous segment of videos will be forced to save permanently. If
the MENU button is pressed at the last 10 seconds of video segment, then the current and
next segment of video file will be forced to save. If the MENU button is pressed between the
first 10 seconds and the last 10 seconds of the video segment, the current the video will be
forced to record.
3.9 G-SENSOR function
When take brakes suddenly or the car is impacted by external force, the G-sensor in the
Car DVR will detect the unexpected change of acceleration, which will automatically force
the Car DVR to save these important video files. The sensitivity of G-sensor can be set in
the main system: high, medium and low. The forced video saving mechanism is the same
as the SOS function.
3.10 Motion detecting
Press the “DOWN” button directly to enter into motion detection under video standby mode.
When the Car DVR detects moving objects, it will start to record. If there is no moving
object for 5 seconds, it will stop recording and then standby for motion detection mode.
Press the DOWN key to save the files, then exit motion detection.
4.0 OPTIONS AND SYSTEM SETTINGS
Press MENU to go to the setup menu under standby mode. Press the UP/DOWM button to
select item, confirm it by pressing REC button.
The specific menu options are described as below:
MODE
Menu
Resolution
Loop recording
video
Exposure
1minute
+0.0
On
Date stamp
Off/on
On
G_SENSOR
Off/high/medium/low
Sequence
Quality
Sharpness
White balance
color
ISO
Exposure
Anti-shaking
Quick Preview
Date Stamp
DELETE
Playback
1440*1080
Off/on
Resolution
photo
1080FHD 1920x1080
1080P 1440x1080
720P 1280x720
WVGA 848x480
VGA 640x480
off/30seconds/1minute/2minut
es
-+2.0、+5/3、+4/3、+1.0、+2/3、
+1/3、+0.0、-1/3、-2/3、-1.0、
-4/3、-5/3、-2.0
Default
Setting
Record Audio
Capture Mode
Image
setting
To select the setting
Protect
Slide show
Single/2s timer/5s timer/10s
timer
12M/10M/8M/5M/3M/2MHD/V
GA/1.3M
Off/on
Fine/Normal/Economy
Strong/Normal/soft
Auto/daylight/cloudy/Tungsten
/Fluorescent
Color/BLACK & white/Sepia
AUTO/100/200/400
+2.0,+5/3,+4/3,+1.0,+2/3,
+1/3,+0.0,-1/3,-2/3,-1.0,
-4/3,-5/3,-2.0
Off/on
OFF/2Seconds/5Seconds
Off, date, date/time
Delete current/ delete all
LockCurrent/Unlock
Current/Lock All/Unlock All
2seconds/5seconds/8 seconds
Medium
Single
8M
Off
Normal
Normal
Auto
Color
Auto
+0.0
Off
Off
Date/time
Date/time
Auto Power off
Beep sound
Language
setup
Frequency
Format
Default setting
LCD OFF
Version
MM/DD/YY,DD/MM/YY,YY/MM
/DD
Off/1 minute/3 minutes
Off/on
English/Français/Español/Port
uguês/Deutsch/Italiano/
50Hz/60Hz
To format TF card
Return menu setting to
defaults/cancel/OK
Off/1minute/2minutes/5minutes
DD/MM/YY
Off
On
English
50Hz
The
default:1min
The current version number
5.0 CONNECTED TO THE COMPUTER
5.1 Video and photo download
When connecting the Car DVR to your computer via USB cable, the red Status LED lights
up. Then you will see the selection “Mass storage” and “PC camera” show up on the
screen.
If you select “Mass storage”, then you can browse and manage the files on the computer to
download or format it.
If “PC camera” is selected, it can be used as video tool such as web camera for
communication application.
6.0 PRODUCT SPECIFICATIONS
Screen size
2.0inch TFT
Pixel
1.0MP
Lens
120degree wide angle lens
Min LUX
1LUX
Video resolution
1080FHD/1080P/720P/480P/VGA
Video format
AVI@MJPG
Frames
30fps
Image resolution
12M/10M/8M/5M/3M/2M/VGA/1.3M
5M/3M/1.3M
Image format
JPG
Motion detection
Support
Cycle recording
Off/30s/1min/2mins
Memory card
MicroSD (TF) card
Storage capacity
Max 32GB
USB port
USB2.0
Power port
USB5V 500mA
Optical frequency
50HZ/60HZ
Battery capacity
350mAHr
Microphone/speaker
Bulit-in
Language
English/Français/Español/Português/Deutsch/Italiano
Weight
50g
Dimension
62.8 x 58 x 27.5mm