1
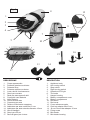
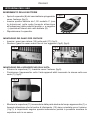
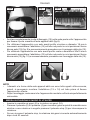
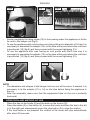
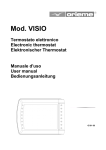
Libretto istruzioni
Instruction Manual
- DATI TECNICI
- TECHNICAL DATA
IL CRAVATTIERE
Type: 803005
4 (Type C) X 1,5 V dc
Made in China
Fig. 1
8
12
1
2
3
9
4
7
5
6
10
11
15
13
16
14
17
DESCRIZIONE
DESCRIPTION
1.
2.
3.
4.
5.
6.
7.
8.
9.
10.
11.
12.
13.
14.
15.
16.
17.
1.
2.
3.
4.
5.
6.
7.
8.
9.
10.
11.
12.
13.
14.
15.
16.
17.
Corpo apparecchio
Pulsante rotazione a sinistra
Pulsante Stop
Pulsante rotazione a destra
Luce a led di funzionamento
Ganci per cravatte
Sede per asta appendi abiti
Coperchio vano batterie
Vano Batterie
Fermo blocca asta
Copertura per asta
Tacche di riferimento copertura
Adattatore per asta ovale 30x15 mm
Adattatore per asta rotonda diametro 18 mm
Vite di fissaggio
Ganci per cinture
Sedi dei ganci per cintura
Appliance body
Left turning switch
Stop switch
Right turning switch
Operation LED light
Tie hooks
Hanger housing
Battery compartment cover
Battery compartment
Rod block
Rod cover
Cover reference marks
Oval bar adapter 30x15 mm
18 mm Round bar adapter 18 mm
Fixing screw
Belt hooks
Belt hooks housing
ITALIANO
PRESCRIZIONI DI SICUREZZA
Il presente libretto è parte integrante dell’apparecchio e deve
essere letto attentamente prima dell’utilizzo poiché fornisce
importanti indicazioni riguardanti la sicurezza
d’installazione, d’uso e di manutenzione. Conservare con cura.
• Dopo aver tolto l’imballaggio assicuratevi dell’integrità dell’apparecchio. In caso
di dubbio non utilizzatelo e rivolgetevi presso un centro assistenza autorizzato
da TERMOZETA.
• Non lasciate gli elementi dell’imballaggio (sacchetti in plastica, polistirolo
espanso, chiodi, ecc.) alla portata di bambini o incapaci in quanto potenziali
fonti di pericolo.
• L’apparecchio è destinato esclusivamente ad uso domestico per
alloggiare cravatte e cinture.
• Per motivi di sicurezza fate attenzione a non immergere mai l’apparecchio in
acqua o in altri liquidi.
• L’apparecchio può essere utilizzato da persone con capacità fisiche,
sensoriali o mentali ridotte, oppure con mancanza di esperienza o di
conoscenza, solo se supervisionati o istruiti all’utilizzo dell’apparecchio
in condizioni di sicurezza, e previa comprensione dei relativi rischi.
• Questo apparecchio non deve essere utilizzato da bambini.
• I bambini non devono giocare con l’apparecchio.
• In caso di guasto e/o di cattivo funzionamento dell’apparecchio, spegnetelo e non
manomettetelo. Per l’eventuale riparazione rivolgetevi ad un centro assistenza
autorizzato da TERMOZETA e richiedete l’utilizzo di ricambi originali.
• Si raccomanda, se si decide di non utilizzare più l’apparecchio,di rendere
innocue quelle parti dell’apparecchio stesso suscettibili di costituire un pericolo,
specialmente per bambini che potrebbero servirsene per i propri giochi.
• Se si decide di non utilizzare l’apparecchio per un lungo periodo, rimuovere
le batterie dall’apparecchio per evitare il deterioramento e perdita di eventuali
liquidi corrosivi.
• Per lo smaltimento dell’apparecchio e delle batterie attenetevi alle norme in
vigore nel vostro luogo di residenza.
• TERMOZETA non può essere considerata responsabile di eventuali danni a
persone, animali o cose causati da un uso improprio dell’apparecchio
ITALIANO
ISTRUZIONI PER L’USO
INSERIMENTO DELLE BATTERIE
•
•
•
Aprire il coperchio (8) del vano batterie spingendolo
verso l’esterno (fig.2).
Inserire quattro batterie da 1,5V modello C (non
in dotazione) nella sede facendo attenzione
all’indicazione della polarità (positivo + e negativo
–) riportata all’interno del vano batterie (9).
Riposizionare il coperchio.
Fig.2
MONTAGGIO DEI GANCI PER CINTURE
•
•
Inserire i ganci per cintura (16) nelle sedi (17) (fig.3).
Ruotare i ganci in senso orario fino al loro aggancio (fig.3) (fig.4).
Fig.3
Fig.4
MONTAGGIO DELL’APPARECCHIO SULL’ASTA
•
•
Estrarre la copertura (11) tirandola verso l’esterno (fig.5).
Posizionare l’apparecchio sotto l’asta appendi abiti inserendo la stessa nella sua
sede (7) (fig.6).
Fig.5
•
Montare la copertura (11) inserendola dalla parte destra del corpo apparecchio (1) e
facendo attenzione che le tacche di riferimento (12) siano orientate verso l’esterno
( fig.7): è importante seguire questa indicazione poiché è possibile montare la
copertura solo in un senso.
ITALIANO
Fig.6
•
•
•
Fig.7
Fig.8
Avvitare completamente la vite di fissaggio (15) nella sede posta sotto l’apparecchio
per fissare il porta cravatte all’asta appendi abiti (fig.8).
Per utilizzare l’apparecchio con aste aventi profilo circolare e diametro 18 mm è
necessario assemblare l’adattatore (14) sul tubo nel punto in cui si posiziona il fermo
blocca asta (10) (fig. 9) e successivamente procedere con il serraggio della vite (15).
Per utilizzare l’apparecchio con aste aventi profilo ovale e dimensioni 30x15 mm è
necessario assemblare l’adattatore (13) sul tubo nel punto in cui si posiziona il fermo
blocca asta (10) (fig. 10) e successivamente procedere con il serraggio della vite (15).
Fig. 9
Fig.10
NOTE
• I diametri e le forme delle aste appendi abiti non sono tutte uguali: all’occorrenza,
quindi, è necessario montare l’adattatore (13 o 14) sul tubo prima di fissare
l’apparecchio all’asta.
• Dopo il montaggio, assicurarsi che l’apparecchio montato sull’asta sia perfettamente
orizzontale.
MESSA IN FUNZIONE E MODO DI UTILIZZO
•
•
•
Inserire le cravatte sui ganci (6) e le cinture sui ganci (16).
Premere il pulsante (2) o il pulsante (4) per muovere i ganci e quindi le cravatte verso
sinistra o verso destra e in seguito premere il pulsante stop (3) per interrompere la
rotazione.
Se non si preme il pulsante stop, la rotazione dei ganci si arresta automaticamente
dopo circa 20 secondi.
ITALIANO
•
Durante il funzionamento la luce a led (5) si accende e si spegnerà automaticamente
entro 10 secondi dopo che la rotazione delle cravatte è stata arrestata con il pulsante
stop (3) oppure si è arrestata automaticamente. NOTE
• Non concentrare le cravatte solo in una zona ma distribuirle lungo tutta la fila dei
ganci (6): in questo modo il peso delle cravatte sarà distribuito in modo uniforme e
l’apparecchio sarà bilanciato durante la rotazione delle cravatte.
• Assicurarsi che ai lati dell’apparecchio, non ci siano abiti troppo vicini che possono
intralciare il movimento delle cravatte durante il funzionamento dell’apparecchio
stesso.
• I ganci per le cinture (15) non ruotano ma rimangono in posizione fissa
• Al fine di non danneggiare l’apparecchio, rimuovere le batterie se si pensa di non
utilizzarlo per un lungo periodo.
PULIZIA E SMALTIMENTO
•
•
Pulire il corpo apparecchio solo con un panno umido: non utilizzare sostanze abrasive
o acide.
Non immergere l’apparecchio in acqua o in altri liquidi.
IMPORTANT!
Al termine del ciclo di vita dell’apparecchio o quando si rende necessario sostituire
le batterie, non disperdere nell’ambiente le batterie esauste, ma gettarle negli
appositi punti di raccolta.
INFORMAZIONE AGLI UTENTI
Ai sensi dell’art. 13 del decreto legislativo 25 luglio 2005, n.15 “Attitudine delle Direttive 2011/65/CE,
2002/96/CE e 2003/108/CE, relative alla riduzione dell’uso di sostanze pericolose nelle apparecchiature
elettriche ed elettroniche, nonché allo smaltimento dei rifiuti”.
•Il simbolo del cassonetto barrato sull’apparecchiatura indica che il prodotto alla fine della propria vita deve essere raccolto separatamente dagli altri rifiuti.
•L’utente dovrà, pertanto, conferire l’apparecchiatura giunta a fine vita agli idonei centri di raccolta differenziata dei rifiuti
elettronici ed elettrotecnici, oppure riconsegnarla al rivenditore al momento dell’acquisto di una nuova apparecchiatura
di tipo equivalente, in ragione di uno a uno.
•L’adeguata raccolta differenziata per l’avvio successivo dell’apparecchiatura dismessa al riciclaggio, al trattamento e allo
smaltimento ambientalmente compatibile contribuisce ad evitare possibili effetti negativi sull’ambiente e sulla salute e
favorisce il riciclo dei materiali di cui è composta l’apparecchiatura.
•Lo smaltimento abusivo del prodotto da parte dell’utente comporta l’applicazione delle sanzioni amministrative previste
della normativa vigente.
Termozeta S.p.A. si riserva il diritto di apportare modifiche estetiche e/o tecniche senza preavviso
al fine di migliorare i propri prodotti.
Termozeta is an international trademark. Copyright © 1995. All rights reserved.
Termozeta S.p.A. - Via Magenta, 41/43 - 20010 Bareggio (MI) Italy
ENGLISH
SAFETY PRESCRIPTIONS
This manual is an integral part of the appliance and must
be carefully read before using it as it provides important
indications with regard to safe installation, use and
maintenance. Store with care.
• After removing the packaging, make sure that the appliance is intact. In case
of doubt do not use it and contact a TERMOZETA authorized service centre.
• Do not leave packaging materials (plastic bags, polystyrene foam, nails etc.)
within reach of children or persons with reduced mental capacities since
these are potential sources of danger.
• The appliance is intended exclusively for domestic use to store ties and belts
• For safety reasons, do not put the appliance in water or other liquids
• The appliance may be used by people with reduced physical,
sensorial or mental faculties, or lack of experience or knowledge,
only if supervised or trained for the use of the appliance in safety
conditions and with prior understanding of the risks involved.
• This appliance is not intended for children’s use.
• Children may not play with the appliance.
• In case of damage and / or malfunctioning of the appliance, switch it off
and do not tamper with it. For repairs, contact a TERMOZETA authorized
service center and request original spare parts.
• While the appliance is not in use, make sure the parts of the system which
may constitute a hazard are made harmless especially for children who could
use it to play.
• If the appliance is not used for a long period, remove the batteries from the
unit to prevent deterioration and loss of any corrosive liquids
• When disposing of the appliance and the battery please follow the rules in
force in your place of residence.
• TERMOZETA will not be held responsible for any damage to people, animals
or objects caused by improper use of the appliance.
ENGLISH
INSTRUCTIONS
BATTERY INSTALLATION
•
•
•
Open the lid (8) of the battery compartment by
pushing it outwards (fig.2).
Place four 1,5V batteries model C (not included) in
their housing following the indication of the polarity
(positive + and negative –) mentioned in the battery
compartment (9).
Close the lid.
Fig.2
BELT HOOKS ASSEMBLY
• Place the belt hooks (16) in the housings (17) (fig.3).
• Turn the hooks clockwise until they are hooked (fig.4).
Fig.3
Fig.4
ASSEMBLY OF THE APPLIANCE ON THE ROD
•
•
Extract the cover (11) by pulling it outwards (fig.5).
Place the appliance under the hanger rod by putting it into its housing (7) (fig.6).
Fig.5
•
Assemble the cover (11) by putting it into the right side of the body (1) and making
sure that the reference marks (12) are oriented outwards ( fig.7): it is important to
follow this indication because the cover can be assembled only in one way.
ENGLISH
Fig.6
•
•
•
Fig.7
Fig.8
Screw completely the fixing screw (15) in the housing under the appliance to fix the
tie rack to the hanger rod (fig.8).
To use the appliance with rods having a circular profile and a diameter of 18 mm it is
necessary to assemble the adapter (14) on the tube at the point where the rod block
is positioned (10) (fig.9) and then proceed with the screw tightening (15).
To use the appliance with rods having an oval profile and 30x15 mm size it is
necessary to assemble the adapter (13) on the tube at the point where the rod block
is positioned (10) (fig.9) and then proceed with the screw tightening (15)
Fig. 9
Fig.10
NOTE
• The diameters and shapes of the hanger rods are not all the same: if needed, it is
necessary to fix the adapter (13 or 14) on the tube before fixing the appliance to
the rod.
• After the assembly, make sure that the equipment fixed on the rod is perfectly
horizontal.
OPERATION AND METHOD OF USE
•
•
•
Place the ties on the hooks (6) and the belts on the hooks (16).
Press the button (2) or the button (4) to move the hooks and then the ties to the left
or to the right and subsequently press the stop button (3) to stop the rotation.
If the stop button is not pressed, the rotation of the hooks will stop automatically
after about 20 seconds.
ENGLISH
•
During the operation, the LED light (5) will turn on and off automatically within 10
seconds after the rotation of the ties has been arrested with the stop button (3) or
has stopped automatically.
NOTE
• Do not concentrate ties in one area only but distribute them along the entire row of
hooks (6): in this way the weight of the ties will be distributed evenly and the appliance
will be balanced during the rotation of the ties.
• Make sure that at the sides of the appliance, there are no clothes that may get in the
way of the ties during the operation.
• The belt hooks (16) do not rotate but remain in a fixed position
• In order not to damage the appliance, remove the batteries while not in use for a
long time
CLEANING AND DISPOSAL
•
•
Clean the body of the appliance only with a damp cloth: do not use abrasive or acidic
substances
Do not soak the appliance in water or other liquids.
IMPORTANT!
At the end of its life cycle or when the replacement of the batteries is required,
do not throw used batteries in the environment, but dispose of them in the proper
collection points.
INFORMATION FOR USERS
In accordance with European Directives 2011/65/CE, 2002/96/CE and 2003/108/CE on the restriction of
the use of dangerous substances in electric and electronic equipment as well as their waste disposal.
•The barred symbol of the rubbish bin shown on the equipment indicates that, at the end of its useful life, the product
must be collected separately from other waste.
•Therefore, any products that have reached the end of their useful life must be given to waste disposal centres specialising in separate collection of waste electrical and electronic equipment, or given back to the retailer at the time of
purchasing new similar equipment, on a one for one basis.
•The adequate separate collection for the subsequent start-up of the equipment sent to be recycled, treated and
disposal of in an environmentally compatible way contributes to preventing possible negative effects on the environment and health and optimises the recycling and reuse of components making up the apparatus.
•Abusive disposal of the product by the user involves application of the administrative sanctions according to the laws
in force.
Termozeta S.p.A. reserves the right to introduce technical and/or aesthetic changes to its products
intended to improve performances.
Termozeta is an international trademark. Copyright © 1995. All rights reserved.
Termozeta S.p.A. - Via Magenta, 41/43 - 20010 Bareggio (MI) Italy
www.termozeta.com