1
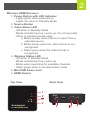
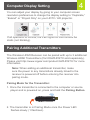
Quick Start Guide Wireless HDMI Transmitter and Receiver Kit GWHD11 PART NO. Q1292 www.iogear.com 1 Package Contents 1 x Wireless HDMI Transmitter 1 x Wireless HDMI Receiver 1 x Mini USB to USB Cable 2 x USB Power Adapter 1 x Remote Control 2 x AAA Battery 1 x HDMI Cable 1 x Quick Start Guide 1 x Warranty Card System Requirements Display: • HDTV or HD Projector • HDMI Input Media Source: • HDMI Output Optional: Additional Wireless HDMI Transmitters (up to 3 additional units), sold separately – Part# GWHDSTX Overview Wireless HDMI Transmitter: 1. LED Status Indicator: - Solid blue when powered on and wireless link established - 1 flash/sec when in pairing mode - 3 flashes/sec when establishing the link with the Receiver 2. HDMI Connector 3. Pairing Button 4. Mini USB Power Jack Top View Side View 1 2 3 4 2 Wireless HDMI Receiver: 1. Power Button with LED Indicator: - Lights green when powered on - Lights red when in Standby Mode 2. Source Button 3. Video Status LED - Off when in Standby Mode - Blinks at initial boot up / warm up (15~20 seconds) - When in wireless linked mode: a. Blinks quickly when there’s no input from a selected source b. Blinks slowly when the video format is not recognized c. Static green when the video format is recognized 4. Wireless Status LED - Off when in Standby Mode - Blinks at initial boot up / warm up - Blinks when searching for available channels - Static green when in wireless linked mode 5. Mini USB Power Jack 6. HDMI Output Top View 8 Back View 1 2 3 4 5 6 7 3 Hardware Installation Step 1: Setup the Wireless HDMI Transmitter 1. Connect the Wireless HDMI Transmitter to the HDMI port of the computer or media source. 2. Power the transmitter through one of two options: a. If used with a Blu-Ray player or similar device, connect the Wireless HDMI Transmitter to the USB power adapter. b. If used with a computer, connect the Mini USB to USB cable from the transmitter to a USB port on the computer. HDMI 1 or 2 USB Step 2: Setup the Wireless HDMI Receiver 1. Connect the USB power adapter to the Mini-USB power jack on the receiver and a wall outlet for power supply. 2. Connect the HDMI cable to the HDMI Output on the receiver and to the HDMI Input on the HDTV / HD projector. 3. Power on the HDTV / HD projector. Once the link has been established between the transmitter and receiver, video from the connected computer or HDMI media source will be displayed on the HDTV / HD Projector. 1 USB 2 HDMI HDMI Display Computer Display Setting 4 You can adjust your display by going to your computer screen resolution preferences to change the display setting to “Duplicate,” “Extend” or “Project Only” on your HDTV / HD projector. If all operation is normal, the LED lights on both should be static (not blinking). Pairing Additional Transmitters The Wireless HDMI Receiver can be paired with up to 3 additional Wireless HDMI Transmitters (Part #GWHDSTX sold separately). Please visit http://www.iogear.com/product/GWHDSTX/ for more information. Note: When adding an additional transmitter, make sure the power to any transmitters already linked to the receiver is powered off before entering the receiver into pairing mode. Pairing Mode for the Transmitter: 1. Once the transmitter is connected to the computer or source player and is powered on, press and hold the Pairing Button. 2. The transmitter is in Pairing Mode once the Power LED flashes slowly (1 flash/sec). 5 Pairing Mode for the Receiver: 1. Once the receiver is connected to the HDTV or HD projector and is powered on, press the Transmitter No. button on the Remote Control. 2. The On-screen Display (OSD) will appear on the HDTV / HD projector. Use the UP or DOWN buttons to select SETUP menu. 3. Select Add New Transmitter to search for an available transmitter. Select Transmitter Number: → GWHD11 SETUP SETUP: → Add New Transmitter → Remove Transmitter → Modify Transmitter Name Return The OSD will display Searching… SEARCHING...... 6 The Power LED on the receiver will flash ORANGE when it is in Pairing Mode. To exit Searching Mode, press the Transmitter No. button on the remote control. 4. When both the transmitter and receiver are in Pairing Mode, they will search for each other and automatically pair. Adding GWHD11... 5. After the pairing is complete, both the transmitter and receiver will re-boot and establish the link to each other automatically within 5 seconds. Repairing Transmitter to Receiver 1. If the transmitter and receiver lose their linked connection, follow the steps for Pairing Additional Transmitter to re-establish the connection. 7 Modifying Transmitter Name If more than one transmitter is linked to the receiver, use the following steps below to modify a transmitter’s name: 1. Press Transmitter No. to display the list of linked transmitters. Select Transmitter Number: → GWHD11 → GWHDSTX SETUP 2. Select SETUP menu by using the Up / Down buttons; press OK to select. Select Transmitter Number: → GWHD11 → GWHDSTX SETUP 3. Select Modify Transmitter Name option to change a transmitter’s name. SETUP: → Add New Transmitter → Remove Transmitter → Modify Transmitter Name Return 8 4. Use the Up / Down buttons to select the transmitter you want to modify. Edit Transmitter name: → GWHD11 → GWHDSTX Return 5. Then use the Up / Down buttons on the remote to select alphanumeric characters; use the Left / Right buttons on the remote to move the cursor; Press IR button to backspace. Edit Transmitter name: → GWHDSTX Return IR Key=Delete = A~Z+0~9 = cursor Switching between Wireless HDMI Transmitters 1. Press the Transmitter No. button. The OSD will show a list of transmitters linked to the receiver. Select Transmitter Number: → GWHD11 → GWHDSTX SETUP 2. Use the Up / Down buttons to select the transmitter you want to display on your HDTV / HD projector. Then press OK and allow ~10-12 seconds for the receiver and transmitter to re-establish a connection. Removing a Paired Transmitter 9 1. Press Transmitter No. to display the list of linked transmitters. Select Transmitter Number: → GWHD11 → GWHDSTX SETUP 2. Select SETUP menu by using the Up / Down buttons; press OK to select. Select Transmitter Number: → GWHD11 → GWHDSTX SETUP 3. Select Remove Transmitter option. SETUP: → Add New Transmitter → Remove Transmitter → Modify Transmitter Name Return 4. Use the Up / Down arrow buttons to select the transmitter to be removed and press OK. Remove Transmitter: → GWHD11 → GWHDSTX Return FCC Statement This equipment has been tested and found to comply with the limits for a Class B digital device, pursuant to Part 15 of the FCC Rules. These limits are designed to provide reasonable protection against harmful interference in a residential setting. This product generates, uses, and can radiate radio frequency energy and, if not installed and used as directed, it may cause harmful interference to radio communications. Although this product complies with the limits for a Class B digital device, there is no guarantee that interference will not occur in a particular installation. CE Compliance This device has been tested and found to comply with the following European Union directives: Electromagnetic Capability (89/336/EMC), Low Voltage (73/23/EEC) and R&TTED (1999/5/EC). Limited Warranty WE’RE HERE TO HELP YOU! NEED ASSISTANCE SETTING UP THIS PRODUCT? Make sure you: 1. Visit www.iogear.com for more product information 2. Visit www.iogear.com/support for live help and product support Warranty Information This product carries a 1 Year Limited Warranty. For the terms and conditions of this warranty, please go to http://www.iogear.com/support/warranty Register online at http://www.iogear.com/register Important Product Information Product Model Serial Number Contact iogear.custhelp.com [email protected] www.iogear.com 19641 Da Vinci, Foothill Ranch, CA 92610